
Good day, friends!
There are 4 ways in JavaScript to create an object:
- Constructor function
- Class (class)
- Object linking to other object (OLOO)
- Factory function
Which method should you use? Which one is the best?
In order to answer these questions, we will not only consider each approach separately, but also compare classes and factory functions according to the following criteria: inheritance, encapsulation, the keyword "this", event handlers.
Let's start with what Object Oriented Programming (OOP) is.
What is OOP?
Essentially, OOP is a way of writing code that allows you to create objects using a single object. This is also the essence of the Constructor design pattern. A shared object is usually called a blueprint, blueprint, or blueprint, and the objects it creates are instances.
Each instance has both properties inherited from the parent and properties of its own. For example, if we have a Human project, we can create instances with different names based on it.
The second aspect of OOP is structuring the code when we have several projects of different levels. This is called inheritance or subclassing.
The third aspect of OOP is encapsulation, when we hide implementation details from outsiders, making variables and functions inaccessible from the outside. This is the essence of the Module and Facade design patterns.
Let's move on with ways to create objects.
Object creation methods
Constructor function
Constructors are functions that use the "this" keyword.
    function Human(firstName, lastName) {
        this.firstName = firstName
        this.lastName = lastName
    }
this allows you to store and access the unique values of the instance being created. Instances are created using the "new" keyword.
const chris = new Human('Chris', 'Coyier')
console.log(chris.firstName) // Chris
console.log(chris.lastName) // Coyier

const zell = new Human('Zell', 'Liew')
console.log(zell.firstName) // Zell
console.log(zell.lastName) // Liew
Class
Classes are an abstraction ("syntactic sugar") over constructor functions. They make it easier to create instances.
    class Human {
        constructor(firstName, lastName) {
            this.firstName = firstName
            this.lastName = lastName
        }
    }
Note that constructor contains the same code as the constructor function above. We have to do this in order to initialize this. We can omit constructor if we don't need to assign initial values.
At first glance, classes seem to be more complex than constructors - you have to write more code. Hold your horses and don't jump to conclusions. Classes are cool. You will understand why a little later.
Instances are also created using the "new" keyword.
const chris = new Human('Chris', 'Coyier')

console.log(chris.firstName) // Chris
console.log(chris.lastName) // Coyier
Linking objects
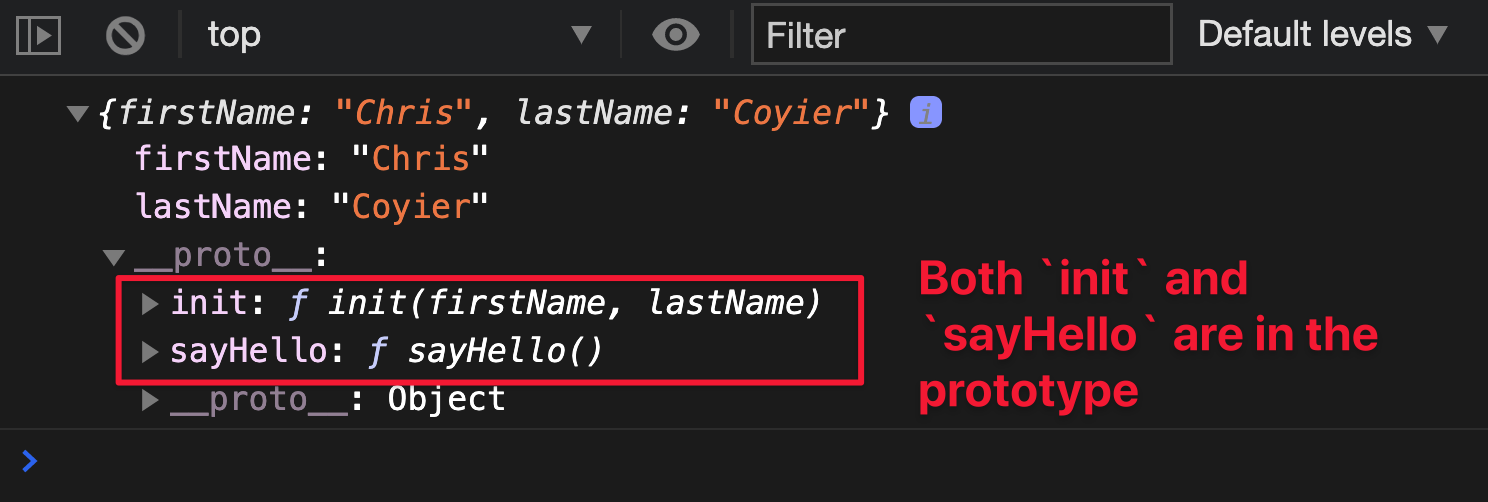
This method of creating objects was proposed by Kyle Simpson. In this approach, we define the project as an ordinary object. Then, using a method (which is usually called init, but this is not required, unlike the constructor in the class), we initialize the instance.
const Human = {
    init(firstName, lastName) {
        this.firstName = firstName
        this.lastName = lastName
    }
}
Object.create is used to create an instance. After instantiation, init is called.
const chris = Object.create(Human)
chris.init('Chris', 'Coyier')

console.log(chris.firstName) // Chris
console.log(chris.lastName) // Coyier
The code can be improved a bit by returning this to init.
const Human = {
  init () {
    // ...
    return this
  }
}

const chris = Object.create(Human).init('Chris', 'Coyier')
console.log(chris.firstName) // Chris
console.log(chris.lastName) // Coyier
Factory function
A factory function is a function that returns an object. Any object can be returned. You can even return an instance of a class or object bindings.
Here's a simple example of a factory function.
function Human(firstName, lastName) {
    return {
        firstName,
        lastName
    }
}
We don't need the "this" keyword to create an instance. We just call the function.
const chris = Human('Chris', 'Coyier')

console.log(chris.firstName) // Chris
console.log(chris.lastName) // Coyier
Now let's look at ways to add properties and methods.
Defining properties and methods
Methods are functions declared as properties of an object.
    const someObject = {
        someMethod () { /* ... */ }
    }
In OOP, there are two ways to define properties and methods:
- In an instance
- In prototype
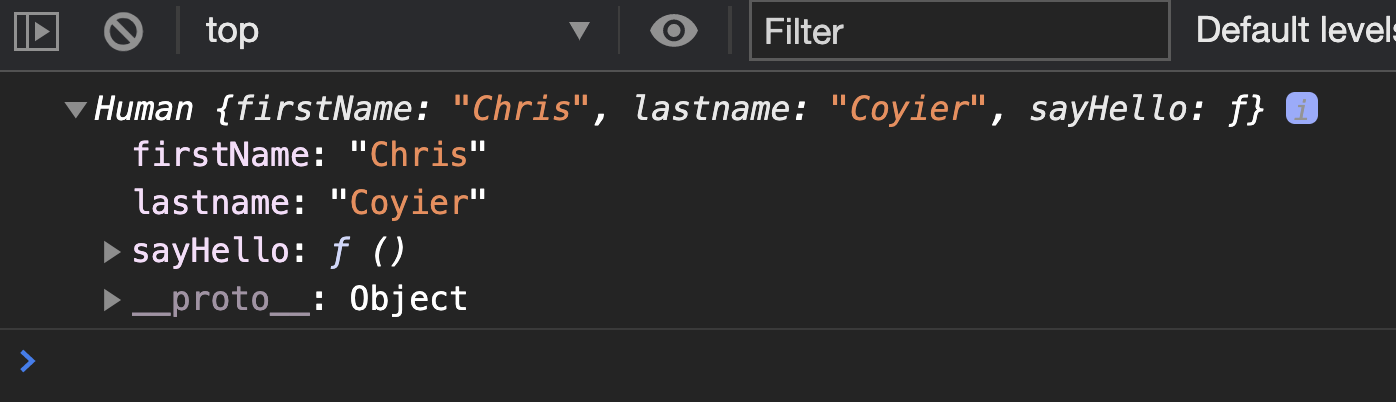
Defining properties and methods in the constructor
To define a property on an instance, you must add it to the constructor function. Make sure to add the property to this.
function Human (firstName, lastName) {
  //
  this.firstName = firstName
  this.lastname = lastName

  //
  this.sayHello = function () {
    console.log(`Hello, I'm ${firstName}`)
  }
}

const chris = new Human('Chris', 'Coyier')
console.log(chris)

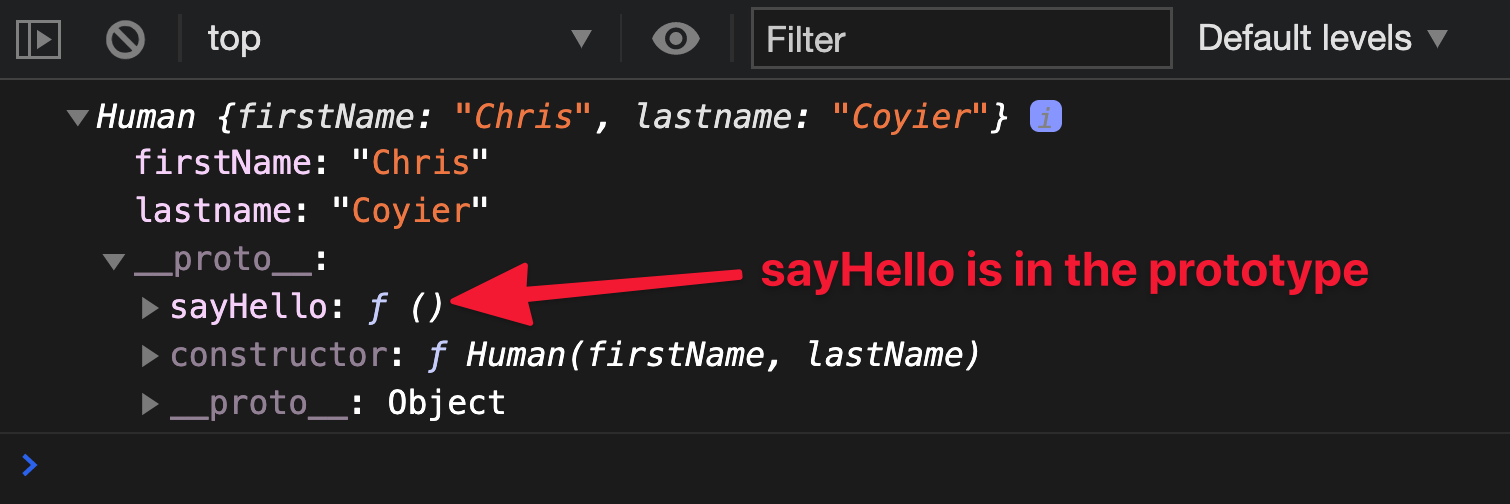
Methods are usually defined in the prototype, as this avoids creating a function for each instance, i.e. Allows all instances to share a single function (called a shared or distributed function).
To add a property to the prototype, use prototype.
function Human (firstName, lastName) {
  this.firstName = firstName
  this.lastname = lastName
}

//
Human.prototype.sayHello = function () {
  console.log(`Hello, I'm ${this.firstName}`)
}
Creating multiple methods can be tedious.
//
Human.prototype.method1 = function () { /*...*/ }
Human.prototype.method2 = function () { /*...*/ }
Human.prototype.method3 = function () { /*...*/ }
You can make your life easier with Object.assign.
Object.assign(Human.prototype, {
  method1 () { /*...*/ },
  method2 () { /*...*/ },
  method3 () { /*...*/ }
})
Defining properties and methods in a class
Instance properties can be defined in constructor.
class Human {
  constructor (firstName, lastName) {
    this.firstName = firstName
      this.lastname = lastName

      this.sayHello = function () {
        console.log(`Hello, I'm ${firstName}`)
      }
  }
}
Prototype properties are defined after constructor as a normal function.
class Human (firstName, lastName) {
  constructor (firstName, lastName) { /* ... */ }

  sayHello () {
    console.log(`Hello, I'm ${this.firstName}`)
  }
}
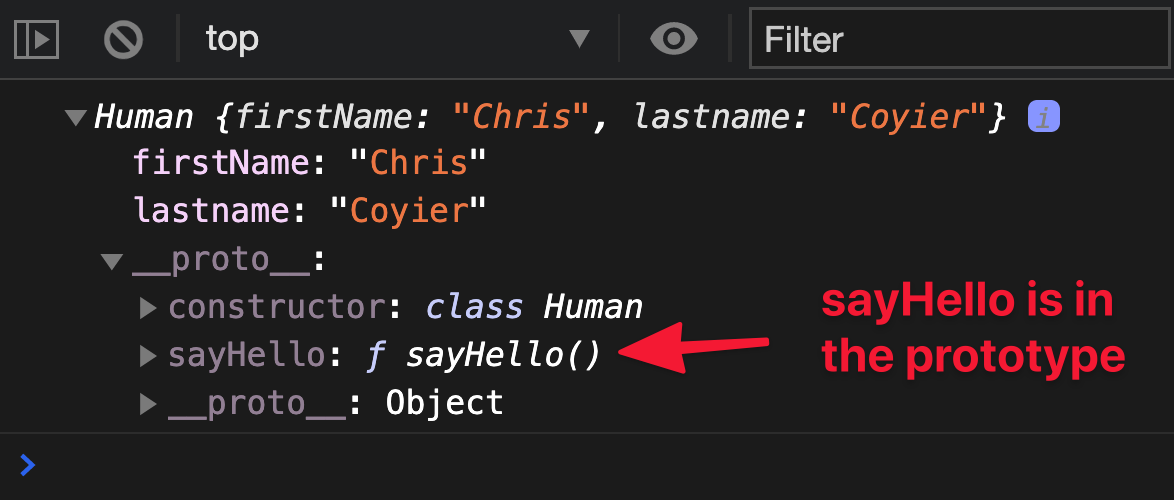
Creating multiple methods in a class is easier than in a constructor. We don't need Object.assign for this. We're just adding other features.
class Human (firstName, lastName) {
  constructor (firstName, lastName) { /* ... */ }

  method1 () { /*...*/ }
  method2 () { /*...*/ }
  method3 () { /*...*/ }
}
Defining properties and methods when binding objects
To define properties for an instance, we add a property to this.
const Human = {
  init (firstName, lastName) {
    this.firstName = firstName
    this.lastName = lastName
    this.sayHello = function () {
      console.log(`Hello, I'm ${firstName}`)
    }

    return this
  }
}

const chris = Object.create(Human).init('Chris', 'Coyier')
console.log(chris)
The prototype method is defined as a regular object.
const Human = {
  init () { /*...*/ },
  sayHello () {
    console.log(`Hello, I'm ${this.firstName}`)
  }
}
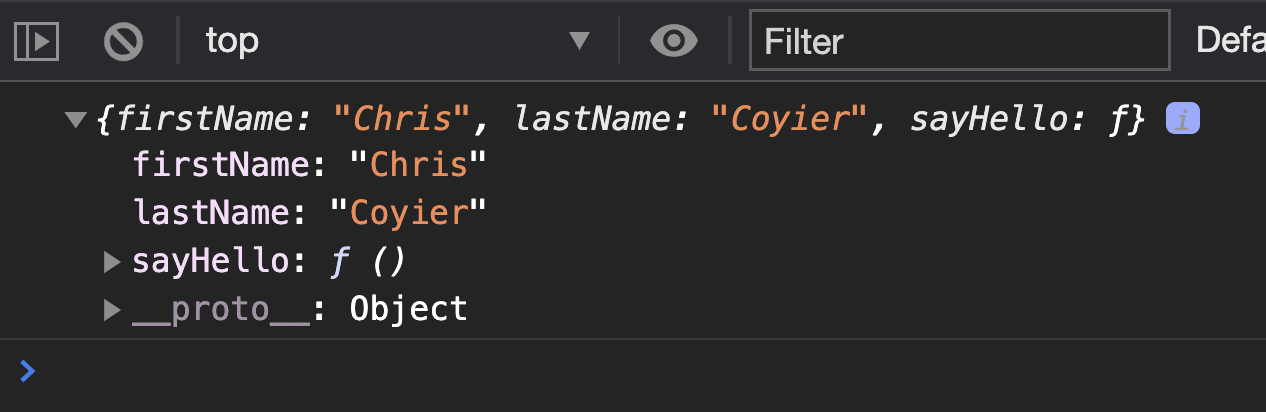
Defining properties and methods in factory functions (FF)
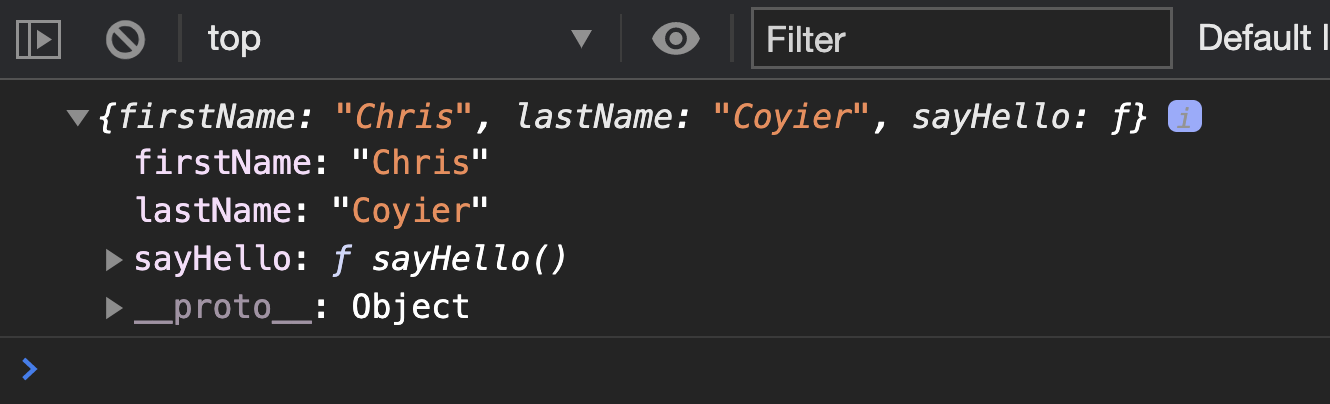
Properties and methods can be included in the returned object.
function Human (firstName, lastName) {
  return {
    firstName,
    lastName,
    sayHello () {
      console.log(`Hello, I'm ${firstName}`)
    }
  }
}
When using FF, you cannot define prototype properties. If you need properties like this, you can return an instance of the class, constructor, or object bindings (but that doesn't make sense).
//
function createHuman (...args) {
  return new Human(...args)
}
Where to define properties and methods
Where should you define properties and methods? Instance or prototype?
Many people think that prototypes are better for this.
However, it really doesn't really matter.
By defining properties and methods on an instance, each instance will consume more memory. When defining methods in prototypes, memory will be consumed less, but insignificantly. Given the power of modern computers, this difference is not significant. So do whatever works best for you, but still prefer prototypes.
For example, when using classes or object bindings, it is better to use prototypes because it makes the code easier to write. In the case of FF, prototypes cannot be used. Only properties of instances can be defined.
Approx. per .: let me disagree with the author. The issue of using prototypes instead of instances when defining properties and methods is not only a matter of memory consumption, but above all a matter of the purpose of the property or method being defined. If a property or method must be unique for each instance, then it must be defined on the instance. If a property or method must be the same (common) for all instances, then it must be defined in the prototype. In the latter case, if you need to make changes to a property or method, it will be enough to make them to the prototype, in contrast to properties and methods of instances, which are adjusted individually.
Preliminary conclusion
Based on the material studied, several conclusions can be drawn. It's my personal opinion.
- Classes are better than constructors because they make it easier to define multiple methods.
- Object binding seems strange due to the need to use Object.create. I kept forgetting about this when studying this approach. For me, this was reason enough to refuse further use.
- Classes and FFs are the easiest to use. The problem is that prototypes cannot be used in FF. But as I noted earlier, it doesn't really matter.
Next, we will compare classes and FFs as the two best ways to create objects in JavaScript.
Classes vs. FF - Inheritance
Before moving on to comparing classes and FFs, you need to get acquainted with the three concepts underlying OOP:
- inheritance
- encapsulation
- this
Let's start with inheritance.
What is inheritance?
In JavaScript, inheritance means passing properties from parent to child, i.e. from project to instance.
This happens in two ways:
- using instance initialization
- using a prototype chain
In the second case, the parent project is expanded with a child project. This is called subclassing, but some also call it inheritance.
Understanding Subclassing
Subclassing is when a child project extends the parent.
Let's look at the example of classes.
Subclassing with a class
The "extends" keyword is used to extend the parent class.
class Child extends Parent {
    // ...
}
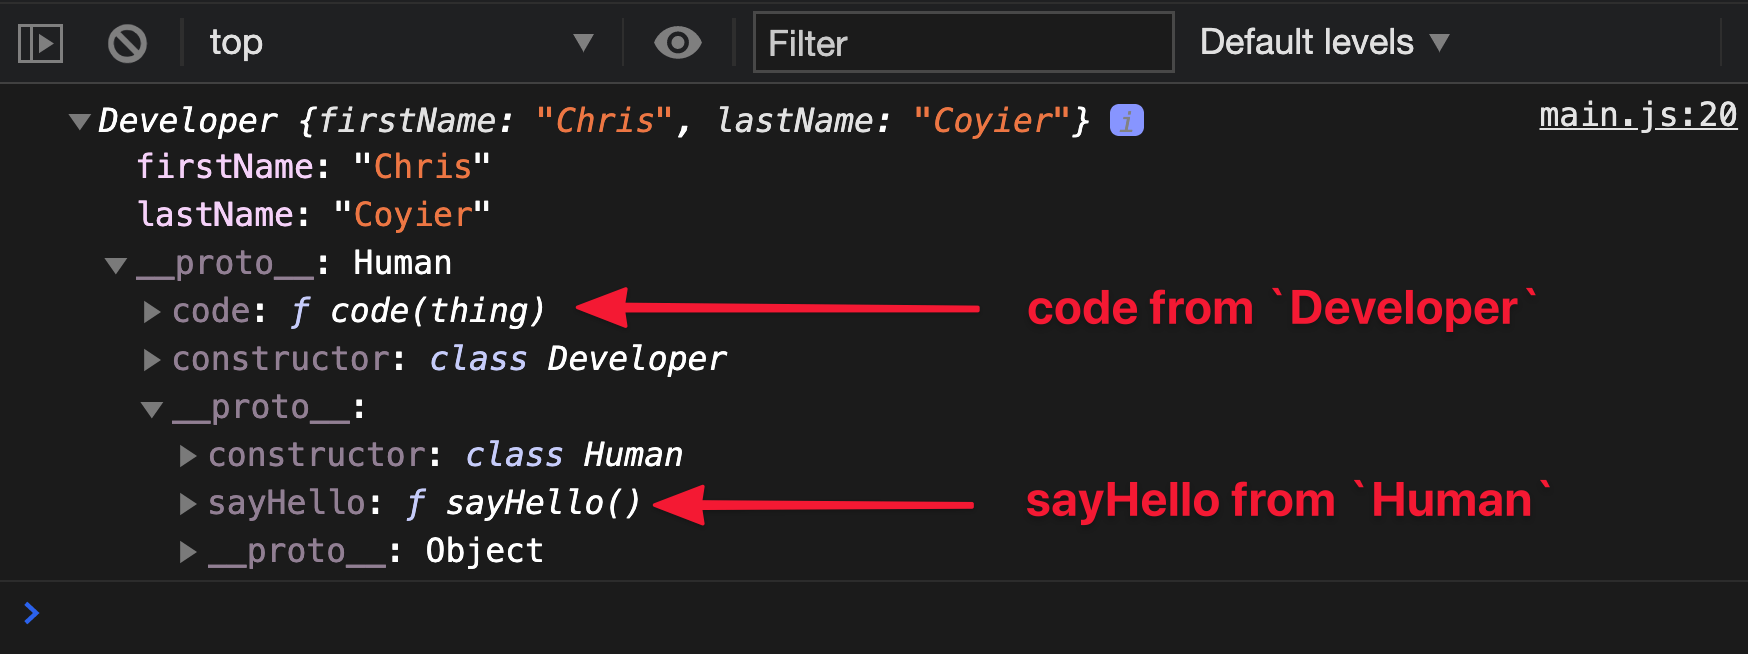
For example, let's create a "Developer" class that extends the "Human" class.
//  Human
class Human {
  constructor (firstName, lastName) {
    this.firstName = firstName
    this.lastName = lastName
  }

  sayHello () {
    console.log(`Hello, I'm ${this.firstName}`)
  }
}
The Developer class will extend Human as follows:
class Developer extends Human {
  constructor(firstName, lastName) {
    super(firstName, lastName)
  }

    // ...
}
The "super" keyword calls the constructor of the "Human" class. If you don't need this, super can be omitted.
class Developer extends Human {
  // ...
}
Let's say Developer can write code (who would have thought). Let's add a corresponding method to it.
class Developer extends Human {
  code (thing) {
    console.log(`${this.firstName} coded ${thing}`)
  }
}
Here is an example of an instance of the "Developer" class.
const chris = new Developer('Chris', 'Coyier')
console.log(chris)
Subclassing with FF
To create subclasses using FF, you need to perform 4 steps:
- create a new FF
- create an instance of the parent project
- create a copy of this instance
- add properties and methods to this copy
This process looks like this.
function Subclass (...args) {
  const instance = ParentClass(...args)
  return Object.assign({}, instance, {
    //
  })
}
Let's create a subclass "Developer". This is what the FF "Human" looks like.
function Human (firstName, lastName) {
  return {
    firstName,
    lastName,
    sayHello () {
      console.log(`Hello, I'm ${firstName}`)
    }
  }
}
Create Developer.
function Developer (firstName, lastName) {
  const human = Human(firstName, lastName)
  return Object.assign({}, human, {
    //
  })
}
Add the "code" method to it.
function Developer (firstName, lastName) {
  const human = Human(firstName, lastName)
  return Object.assign({}, human, {
    code (thing) {
      console.log(`${this.firstName} coded ${thing}`)
    }
  })
}
We create an instance of Developer.
const chris = Developer('Chris', 'Coyier')
console.log(chris)

Overwriting the parent method
Sometimes it becomes necessary to overwrite a parent method within a subclass. This can be done as follows:
- create a method with the same name
- call the parent method (optional)
- create a new method in the subclass
This process looks like this.
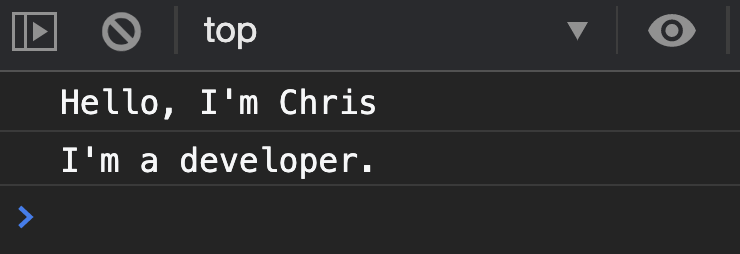
class Developer extends Human {
  sayHello () {
    //
    super.sayHello()

    //
    console.log(`I'm a developer.`)
  }
}

const chris = new Developer('Chris', 'Coyier')
chris.sayHello()
The same process using FF.
function Developer (firstName, lastName) {
  const human = Human(firstName, lastName)

  return Object.assign({}, human, {
      sayHello () {
        //
        human.sayHello()

        //
        console.log(`I'm a developer.`)
      }
  })
}

const chris = new Developer('Chris', 'Coyier')
chris.sayHello()
Inheritance versus composition
A conversation about inheritance rarely goes without mentioning composition. Experts like Eric Elliot believe that composition should be used whenever possible.
What is composition?
Understanding composition
Basically, composition is the combination of several things into one. The most common and simplest way to combine objects is using Object.assign.
const one = { one: 'one' }
const two = { two: 'two' }
const combined = Object.assign({}, one, two)
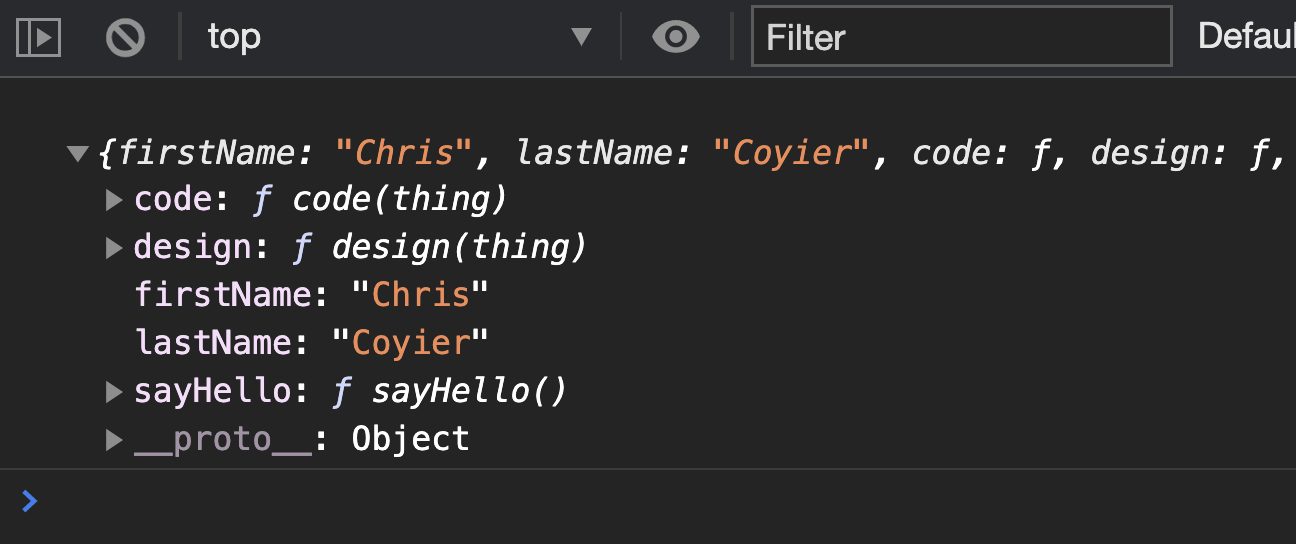
Composition is easiest to explain with an example. Let's say we have two subclasses, Developer and Designer. Designers know how to design, and developers know how to write code. Both inherit from the "Human" class.
class Human {
  constructor(firstName, lastName) {
    this.firstName = firstName
    this.lastName = lastName
  }

  sayHello () {
    console.log(`Hello, I'm ${this.firstName}`)
  }
}

class Designer extends Human {
  design (thing) {
    console.log(`${this.firstName} designed ${thing}`)
  }
}

class Developer extends Designer {
  code (thing) {
    console.log(`${this.firstName} coded ${thing}`)
  }
}
Now, suppose we want to create a third subclass. This subclass should be a mixture of designer and developer - it should be able to both design and write code. Let's call it DesignerDeveloper (or DeveloperDesigner, if you prefer).
How do we create it?
We cannot extend the "Designer" and "Developer" classes at the same time. This is not possible because we cannot decide which properties should come first. This is called the diamond problem (diamond inheritance) .

The rhombus problem can be solved with Object.assign if we give one object priority over another. However, JavaScript does not support multiple inheritance.
//
class DesignerDeveloper extends Developer, Designer {
  // ...
}
This is where composition comes in handy.
This approach states the following: instead of subclassing DesignerDeveloper, create an object that contains skills that you can subclass as needed.
The implementation of this approach leads to the following.
const skills = {
    code (thing) { /* ... */ },
    design (thing) { /* ... */ },
    sayHello () { /* ... */ }
}
We don't need the Human class anymore, because we can create three different classes using the specified object.
Here is the code for DesignerDeveloper.
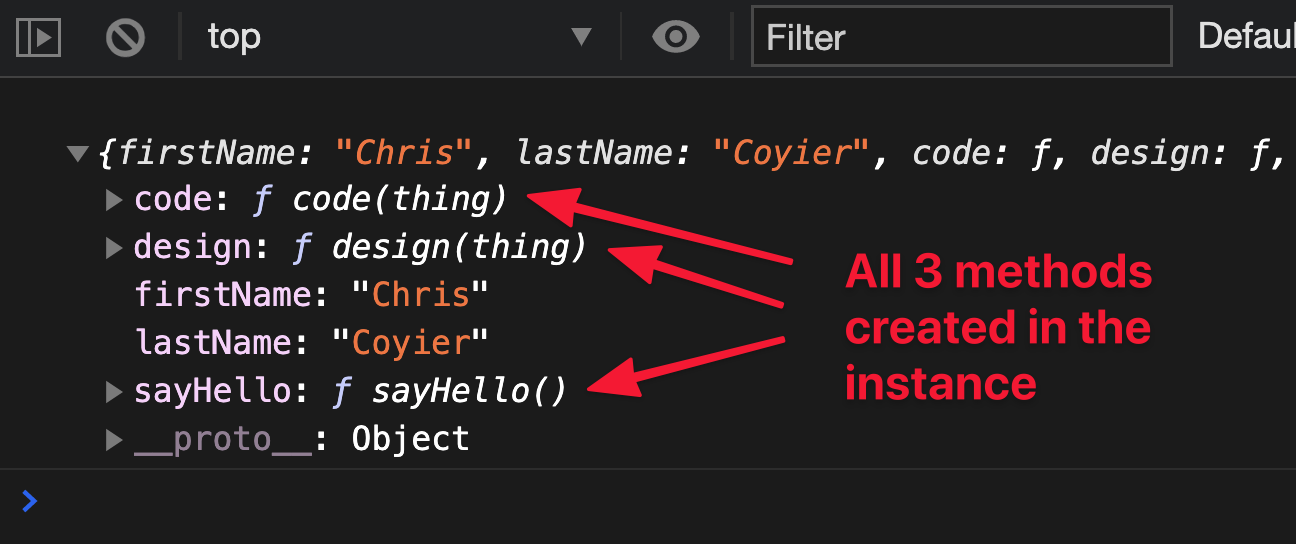
class DesignerDeveloper {
  constructor (firstName, lastName) {
    this.firstName = firstName
    this.lastName = lastName

    Object.assign(this, {
      code: skills.code,
      design: skills.design,
      sayHello: skills.sayHello
    })
  }
}

const chris = new DesignerDeveloper('Chris', 'Coyier')
console.log(chris)

We can do the same for Designer and Developer.
class Designer {
  constructor (firstName, lastName) {
    this.firstName = firstName
    this.lastName = lastName

    Object.assign(this, {
      design: skills.design,
      sayHello: skills.sayHello
    })
  }
}

class Developer {
  constructor (firstName, lastName) {
    this.firstName = firstName
    this.lastName = lastName

    Object.assign(this, {
      code: skills.code,
      sayHello: skills.sayHello
    })
  }
}
Have you noticed that we create methods on an instance? This is just one of the possible options. We can also put methods in the prototype, but I find it unnecessary (this approach seems like we are back to constructors).
class DesignerDeveloper {
  constructor (firstName, lastName) {
    this.firstName = firstName
    this.lastName = lastName
  }
}

Object.assign(DesignerDeveloper.prototype, {
  code: skills.code,
  design: skills.design,
  sayHello: skills.sayHello
})

Use whichever approach you see fit. The result will be the same.
Composition with FF
Composition with FF is about adding distributed methods to the returned object.
function DesignerDeveloper (firstName, lastName) {
  return {
    firstName,
    lastName,
    code: skills.code,
    design: skills.design,
    sayHello: skills.sayHello
  }
}
Inheritance and composition
Nobody said that we can't use inheritance and composition at the same time.
Going back to the Designer, Developer, and DesignerDeveloper examples, it should be noted that they are also human. Therefore, they can extend the Human class.
Here is an example of inheritance and composition using class syntax.
class Human {
  constructor (firstName, lastName) {
    this.firstName = firstName
    this.lastName = lastName
  }

  sayHello () {
    console.log(`Hello, I'm ${this.firstName}`)
  }
}

class DesignerDeveloper extends Human {}
Object.assign(DesignerDeveloper.prototype, {
  code: skills.code,
  design: skills.design
})

And here is the same with the use of FF.
function Human (firstName, lastName) {
  return {
    firstName,
    lastName,
    sayHello () {
      console.log(`Hello, I'm ${this.firstName}`)
    }
  }
}

function DesignerDeveloper (firstName, lastName) {
  const human = Human(firstName, lastName)
  return Object.assign({}, human, {
    code: skills.code,
    design: skills.design
  })
}
Subclasses in the real world
While many experts argue that composition is more flexible (and therefore more useful) than subclasses, subclasses should not be discounted. Many of the things we deal with are based on this strategy.
For example: the "click" event is a MouseEvent. MouseEvent is a subclass of UIEvent (user interface event), which in turn is a subclass of Event (event).

Another example: HTML Elements are subclasses of Nodes. Therefore, they can use all the properties and methods of the nodes.

Preliminary conclusion regarding inheritance
Inheritance and composition can be used in both classes and FF. In FF, the composition looks "cleaner", but this is a slight advantage over classes.
Let's continue the comparison.
Classes vs. FF - Encapsulation
Basically, encapsulation is about hiding one thing inside another, making the inner essence inaccessible from the outside.
In JavaScript, hidden entities are variables and functions that are only available in the current context. In this case, context is the same as scope.
Simple encapsulation
The simplest form of encapsulation is a block of code.
{
  // ,  ,
}
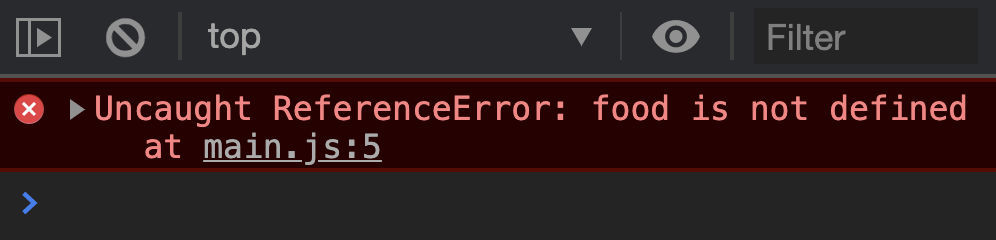
While in a block, you can access a variable declared outside of it.
const food = 'Hamburger'

{
  console.log(food)
}

But not vice versa.
{
  const food = 'Hamburger'
}

console.log(food)
Note that variables declared with the "var" keyword have global or functional scope. Try not to use var to declare variables.
Encapsulation with a function
Functional scope is similar to block scope. Variables declared in a function are accessible only within it. This applies to all variables, even those declared with var.
function sayFood () {
  const food = 'Hamburger'
}

sayFood()
console.log(food)

When we are inside a function, we have access to variables declared outside of it.
const food = 'Hamburger'

function sayFood () {
  console.log(food)
}

sayFood()
Functions can return values that can be used later outside of the function.
function sayFood () {
  return 'Hamburger'
}

console.log(sayFood())
Closure
Closure is an advanced form of encapsulation. It's just a function inside another function.
//
function outsideFunction () {
  function insideFunction () { /* ... */ }
}
Variables declared in outsideFunction can be used in insideFunction.
function outsideFunction () {
  const food = 'Hamburger'
  console.log('Called outside')

  return function insideFunction () {
    console.log('Called inside')
    console.log(food)
  }
}

//  outsideFunction,   insideFunction
//  insideFunction   "fn"
const fn = outsideFunction()

Encapsulation and OOP
When creating objects, we want some properties to be public (public) and others private (private or private).
Let's look at an example. Let's say we have a Car project. When creating a new instance, we add a "fuel" property to it with a value of 50.
class Car {
  constructor () {
    this.fuel = 50
  }
}
Users can use this property to determine the amount of fuel remaining.
const car = new Car()
console.log(car.fuel) // 50
Users can also set the amount of fuel by themselves.
const car = new Car()
car.fuel = 3000
console.log(car.fuel) // 3000
Let's add the condition that the car's tank holds a maximum of 100 liters of fuel. We do not want users to be able to set the amount of fuel on their own, because they can break the car.
There are two ways to do this:
- use of private properties by convention
- using real private fields
Private properties by agreement
In JavaScript, private variables and properties are usually denoted with an underscore.
class Car {
  constructor () {
    //   "fuel"  ,
    this._fuel = 50
  }
}
Typically, we create methods to manage private properties.
class Car {
  constructor () {
    this._fuel = 50
  }

  getFuel () {
    return this._fuel
  }

  setFuel (value) {
    this._fuel = value
    //
    if (value > 100) this._fuel = 100
  }
}
Users must use the getFuel and setFuel methods to determine and set the amount of fuel, respectively.
const car = new Car()
console.log(car.getFuel()) // 50

car.setFuel(3000)
console.log(car.getFuel()) // 100
But the "_fuel" variable is not really private. It is accessible from the outside.
const car = new Car()
console.log(car.getFuel()) // 50

car._fuel = 3000
console.log(car.getFuel()) // 3000
Use real private fields to restrict access to variables.
Truly private fields
Fields is the term used to combine variables, properties, and methods.
Private class fields
Classes allow you to create private variables using the "#" prefix.
class Car {
  constructor () {
    this.#fuel = 50
  }
}
Unfortunately, this prefix cannot be used in the constructor.

Private variables must be defined outside the constructor.
class Car {
  //
  #fuel
  constructor () {
    //
    this.#fuel = 50
  }
}
In this case, we can initialize the variable when defined.
class Car {
  #fuel = 50
}
Now the "#fuel" variable is only available inside the class. Trying to access it outside of the class will result in an error.
const car = new Car()
console.log(car.#fuel)
We need appropriate methods to manipulate the variable.
class Car {
  #fuel = 50

  getFuel () {
    return this.#fuel
  }

  setFuel (value) {
    this.#fuel = value
    if (value > 100) this.#fuel = 100
  }
}

const car = new Car()
console.log(car.getFuel()) // 50

car.setFuel(3000)
console.log(car.getFuel()) // 100
I personally prefer to use getters and setters for this. I find this syntax more readable.
class Car {
  #fuel = 50

  get fuel () {
    return this.#fuel
  }

  set fuel (value) {
    this.#fuel = value
    if (value > 100) this.#fuel = 100
  }
}

const car = new Car()
console.log(car.fuel) // 50

car.fuel = 3000
console.log(car.fuel) // 100
Private FF fields
FFs create private fields automatically. We just need to declare a variable. Users will not be able to access this variable from outside. This is due to the fact that variables have block (or functional) scope, i.e. are encapsulated by default.
function Car () {
  const fuel = 50
}

const car = new Car()
console.log(car.fuel) // undefined
console.log(fuel) // Error: "fuel" is not defined
Getters and setters are also used to control the private variable "fuel".
function Car () {
  const fuel = 50

  return {
    get fuel () {
      return fuel
    },

    set fuel (value) {
      fuel = value
      if (value > 100) fuel = 100
    }
  }
}

const car = new Car()
console.log(car.fuel) // 50

car.fuel = 3000
console.log(car.fuel) // 100
Like this. Simply and easily!
Preliminary conclusion regarding encapsulation
FF encapsulation is simpler and easier to understand. It is based on scope, which is an important part of JavaScript.
Class encapsulation involves using the "#" prefix, which can be somewhat tedious.
Classes against FF - this
this is the main argument against using classes. Why? Because the meaning of this depends on where and how this is used. This behavior is often confusing not only for beginners, but also for experienced developers.
However, the concept of this is actually not that difficult. There are 6 contexts in total in which this can be used. If you understand these contexts, you shouldn't have any problems with this.
The named contexts are:
- global context
- context of the object being created
- the context of a property or method of an object
- simple function
- arrow function
- event handler context
But back to the article. Let's look at the specifics of using this in classes and FFs.
Using this in classes
When used in a class, this points to the instance being created (property / method context). This is why the instance is initialized in constructor.
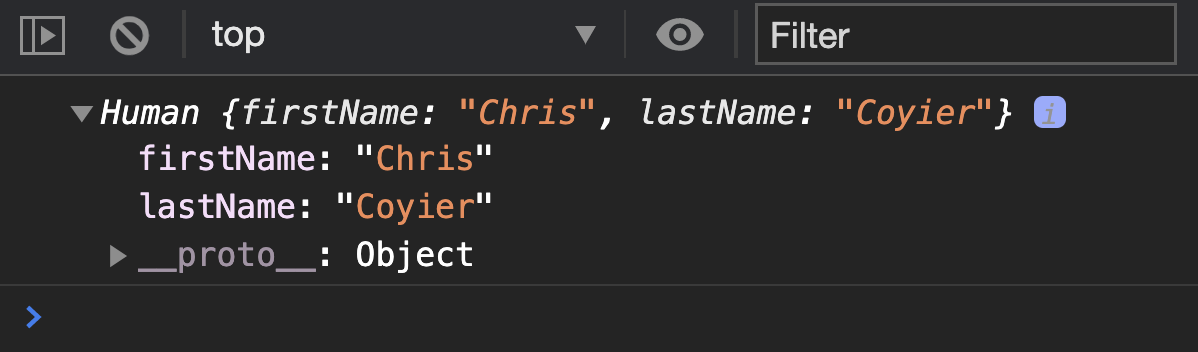
class Human {
  constructor (firstName, lastName) {
    this.firstName = firstName
    this.lastName = lastName
    console.log(this)
  }
}

const chris = new Human('Chris', 'Coyier')
Using this in constructor functions
When using this inside a function and new to create an instance, this will point to the instance.
function Human (firstName, lastName) {
  this.firstName = firstName
  this.lastName = lastName
  console.log(this)
}

const chris = new Human('Chris', 'Coyier')

In contrast to FK in FF this points to window (in the context of the module, this generally has the value "undefined").
//        "new"
function Human (firstName, lastName) {
  this.firstName = firstName
  this.lastName = lastName
  console.log(this)
}

const chris = Human('Chris', 'Coyier')

Therefore, this should not be used in FF. This is one of the main differences between FF and FC.
Using this in FF
In order to be able to use this in FF, it is necessary to create a property / method context.
function Human (firstName, lastName) {
  return {
    firstName,
    lastName,
    sayThis () {
      console.log(this)
    }
  }
}

const chris = Human('Chris', 'Coyier')
chris.sayThis()

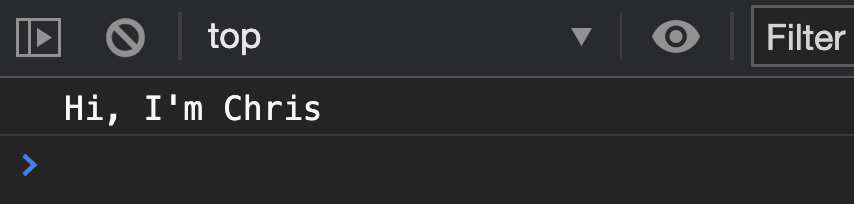
Even though we can use this in FF, we don't need it. We can create a variable pointing to the instance. Such a variable can be used instead of this.
function Human (firstName, lastName) {
  const human = {
    firstName,
    lastName,
    sayHello() {
      console.log(`Hi, I'm ${human.firstName}`)
    }
  }

  return human
}

const chris = Human('Chris', 'Coyier')
chris.sayHello()
human.firstName is more accurate than this.firstName because human is explicitly pointing to an instance.
In fact, we don't even need to write human.firstName. We can restrict ourselves to firstName, since this variable has lexical scope (this is when the value of the variable is taken from the external environment).
function Human (firstName, lastName) {
  const human = {
    firstName,
    lastName,
    sayHello() {
      console.log(`Hi, I'm ${firstName}`)
    }
  }

  return human
}

const chris = Human('Chris', 'Coyier')
chris.sayHello()
Let's look at a more complex example.
Complex example
The conditions are as follows: we have a “Human” project with “firstName” and “lastName” properties and a “sayHello” method.
We also have a "Developer" project that inherits from Human. Developers know how to write code, so they must have a "code" method. In addition, they must declare that they are in the developer caste, so we need to overwrite the sayHello method.
Let's implement the specified logic using classes and FF.
Classes
We create a project "Human".
class Human {
  constructor (firstName, lastName) {
    this.firstName = firstName
    this.lastname = lastName
  }

  sayHello () {
    console.log(`Hello, I'm ${this.firstName}`)
  }
}
Create a "Developer" project with the "code" method.
class Developer extends Human {
  code (thing) {
    console.log(`${this.firstName} coded ${thing}`)
  }
}
We overwrite the "sayHello" method.
class Developer extends Human {
  code (thing) {
    console.log(`${this.firstName} coded ${thing}`)
  }

  sayHello () {
    super.sayHello()
    console.log(`I'm a developer`)
  }
}
FF (using this)
We create a project "Human".
function Human () {
  return {
    firstName,
    lastName,
    sayHello () {
      console.log(`Hello, I'm ${this.firstName}`)
    }
  }
}
Create a "Developer" project with the "code" method.
function Developer (firstName, lastName) {
  const human = Human(firstName, lastName)
  return Object.assign({}, human, {
    code (thing) {
      console.log(`${this.firstName} coded ${thing}`)
    }
  })
}
We overwrite the "sayHello" method.
function Developer (firstName, lastName) {
  const human = Human(firstName, lastName)
  return Object.assign({}, human, {
    code (thing) {
      console.log(`${this.firstName} coded ${thing}`)
    },

    sayHello () {
      human.sayHello()
      console.log('I\'m a developer')
    }
  })
}
Ff (without this)
Since firstName is lexically scoped directly, we can omit this.
function Human (firstName, lastName) {
  return {
    // ...
    sayHello () {
      console.log(`Hello, I'm ${firstName}`)
    }
  }
}

function Developer (firstName, lastName) {
  // ...
  return Object.assign({}, human, {
    code (thing) {
      console.log(`${firstName} coded ${thing}`)
    },

    sayHello () { /* ... */ }
  })
}
Preliminary conclusion regarding this
In simple words, classes require the use of this, but FFs do not. In this case, I prefer to use FF because:
- this context can change
- the code written using FF is shorter and cleaner (also due to automatic encapsulation of variables)
Classes vs. FF - Event Handlers
Many articles on OOP overlook the fact that as frontend developers we are constantly dealing with event handlers. They provide interaction with users.
Because event handlers change the this context, working with them in classes can be problematic. At the same time, such problems do not arise in FF.
However, changing the this context doesn't matter if we know how to handle it. Let's look at a simple example.
Create counter
To create a counter, we will use the knowledge gained, including private variables.
Our counter will contain two things:
- the counter itself
- button to increase its value

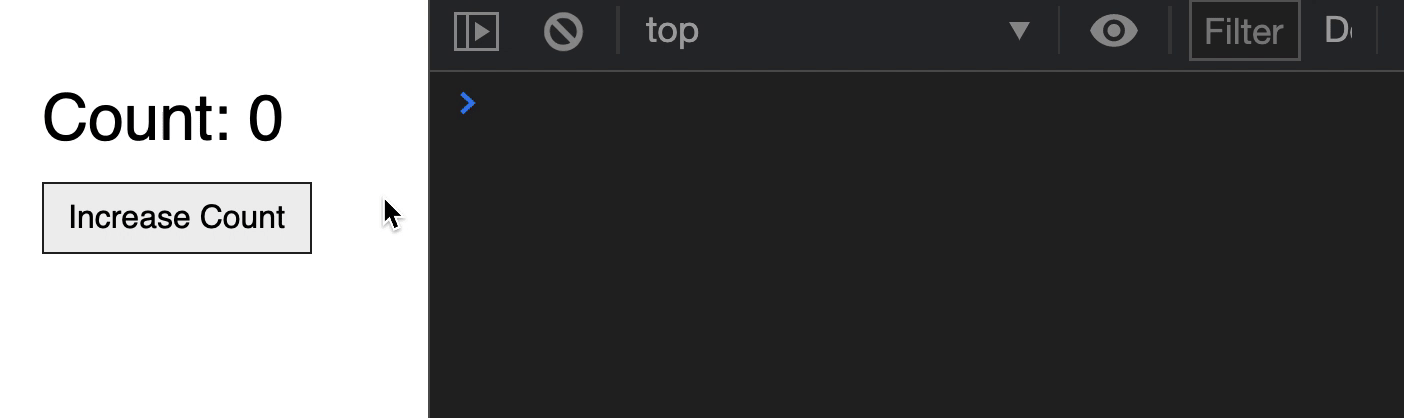
This is what the markup might look like:
<div class="counter">
  <p>Count: <span>0</span></p>
  <button>Increase Count</button>
</div>
Creating a counter using a class
To make things easier, ask the user to find and pass the counter markup to the Counter class:
class Counter {
  constructor (counter) {
    // ...
  }
}

//
const counter = new Counter(document.querySelector('.counter'))
You need to get 2 elements in the class:
- <span> containing the counter value - we need to update this value when the counter increases
- <button> - we need to add a handler for events called by this element
class Counter {
  constructor (counter) {
    this.countElement = counter.querySelector('span')
    this.buttonElement = counter.querySelector('button')
  }
}
Next, we initialize the "count" variable with the text content of countElement. The specified variable must be private.
class Counter {
  #count
  constructor (counter) {
    // ...

    this.#count = parseInt(countElement.textContent)
  }
}
When the button is pressed, the value of the counter should increase by 1. We implement this using the "increaseCount" method.
class Counter {
  #count
  constructor (counter) { /* ... */ }

  increaseCount () {
    this.#count = this.#count + 1
  }
}
Now we need to update the DOM. Let's implement this using the "updateCount" method called inside increaseCount:
class Counter {
  #count
  constructor (counter) { /* ... */ }

  increaseCount () {
    this.#count = this.#count + 1
    this.updateCount()
  }

  updateCount () {
    this.countElement.textContent = this.#count
  }
}
It remains to add an event handler.
Adding an event handler
Let's add a handler to this.buttonElement. Unfortunately, we cannot use increaseCount as a callback function. This will result in an error.
class Counter {
  // ...

  constructor (counter) {
    // ...
    this.buttonElement.addEventListener('click', this.increaseCount)
  }

  //
}

The exception is thrown because this points to buttonElement (event handler context). You can verify this by printing the this value to the console.
The this value must be changed to point to the instance. This can be done in two ways:
- using bind
- using the arrow function
Most use the first method (but the second is simpler).
Adding an event handler with bind
bind returns a new function. As the first argument, it is passed an object to which this will point (to which this will be bound).
class Counter {
  // ...

  constructor (counter) {
    // ...
    this.buttonElement.addEventListener('click', this.increaseCount.bind(this))
  }

  // ...
}
It works, but it doesn't look very good. In addition, bind is an advanced feature that is difficult for beginners to deal with.
Arrow functions
Arrow functions, among other things, do not have their own this. They borrow it from the lexical (external) environment. Therefore, the counter code can be rewritten as follows:
class Counter {
  // ...

  constructor (counter) {
    // ...
    this.buttonElement.addEventListener('click', () => {
      this.increaseCount()
    })
  }

  //
}
There is an even easier way. We can create increaseCount as an arrow function. In this case, this will point to the instance.
class Counter {
  // ...

  constructor (counter) {
    // ...
    this.buttonElement.addEventListener('click', this.increaseCount)
  }

  increaseCount = () => {
    this.#count = this.#count + 1
    this.updateCounter()
  }

  // ...
}
The code
Here is the complete example code:
Creating a counter using FF
The beginning is similar - we ask the user to find and pass the counter markup:
function Counter (counter) {
  // ...
}

const counter = Counter(document.querySelector('.counter'))
We get the necessary elements, which will be private by default:
function Counter (counter) {
  const countElement = counter.querySelector('span')
  const buttonElement = counter.querySelector('button')
}
Let's initialize the "count" variable:
function Counter (counter) {
  const countElement = counter.querySelector('span')
  const buttonElement = counter.querySelector('button')

  let count = parseInt(countElement.textContext)
}
The counter value will be increased using the "increaseCount" method. You can use a regular function, but I prefer a different approach:
function Counter (counter) {
  // ...
  const counter = {
    increaseCount () {
      count = count + 1
    }
  }
}
The DOM will be updated using the "updateCount" method that is called inside increaseCount:
function Counter (counter) {
  // ...
  const counter = {
    increaseCount () {
      count = count + 1
      counter.updateCount()
    },

    updateCount () {
      increaseCount()
    }
  }
}
Note that we are using counter.updateCount instead of this.updateCount.
Adding an event handler
We can add an event handler to the buttonElement using counter.increaseCount as a callback.
This will work since we are not using this, so it doesn't matter to us that the handler changes the context of this.
function Counter (counterElement) {
  //

  //
  const counter = { /* ... */ }

  //
  buttonElement.addEventListener('click', counter.increaseCount)
}
The first feature of this
You can use this in FF, but only in the context of a method.
In the following example, calling counter.increaseCount will call counter.updateCount because this points to counter:
function Counter (counterElement) {
  //

  //
  const counter = {
    increaseCount() {
      count = count + 1
      this.updateCount()
    }
  }

  //
  buttonElement.addEventListener('click', counter.increaseCount)
}
However, the event handler will not work because the this value has changed. This problem can be solved with bind, but not with arrow functions.
The second feature of this
When using the FF syntax, we cannot create methods in the form of arrow functions, because methods are created in the context of a function, i.e. this will point to window:
function Counter (counterElement) {
  // ...
  const counter = {
    //
    //  ,  this   window
    increaseCount: () => {
      count = count + 1
      this.updateCount()
    }
  }
  // ...
}
Therefore, when using FF, I highly recommend avoiding using this.
The code
Event handler verdict
Event handlers change the value of this, so use this very carefully. When using classes, I advise you to create event handler callbacks in the form of arrow functions. Then you don't have to resort to bind services.
When using FF, I recommend to do without this at all.
Conclusion
So, in this article, we looked at four ways to create objects in JavaScript:
- Constructor functions
- Classes
- Linking objects
- Factory functions
First, we came to the conclusion that classes and FFs are the most optimal ways to create objects.
Second, we saw that subclasses are easier to create with classes. However, in the case of composition, it is better to use FF.
Third, we summarized that when it comes to encapsulation, FFs have an advantage over classes, since the latter require the use of a special "#" prefix, and FFs make variables private automatically.
Fourth, FFs allow you to do without using this as an instance reference. In classes, you have to resort to some trickery in order to return this to the original context changed by the event handler.
That's all for me. I hope you enjoyed the article. Thank you for attention.