
Prior to the release of OpenShift 4.5.1, it was possible to install a cluster on the vSphere platform only in the UPI (User Provider Infrastructure) version. The user had to independently prepare the infrastructure necessary for installation, namely, prepare:
- external network balancers (one for balancing cluster traffic, the other for balancing application traffic);
- a number of DNS records, including SRV record;
- DHCP server for issuing addresses to cluster nodes (well, or decide on a method for setting static addressing);
- HTTP server for transferring ingnition config when installing RHCOS.
At the same time, any mistake (and as you know - "errare humanum est") in the preparation of the environment leads to failure with the installation of the cluster. To somehow facilitate this task, third-party projects began to appear to speed up the preparation of the environment and reduce the influence of the "human factor" in this process. One of the most famous is the OCP Helper Node project , which prepares all the necessary configuration for installing OpenShift on one server via Ansible. There were also options for installing a cluster with the preparation of infrastructure through Terraform.
But such projects did not solve all the problems with deploying a cluster in vSphere. Often it is necessary to provide an OpenShift cluster as a service ("kubernetes as service"), and in this case, automating the OpenShift installation was not an easy task - manual intervention was required: observing the order of installing the OS on the cluster nodes, confirming certificates in the cluster, waiting for the installation of cluster operators to complete, and etc. If necessary, you can automate this process, but this also takes time and resources to create and maintain such solutions.
Since release 4.5.1. released on July 13, 2020, OpenShift supports installation in vSphere using IPI (Installer Provided Infrastructure). This means that the installation program can now:
- independently prepare all the necessary resources in vSphere;
- create an OpenShift cluster with one command;
- delete the previously created OpenShift cluster with one command.
In addition, after such an installation, the administrator can add or remove cluster nodes with one command in OpenShift. Or enable autoscaling altogether, giving the cluster the ability to independently respond to load changes.
But the new installation method has one limitation - all cluster nodes, as well as the server from which the installation is performed, must have direct access to the Internet. If the administrator is behind a corporate proxy server or the Internet is not available for the cluster, the cluster will have to be installed as before, in the UPI version.
Preparing the surrounding infrastructure
When installing OpenShift, you cannot do without preparing the infrastructure, but the list of tasks has become more modest:
- A DHCP server is needed (to issue addresses to OpenShift nodes);
- Two DNS records are required (VIP for cluster API and VIP for Ingress traffic);
- You will need an account in vSphere with a set of privileges described in the documentation for installing OpenShift .
In our case, to install OpenShift and run all the required services, we used the shift-is01 server running CentOS 7.
DHCPD configuration
There is nothing specific here, we allocate the pool of addresses (192.168.111.100 -192.168.111.150) for OpenShift servers:
[ocp@shift-is01 ~]$ sudo cat /etc/dhcp/dhcpd.conf
authoritative;
ddns-update-style interim;
default-lease-time 14400;
max-lease-time 14400;

        option routers                  192.168.111.1;
        option broadcast-address        192.168.111.255;
        option subnet-mask              255.255.255.0;
        option domain-name-servers      192.168.111.10;
        option domain-name              «ocp45.demo.local»;
        subnet 192.168.111.0 netmask 255.255.255.0 {
        interface ens192;
        pool {
                range 192.168.111.100 192.168.111.150;
                  # this is PXE specific
                filename «pxelinux.0»;
                next-server 192.168.111.10;
        }
}
DNS configuration
For our cluster, the ocp45.demo.local zone was created and A and PTR records for the DHCP range were created. Create the required OpenShift entries for the API and Ingress:
A chunk from the BIND zone ocp45.demo.local:
api             IN      A       192.168.111.190
*.apps          IN      A       192.168.111.191
After that, we download the certificates from our vCenter and install them as trusted on our server.
Install vCenter certificates:
[ocp@shift-is01 ~]$ mkdir certs; cd certs; curl -kO https://vc01.demo.local/certs/download.zip
  % Total    % Received % Xferd  Average Speed   Time    Time     Time  Current
                                 Dload  Upload   Total   Spent    Left  Speed
100  5795  100  5795    0     0  15500      0 --:--:-- --:--:-- --:--:-- 15536

[ocp@shift-is01 certs]$ unzip ./download.zip
Archive:  ./download.zip
  inflating: certs/lin/e01a85a3.r1
  inflating: certs/mac/e01a85a3.r1
  inflating: certs/win/e01a85a3.r1.crl
  inflating: certs/lin/e01a85a3.0
  inflating: certs/mac/e01a85a3.0
  inflating: certs/win/e01a85a3.0.crt

[ocp@shift-is01 certs]$ sudo cp ./certs/lin/e01a85a3.* /etc/pki/ca-trust/source/anchors

[ocp@shift-is01 certs]$ sudo update-ca-trust extract
Installing an OpenShift cluster
The installation procedure itself is now as simple as possible:
- get the installer and keys (Pull Secret) from the Red Hat website ;
- preparing a yaml file with install-config.yaml with the planned cluster configuration;
- install the cluster.
We get the installer and keys
Download the installation program and PullSecret from RedHat, this procedure is described in the Installation Guide . In our example, all the binaries necessary for work are located in the bin directory of the user's home directory ocp.
[ocp@shift-is01 bin]$ ll
total 499036
-rwxr-xr-x 1 ocp ocp  78599208 Jul 16 11:53 kubectl
-rwxr-xr-x 1 ocp ocp  78599208 Jul 16 11:53 oc
-rwxr-xr-x 1 ocp ocp 353804288 Jul 16 11:53 openshift-install
-rw-r--r-- 1 ocp ocp       954 Jul 16 11:53 README.md
Preparing install-config.yaml
[ocp@shift-is01 ~]$ cat ./install-config.yaml
apiVersion: v1
baseDomain: demo.local
compute:
- hyperthreading: Enabled
  architecture: amd64
  name: worker
  replicas: 3
  platform:
    vsphere:
      cpus: 2
      coresPerSocket: 1
      memoryMB: 8192
      osDisk:
        diskSizeGB: 120
controlPlane:
  hyperthreading: Enabled
  architecture: amd64
  name: master
  replicas: 3
  platform:
    vsphere:
      cpus: 4
      coresPerSocket: 1
      memoryMB: 16384
      osDisk:
        diskSizeGB: 120
metadata:
  name: ocp45
networking:
  networkType: OpenShiftSDN
  clusterNetwork:
  - cidr: 10.128.0.0/14
    hostPrefix: 23
  serviceNetwork:
- 172.30.0.0/16
platform:
  vsphere:
    vcenter: _vCenter
    username: __vCenter
    password: _
    datacenter: _Datacenter
    defaultDatastore: _Datastre
    network: _Network
    cluster: _Cluster
    apiVIP: 192.168.111.190
    ingressVIP: 192.168.111.191
fips: false
pullSecret: '_PullSecret'
sshKey: '_SSH_Public_Key'
When preparing this file with the future configuration of the cluster, there are three things to note.
First, the cluster will remember the configuration of the worker nodes of the cluster defined in install-config. And all subsequent nodes that you will create when scaling the cluster will have exactly the same configuration. Therefore, it is necessary to immediately determine the optimal configuration of the worker node.
Second, it is desirable that the internal addressing of the cluster (Cluster Network and Service Network) is not interfered with with your internal addressing. Otherwise, there is a possibility that the POD inside the cluster will not be able to open a connection to external resources (for example, go to an external database).
Third, the cluster name (metadata field) must match your domain for that cluster. In our case, the cluster name is ocp45, and its addresses are in the ocp45.demo.local domain.
You can also prepare install-config.yaml through the openshift-install installer, but then you will not be able to determine the worker node configuration and internal addressing. In any case, it makes sense to create install-config.yaml through the installer and then fix it.
Installing the cluster
The very procedure for installing a cluster has not fundamentally changed. After starting the installation program:
- the installer creates a bootstrap node with resources to initialize the master node;
- the installer creates three master nodes;
- bootstrap node and three master nodes form a cluster control plane;
- the installer disables and removes the bootstrap node;
- The control plane deploys worker nodes and configures the necessary cluster services.
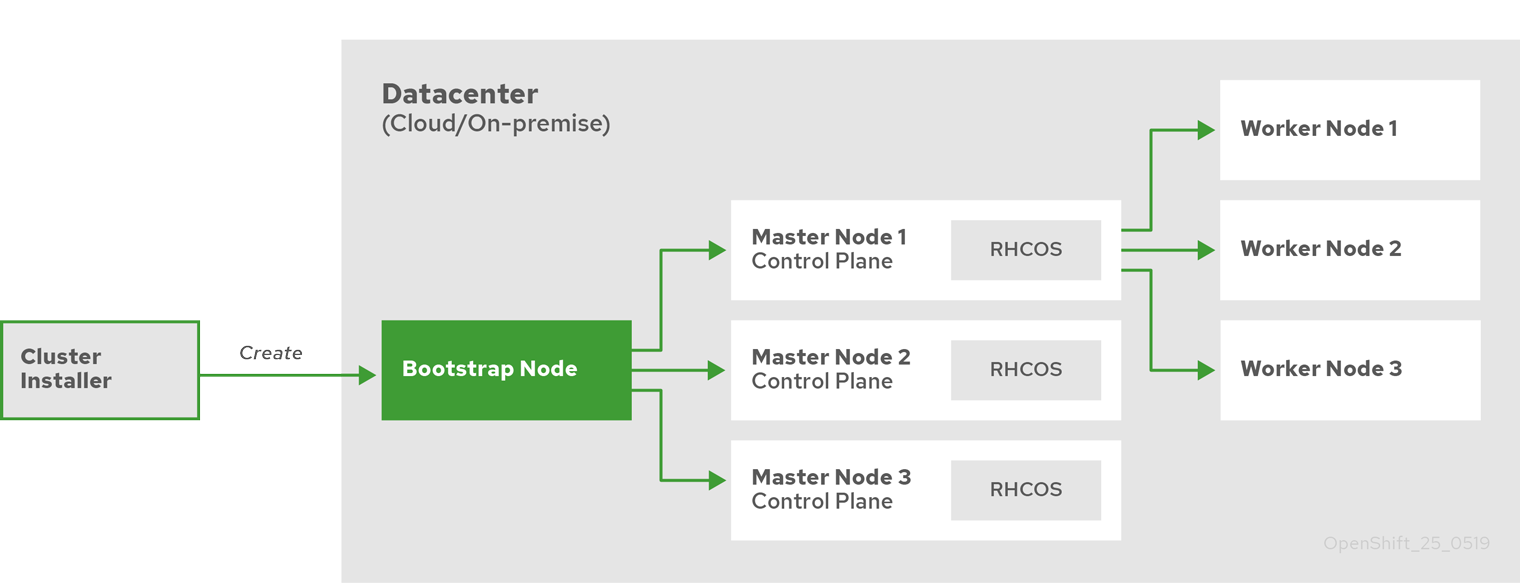
Cluster setup process.
We start the cluster installation and wait. The installation process usually takes 30-40 minutes:
Cluster installation
[ocp@shift-is01 ~]$ mkdir ocp45; cp ./install-config.yaml ./ocp45
[ocp@shift-is01 ~]$ ./bin/openshift-install create cluster --dir=ocp45 --log-level=info
INFO Consuming Install Config from target directory
INFO Obtaining RHCOS image file from 'https://releases-art-rhcos.svc.ci.openshift.org/art/storage/releases/rhcos-4.5/45.82.202007062333-0/x86_64/rhcos-45.82.202007062333-0-vmware.x86_64.ova?sha256=4189881eadb0b0cfd85c2f2ab1c32f6a320b71713cac3bd4179dba746ad4070a'

INFO Creating infrastructure resources...
INFO Waiting up to 20m0s for the Kubernetes API at https://api.ocp45.demo.local:6443...
INFO API v1.18.3+8b0a82f up
INFO Waiting up to 40m0s for bootstrapping to complete...
INFO Destroying the bootstrap resources...
INFO Waiting up to 30m0s for the cluster at https://api.ocp45.demo.local:6443 to initialize...
INFO Waiting up to 10m0s for the openshift-console route to be created...
INFO Install complete!
INFO To access the cluster as the system:admin user when using 'oc', run 'export KUBECONFIG=/home/ocp/ocp45/auth/kubeconfig'
INFO Access the OpenShift web-console here: https://console-openshift-console.apps.ocp45.demo.local
INFO Login to the console with user: «kubeadmin», and password: «xxxxxxxxxxxxxxx»
INFO Time elapsed: 41m56s
RHCOS Boot Problems
If the Internet connection is slow, the installation may not work: the installer will not wait for the RHCOS image to load. You can download the RHCOS image in advance from the link shown by the installer. The resulting file must be placed in the ~ / .cache / openshift-installer / image_cache directory with the name 5dad1f50634794b0e1ff8a830cad4b98 and restart the installation. This time openshift-install will take it from the file system:
INFO The file was found in cache: /home/ocp/.cache/openshift-installer/image_cache/5dad1f50634794b0e1ff8a830cad4b98. Reusing...
That's it, the cluster is ready:
[ocp@shift-is01 ~]$ export KUBECONFIG=/home/ocp/ocp45/auth/kubeconfig
[ocp@shift-is01 ~]$ ./bin/oc get nodes

NAME                       STATUS   ROLES    AGE   VERSION
ocp45-64clc-master-0       Ready    master   33m   v1.18.3+6025c28
ocp45-64clc-master-1       Ready    master   33m   v1.18.3+6025c28
ocp45-64clc-master-2       Ready    master   33m   v1.18.3+6025c28
ocp45-64clc-worker-f7bw2   Ready    worker   15m   v1.18.3+6025c28
ocp45-64clc-worker-m277w   Ready    worker   15m   v1.18.3+6025c28
ocp45-64clc-worker-wcjj7   Ready    worker   15m   v1.18.3+6025c28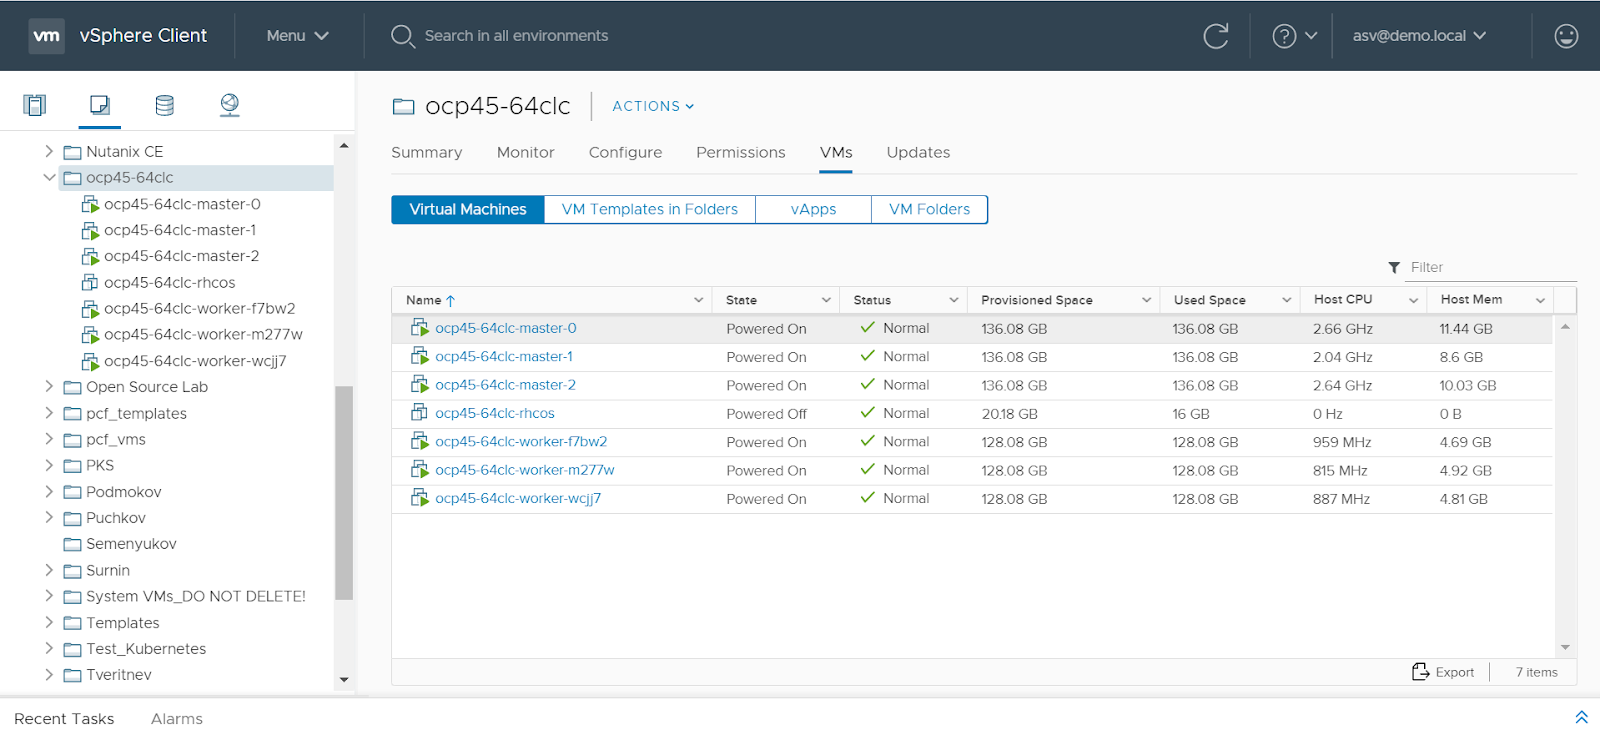
Scaling and deleting an OpenShift cluster
The advantages of the new method are not only that the installation is now easier and requires less preparation effort. An OpenShift cluster installed in vSphere via IPI perceives vShpere as a full-fledged Cloud Platform and can take advantage of its "elasticity" benefits.
Now a cluster on the vSphere platform (like large cloud platforms like Amazon AWS or Google GCP) has a machineset that is automatically generated by the installer:
OpenShift machineset
[ocp@shift-is01 ~]$ ./bin/oc get machinesets -n openshift-machine-api
NAME                 DESIRED   CURRENT   READY   AVAILABLE   AGE
ocp45-64clc-worker   3         3         3       3           50m
This allows you to reduce cluster scaling to running a single command. OpenShift will independently create a node and add it to the cluster or delete it.
Adding a node to a cluster
[ocp@shift-is01 ~]$ ./bin/oc scale --replicas=4 machineset ocp45-64clc-worker -n openshift-machine-api
machineset.machine.openshift.io/ocp45-64clc-worker scaled

[ocp@shift-is01 ~]$ ./bin/oc get machinesets -n openshift-machine-api

NAME                 DESIRED   CURRENT   READY   AVAILABLE   AGE
ocp45-64clc-worker   4         4         3       3           61m

[ocp@shift-is01 ~]$ ./bin/oc get nodes

NAME                       STATUS   ROLES    AGE     VERSION
ocp45-64clc-master-0       Ready    master   75m     v1.18.3+6025c28
ocp45-64clc-master-1       Ready    master   75m     v1.18.3+6025c28
ocp45-64clc-master-2       Ready    master   75m     v1.18.3+6025c28
ocp45-64clc-worker-f7bw2   Ready    worker   57m     v1.18.3+6025c28
ocp45-64clc-worker-hvjmn   Ready    worker   9m27s   v1.18.3+6025c28
ocp45-64clc-worker-m277w   Ready    worker   57m     v1.18.3+6025c28
ocp45-64clc-worker-wcjj7   Ready    worker   57m     v1.18.3+6025c28
Removing a node from a cluster
[ocp@shift-is01 ~]$ ./bin/oc scale --replicas=3 machineset ocp45-64clc-worker -n openshift-machine-api
machineset.machine.openshift.io/ocp45-64clc-worker scaled

[ocp@shift-is01 ~]$ ./bin/oc get nodes

NAME                       STATUS   ROLES    AGE   VERSION
ocp45-64clc-master-0       Ready    master   97m   v1.18.3+6025c28
ocp45-64clc-master-1       Ready    master   98m   v1.18.3+6025c28
ocp45-64clc-master-2       Ready    master   98m   v1.18.3+6025c28
ocp45-64clc-worker-hvjmn   Ready    worker   32m   v1.18.3+6025c28
ocp45-64clc-worker-m277w   Ready    worker   79m   v1.18.3+6025c28
ocp45-64clc-worker-wcjj7   Ready    worker   79m   v1.18.3+6025c28
The cluster's ability to self-create and drop nodes can be used to configure the automatic scaling of an OpenShfit cluster .
In general, with vSphere IPI Installation, all management of the OpenShift container orchestration platform goes to the kubernetes side:
- creation and deletion of resources for the cluster is managed by the OpenShift administrator through the machineset;
- the configuration of OS settings on cluster nodes is also managed by the OpenShift administrator via macheneconfig.
This fits well with RedHat's stated Zero Administration approach for the underlying infrastructure under the cluster.
In addition to automating the creation of clusters, the new installer can remove them on its own. Terraform's state file (terraform.tfstate) remains under the hood of the Terraform installer and in the directory with the installation configuration files. This allows you to delete a previously created cluster without fear of accidentally "touching" other people's resources:
[ocp@shift-is01 ~]$./bin/openshift-install destroy cluster --dir=ocp45 --log-level=infoIf you are constantly creating and dropping clusters, for example, for tests or learning environments, then this feature also helps automate this process and prevent possible human error in the process.
Conclusion
Installing OpenShift on VMware vSphere is the most common installation option. And the ability of OpenShift to work with vSphere as a cloud platform, which appeared in release 4.5.1, greatly simplifies its administration, providing a turnkey solution for automating lifecycle processes from platform creation, scaling and removal.
Now the Infrastructure as Code approach for serving on-premise solutions based on Red Hat OpenShift and VMware vSphere is becoming much more affordable to implement.
Author: Sergey Artemov, architect of DevOps-solutions department of Jet Infosystems
PS Join the Telegram DevSecOps Talks community .