The opinion that JavaScript does not know how to interact with the file system is not entirely correct. Rather, the point is that this interaction is significantly limited compared to server-side programming languages such as Node.js or PHP. Nevertheless, JavaScript can both receive (receive) and create some types of files and successfully process them natively.
In this article, we will create three small projects:
- We implement receiving and processing of images, audio, video and text in txt and pdf format
- Let's create a JSON file generator
- Let's write two programs: one will form questions (in JSON format), and the other will use them to create a test
If you are interested, please follow me.
Project code on GitHub .
We receive and process files
First, let's create a directory where our projects will be stored. Let's call it "Work-With-Files-in-JavaScript" or whatever you like.
In this directory, create a folder for the first project. Let's call it "File-Reader".
Create a file "index.html" in it with the following content:
<div>+</div>
<input type="file">
Here we have a container-file receiver and an input with the "file" type (to get a file; we will work with single files; to get multiple files, the input should be added with the "multiple" attribute), which will be hidden under the container.
Styles can be included in a separate file or in the "style" tag inside the head:
body {
    margin: 0 auto;
    display: flex;
    justify-content: center;
    align-items: center;
    min-height: 100vh;
    max-width: 768px;
    background: radial-gradient(circle, skyblue, steelblue);
    color: #222;
}

div {
    width: 150px;
    height: 150px;
    display: flex;
    justify-content: center;
    align-items: center;
    font-size: 10em;
    font-weight: bold;
    border: 6px solid;
    border-radius: 8px;
    user-select: none;
    cursor: pointer;
}

input {
    display: none;
}

img,
audio,
video {
    max-width: 80vw;
    max-height: 80vh;
}
You can make the design to your liking.
Do not forget to include the script either in the head with the "defer" attribute (we need to wait for the DOM to be drawn (rendered); you can, of course, do this in the script by handling the "load" or "DOMContentLoaded" event of the "window" object, but defer is much shorter) , or before the closing “body” tag (then no attribute or handler is needed). I personally prefer the first option.
Let's open index.html in a browser:

Before proceeding to writing the script, we need to prepare the files for the application: we need an image, audio, video, text in txt, pdf and any other format, for example, doc. You can use my collection or build your own.
We often have to access the "document" and "document.body" objects, as well as output the results to the console several times, so I suggest wrap our code in this IIFE (this is not necessary):
;((D, B, log = arg => console.log(arg)) => {

    //

    //     document  document.body   D  B,
    // log = arg => console.log(arg) -
    //    console.log  log
})(document, document.body)
First of all, we declare the variables for the file receiver, input and file (we do not initialize the latter, since its value depends on the transfer method - by clicking on the input or dropping into the file receiver):
const dropZone = D.querySelector('div')
const input = D.querySelector('input')
let file
Disable the browser handling of the dragover and drop events:
D.addEventListener('dragover', ev => ev.preventDefault())
D.addEventListener('drop', ev => ev.preventDefault())
In order to understand why we did this, try transferring an image or other file to the browser and see what happens. And there is automatic processing of files, i.e. what we are going to implement on our own for educational purposes.
We handle throwing a file into the file receiver:
dropZone.addEventListener('drop', ev => {
    //
    ev.preventDefault()

    //   ,
    log(ev.dataTransfer)

    //   (   )
    /*
    DataTransfer {dropEffect: "none", effectAllowed: "all", items: DataTransferItemList, types: Array(1), files: FileList}
        dropEffect: "none"
        effectAllowed: "all"
    =>  files: FileList
            length: 0
        __proto__: FileList
        items: DataTransferItemList {length: 0}
        types: []
        __proto__: DataTransfer
    */

    //    (File)    "files"  "DataTransfer"
    //
    file = ev.dataTransfer.files[0]

    //
    log(file)
    /*
    File {name: "image.png", lastModified: 1593246425244, lastModifiedDate: Sat Jun 27 2020 13:27:05 GMT+0500 (,  ), webkitRelativePath: "", size: 208474, …}
        lastModified: 1593246425244
        lastModifiedDate: Sat Jun 27 2020 13:27:05 GMT+0500 (,  ) {}
        name: "image.png"
        size: 208474
        type: "image/png"
        webkitRelativePath: ""
        __proto__: File
    */

    //
    handleFile(file)
})
We have just implemented the simplest dran'n'drop mechanism.
We process the click on the file receiver (we delegate the click to the input):
dropZone.addEventListener('click', () => {
    //
    input.click()

    //
    input.addEventListener('change', () => {
        //   ,
        log(input.files)

        //   (   )
        /*
        FileList {0: File, length: 1}
        =>  0: File
                lastModified: 1593246425244
                lastModifiedDate: Sat Jun 27 2020 13:27:05 GMT+0500 (,  ) {}
                name: "image.png"
                size: 208474
                type: "image/png"
                webkitRelativePath: ""
                __proto__: File
            length: 1
            __proto__: FileList
        */

        //  File
        file = input.files[0]

        //
        log(file)

        //
        handleFile(file)
    })
})
Let's start processing the file:
const handleFile = file => {
    //
}
We delete the file receiver and input:
dropZone.remove()
input.remove()
The way a file is processed depends on its type:
log(file.type)
//
// image/png
We will not work with html, css and js files, so we prohibit their processing:
if (file.type === 'text/html' ||
    file.type === 'text/css' ||
    file.type === 'text/javascript')
return;
We will also not work with MS files (with the MIME type "application / msword", "application / vnd.ms-excel", etc.), since they cannot be processed by native means. All methods of processing such files, offered on StackOverflow and other resources, come down to either converting to other formats using various libraries, or using viewers from Google and Microsoft, which do not want to work with the file system and localhost. At the same time, the type of pdf-files also starts with "application", so we will process such files separately:
if (file.type === 'application/pdf') {
    createIframe(file)
    return;
}
For the rest of the files, we get their "group" type:
//   ,
const type = file.type.replace(/\/.+/, '')

//
log(type)
//
// image
Using switch..case, we define a specific file processing function:
switch (type) {
    //
    case 'image':
        createImage(file)
        break;
    //
    case 'audio':
        createAudio(file)
        break;
    //
    case 'video':
        createVideo(file)
        break;
    //
    case 'text':
        createText(file)
        break;
    // ,      ,
    //
    default:
        B.innerHTML = `<h3>Unknown File Format!</h3>`
        const timer = setTimeout(() => {
            location.reload()
            clearTimeout(timer)
        }, 2000)
        break;
}
Image processing function:
const createImage = image => {
    //   "img"
    const imageEl = D.createElement('img')
    //
    imageEl.src = URL.createObjectURL(image)
    //
    log(imageEl)
    //
    B.append(imageEl)
    //
    URL.revokeObjectURL(image)
}
Audio processing function:
const createAudio = audio => {
    //   "audio"
    const audioEl = D.createElement('audio')
    //
    audioEl.setAttribute('controls', '')
    //
    audioEl.src = URL.createObjectURL(audio)
    //
    log(audioEl)
    //
    B.append(audioEl)
    //
    audioEl.play()
    //
    URL.revokeObjectURL(audio)
}
Video processing function:
const createVideo = video => {
    //   "video"
    const videoEl = D.createElement('video')
    //
    videoEl.setAttribute('controls', '')
    //
    videoEl.setAttribute('loop', 'true')
    //
    videoEl.src = URL.createObjectURL(video)
    //
    log(videoEl)
    //
    B.append(videoEl)
    //
    videoEl.play()
    //
    URL.revokeObjectURL(video)
}
Text processing function:
const createText = text => {
    //    "FileReader"
    const reader = new FileReader()
    //
    //
    //   - utf-8,
    //
    reader.readAsText(text, 'windows-1251')
    //
    //
    reader.onload = () => B.innerHTML = `<p><pre>${reader.result}</pre></p>`
}
Last, but not least, pdf processing function:
const createIframe = pdf => {
    //   "iframe"
    const iframe = D.createElement('iframe')
    //
    iframe.src = URL.createObjectURL(pdf)
    //
    iframe.width = innerWidth
    iframe.height = innerHeight
    //
    log(iframe)
    //
    B.append(iframe)
    //
    URL.revokeObjectURL(pdf)
}
Result:
Create a JSON file
For the second project, create a "Create-JSON" folder in the root directory (Work-With-Files-in-JavaScript).
Create a file "index.html" with the following content:
<!-- head -->
<!-- materialize css -->
<link rel="stylesheet" href="https://cdnjs.cloudflare.com/ajax/libs/materialize/1.0.0/css/materialize.min.css">
<!-- material icons -->
<link href="https://fonts.googleapis.com/icon?family=Material+Icons" rel="stylesheet">

<!-- body -->
<h3>Create JSON</h3>

<!--   -->
<div class="row main">
    <h3>Create JSON</h3>
    <form class="col s12">
        <!--   "-" -->
        <div class="row">
            <div class="input-field col s5">
                <label>key</label>
                <input type="text" value="1" required>
            </div>
            <div class="input-field col s2">
                <p>:</p>
            </div>
            <div class="input-field col s5">
                <label>value</label>
                <input type="text" value="foo" required>
            </div>
        </div>

        <!--   -->
        <div class="row">
            <div class="input-field col s5">
                <label>key</label>
                <input type="text" value="2" required>
            </div>
            <div class="input-field col s2">
                <p>:</p>
            </div>
            <div class="input-field col s5">
                <label>value</label>
                <input type="text" value="bar" required>
            </div>
        </div>

        <!--   -->
        <div class="row">
            <div class="input-field col s5">
                <label>key</label>
                <input type="text" value="3" required>
            </div>
            <div class="input-field col s2">
                <p>:</p>
            </div>
            <div class="input-field col s5">
                <label>value</label>
                <input type="text" value="baz" required>
            </div>
        </div>

        <!--  -->
        <div class="row">
            <button class="btn waves-effect waves-light create-json">create json
                <i class="material-icons right">send</i>
            </button>
            <a class="waves-effect waves-light btn get-data"><i class="material-icons right">cloud</i>get data</a>
        </div>
    </form>
</div>
Materialize is used for styling .
Add a couple of custom styles:
body {
    max-width: 512px;
    margin: 0 auto;
    text-align: center;
}

input {
    text-align: center;
}

.get-data {
    margin-left: 1em;
}
We get the following:
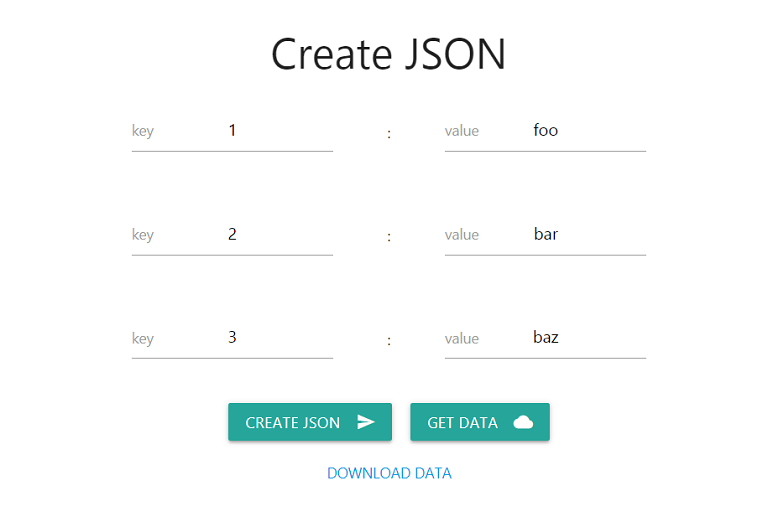
JSON files have the following format:
{
    "": "",
    "": "",
    ...
}
Odd inputs of type “text” are keys, even ones are values. We assign default values to the inputs (values can be any). A button with the "create-json" class is used to get the values entered by the user and create a file. Button from the "get-data" classes - to get data.
Let's move on to the script:
//     "create-json"
document.querySelector('.create-json').addEventListener('click', ev => {
    //       "submit"  , ..
    //
    //    ,
    ev.preventDefault()

    //
    const inputs = document.querySelectorAll('input')

    //  ,
    //
    //

    //        "chunk"  "lodash"
    //    (,   ) -
    //
    //    (,   ) -
    //
    const arr = []
    for (let i = 0; i < inputs.length; ++i) {
        arr.push([inputs[i].value, inputs[++i].value])
    }

    //  ,
    console.log(arr)
    /*
        [
            ["1", "foo"]
            ["2", "bar"]
            ["3", "baz"]
        ]
    */

    //
    const data = Object.fromEntries(arr)

    //
    console.log(data)
    /*
        {
            1: "foo"
            2: "bar"
            3: "baz"
        }
    */

    //
    const file = new Blob(
        //
        [JSON.stringify(data)], {
            type: 'application/json'
        }
    )

    //
    console.log(file)
    /*
        {
            "1": "foo",
            "2": "bar",
            "3": "baz"
        }
    */
    // ,

    //   "a"
    const link = document.createElement('a')
    //   "href"  "a"
    link.setAttribute('href', URL.createObjectURL(file))
    //  "download"   ,
    //    -
    link.setAttribute('download', 'data.json')
    //
    link.textContent = 'DOWNLOAD DATA'
    //       "main"
    document.querySelector('.main').append(link)
    //
    URL.revokeObjectURL(file)

    // { once: true }
    //
}, { once: true })
By clicking on the "CREATE JSON" button, the "data.json" file is generated, the "DOWNLOAD DATA" link appears to download this file.
What can we do with this file? Download it and place it in the Create-JSON folder.
We get:
//   (    )   "get-data"
document.querySelector('.get-data').addEventListener('click', () => {
    //   IIFE  async..await
    (async () => {
        const response = await fetch('data.json')

        //  ()
        const data = await response.json()

        console.table(data)
    })()
})
Result:
Create a question generator and tester
Question generator
For the third project, let's create a “Test-Maker” folder in the root directory.
Create a file "createTest.html" with the following content:
<!-- head -->
<!-- Bootstrap CSS -->
<link rel="stylesheet" href="https://stackpath.bootstrapcdn.com/bootstrap/4.5.0/css/bootstrap.min.css"
    integrity="sha384-9aIt2nRpC12Uk9gS9baDl411NQApFmC26EwAOH8WgZl5MYYxFfc+NcPb1dKGj7Sk" crossorigin="anonymous">

<!-- body -->
<!--   -->
<div class="container">
    <h3>Create Test</h3>
    <form id="questions-box">
        <!--    -->
        <div class="question-box">
            <br><hr>
            <h4 class="title"></h4>
            <!--  -->
            <div class="row">
                <input type="text" class="form-control col-11 question-text" value="first question" >
                <!--    -->
                <button class="btn btn-danger col remove-question-btn">X</button>
            </div>
            <hr>

            <h4>Answers:</h4>
            <!--   -->
            <div class="row answers-box">
                <!--   -->
                <div class="input-group">
                    <div class="input-group-prepend">
                        <div class="input-group-text">
                            <input type="radio" checked name="answer">
                        </div>
                    </div>

                    <input class="form-control answer-text" type="text" value="foo" >

                    <!--     -->
                    <div class="input-group-append">
                        <button class="btn btn-outline-danger remove-answer-btn">X</button>
                    </div>
                </div>
                <!--   -->
                <div class="input-group">
                    <div class="input-group-prepend">
                        <div class="input-group-text">
                            <input type="radio" name="answer">
                        </div>
                    </div>

                    <input class="form-control answer-text" type="text" value="bar" >

                    <div class="input-group-append">
                        <button class="btn btn-outline-danger remove-answer-btn">X</button>
                    </div>
                </div>
                <!--   -->
                <div class="input-group">
                    <div class="input-group-prepend">
                        <div class="input-group-text">
                            <input type="radio" name="answer">
                        </div>
                    </div>

                    <input class="form-control answer-text" type="text" value="baz" >

                    <div class="input-group-append">
                        <button class="btn btn-outline-danger remove-answer-btn">X</button>
                    </div>
                </div>
            </div>
            <br>

            <!--      -->
            <button class="btn btn-primary add-answer-btn">Add answer</button>
            <hr>

            <h4>Explanation:</h4>
            <!--  -->
            <div class="row explanation-box">
                <input type="text" value="first explanation" class="form-control explanation-text" >
            </div>
        </div>
    </form>

    <br>

    <!--        -->
    <button class="btn btn-primary" id="add-question-btn">Add question</button>
    <button class="btn btn-primary" id="create-test-btn">Create test</button>
</div>
This time, Bootstrap is used for styling . We are not using the "required" attributes since we will be validating the form in JS (with required, the behavior of a form consisting of multiple required fields becomes annoying).
Add a couple of custom styles:
body {
        max-width: 512px;
        margin: 0 auto;
        text-align: center;
    }

input[type="radio"] {
    cursor: pointer;
}
We
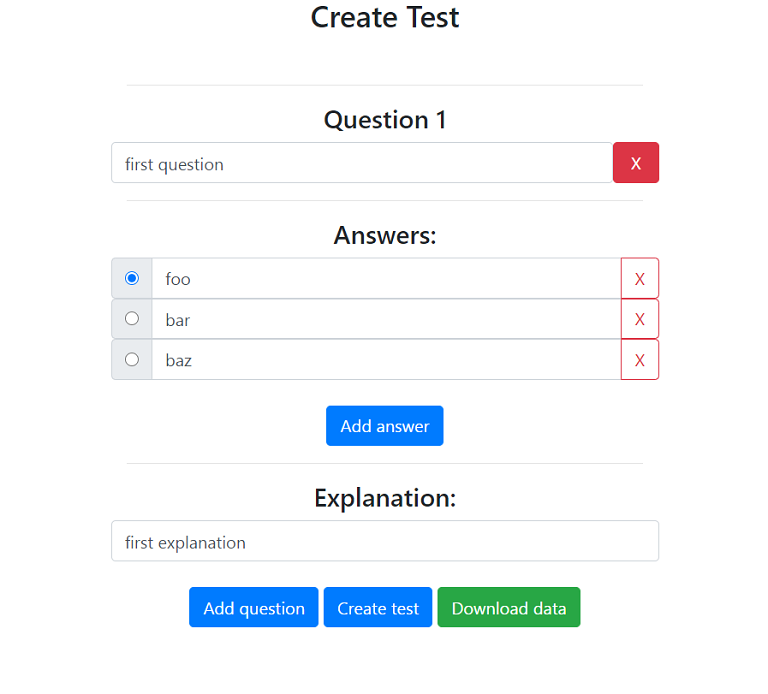
get the following: We have a question template. I propose to move it to a separate file for use as a component using dynamic import. Create a file "Question.js" with the following content:
export default (name = Date.now()) => `
<div class="question-box">
    <br><hr>
    <h4 class="title"></h4>
    <div class="row">
        <input type="text" class="form-control col-11 question-text">
        <button class="btn btn-danger col remove-question-btn">X</button>
    </div>
    <hr>
    <h4>Answers:</h4>
    <div class="row answers-box">
        <div class="input-group">
            <div class="input-group-prepend">
                <div class="input-group-text">
                    <input type="radio" checked name="${name}">
                </div>
            </div>

            <input class="form-control answer-text" type="text" >

            <div class="input-group-append">
                <button class="btn btn-outline-danger remove-answer-btn">X</button>
            </div>
        </div>
        <div class="input-group">
            <div class="input-group-prepend">
                <div class="input-group-text">
                    <input type="radio" name="${name}">
                </div>
            </div>

            <input class="form-control answer-text" type="text" >

            <div class="input-group-append">
                <button class="btn btn-outline-danger remove-answer-btn">X</button>
            </div>
        </div>
    </div>
    <br>
    <button class="btn btn-primary add-answer-btn">Add answer</button>
    <hr>
    <h4>Explanation:</h4>
    <div class="row explanation-box">
        <input type="text" class="form-control explanation-text">
    </div>
</div>
`
Here we have everything the same as in createTest.html, except that we removed the default values for inputs and pass the “name” argument as the value of the attribute of the same name (this attribute must be unique for each question - this makes it possible switch answer options, choose one of several). The default value for name is the time in milliseconds since January 1, 1970, a simple alternative to the Nanoid random value generators used to obtain a unique identifier (the user is unlikely to have time to create two questions in 1 ms).
Let's move on to the main script.
I'm going to create some helper (factory) functions, but this is not necessary.
Secondary functions:
//
const findOne = (element, selector) => element.querySelector(selector)
//
const findAll = (element, selector) => element.querySelectorAll(selector)
//
const addHandler = (element, event, callback) => element.addEventListener(event, callback)

//
//    Bootstrap    ,
//    DOM
//      -    (),
//     1
const findParent = (element, depth = 1) => {
    //       ,
    // ,
    let parentEl = element.parentElement

    // ,      ..
    while (depth > 1) {
        //
        parentEl = findParent(parentEl)
        //
        depth--
    }

    //
    return parentEl
}
In our case, in search of the parent element, we will reach the third nesting level. Since we know the exact number of these levels, we could have used if..else if or switch..case, but the recursion option is more versatile.
Once again: it is not necessary to introduce factory functions, you can easily get by with the standard functionality.
Find the main container and container for questions, and also disable the form submission:
const C = findOne(document.body, '.container')
// const C = document.body.querySelector('.container')
const Q = findOne(C, '#questions-box')

addHandler(Q, 'submit', ev => ev.preventDefault())
// Q.addEventListener('submit', ev => ev.preventDefault())
Button initialization function to delete question:
//
const initRemoveQuestionBtn = q => {
    const removeQuestionBtn = findOne(q, '.remove-question-btn')

    addHandler(removeQuestionBtn, 'click', ev => {
        //
        /*
        =>  <div class="question-box">
                <br><hr>
                <h4 class="title"></h4>
            =>  <div class="row">
                    <input type="text" class="form-control col-11 question-text" value="first question" >
                =>  <button class="btn btn-danger col remove-question-btn">X</button>
                </div>

                ...
        */
        findParent(ev.target, 2).remove()
        // ev.target.parentElement.parentElement.remove()

        //
        initTitles()
    }, {
        //
        once: true
    })
}
Button initialization function to delete answer option:
const initRemoveAnswerBtns = q => {
    const removeAnswerBtns = findAll(q, '.remove-answer-btn')
    // const removeAnswerBtns = q.querySelectorAll('.remove-answer-btn')

    removeAnswerBtns.forEach(btn => addHandler(btn, 'click', ev => {
        /*
        =>  <div class="input-group">
              ...

          =>  <div class="input-group-append">
              =>  <button class="btn btn-outline-danger remove-answer-btn">X</button>
              </div>
            </div>
        */
        findParent(ev.target, 2).remove()
    }, {
        once: true
    }))
}
Button initialization function to add answer option:
const initAddAnswerBtns = q => {
    const addAnswerBtns = findAll(q, '.add-answer-btn')

    addAnswerBtns.forEach(btn => addHandler(btn, 'click', ev => {
        //
        const answers = findOne(findParent(ev.target), '.answers-box')
        // const answers = ev.target.parentElement.querySelector('.answers-box')

        //  "name"
        let name
        answers.children.length > 0
            ? name = findOne(answers, 'input[type="radio"]').name
            : name = Date.now()

        //
        const template = `
                <div class="input-group">
                    <div class="input-group-prepend">
                        <div class="input-group-text">
                            <input type="radio" name="${name}">
                        </div>
                    </div>

                    <input class="form-control answer-text" type="text" value="">

                    <div class="input-group-append">
                        <button class="btn btn-outline-danger remove-answer-btn">X</button>
                    </div>
                </div>
                `
        //
        answers.insertAdjacentHTML('beforeend', template)

        //
        initRemoveAnswerBtns(q)
    }))
}
We combine the functions of initializing buttons into one:
const initBtns = q => {
    initRemoveQuestionBtn(q)
    initRemoveAnswerBtns(q)
    initAddAnswerBtns(q)
}
Function for initializing question headers:
const initTitles = () => {
    //
    const questions = Array.from(findAll(Q, '.question-box'))

    //
    questions.map(q => {
        const title = findOne(q, '.title')
        //   -    + 1
        title.textContent = `Question ${questions.indexOf(q) + 1}`
    })
}
Let's initialize the buttons and the title of the question:
initBtns(findOne(Q, '.question-box'))

initTitles()
Add question function:
//
const addQuestionBtn = findOne(C, '#add-question-btn')

addHandler(addQuestionBtn, 'click', ev => {
    //   IIFE  async..await
    //
    //
    //
    (async () => {
        const data = await import('./Question.js')
        const template = await data.default()
        await Q.insertAdjacentHTML('beforeend', template)

        const question = findOne(Q, '.question-box:last-child')
        initBtns(question)
        initTitles()
    })()
})
Test creation function:
//
addHandler(findOne(C, '#create-test-btn'), 'click', () => createTest())

const createTest = () => {
    //
    const obj = {}

    //
    const questions = findAll(Q, '.question-box')

    //
    //
    const isEmpty = (...args) => {
        //
        args.map(arg => {
            //
            //
            arg = arg.replace(/\s+/g, '').trim()
            //
            if (arg === '') {
                //
                alert('Some field is empty!')
                //
                throw new Error()
            }
        })
    }

    //
    questions.forEach(q => {
        //
        const questionText = findOne(q, '.question-text').value

        //
        //
        const answersText = []
        findAll(q, '.answer-text').forEach(text => answersText.push(text.value))

        //    -          "checked"    "answer-text"
        /*
        =>  <div class="input-group">
              <div class="input-group-prepend">
                <div class="input-group-text">
              =>  <input type="radio" checked name="answer">
                </div>
              </div>

          => <input class="form-control answer-text" type="text" value="foo" >

          ...
        */
        const rightAnswerText = findOne(findParent(findOne(q, 'input:checked'), 3), '.answer-text').value

        //
        const explanationText = findOne(q, '.explanation-text').value

        //
        isEmpty(questionText, ...answersText, explanationText)

        //       " "
        obj[questions.indexOf(q)] = {
            question: questionText,
            answers: answersText,
            rightAnswer: rightAnswerText,
            explanation: explanationText
        }
    })

    //
    console.table(obj)

    //
    const data = new Blob(
        [JSON.stringify(obj)], {
            type: 'application/json'
        }
    )

    //
    //
    if (findOne(C, 'a') !== null) {
        findOne(C, 'a').remove()
    }

    //
    const link = document.createElement('a')
    link.setAttribute('href', URL.createObjectURL(data))
    link.setAttribute('download', 'data.json')
    link.className = 'btn btn-success'
    link.textContent = 'Download data'
    C.append(link)
    URL.revokeObjectURL(data)
}
Result:
Using data from a file
Using the question generator, create a file like this:
{
    "0": {
        "question": "first question",
        "answers": ["foo", "bar", "baz"],
        "rightAnswer": "foo",
        "explanation": "first explanation"
    },
    "1": {
        "question": "second question",
        "answers": ["foo", "bar", "baz"],
        "rightAnswer": "bar",
        "explanation": "second explanation"
    },
    "2": {
        "question": "third question",
        "answers": ["foo", "bar", "baz"],
        "rightAnswer": "baz",
        "explanation": "third explanation"
    }
}
Place this file (data.json) in the "Test-Maker" folder.
Create a file "useData.html" with the following content:
<!-- head -->
<!-- Bootstrap CSS -->
<link rel="stylesheet" href="https://stackpath.bootstrapcdn.com/bootstrap/4.5.0/css/bootstrap.min.css"
        integrity="sha384-9aIt2nRpC12Uk9gS9baDl411NQApFmC26EwAOH8WgZl5MYYxFfc+NcPb1dKGj7Sk" crossorigin="anonymous">

<!-- body -->
<h1>Use data</h1>
Add a couple of custom styles:
body {
    max-width: 512px;
    margin: 0 auto;
    text-align: center;
}

section *:not(h3) {
    text-align: left;
}

input,
button {
    margin: .4em;
}

label,
input {
    cursor: pointer;
}

.right-answer,
.explanation {
    display: none;
}
Script:
//
const getData = async url => {
const response = await fetch(url)
const data = await response.json()
return data
}
//
getData('data.json')
.then(data => {
//
console.table(data)
//
createTest(data)
})
// name
let name = Date.now()
//
const createTest = data => {
// data -
//
for (const item in data) {
//
console.log(data[item])
// ,
// , ,
const {
question,
answers,
rightAnswer,
explanation
} = data[item]
// name
name++
//
const questionTemplate = `
<hr>
<section>
<h3>Question ${item}: ${question}</h3>
<form>
<legend>Answers</legend>
${answers.reduce((html, ans) => html += `<label><input type="radio" name="${name}">${ans}</label><br>`, '')}
</form>
<p class="right-answer">Right answer: ${rightAnswer}</p>
<p class="explanation">Explanation: ${explanation}</p>
</section>
`
//
document.body.insertAdjacentHTML('beforeend', questionTemplate)
})
//
const forms = document.querySelectorAll('form')
//
forms.forEach(form => {
const input = form.querySelector('input')
input.click()
})
//
//
const btn = document.createElement('button')
btn.className = 'btn btn-primary'
btn.textContent = 'Check answers'
document.body.append(btn)
//
btn.addEventListener('click', () => {
//
const answers = []
//
forms.forEach(form => {
// ()
const chosenAnswer = form.querySelector('input:checked').parentElement.textContent
//
const rightAnswer = form.nextElementSibling.textContent.replace('Right answer: ', '')
//
answers.push([chosenAnswer, rightAnswer])
})
console.log(answers)
//
// ,
/*
Array(3)
0: (2) ["foo", "foo"]
1: (2) ["bar", "bar"]
2: (2) ["foo", "baz"]
*/
//
checkAnswers(answers)
})
// ()
const checkAnswers = answers => {
//
let rightAnswers = 0
let wrongAnswers = 0
// ,
// - () ,
// -
for (const answer of answers) {
//
if (answer[0] === answer[1]) {
//
rightAnswers++
//
} else {
//
wrongAnswers++
//
const wrongSection = forms[answers.indexOf(answer)].parentElement
//
wrongSection.querySelector('.right-answer').style.display = 'block'
wrongSection.querySelector('.explanation').style.display = 'block'
}
}
//
const percent = parseInt(rightAnswers / answers.length * 100)
// -
let result = ''
//
// result
if (percent >= 80) {
result = 'Great job, super genius!'
} else if (percent > 50) {
result = 'Not bad, but you can do it better!'
} else {
result = 'Very bad, try again!'
}
//
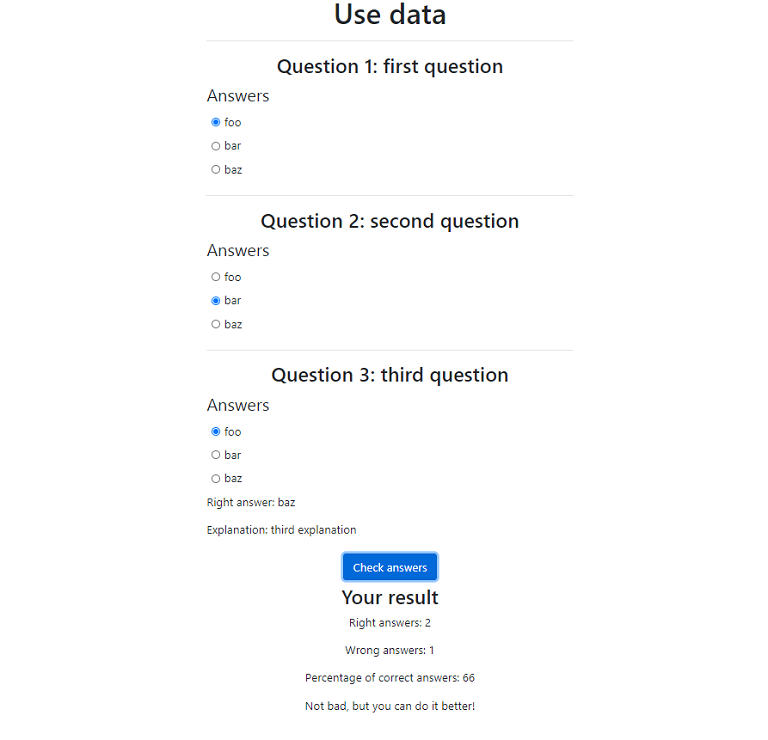
const resultTemplate = `
<h3>Your result</h3>
<p>Right answers: ${rightAnswers}</p>
<p>Wrong answers: ${wrongAnswers}</p>
<p>Percentage of correct answers: ${percent}</p>
<p>${result}</p>
`
//
document.body.insertAdjacentHTML('beforeend', resultTemplate)
}
}
Result (in case the answer to the third question is wrong):
Bonus. Writing data to CloudFlare
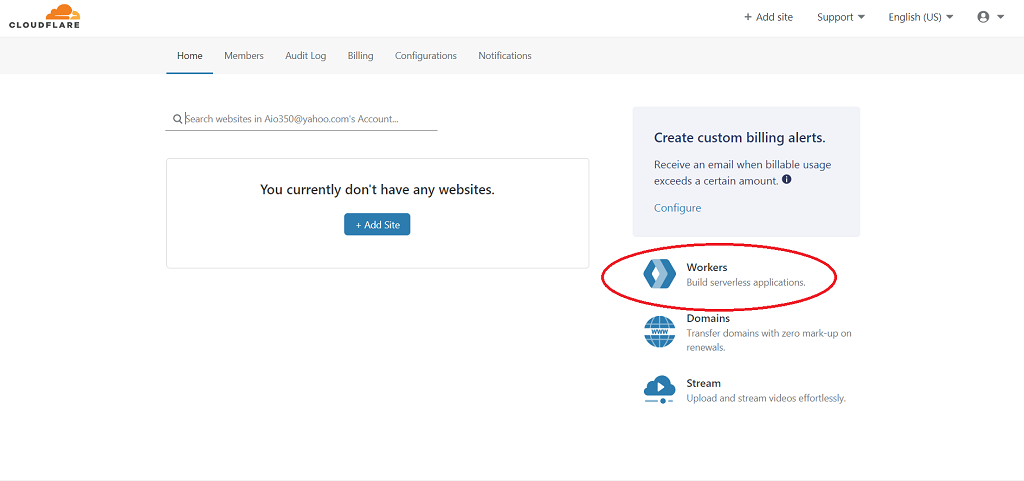
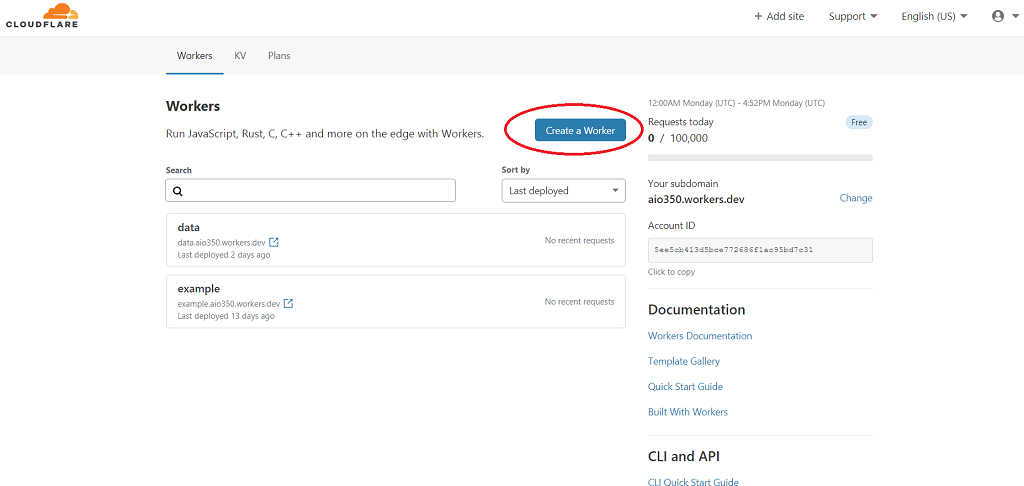
Go to cloudflare.com , register, click on Workers on the right, then click on the "Create a Worker" button.

Change the name of the worker to "data" (this is optional). In the "{} Script" field, insert the following code and click on the "Save and Deploy" button:
//
addEventListener('fetch', event => {
    event.respondWith(
        new Response(
            //
            `{
                "0": {
                    "question": "first question",
                    "answers": ["foo", "bar", "baz"],
                    "rightAnswer": "foo",
                    "explanation": "first explanation"
                },
                "1": {
                    "question": "second question",
                    "answers": ["foo", "bar", "baz"],
                    "rightAnswer": "bar",
                    "explanation": "second explanation"
                },
                "2": {
                    "question": "third question",
                    "answers": ["foo", "bar", "baz"],
                    "rightAnswer": "baz",
                    "explanation": "third explanation"
                }
            }`,
            {
                status: 200,
                //     CORS
                headers: new Headers({'Access-Control-Allow-Origin': '*'})
            })
        )
    })
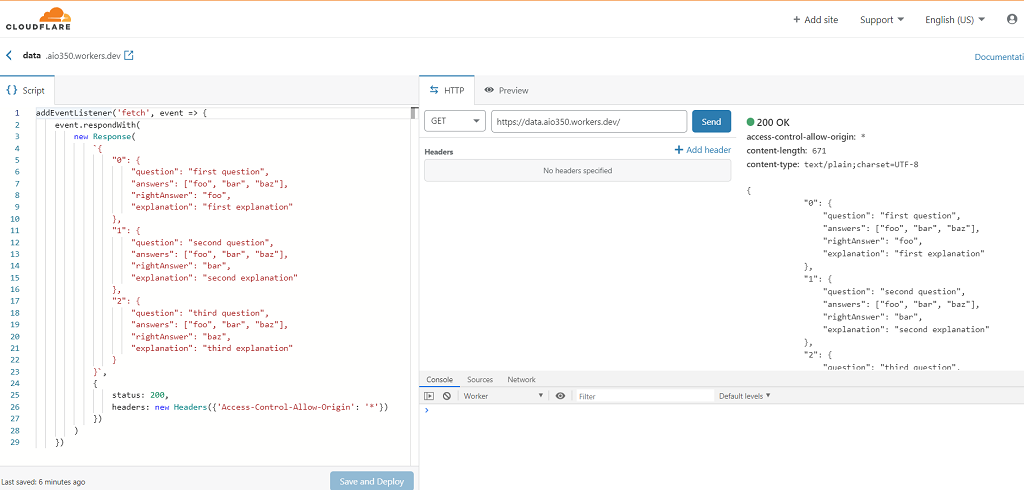
We can now receive data from CloudFlare. To do this, you just need to specify the worker's URL instead of 'data.json' in the "getData" function. In my case it looks like this: getData ('https://data.aio350.workers.dev/') .then (...).
Long article turned out. I hope you found something useful in it.
Thank you for attention.