The choice of the genre, plot and style of the game is quite an interesting task, and the success of the game may depend on the solution of these issues. In addition, the choice of technology on the basis of which the product will be created also brings its own nuances. My goal is to show the basic basics of this fun process, so I will make a 3-dimensional maze with a simple design. Moreover, I will do it in pure code without using libraries and engines, such as three.js (although it is better to do large projects on it) to show how you can create an engine for your needs. A completely self-written game can be original and therefore interesting. In general, both approaches have their pros and cons.
I suppose if you are reading this article, then you are interested in the topic of creating games for Google Chrome, which means that you understand how the html-css-javaScript bundle works, so I will not dwell on the basics, but will immediately start developing. In html5 and css3, which are supported by all modern browsers (the Explorer does not count), it is possible to arrange blocks in 3-dimensional space. There is also an element in which you can draw lines and graphic primitives. Most browser engines use <canvas> because more things can be done on it, and the performance is better on it. But for simple things it is quite possible to use transform-3d methods, which will take less code.
1. Development tools
I only use 2 browsers to check sites and games: Chrome and Mozilla. All other browsers (except the Explorer itself) are built on the first engine, so I don't see the point in using them, because the results are exactly the same as in Chrome. Notepad ++ is enough to write code.
2. How is 3D space implemented in html?
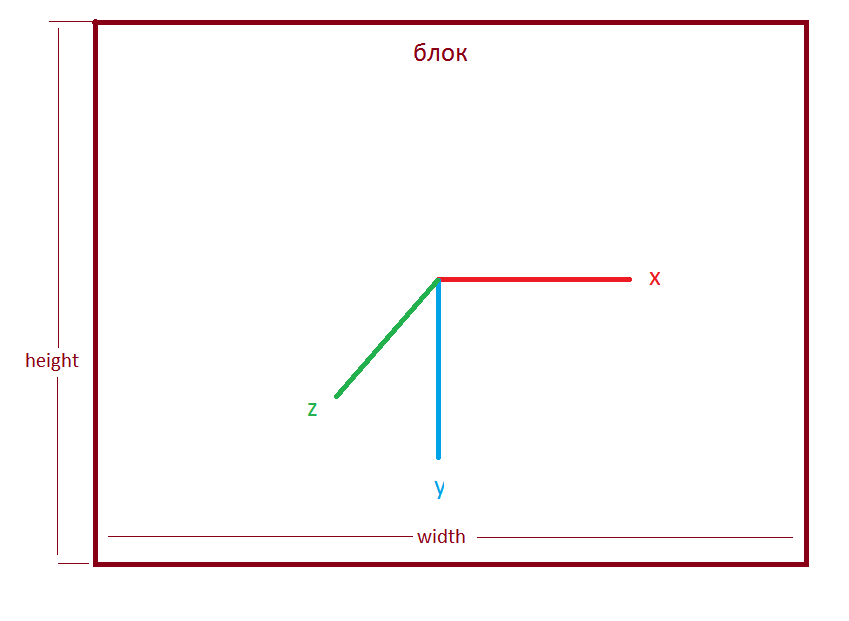
Let's look at the block coordinate system:
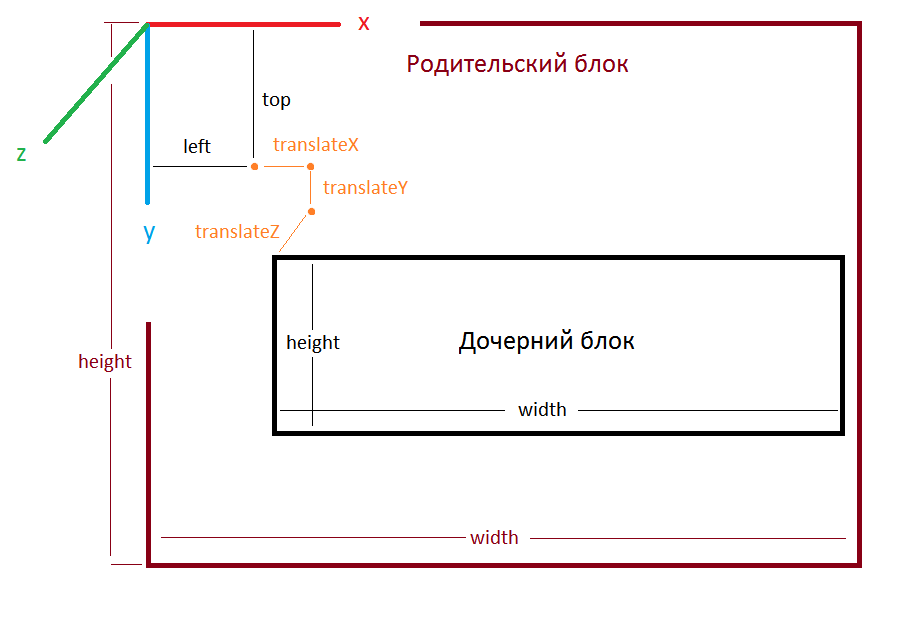
By default, the child block has coordinates (left and top) 0 pixels in x and 0 pixels in y. Offset (translate), also 0 pixels on all three axes. Let's show this with an example, for which we will create a new folder. In it, we will create the index.html, style.css and script.js files. Let's open index.html and write the following there:
<!DOCTYPE HTML>
<HTML>
<HEAD>
	<TITLE></TITLE>
	<LINK rel="stylesheet" href="style.css">
	<meta charset="utf-8">
</HEAD>
<BODY>
	<div id="container">
		<div id="world">
        </div>
	</div>
</BODY>
</HTML>
<script src="script.js"></script>
In the style.css file, let's set the styles for the “container” and “world” elements.
#container{
position:absolute;
width:1200px;
height:800px;
border:2px solid #000000;
}
#world{
width:300px;
height:300px;
background-color:#C0FFFF;
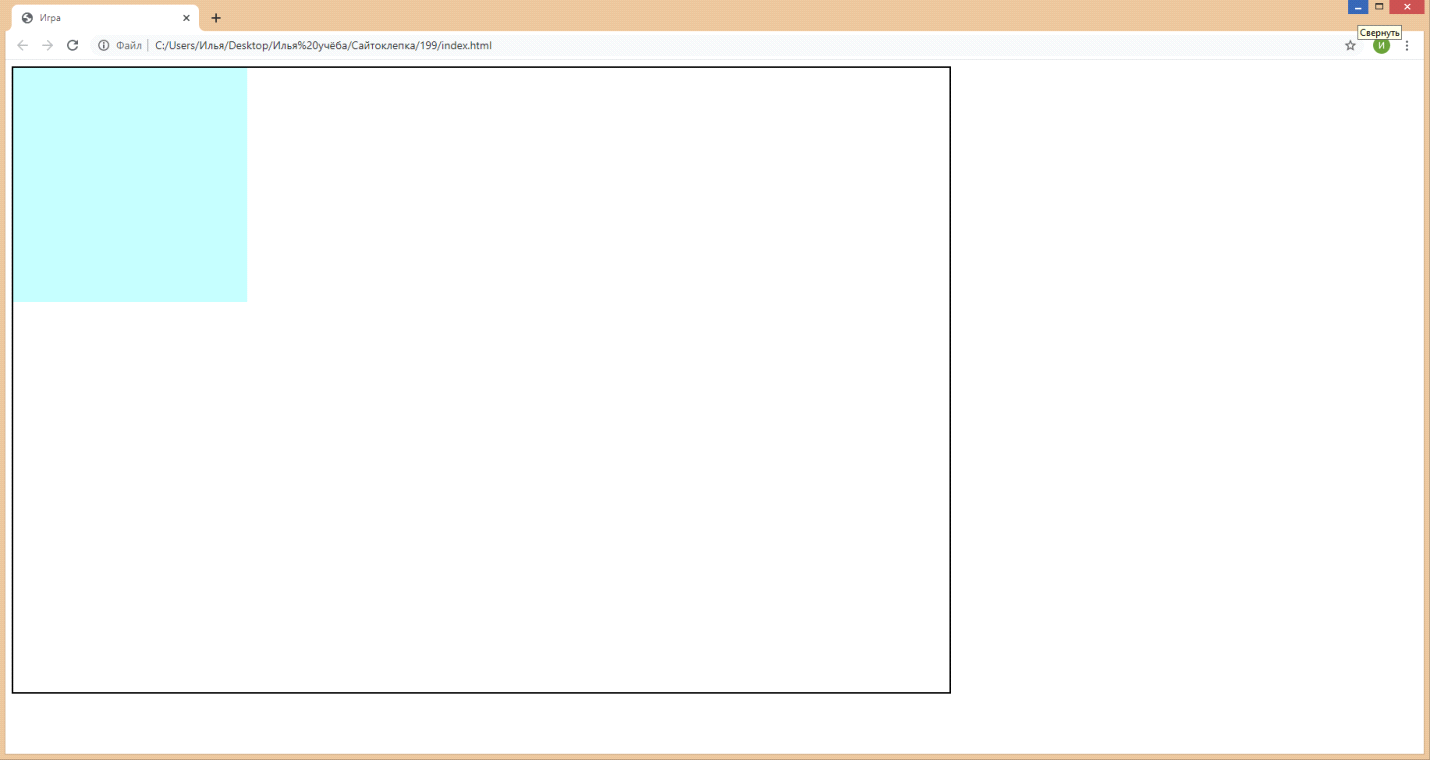
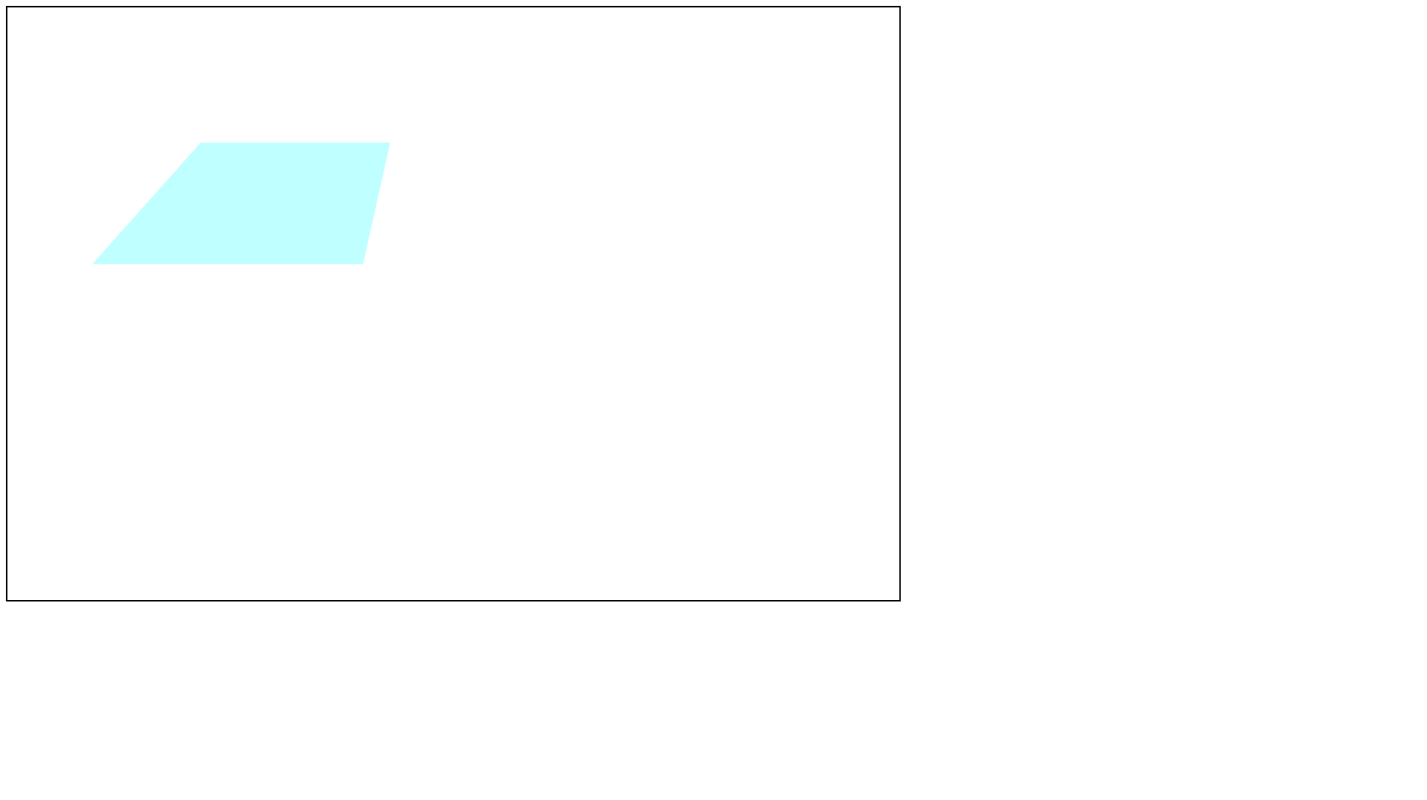
}Let's save. Opening index.html with Chrome, we get:
Let's try to apply translate3d to the element "world":
#world{
	width:300px;
	height:300px;
        background-color:#C0FFFF;
        transform:translate3d(200px,100px,0px);
}
As you understand, I switched to full screen mode. Now let's set the Z offset:
transform: translate3d (200px, 100px, -1000px);
If you open the html file in the browser again, you will not see any changes. To see the changes, you need to set the perspective for the "container" object:
#container{
	position:absolute;
	width:1200px;
	height:800px;
	border:2px solid #000000;
	perspective:600px;
}
As a result: the
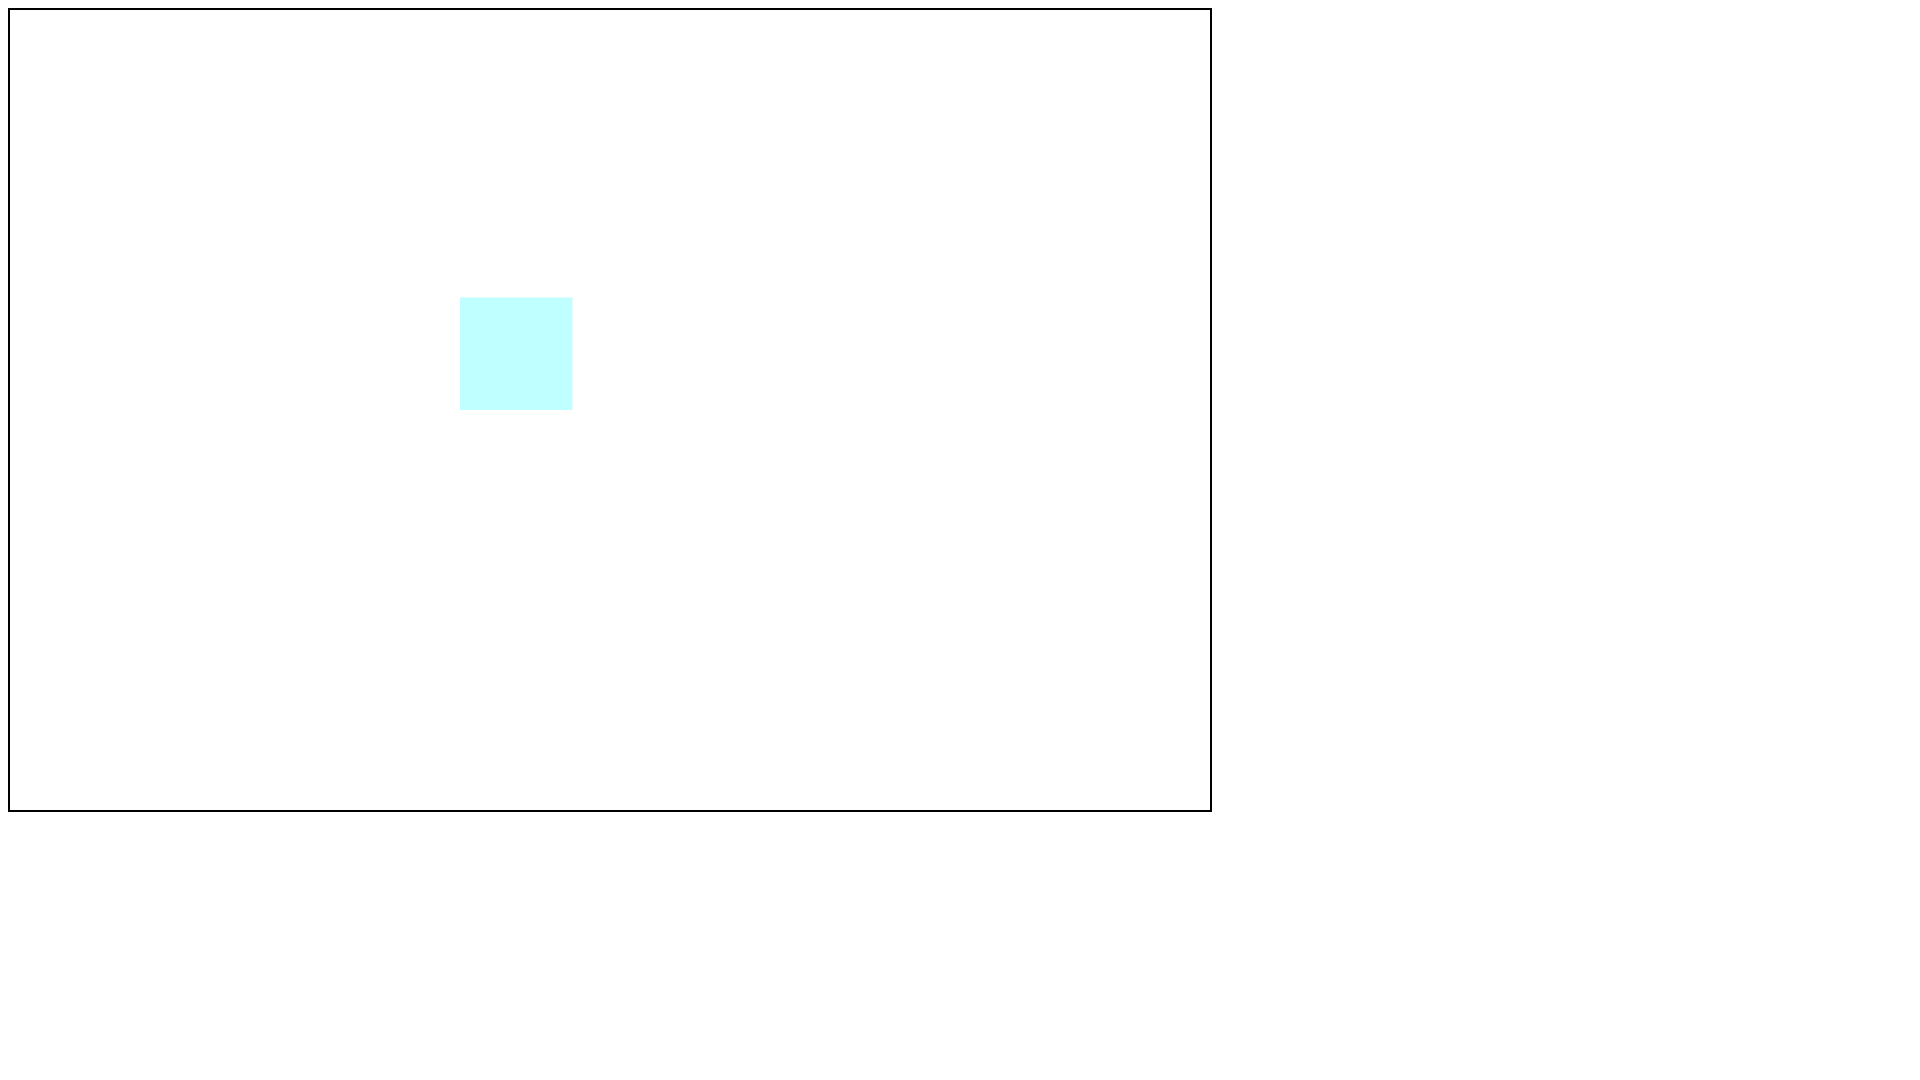
Square has moved away from us. How does perspective work in html? Let's take a look at the picture:
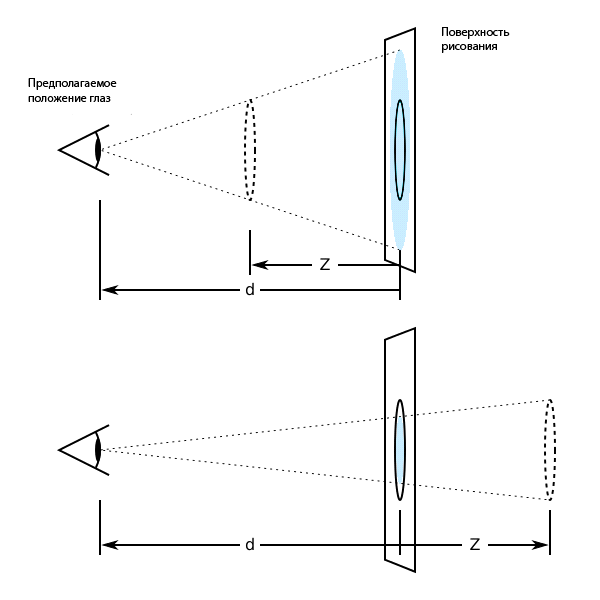
d is the distance from the user to the object, and z is its coordinate. A negative z (in html this is translateZ) means that we have moved away the object, and a positive z is the opposite. The perspective value determines the value of d. If the perspective property is not set, then the d value is assumed to be infinity, and in this case the object does not visually change for the user with a change in z. In our case, we set d = 600px. By default, the perspective viewpoint is in the center of the element, however, it can be changed by setting the perspective-origin: property.
Now let's rotate "world" around some axis. There are 2 ways of rotation can be used in css. The first is rotation around the x, y and z axes. To do this, use the transform properties rotateX (), rotateY () and rotateZ (). The second is rotation around a given axis using the rotate3d () property. We will use the first method, as it is more suitable for our tasks. Note that the axes of rotation go out from the center of the rectangle!
The point at which the transformations occur can be changed by setting the translate-origin: property. So, let's set the rotation of "world" along the x-axis:
#world{
	width:300px;
	height:300px;
background-color:#C0FFFF;
transform:translate3d(200px,100px,0px) rotateX(45deg);
}
We get:
Noticeable offset counterclockwise. If we add rotateY (), we will get the displacement along the Y axis. It is important to note that when the block is rotated, the rotation axes also rotate. You can also experiment with different rotation values.
Now, inside the "world" block, we will create another block, for this we add a tag to the html file:
<!DOCTYPE HTML>
<HTML>
<HEAD>
	<TITLE></TITLE>
	<LINK rel="stylesheet" href="style.css">
	<meta charset="utf-8">
</HEAD>
<BODY>
	<div id="container">
		<div id="world">
			<div id="square1"></div>
		</div>
	</div>
</BODY>
</HTML>
<script src="script.js"></script>
Add styles to this block in style.css:
#square1{
position:absolute;
width:200px;
height:200px;
background-color:#FF0000;
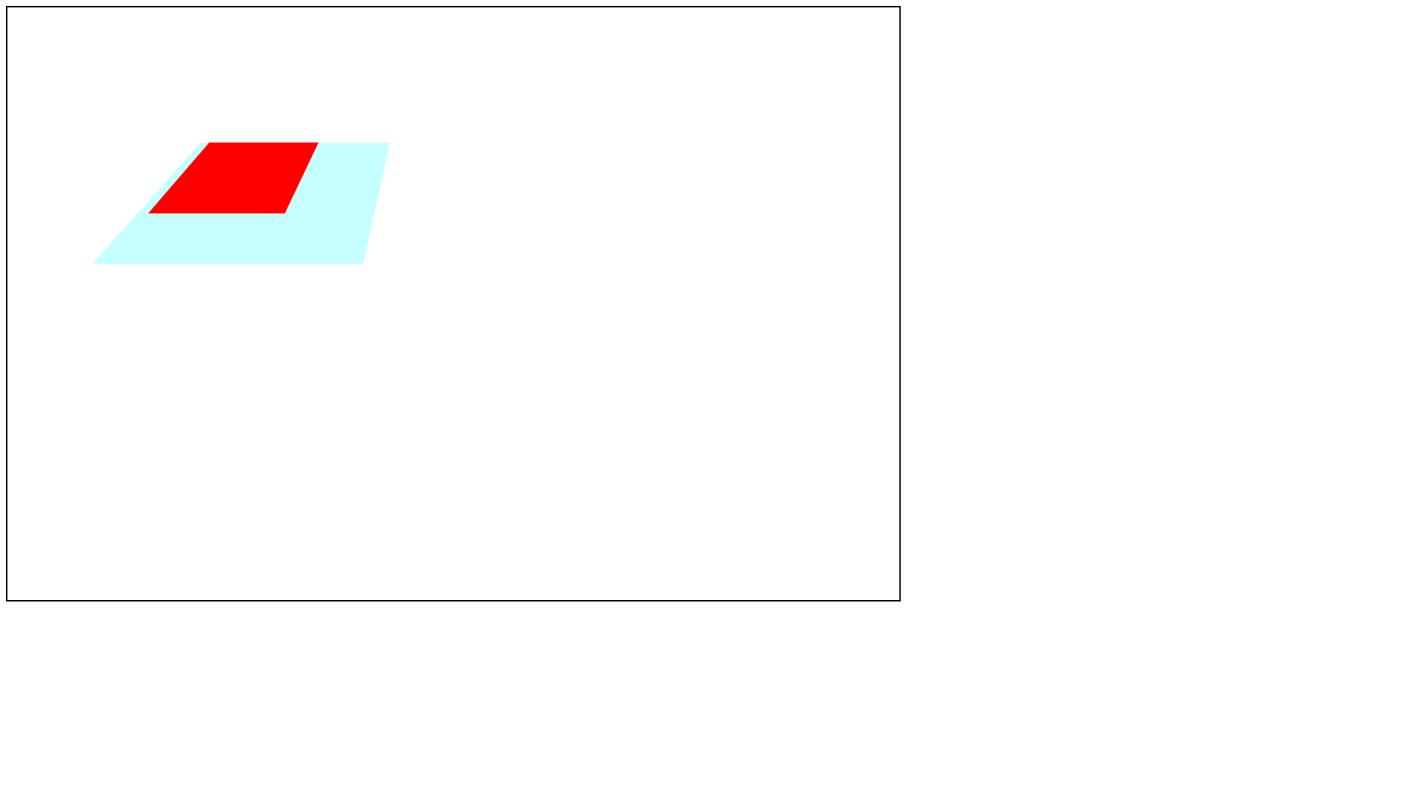
}We get:

That is, the elements inside the "world" block will be transformed as part of this block. Let's try to rotate “square1” along the y-axis by adding a rotation style to it:
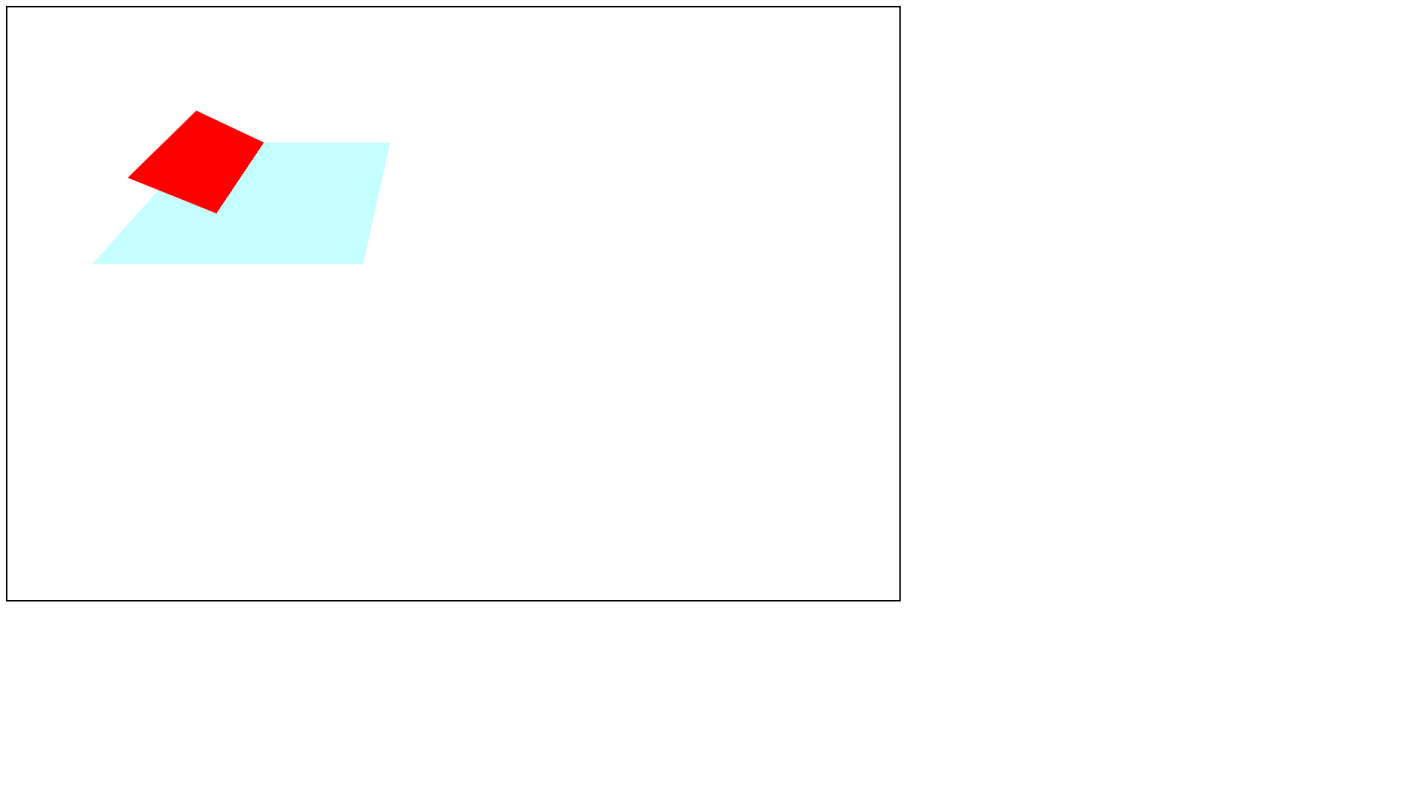
transform: rotateY (30deg);
In the end:
"Where is the rotation?" - you ask? In fact, this is exactly what the projection of the “square1” block on the plane formed by the “world” element looks like. But we do not need a projection, but a real rotation. To make all the elements inside the "world" three-dimensional, you need to apply the transform-style: preserve-3d property to it. After substituting the property inside the list of "world" styles, check the changes:
Excellent! Half of the “square” block is hidden behind the blue block. To show it completely, let's remove the color of the "world" block, namely, remove the background-color line: # C0FFFF; If we add more rectangles inside the "world" block, then we can create a 3D world. Now let's remove the "world" offset by removing the transform property line in the styles for this element.
3. Create motion in a three-dimensional world
In order for the user to be able to move around this world, you need to define handlers for keystrokes and mouse movements. The controls will be standard, which is present in most 3D shooters. With the W, S, A, D keys, we will move forward, backward, left, right, with the spacebar we will jump (in other words, move up), and with the mouse we will change the direction of our gaze. To do this, let's open a still empty script.js file. First, let's add the following variables there:
//   ?

var PressBack = 0;
var PressForward = 0;
var PressLeft = 0;
var PressRight = 0;
var PressUp = 0;
No keys were pressed initially. If we press a key, the value of a certain variable will change to 1. If we release it, it will become 0. We will implement this by adding handlers for pressing and releasing keys:
//

document.addEventListener("keydown", (event) =>{
	if (event.key == "a"){
		PressLeft = 1;
	}
	if (event.key == "w"){
		PressForward = 1;
	}
	if (event.key == "d"){
		PressRight = 1;
	}
	if (event.key == "s"){
		PressBack = 1;
	}
	if (event.keyCode == 32 && onGround){
		PressUp = 1;
	}
});

//

document.addEventListener("keyup", (event) =>{
	if (event.key == "a"){
		PressLeft = 0;
	}
	if (event.key == "w"){
		PressForward = 0;
	}
	if (event.key == "d"){
		PressRight = 0;
	}
	if (event.key == "s"){
		PressBack = 0;
	}
	if (event.keyCode == 32){
		PressUp = 0;
	}
});
Number 32 is a space code. As you can see, there is a variable onGround that indicates whether we are on the ground. For now, let's allow upward movement by adding the onGround variable after the press ... variables:
//    ?

var onGround = true;
So, we've added a push and pull algorithm. Now we need to add the movement itself. What, in fact, we are moving. Let's imagine that we have an object that we are moving. Let's call it “pawn”. As is customary for normal developers, we will create a separate “Player” class for it. Classes in javaScript are created, oddly enough, using functions:
function player(x,y,z,rx,ry) {
	this.x = x;
	this.y = y;
	this.z = z;
	this.rx = rx;
	this.ry = ry;
}
Let's paste this code into script.js at the very beginning of the file. At the end of the file, let's create an object of this type:
//

var pawn = new player(0,0,0,0,0);
Let's write down what these variables mean. x, y, z are the initial coordinates of the player, rx, ry are the angles of his rotation relative to the x and y axes in degrees. The last line written means that we create a “pawn” object of type “player” (I am writing a type specifically, not a class, since classes in javascript mean a few other things) with zero starting coordinates. When we move the object, the world coordinate should not change, but the "pawn" coordinate should change. This is in terms of variables. And from the user's point of view, the player is in one place, but the world is moving. Thus, you need to force the program to change the coordinates of the player, handle these changes and, in the end, move the world. In fact, this is easier than it sounds.
So, after loading the document into the browser, we will run a function that redraws the world. Let's write a redraw function:
function update(){

	//

	let dx = (PressRight - PressLeft);
	let dz = - (PressForward - PressBack);
	let dy = PressUp;

	//

	pawn.x = pawn.x + dx;
	pawn.y = pawn.y + dy;
	pawn.z = pawn.z + dz;

	//    ( )

	world.style.transform =
	"rotateX(" + (-pawn.rx) + "deg)" +
	"rotateY(" + (-pawn.ry) + "deg)" +
	"translate3d(" + (-pawn.x) + "px," + (-pawn.y) + "px," + (-pawn.z) + "px)";

};
In new browsers, world will match the element with id = "world", but it is safer to assign it before the update () function using the following construction:
var world = document.getElementById("world");We will change the position of the world every 10 ms (100 updates per second), for which we will start an infinite loop:
TimerGame = setInterval(update,10);Let's start the game. Hurray, now we can move! However, the world crawls out of the bounds of the container element. To prevent this from happening, let's set a css property for it in style.css. Add the line overflow: hidden; and see the changes. The world now remains within the container.
It is possible that you do not always understand where you need to write certain lines of code, so now I will present you the files that, I believe, you should get:
index.html:
<!DOCTYPE HTML>
<HTML>
<HEAD>
	<TITLE></TITLE>
	<LINK rel="stylesheet" href="style.css">
	<meta charset="utf-8">
</HEAD>
<BODY>
	<div id="container">
		<div id="world">
			<div id="square1"></div>
		</div>
	</div>
</BODY>
</HTML>
<script src="script.js"></script>
style.css:
#container{
	position:absolute;
	width:1200px;
	height:800px;
	border:2px solid #000000;
	perspective:600px;
	overflow:hidden;
}
#world{
	position:absolute;
	width:300px;
	height:300px;
	transform-style:preserve-3d;
}
#square1{
	position:absolute;
	width:200px;
	height:200px;
	background-color:#FF0000;
	transform:rotateY(30deg);
}
script.js:
//  Pawn

function player(x,y,z,rx,ry) {
	this.x = x;
	this.y = y;
	this.z = z;
	this.rx = rx;
	this.ry = ry;
}

//   ?

var PressBack = 0;
var PressForward = 0;
var PressLeft = 0;
var PressRight = 0;
var PressUp = 0;

//    ?

var onGround = true;

//

document.addEventListener("keydown", (event) =>{
	if (event.key == "a"){
		PressLeft = 1;
	}
	if (event.key == "w"){
		PressForward = 1;
	}
	if (event.key == "d"){
		PressRight = 1;
	}
	if (event.key == "s"){
		PressBack = 1;
	}
	if (event.keyCode == 32 && onGround){
		PressUp = 1;
	}
});

//

document.addEventListener("keyup", (event) =>{
	if (event.key == "a"){
		PressLeft = 0;
	}
	if (event.key == "w"){
		PressForward = 0;
	}
	if (event.key == "d"){
		PressRight = 0;
	}
	if (event.key == "s"){
		PressBack = 0;
	}
	if (event.keyCode == 32){
		PressUp = 0;
	}
});

//

var pawn = new player(0,0,0,0,0);

//     world

var world = document.getElementById("world");

function update(){

	//

	let dx = (PressRight - PressLeft);
	let dz = - (PressForward - PressBack);
	let dy = - PressUp;

	//

	pawn.x = pawn.x + dx;
	pawn.y = pawn.y + dy;
	pawn.z = pawn.z + dz;

	//    ( )

	world.style.transform =
	"rotateX(" + (-pawn.rx) + "deg)" +
	"rotateY(" + (-pawn.ry) + "deg)" +
	"translate3d(" + (-pawn.x) + "px," + (-pawn.y) + "px," + (-pawn.z) + "px)";

};

TimerGame = setInterval(update,10);
If you have something different, be sure to correct it!
We learned how to move the character, but we don't know how to rotate it yet! The rotation of the character, of course, will be done with the mouse. For the mouse, to the state variables of the press ... keys, we add the state variables of the mouse movement:
//       ?

var PressBack = 0;
var PressForward = 0;
var PressLeft = 0;
var PressRight = 0;
var PressUp = 0;
var MouseX = 0;
var MouseY = 0;
And after the push-release handlers, insert the motion handler:
//

document.addEventListener("mousemove", (event)=>{
	MouseX = event.movementX;
	MouseY = event.movementY;
});
Add a rotation to the update function:
	//

	let dx = (PressRight - PressLeft);
	let dz = - (PressForward - PressBack);
	let dy = - PressUp;
	let drx = MouseY;
	let dry = - MouseX;

	//

	pawn.x = pawn.x + dx;
	pawn.y = pawn.y + dy;
	pawn.z = pawn.z + dz;
	pawn.rx = pawn.rx + drx;
	pawn.ry = pawn.ry + dry;
Note that moving the mouse along the y-axis rotates the pawn along the x-axis and vice versa. If we look at the result, we will be horrified by what we saw. The point is that if there is no offset, then MouseX and MouseY remain the same, and not equal to zero. This means that after each iteration of update, misha's offsets should be reset to zero:
//

	let dx = (PressRight - PressLeft);
	let dz = - (PressForward - PressBack);
	let dy = - PressUp;
	let drx = MouseY;
	let dry = - MouseX;

//   :

	MouseX = MouseY = 0;

//

	pawn.x = pawn.x + dx;
	pawn.y = pawn.y + dy;
	pawn.z = pawn.z + dz;
	pawn.rx = pawn.rx + drx;
	pawn.ry = pawn.ry + dry;
Even better, we got rid of the inertia of rotation, but the rotation is still strange! To get a sense of what's going on, let's add the "pawn" div inside the "container":
	<div id="container">
		<div id="world">
			<div id="square1"></div>
		</div>
		<div id="pawn"></div>
	</div>
Let's style it in style.css:
#pawn{
	position:absolute;
	width:100px;
	height:100px;
	top:400px;
	left:600px;
	transform:translate(-50%,-50%);
	background-color:#0000FF;
}
Let's check the result. Now everything is smooth! The only thing is that the blue square remains in front, but for now let's leave that. To make the game in the first person, and not in the third, you need to bring the world closer to us by a perspective value. Let's do it in script.js in the update () function:
world.style.transform =
	"translateZ(600px)" +
	"rotateX(" + (-pawn.rx) + "deg)" +
	"rotateY(" + (-pawn.ry) + "deg)" +
	"translate3d(" + (-pawn.x) + "px," + (-pawn.y) + "px," + (-pawn.z) + "px)";
Now you can make the game from the first person. Hide the pawn by adding a line to style.css:
#pawn{
	display:none;
	position:absolute;
	top:400px;
	left:600px;
	width:100px;
	height:100px;
	transform:translate(-50%,-50%);
	background-color:#0000FF;
}
Excellent. I must say right away that it is extremely difficult to navigate in a world with one square, so we will create a site. Let's add the "square2" block to the "world":
	<div id="world">
			<div id="square1"></div>
			<div id="square2"></div>
		</div>
And in style.css add styles for it:
#square2{
	position:absolute;
	width:1000px;
	height:1000px;
	top:400px;
	left:600px;
	background-color:#00FF00;
	transform:translate(-50%,-50%) rotateX(90deg) translateZ(-100px);
}
Now everything is clear. Well, not quite. When we press the keys, we are moving strictly along the X and Z axes. And we want to make the movement in the direction of the view. Let's do the following: at the very beginning of the script.js file, add 2 variables:
//

var pi = 3.141592;
var deg = pi/180;
A degree is pi / 180 of a radian. We will have to apply sines and cosines, which are calculated from radians. What should be done? Take a look at the picture:
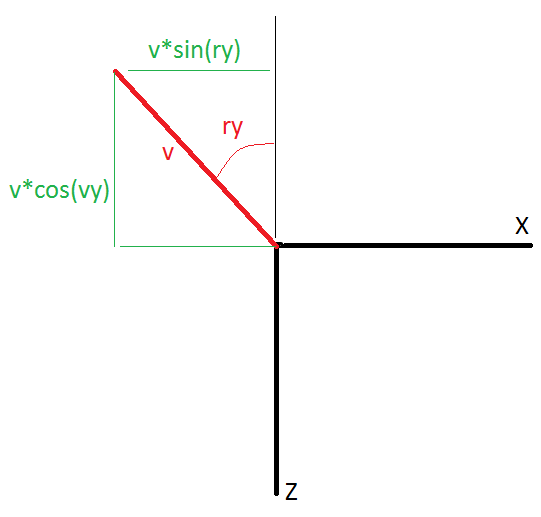
When our gaze is directed at an angle and we want to go forward, then both coordinates will change: X and Z. In the case of moving to the side, the trigonometric functions will simply change places, and the sign in front of the resulting sine will change. Let's change the offset equations in update ():
//

	let dx = (PressRight - PressLeft)*Math.cos(pawn.ry*deg) - (PressForward - PressBack)*Math.sin(pawn.ry*deg);
	let dz = - (PressForward - PressBack)*Math.cos(pawn.ry*deg) - (PressRight - PressLeft)*Math.sin(pawn.ry*deg);
	let dy = -PressUp;
	let drx = MouseY;
	let dry = - MouseX;
Review all files carefully! If something turns out to be wrong for you, then there will definitely be mistakes that will break your head!
index.html:
<!DOCTYPE HTML>
<HTML>
<HEAD>
	<TITLE></TITLE>
	<LINK rel="stylesheet" href="style.css">
	<meta charset="utf-8">
</HEAD>
<BODY>
	<div id="container">
		<div id="world">
			<div id="square1"></div>
			<div id="square2"></div>
		</div>
		<div id="pawn"></div>
	</div>
</BODY>
</HTML>
<script src="script.js"></script>
style.css:
#container{
	position:absolute;
	width:1200px;
	height:800px;
	border:2px solid #000000;
	perspective:600px;
	overflow:hidden;
}
#world{
	position:absolute;
	width:inherit;
	height:inherit;
	transform-style:preserve-3d;
}
#square1{
	position:absolute;
	width:200px;
	height:200px;
	top:400px;
	left:600px;
	background-color:#FF0000;
	transform:translate(-50%,-50%) rotateY(30deg);
}
#square2{
	position:absolute;
	width:1000px;
	height:1000px;
	top:400px;
	left:600px;
	background-color:#00FF00;
	transform:translate(-50%,-50%) rotateX(90deg) translateZ(-100px);
}
#pawn{
	display:none;
	position:absolute;
	top:400px;
	left:600px;
	transform:translate(-50%,-50%);
	width:100px;
	height:100px;
	background-color:#0000FF;
}
script.js:
//

var pi = 3.141592;
var deg = pi/180;

//  Pawn

function player(x,y,z,rx,ry) {
	this.x = x;
	this.y = y;
	this.z = z;
	this.rx = rx;
	this.ry = ry;
}

//       ?

var PressBack = 0;
var PressForward = 0;
var PressLeft = 0;
var PressRight = 0;
var PressUp = 0;
var MouseX = 0;
var MouseY = 0;

//    ?

var onGround = true;

//

document.addEventListener("keydown", (event) =>{
	if (event.key == "a"){
		PressLeft = 1;
	}
	if (event.key == "w"){
		PressForward = 1;
	}
	if (event.key == "d"){
		PressRight = 1;
	}
	if (event.key == "s"){
		PressBack = 1;
	}
	if (event.keyCode == 32 && onGround){
		PressUp = 1;
	}
});

//

document.addEventListener("keyup", (event) =>{
	if (event.key == "a"){
		PressLeft = 0;
	}
	if (event.key == "w"){
		PressForward = 0;
	}
	if (event.key == "d"){
		PressRight = 0;
	}
	if (event.key == "s"){
		PressBack = 0;
	}
	if (event.keyCode == 32){
		PressUp = 0;
	}
});

//

document.addEventListener("mousemove", (event)=>{
	MouseX = event.movementX;
	MouseY = event.movementY;
});


//     player

var pawn = new player(0,0,0,0,0);

//     world

var world = document.getElementById("world");

function update(){

	//

	let dx = (PressRight - PressLeft)*Math.cos(pawn.ry*deg) - (PressForward - PressBack)*Math.sin(pawn.ry*deg);
	let dz = - (PressForward - PressBack)*Math.cos(pawn.ry*deg) - (PressRight - PressLeft)*Math.sin(pawn.ry*deg);
	let dy = - PressUp;
	let drx = MouseY;
	let dry = - MouseX;

	//   :

	MouseX = MouseY = 0;

	//

	pawn.x = pawn.x + dx;
	pawn.y = pawn.y + dy;
	pawn.z = pawn.z + dz;
	pawn.rx = pawn.rx + drx;
	pawn.ry = pawn.ry + dry;


	//    ( )

	world.style.transform =
	"translateZ(600px)" +
	"rotateX(" + (-pawn.rx) + "deg)" +
	"rotateY(" + (-pawn.ry) + "deg)" +
	"translate3d(" + (-pawn.x) + "px," + (-pawn.y) + "px," + (-pawn.z) + "px)";

};

TimerGame = setInterval(update,10);
We almost figured out the movement. But there was an inconvenience: the mouse cursor can only move within the screen. In three-dimensional shooters, you can rotate the mouse as long and as far as you like. Let's also do: when we click on the game screen (on "container"), the cursor will disappear, and we will be able to rotate the mouse without restrictions on the screen size. We activate the capture of the mouse when clicking on the screen, for which we put a handler for clicking the mouse on “container” in front of the keystroke handlers:
//     container

var container = document.getElementById("container");

//

container.onclick = function(){
	container.requestPointerLock();
};
Now it's a completely different matter. However, it is generally best to make the rotation only occur when the cursor is captured. Let's introduce a new variable after the press ...
//    ?

var lock = false;
Add a handler for changing the state of the cursor capture (captured or not) before the cursor capture handler (sorry for the tautology):
//

document.addEventListener("pointerlockchange", (event)=>{
	lock = !lock;
});
And in update () add the “pawn” rotation condition:
//   ,

	if (lock){
		pawn.rx = pawn.rx + drx;
		pawn.ry = pawn.ry + dry;
	};
And the capture of the mouse itself when clicking on the container is allowed only when the cursor has not yet been captured:
//

container.onclick = function(){
	if (!lock) container.requestPointerLock();
};
We have completely dealt with the movement. Let's move on to generating the world
4. Loading the map
The world in our case is most conveniently represented as a set of rectangles with different locations, rotation, sizes and colors. Textures can also be used instead of color. In fact, all modern 3D worlds in games are a collection of triangles and rectangles called polygons. In cool games, their number can reach tens of thousands in just one frame. We will have about a hundred of them, since the browser itself has a low graphics performance. In the previous paragraphs, we inserted “div” blocks inside the “world”. But if there are many such blocks (hundreds), then inserting each of them into the container is very tedious. And there can be many levels. So let javaScript insert these rectangles, not us. We will create a special array for it.
Let's open index.html and remove all internal blocks from the "world" block:
<BODY>
	<div id="container">
		<div id="world"></div>
		<div id="pawn"></div>
	</div>
</BODY>
As you can see, there is nothing in "world" now. In style.css, remove the styles for # square1 and # square2 (remove # square1 and # square2 from this file altogether), and instead create styles for the .square class, which will be common to all rectangles. And we will set only one property for it:
.square{
	position:absolute;
}
Now let's create an array of rectangles (for example, we will push it between the player constructor and the press variables ... in script.js):
//

var map = [
		   [0,0,1000,0,180,0,2000,200,"#F0C0FF"],
		   [0,0,-1000,0,0,0,2000,200,"#F0C0FF"],
		   [1000,0,0,0,-90,0,2000,200,"#F0C0FF"],
		   [-1000,0,0,0,90,0,2000,200,"#F0C0FF"],
		   [0,100,0,90,0,0,2000,2000,"#666666"]
]
It was possible to do this in the form of a constructor, but for now we will manage with a purely array, since it is easier to start the cycle for arranging rectangles through arrays, and not through constructors. I’ll explain what the numbers in it mean. The map array contains one-dimensional arrays of 9 variables: [,,,,,,,,]. I think you understand that the first three numbers are the coordinates of the center of the rectangle, the second three numbers are the angles of rotation in degrees (relative to the same center), then two numbers are its dimensions and the last number is the background. Moreover, the background can be a solid color, a gradient or a photograph. The latter is very convenient to use as textures.
We have written the array, now we will write a function that will transform this array into the actual rectangles:
function CreateNewWorld(){
	for (let i = 0; i < map.length; i++){

		//

		let newElement = document.createElement("div");
		newElement.className = "square";
		newElement.id = "square" + i;
		newElement.style.width = map[i][6] + "px";
		newElement.style.height = map[i][7] + "px";
		newElement.style.background = map[i][8];
		newElement.style.transform = "translate3d(" +
                (600 - map[i][6]/2 + map[i][0]) + "px," +
		(400 - map[i][7]/2 + map[i][1]) + "px," +
		(map[i][2]) + "px)" +
		"rotateX(" + map[i][3] + "deg)" +
		"rotateY(" + map[i][4] + "deg)" +
		"rotateZ(" + map[i][5] + "deg)";

		//    world

		world.append(newElement);
	}
}
Let me explain what is happening: we are creating a new variable that points to the element we just created. We assign it an id and a css class (this is what we mean by the word class in javaScript), set the width with height, background and transformation. It is noteworthy that in the transformation, in addition to the coordinates of the center of the rectangle, we specify an offset of 600 and 400 and half the dimensions so that the center of the rectangle is exactly at the point with the desired coordinates. Let's start the world generator in front of the timer:
CreateNewWorld();
TimerGame = setInterval(update,10);
We now see an area with pink walls and a gray floor. As you can see, creating a map is not technically difficult to implement. As a result, your code in three files should look like this:
index.html:
<!DOCTYPE HTML>
<HTML>
<HEAD>
	<TITLE></TITLE>
	<LINK rel="stylesheet" href="style.css">
	<meta charset="utf-8">
</HEAD>
<BODY>
	<div id="container">
		<div id="world"></div>
		<div id="pawn"></div>
	</div>
</BODY>
</HTML>
<script src="script.js"></script>
style.css
#container{
	position:absolute;
	width:1200px;
	height:800px;
	border:2px solid #000000;
	perspective:600px;
	overflow:hidden;
}
#world{
	position:absolute;
	width:inherit;
	height:inherit;
	transform-style:preserve-3d;
}
.square{
	position:absolute;
}
#pawn{
	display:none;
	position:absolute;
	top:400px;
	left:600px;
	transform:translate(-50%,-50%);
	width:100px;
	height:100px;
}
script.js:
//

var pi = 3.141592;
var deg = pi/180;

//  player

function player(x,y,z,rx,ry) {
	this.x = x;
	this.y = y;
	this.z = z;
	this.rx = rx;
	this.ry = ry;
}

//

var map = [
		   [0,0,1000,0,180,0,2000,200,"#F0C0FF"],
		   [0,0,-1000,0,0,0,2000,200,"#F0C0FF"],
		   [1000,0,0,0,-90,0,2000,200,"#F0C0FF"],
		   [-1000,0,0,0,90,0,2000,200,"#F0C0FF"],
		   [0,100,0,90,0,0,2000,2000,"#666666"]
]

//       ?

var PressBack = 0;
var PressForward = 0;
var PressLeft = 0;
var PressRight = 0;
var PressUp = 0;
var MouseX = 0;
var MouseY = 0;

//    ?

var lock = false;

//    ?

var onGround = true;

//     container

var container = document.getElementById("container");

//

document.addEventListener("pointerlockchange", (event)=>{
	lock = !lock;
});

//

container.onclick = function(){
	if (!lock) container.requestPointerLock();
};

//

document.addEventListener("keydown", (event) =>{
	if (event.key == "a"){
		PressLeft = 1;
	}
	if (event.key == "w"){
		PressForward = 1;
	}
	if (event.key == "d"){
		PressRight = 1;
	}
	if (event.key == "s"){
		PressBack = 1;
	}
	if (event.keyCode == 32 && onGround){
		PressUp = 1;
	}
});

//

document.addEventListener("keyup", (event) =>{
	if (event.key == "a"){
		PressLeft = 0;
	}
	if (event.key == "w"){
		PressForward = 0;
	}
	if (event.key == "d"){
		PressRight = 0;
	}
	if (event.key == "s"){
		PressBack = 0;
	}
	if (event.keyCode == 32){
		PressUp = 0;
	}
});

//

document.addEventListener("mousemove", (event)=>{
	MouseX = event.movementX;
	MouseY = event.movementY;
});

//

var pawn = new player(0,0,0,0,0);

//     world

var world = document.getElementById("world");

function update(){

	//

	let dx =   (PressRight - PressLeft)*Math.cos(pawn.ry*deg) - (PressForward - PressBack)*Math.sin(pawn.ry*deg);
	let dz = - (PressForward - PressBack)*Math.cos(pawn.ry*deg) - (PressRight - PressLeft)*Math.sin(pawn.ry*deg);
	let dy = - PressUp;
	let drx = MouseY;
	let dry = - MouseX;

	//   :

	MouseX = MouseY = 0;

	//

	pawn.x = pawn.x + dx;
	pawn.y = pawn.y + dy;
	pawn.z = pawn.z + dz;

	//   ,

	if (lock){
		pawn.rx = pawn.rx + drx;
		pawn.ry = pawn.ry + dry;
	};

	//    ( )

	world.style.transform =
	"translateZ(" + (600 - 0) + "px)" +
	"rotateX(" + (-pawn.rx) + "deg)" +
	"rotateY(" + (-pawn.ry) + "deg)" +
	"translate3d(" + (-pawn.x) + "px," + (-pawn.y) + "px," + (-pawn.z) + "px)";

};

function CreateNewWorld(){
	for (let i = 0; i < map.length; i++){

		//

		let newElement = document.createElement("div");
		newElement.className = "square";
		newElement.id = "square" + i;
		newElement.style.width = map[i][6] + "px";
		newElement.style.height = map[i][7] + "px";
		newElement.style.background = map[i][8];
		newElement.style.transform = "translate3d(" +
		(600 - map[i][6]/2 + map[i][0]) + "px," +
		(400 - map[i][7]/2 + map[i][1]) + "px," +
		                    (map[i][2]) + "px)" +
		"rotateX(" + map[i][3] + "deg)" +
		"rotateY(" + map[i][4] + "deg)" +
		"rotateZ(" + map[i][5] + "deg)";

		//    world

		world.append(newElement);
	}
}

CreateNewWorld();
TimerGame = setInterval(update,10);
If all is well, move on to the next item.
5. Player collisions with world objects
We have created a motion technique, a generator of the world from an array. We can move around a world that can be beautiful. However, our player does not interact with him yet. For this interaction to occur, we need to check if the player collides with any rectangle or not? That is, we will check for collisions. First, let's insert an empty function:
function collision(){

}
And we will call it in update ():
//   :

	MouseX = MouseY = 0;

	//

	collision();
How does this happen? Let's imagine that the player is a ball with radius r. And it moves towards the rectangle:
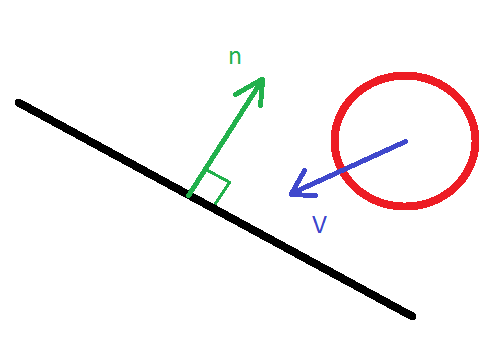
Obviously, if the distance from the ball to the plane of the rectangle is greater than r, then the collision definitely does not occur. To find out this distance, you can translate the player's coordinates to the rectangle's coordinate system. Let's write the function of transferring from the world system to the rectangle system:
function coorTransform(x0,y0,z0,rxc,ryc,rzc){
	let x1 =  x0;
	let y1 =  y0*Math.cos(rxc*deg) + z0*Math.sin(rxc*deg);
	let z1 = -y0*Math.sin(rxc*deg) + z0*Math.cos(rxc*deg);
	let x2 =  x1*Math.cos(ryc*deg) - z1*Math.sin(ryc*deg);
	let y2 =  y1;
	let z2 =  x1*Math.sin(ryc*deg) + z1*Math.cos(ryc*deg);
	let x3 =  x2*Math.cos(rzc*deg) + y2*Math.sin(rzc*deg);
 	let y3 = -x2*Math.sin(rzc*deg) + y2*Math.cos(rzc*deg);
	let z3 =  z2;
	return [x3,y3,z3];
}
And the inverse function:
function coorReTransform (x3,y3,z3,rxc,ryc,rzc){
	let x2 =  x3*Math.cos(rzc*deg) - y3*Math.sin(rzc*deg);
	let y2 =  x3*Math.sin(rzc*deg) + y3*Math.cos(rzc*deg);
	let z2 =  z3
	let x1 =  x2*Math.cos(ryc*deg) + z2*Math.sin(ryc*deg);
	let y1 =  y2;
	let z1 = -x2*Math.sin(ryc*deg) + z2*Math.cos(ryc*deg);
	let x0 =  x1;
	let y0 =  y1*Math.cos(rxc*deg) - z1*Math.sin(rxc*deg);
	let z0 =  y1*Math.sin(rxc*deg) + z1*Math.cos(rxc*deg);
	return [x0,y0,z0];
}
Let's insert these functions after the update () function. I won't explain how it works, because I don't feel like giving a course in analytic geometry. I will say that there are such formulas for the translation of coordinates during rotation and we just used them. From the point of view of the rectangle, our player is positioned like this:
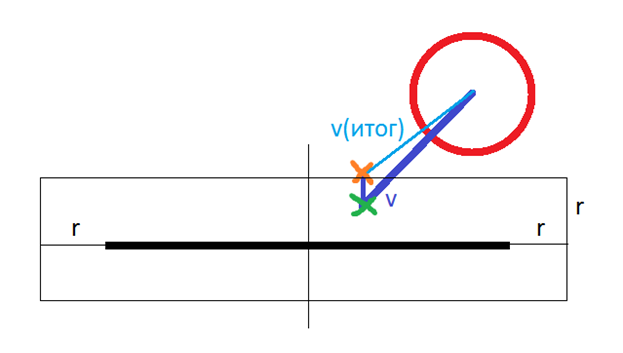
In this case, the collision condition becomes as follows: if, after displacing the ball by the value v (v is a vector), the z coordinate is between –r and r, and the x and y coordinates lie within the rectangle or are separated from it by an amount not greater than r, then a collision is declared. In this case, the z coordinate of the player after the offset will be r or - r (depending on which side the player comes from). Accordingly, the player's offset is changed. We intentionally call the collision before updating () the player coordinates to change the offset in time. Thus, the ball will never intersect with the rectangle, as happens in other collision algorithms. Although physically the player will be more like a cube, we will not pay attention to this. So, let's implement this in javaScript:
function collision(){
	for(let i = 0; i < map.length; i++){

		//

		let x0 = (pawn.x - map[i][0]);
		let y0 = (pawn.y - map[i][1]);
		let z0 = (pawn.z - map[i][2]);

		let x1 = x0 + dx;
		let y1 = y0 + dy;
		let z1 = z0 + dz;

		let point0 = coorTransform(x0,y0,z0,map[i][3],map[i][4],map[i][5]);
		let point1 = coorTransform(x1,y1,z1,map[i][3],map[i][4],map[i][5]);
		let point2 = new Array();

		//

		if (Math.abs(point1[0])<(map[i][6]+98)/2 && Math.abs(point1[1])<(map[i][7]+98)/2 && Math.abs(point1[2]) < 50){
			point1[2] = Math.sign(point0[2])*50;
			point2 = coorReTransform(point1[0],point1[1],point1[2],map[i][3],map[i][4],map[i][5]);
			dx = point2[0] - x0;
			dy = point2[1] - y0;
			dz = point2[2] - z0;
		}
	};
}
x0, y0 and z0 are the initial coordinates of the player in the rectangle coordinate system (no rotations.x1, y1 and z1 are the coordinates of the player after displacement without collision.point0, point0, point1 and point2 are the initial radius vector, radius vector after displacement without collisions and radius vector with collisions, respectively. map [i] [3] and others, if you remember, these are the angles of rotation of the rectangle. Note that in the condition we add not 100 to the size of the rectangle, but 98. This is a crutch, why, think Start the game and you should see some pretty high quality collisions.
As you can see, all these actions take place in the for loop for all rectangles. With a large number of them, such an operation becomes very expensive, since there are already 3 calls to the coordinate transformation functions, which also perform a lot of mathematical operations. Obviously, if the rectangles are very far from the player, then it makes no sense to count the collision. Let's add this condition:
if ((x0**2 + y0**2 + z0**2 + dx**2 + dy**2 + dz**2) < (map[i][1]**2 + map[i][2]**2)){

			let x1 = x0 + dx;
			let y1 = y0 + dy;
			let z1 = z0 + dz;

			let point0 = coorTransform(x0,y0,z0,map[i][3],map[i][4],map[i][5]);
			let point1 = coorTransform(x1,y1,z1,map[i][3],map[i][4],map[i][5]);
			let point2 = new Array();

			//

			if (Math.abs(point1[0])<(map[i][6]+98)/2 && Math.abs(point1[1])<(map[i][7]+98)/2 && Math.abs(point1[2]) < 50){
				point1[2] = Math.sign(point0[2])*50;
				point2 = coorReTransform(point1[0],point1[1],point1[2],map[i][3],map[i][4],map[i][5]);
				dx = point2[0] - x0;
				dy = point2[1] - y0;
				dz = point2[2] - z0;
			}

		}
So, we have dealt with collisions. We can easily climb on inclined surfaces, and the occurrence of bugs is possible only on slow systems, if, of course, possible. In fact, the whole main technical part ended there. We just have to add private things such as gravity, things, menus, sounds, beautiful graphics. But this is easy enough to do, and it has nothing to do with the engine that we just made. Therefore, I will talk about this in the next part . Now check what you got with my code:
index.html:
<!DOCTYPE HTML>
<HTML>
<HEAD>
	<TITLE></TITLE>
	<LINK rel="stylesheet" href="style.css">
	<meta charset="utf-8">
</HEAD>
<BODY>
	<div id="container">
		<div id="world"></div>
		<div id="pawn"></div>
	</div>
</BODY>
</HTML>
<script src="script.js"></script>
style.css
#container{
	position:absolute;
	width:1200px;
	height:800px;
	border:2px solid #000000;
	perspective:600px;
	overflow:hidden;
}
#world{
	position:absolute;
	width:inherit;
	height:inherit;
	transform-style:preserve-3d;
}
.square{
	position:absolute;
}
#pawn{
	display:none;
	position:absolute;
	top:400px;
	left:600px;
	transform:translate(-50%,-50%);
	width:100px;
	height:100px;
}
script.js:
//

var pi = 3.141592;
var deg = pi/180;

//  player

function player(x,y,z,rx,ry) {
	this.x = x;
	this.y = y;
	this.z = z;
	this.rx = rx;
	this.ry = ry;
}

//

var map = [
		   [0,0,1000,0,180,0,2000,200,"#F0C0FF"],
		   [0,0,-1000,0,0,0,2000,200,"#F0C0FF"],
		   [1000,0,0,0,-90,0,2000,200,"#F0C0FF"],
		   [-1000,0,0,0,90,0,2000,200,"#F0C0FF"],
		   [0,100,0,90,0,0,2000,2000,"#666666"]
];

//       ?

var PressBack = 0;
var PressForward = 0;
var PressLeft = 0;
var PressRight = 0;
var PressUp = 0;
var MouseX = 0;
var MouseY = 0;

//    ?

var lock = false;

//    ?

var onGround = true;

//     container

var container = document.getElementById("container");

//

document.addEventListener("pointerlockchange", (event)=>{
	lock = !lock;
});

//

container.onclick = function(){
	if (!lock) container.requestPointerLock();
};

//

document.addEventListener("keydown", (event) =>{
	if (event.key == "a"){
		PressLeft = 1;
	}
	if (event.key == "w"){
		PressForward = 1;
	}
	if (event.key == "d"){
		PressRight = 1;
	}
	if (event.key == "s"){
		PressBack = 1;
	}
	if (event.keyCode == 32 && onGround){
		PressUp = 1;
	}
});

//

document.addEventListener("keyup", (event) =>{
	if (event.key == "a"){
		PressLeft = 0;
	}
	if (event.key == "w"){
		PressForward = 0;
	}
	if (event.key == "d"){
		PressRight = 0;
	}
	if (event.key == "s"){
		PressBack = 0;
	}
	if (event.keyCode == 32){
		PressUp = 0;
	}
});

//

document.addEventListener("mousemove", (event)=>{
	MouseX = event.movementX;
	MouseY = event.movementY;
});

//

var pawn = new player(-900,0,-900,0,0);

//     world

var world = document.getElementById("world");

function update(){

	//

	dx =   (PressRight - PressLeft)*Math.cos(pawn.ry*deg) - (PressForward - PressBack)*Math.sin(pawn.ry*deg);
	dz = - (PressForward - PressBack)*Math.cos(pawn.ry*deg) - (PressRight - PressLeft)*Math.sin(pawn.ry*deg);
	dy = - PressUp;
	drx = MouseY;
	dry = - MouseX;

	//   :

	MouseX = MouseY = 0;

	//

	collision();

	//

	pawn.x = pawn.x + dx;
	pawn.y = pawn.y + dy;
	pawn.z = pawn.z + dz;
	console.log(pawn.x + ":" + pawn.y + ":" + pawn.z);

	//   ,

	if (lock){
		pawn.rx = pawn.rx + drx;
		pawn.ry = pawn.ry + dry;
	};

	//    ( )

	world.style.transform =
	"translateZ(" + (600 - 0) + "px)" +
	"rotateX(" + (-pawn.rx) + "deg)" +
	"rotateY(" + (-pawn.ry) + "deg)" +
	"translate3d(" + (-pawn.x) + "px," + (-pawn.y) + "px," + (-pawn.z) + "px)";

};

function CreateNewWorld(){
	for (let i = 0; i < map.length; i++){

		//

		let newElement = document.createElement("div");
		newElement.className = "square";
		newElement.id = "square" + i;
		newElement.style.width = map[i][6] + "px";
		newElement.style.height = map[i][7] + "px";
		newElement.style.background = map[i][8];
		newElement.style.transform = "translate3d(" +
		(600 - map[i][6]/2 + map[i][0]) + "px," +
		(400 - map[i][7]/2 + map[i][1]) + "px," +
		(map[i][2]) + "px)" +
		"rotateX(" + map[i][3] + "deg)" +
		"rotateY(" + map[i][4] + "deg)" +
		"rotateZ(" + map[i][5] + "deg)";

		//    world

		world.append(newElement);
	}
}

function collision(){
	for(let i = 0; i < map.length; i++){

		//

		let x0 = (pawn.x - map[i][0]);
		let y0 = (pawn.y - map[i][1]);
		let z0 = (pawn.z - map[i][2]);

		if ((x0**2 + y0**2 + z0**2 + dx**2 + dy**2 + dz**2) < (map[i][6]**2 + map[i][7]**2)){

			let x1 = x0 + dx;
			let y1 = y0 + dy;
			let z1 = z0 + dz;

			let point0 = coorTransform(x0,y0,z0,map[i][3],map[i][4],map[i][5]);
			let point1 = coorTransform(x1,y1,z1,map[i][3],map[i][4],map[i][5]);
			let point2 = new Array();

			//

			if (Math.abs(point1[0])<(map[i][6]+98)/2 && Math.abs(point1[1])<(map[i][7]+98)/2 && Math.abs(point1[2]) < 50){
				point1[2] = Math.sign(point0[2])*50;
				point2 = coorReTransform(point1[0],point1[1],point1[2],map[i][3],map[i][4],map[i][5]);
				dx = point2[0] - x0;
				dy = point2[1] - y0;
				dz = point2[2] - z0;
			}

		}
	};
}

function coorTransform(x0,y0,z0,rxc,ryc,rzc){
	let x1 =  x0;
	let y1 =  y0*Math.cos(rxc*deg) + z0*Math.sin(rxc*deg);
	let z1 = -y0*Math.sin(rxc*deg) + z0*Math.cos(rxc*deg);
	let x2 =  x1*Math.cos(ryc*deg) - z1*Math.sin(ryc*deg);
	let y2 =  y1;
	let z2 =  x1*Math.sin(ryc*deg) + z1*Math.cos(ryc*deg);
	let x3 =  x2*Math.cos(rzc*deg) + y2*Math.sin(rzc*deg);
 	let y3 = -x2*Math.sin(rzc*deg) + y2*Math.cos(rzc*deg);
	let z3 =  z2;
	return [x3,y3,z3];
}

function coorReTransform(x3,y3,z3,rxc,ryc,rzc){
	let x2 =  x3*Math.cos(rzc*deg) - y3*Math.sin(rzc*deg);
	let y2 =  x3*Math.sin(rzc*deg) + y3*Math.cos(rzc*deg);
	let z2 =  z3
	let x1 =  x2*Math.cos(ryc*deg) + z2*Math.sin(ryc*deg);
	let y1 =  y2;
	let z1 = -x2*Math.sin(ryc*deg) + z2*Math.cos(ryc*deg);
	let x0 =  x1;
	let y0 =  y1*Math.cos(rxc*deg) - z1*Math.sin(rxc*deg);
	let z0 =  y1*Math.sin(rxc*deg) + z1*Math.cos(rxc*deg);
	return [x0,y0,z0];
}

CreateNewWorld();
TimerGame = setInterval(update,10);