
Panorama is Palo Alto Networks' next generation centralized firewall monitoring and control (NGFW) system, which has been gaining more and more popularity lately. In particular, we at Angara Professional Assistance work with this product quite often. In 2019, analyst agency Gartner recognized them as leaders in its Magic Quadrant 8 times. With Panorama, we can aggregate and store logs from all firewalls, build reports, manage settings (using flexible access control), licenses, updates, and even monitor the state of the hardware.

But let's start in order.
Panorama is delivered as a PAK or virtual appliance. The virtual applets have the same functionality as the PAK. Virtual applets can be deployed on VMware ESXi, Google Cloud Platform, Amazon Web Services, Microsoft Azure. Licensing is the same on all platforms. Panorama supports cluster work.
Panorama can work in three modes (in fact, in four, but the latter is very outdated and not recommended for new installations):
- Panorama Mode is the default operating mode. In this mode, the device can both control other firewalls and collect logs from them.
- Log Collector Mode - in this mode, Panorama only collects logs from the corresponding firewalls.
- Management Only Mode - speaks for itself. Panorama only manages devices.
Accordingly, there are several popular architectural solutions for integrating Panorama into the network.

Let's take a look at the most popular architecture and Panorama Mode. This mode is used by default, so no additional steps are required to activate it.
After registering the device on the Support Portal, connect to Panorama via the MGT interface on IP 192.168.1.252, admin / admin. If we use virtual applets, then we need to set the initial settings via the command line:
# set deviceconfig system ip-address <Panorama-IP> netmask <netmask> default-gateway <gateway-IP> dns-setting servers primary <DNS-IP>
The initial interface is very similar to the one you see on a firewall.
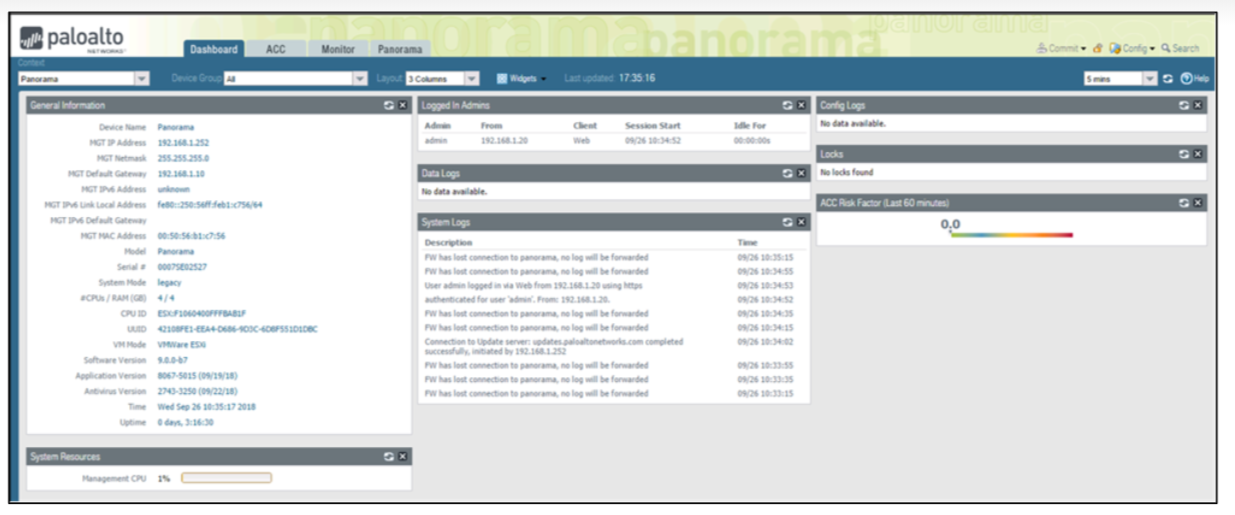
The full interface will be available after configuring the Template and Device Group sections, but more on that later.
Licensing
If we use a virtual device, then we need to generate a serial number for it on the Palo Alto Network Customer Support Portal, and then enter it in the section
Panorama > Setup > Management > General Settings. Then you need to upload the license in the section Panorama > Licenses > License Management.
Training
In the panorama, it is recommended to install the version of PAN-OS and Dynamic Updates not lower than those installed on the firewalls. This can be done in sections
Panorama > Softwareand Panorama > Dynamic Updates. In the same section, it is desirable to configure automatic signature updates. In general, Panorama versions are allowed to differ from the firewall upwards by 5-6 versions within the framework of the main release. For example, Panorama version 9.0.6 and firewall version 9.0.2.
The initial configuration of the device is not very different from what you will do on the firewall. In the section,
Panorama > Setup > Management Servicesregister the DNS and NTP servers (if we did not do it first through the CLI).
Settings are applied in the same way - through the Commit menu, which is divided here into three parts: Commit to Panorama, Push to Devices, Commit and Push.
- Commit to Panorama - Applies the configuration to the Panorama device only.
- Push to Devices - sending the applied (Running configuration) Panorama to firewalls. By the way, the list of firewall data and other settings can be selected in the window that appears after performing this action.
- Commit and Push - Applies a configuration to Panorama and then sends it to slave devices.
Adding Firewalls to Panorama
So, let's move on to the functionality for which this solution was created, namely, to add firewalls for subsequent management.
This happens in three steps:
- Configuring the Panorama server address on the firewall.
- Adding the serial number of the firewall to Panorama.
- Saving all settings via Commit.
On the firewall, go to the section
Device > Setup > Management. After that, in the Panorama Settings section, we indicate the IP address of the Panorama server.
On Panorama, go to the section
Panorama > Managed Devices > Summary.
Click on the Add button and add the serial number of the firewall.
We apply all the settings on the firewall and Panorama.
After that, in the same menu,
Panorama > Managed Devices > Summarywe will see that the status of the device has become "Connected", as well as information on the serial number, IP-address, model, version of signature bases and other information.
There are nuances when, for example, you need to add a firewall that has been used for a long time, transferring all existing policies and settings under Panorama control. Or when you need to migrate hundreds of firewalls and automate the process. We will not touch on every nuance at this stage, we can only say that the process is not at all difficult.
Templates
 Templates and Device Groups are two of the key settings that are the most difficult to understand at first for anyone using Panorama.
Templates are objects created on Panorama that store data related to the Network and Device sections of firewalls.
Templates are created in the section
Panorama > Templates. This section is initially empty. We need to click on the Add button and add the first Template. Immediately after that, two new sections (Network and Device) will appear in the Panorama web interface.
There can be several templates, therefore, when making changes to the Network and Device sections on Panorama, you must select the appropriate Template.

Template selection menu
Template Stacks is a set that can be formed from eight Templates. Hierarchically, it looks like 8 layers. The settings on the upper layer are propagated to the lower one and have higher priority. They are created in the same section as the regular Templates.

Templates Variables
Let's say we have many firewalls that are managed by Panorama and have internal IP addresses from 10.0.1.1/24 to 10.0.100.1/24. In order not to create 100 different Templates for each of them, you can use the variable values functionality.
Let's see how to do this using the example of the situation above.
Let's
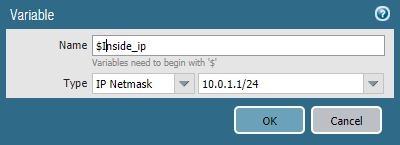
Panorama > Templatesgo to the menu and create a Template that will be responsible for the IP addresses on the firewall interfaces. Let's call it “Firewall interfaces”. Let's Network > Interfacesgo to the menu and, after making sure that the Template we created is selected from above, we will go to the settings of the interface we need, for example, ethernet1 / 1. Going to the IPv4 section, click the Add button to add an IP address value, then click on New XVariable. A new variable can be created here. Let's give it a name and meaning.
Let's
Panorama > Managed Devices > Summarygo to the menu where all our firewalls connected to Panorama are displayed. Select the firewall, which, according to the idea, should have the address 10.0.2.1/24, and click on the Create button in the Variables column, after which the Create Device Variable Definition window will open.

Choose No and click OK. The Template Variables for Device $ name window opens.
Next, select the $ Inside_IP variable we created and click the Override button. Enter the required IP address 10.0.2.1/24.
Let's repeat these steps for all the firewalls we need, after which we will apply the configuration
Commit > Commit and Push.
These actions allowed us, using Panorama, to enter different values for several firewalls within one Template. We can also take a less convenient path by using the Override functionality directly on the firewalls. If the administrator has allowed overwriting the values that come from Panorama, then using this functionality locally on the firewall, you can overwrite the value sent from Panorama (in this case, the IP address).
In the end, we may not define the IP addresses of the interfaces on Panorama at all, but do it locally on each ITU.
Variables (Templates Variables) can be exported to a file, edited and then imported. This can be done in the section
Panorama > Templates. To do this, select the Template we need and, without opening it, click onX Variable CSV > Export... Having opened this file, you need to change the value for each firewall we use, and then import this file in the same way. This method is definitely faster and saves time if we manage a large number of firewalls.
Device Groups
Now let's talk about a similar concept - Device Groups.
Device Groups are objects created on Panorama that store data related to the Policies and Objects sections of the firewalls.
Device Groups are created in the section
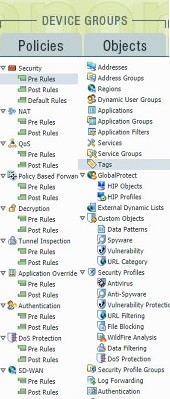
Panorama > Device Groups. This section is initially empty. We need to click on the Add button and add the first group. Right after that, two new sections (Policies and Objects) will appear in the Panorama web interface.
Like Templates, Device Groups are assigned to specific firewalls. A firewall can also belong to a group hierarchy. The principle is slightly different from Templates.
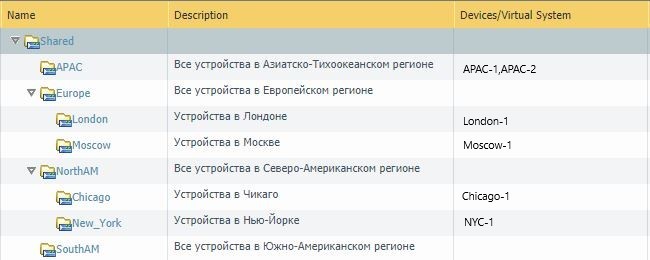
Group hierarchy example
It is worth noting that after we create the first group, we will have a common group called Shared, the settings of which will apply to all other groups.
What happens if you assign a Device Group to a device, but do not assign a Template?
We may face difficulties, for example, when creating a new Security Policy: in the section for selecting zones, we will not have anything available except Any. This is due to the fact that there is not a single Template assigned to the device, in which these zones would be designated. One way to solve this problem is with Reference Templates. When you create a Device Group and add a device to it, you also have the option to provide a link to the template.
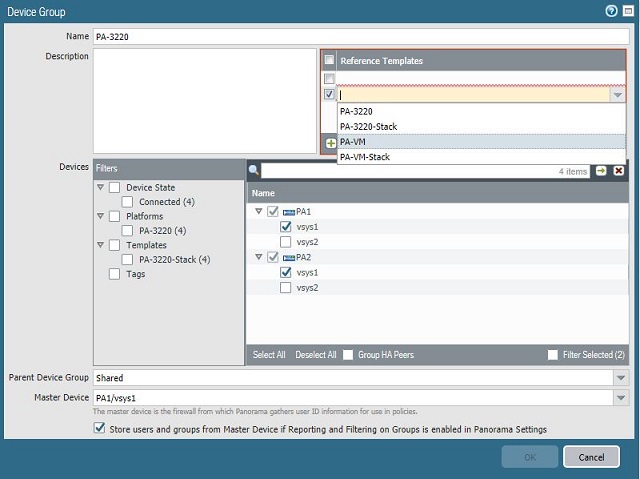
Reference Templates
We can create a Template in which the zones will be designated, and then simply link to it from the menu for creating or editing Device Group.
Policies
As we already know, Device Groups also manages the policies that are sent to the firewall from Panorama. Unlike the usual editor of policies, here we have new sections: Pre Rules, Post Rules, Default Rules.
From a hierarchical point of view, it all works as follows (do not forget that, in addition to the usual Device Groups, we also have a shared Shared group):

At first glance, this may seem a little scary, but, in fact, everything is much simpler. The hierarchy of policies will be clear after the first few rules created. In addition, you can always see how the resulting rules will look on the end device. To do this, you can use the Preview Rules button in the policy editing section.
When you create a rule, it is also possible to select a Target to assign the policy to a specific device. In practice, the author of the article considers this functionality to be not the most convenient, because it can lead to confusion with policies on different devices when they are generally displayed in one window. However, it all depends on the person. Perhaps it will seem convenient to some.
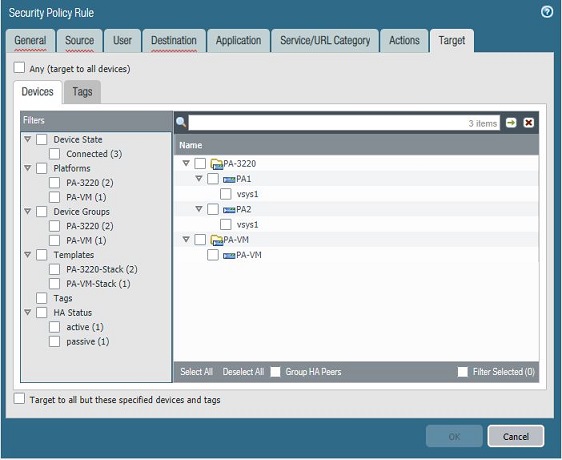
Selecting devices to be covered by the policy
There is also a very interesting functionality for those who love order. In the Panorama settings, you can set the required fields that must be filled in when creating rules, otherwise “Commit fail” will occur. This is convenient and, for example, teaches administrators to always add descriptions to the rules they create or add tags. By the description, we can understand what the idea was for this or that rule; by tags, we can group the rules, filtering out unnecessary ones.
Globally, this is configured in the menu
Panorama > Setup > Management > Policy Rulebase Settings.
At the Templates level, this is configured in the menu
Devices > Setup > Management > Policy Rulebase Settings.
Logging
Now let's go through the logs.
Panorama receives information about logs from two sources: local and remote.
Local source - logs that were sent by the firewall itself to Panorama. Logs that Panorama requested and received from Log Collectors and the Cortex Data lake (we will not touch on them in this article).
Remote source - logs that are requested from the firewall.
There are also two types of logs: Summary Database and Detailed Logs.
- Summary Database - the firewall aggregates logs every 15 minutes, assembles them (some fields and information are removed from the logs) and sends them to Panorama, even if no log forwarding rules are configured. These logs contain information on application statistics, threats, traffic, tunnel inspection and URL filtering.
- Detailed Logs - these logs contain complete information and all fields. Panorama requests these logs from the firewall itself. Also, for their presence on the firewalls, settings for forwarding logs must be configured.
The interface for viewing logs itself is almost identical to what you see on firewalls. There is ACC, and the usual Dashboard, and the Monitor section. And even the sections for generating reports are the same.
Search for problems
Now let's look at debugging issues at the top level.
It is worth checking the Device Summary section often. There you can find information about the status of devices connected to Panorama. For example, we can see the following situation:

In this case, we see that the firewall configuration is out of sync with Panorama due to a "commit failed" error. Information on the causes of this error can be viewed by clicking on the red commit failed link.
On the menu
Panorama > Managed Devices > Healthyou can get information about the state of devices: throughput, the number of new sessions per second, the total number of sessions, processor load on the Data Plane and Management Plane, memory usage, the number of logs per second, the state of fans and power supplies. Also, all this information can be viewed in the form of graphs.
Since we mentioned resources and debugging, within the framework of this article we will mention a wonderful plugin for the Chrome browser called Pan (w) achrome... It turns on after entering the credentials in the web interface of the firewall. In the plug-in, you can view general information about the state of the device and get not only more detailed information on resource loading than we will see on Panorama, but even view statistics on certain counters (the full list did not fit into the screenshot):
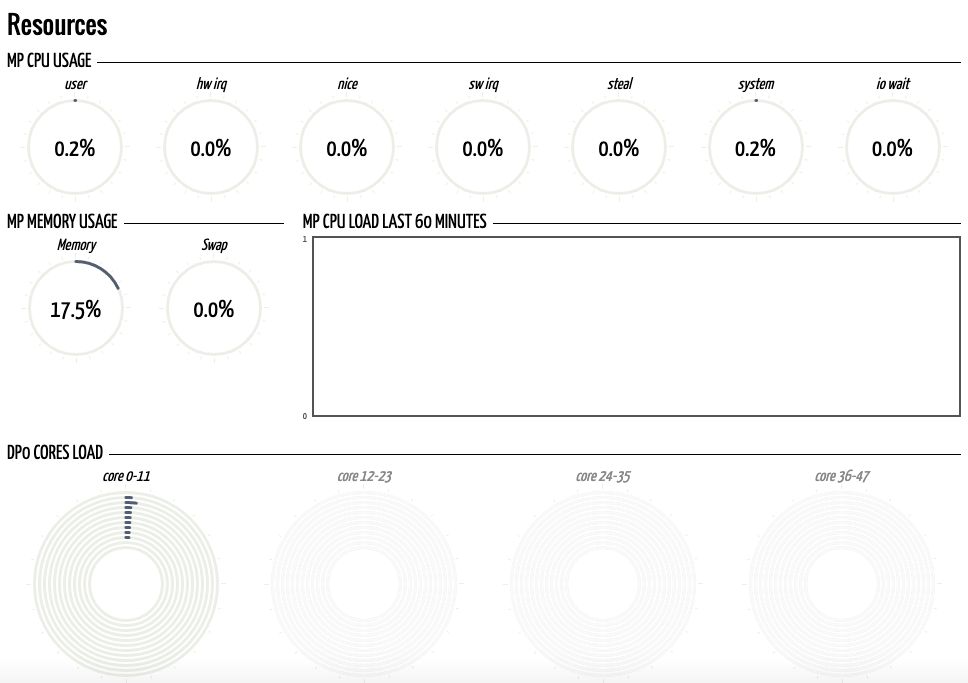

Of course, this information in a much more detailed form and with a description of the counters can be found through the CLI of the device, however, this is a separate topic for another article on debugging. This plugin will allow you to visually assess in a graphical format what is happening with a particular device. And for 70% of emerging problems, this may be quite enough.
Well, let's get back to the "earthly" problems. And one of the most common problems associated with Panorama connectivity to firewalls. To do this, we need to check the availability of the following ports:
- 3978 - Panorama communication with firewalls and Log Collectors;
- 28443 - software update from Panorama to slave devices;
- 28 - communication between Panorama HA nodes (encrypted);
- 28260, 28769 - communication between Panorama HA nodes (unencrypted).
Also, do not forget that errors can be viewed on the firewall in the Monitor section
> Logs > System, filtering them through a filter ("description contains Panorama").
Replacing devices
Finally, let's touch on a not very common situation, such as replacing firewalls connected to Panorama. Let's omit the nuances of transferring licenses from an old device to a new one (you can read about this in the official manuals on the request “how to transfer licenses to a spare device”) and go straight to the setup sequence:
- We make the basic configuration of the new firewall. We need to make sure that we have configured access via the mgmt interface and that the PAN-OS versions match. It is also worth checking the signature versions in the dynamic updates section.
- We export the "device state" of the old device via Panorama. We go to the command line and execute one of the following commands (depending on the supported protocol on the server, where we will export the configuration):
> scp export device-state device <old-serial#> to <login>@<serverIP>:<path>
or:
> tftp export device-state device <old-serial#> to <login>@<serverIP>:<path>
, :
> replace device old <old-serial#> new <new-serial#> - «device state» .
Device > Setup > Operations > Import device state. - Commit.
Of course, we only went through the very top of the Panorama settings and did not touch on many nuances. However, understanding the top will allow you to connect firewalls to Panorama, understand its basic functions, and start more granular customization yourself.
If this topic turned out to be interesting for you, in the following articles we will try to cover in more detail the debugging (troubleshooting) issues that are usually given to technical support or ASC (Authorized Support Center) for solution and which are absent in the official manufacturer's manuals available to ordinary customers.
We can touch on such topics as:
- CLI. Nuances and life hacks.
- Using the Tech Support File for troubleshooting.
- Flow Logic.
- Capture packets.
- Packet Diagnostic.
- Incoming traffic troubleshooting. VPN, Ike, IPsec.
- Troubleshooting transit traffic.
- System services (DAEMONS).
- Troubleshooting certificates and SSL inspections.
- Troubleshooting User-ID.
- GlobalProtect Trouble Shooting.
Leave comments if you are interested in this topic.