
So let's get started. Our chat bot will be similarly built on the basis of the Microsoft Power Virtual Agents service, which is part of the Power Platform service line, but first we need to ensure the future authorization of our bot through Azure Active Directory. Go to portal.azure.com and open the Azure Active Directory service. To configure future bot authorization through Azure Active Directory, you will need to create a new AAD application.

Go to the "App registrations" section and click "New registration". We indicate the name of the application. Let it be Azure AD Application, enable the Accounts in any organizational directory option and specify the address from the official Microsoft documentation in the Redirect URI:
then click "Register".https://token.botframework.com/.auth/web/redirect

The application is ready. Now go to the section "Certificates and Secrets" in order to generate a secret for authentication. Click "Create a new secret", specify its name and expiration date. The secret is ready. We save it so as not to forget.

Now is the time to move on to creating a new Power Virtual Agents bot. Go to powerva.microsoft.com and create a new bot. We indicate its name, language and environment in which it will be created. Click "Create".

In a few seconds, the bot will be created. Next, let's make the necessary settings for the future authorization of the user in the bot and the bot itself in Microsoft Teams. Go to the section Management - Security. We open the item Authentication. We select the "Manual" type. The service provider remains Azure Active Directory, as the client ID we specify the identifier of the created AAD application - Application ID. We also take the client's secret from the settings of our application. Click "Save".

Now go to the chatbot publishing section.
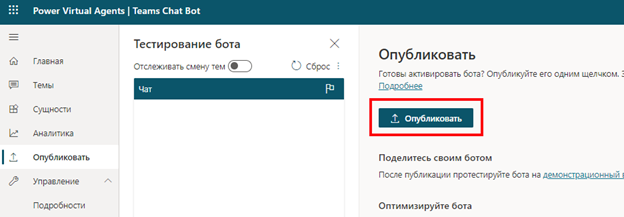
Click "Publish", wait for the end of the publication, and then proceed to setting up channels. Choosing Microsoft Teams. Enable support for the Microsoft Teams channel and click Submit Administrator Approval. Here we need to take the bot ID.
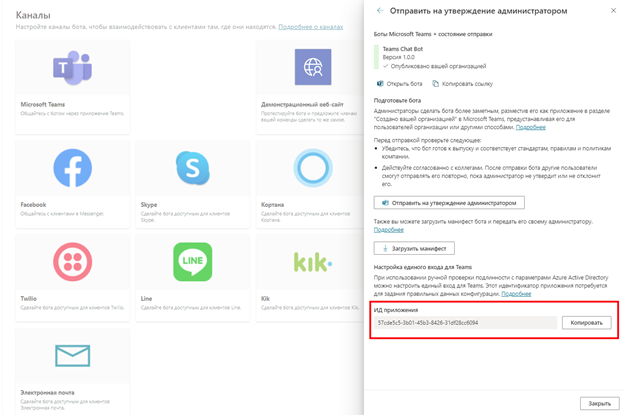
Copy the bot ID and return to the Azure Active Directory app. Open the "Expose an API" section and, first of all, set the "Application ID URI" equal to the value of
api: // botid- {teamsbotid}, where {teamsbotid} is the identifier of our bot.

Click "Save". Now we create a new scope through which the bot will refer to resources. Fill in the fields with data and click save.

Scope is created. Next, we bind the Teams app to the Azure Active Directory app. Teams uses two identifiers, the desktop client ID and the mobile client ID. These identifiers are fixed. We specify both in the binding.
1fec8e78-bce4-4aaf-ab1b-5451cc387264 (Teams mobile/desktop)

5e3ce6c0-2b1f-4285-8d4b-75ee78787346 (Teams on the web)

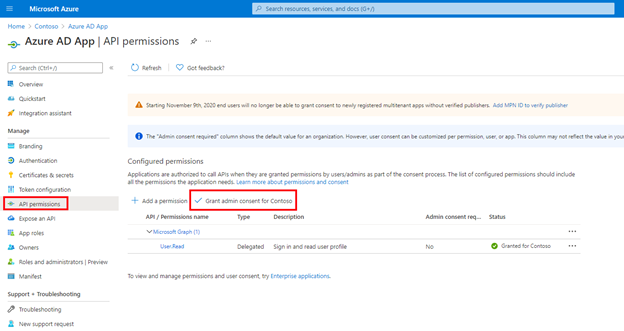
Along the way, let's go to the "API permissions" section and grant the requested rights on behalf of the organization's administrator.
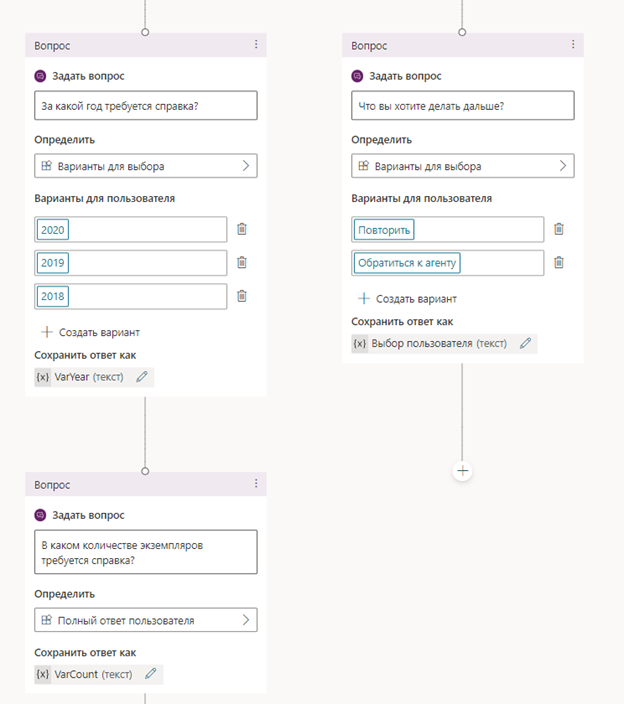
We return to our chatbot. Let's create a bot dialogue. Let's go to the Themes section, create a theme. Let's specify the name of the topic and the trigger phrase.

Let's set up a simple dialogue. First of all, let's call the user authorization.
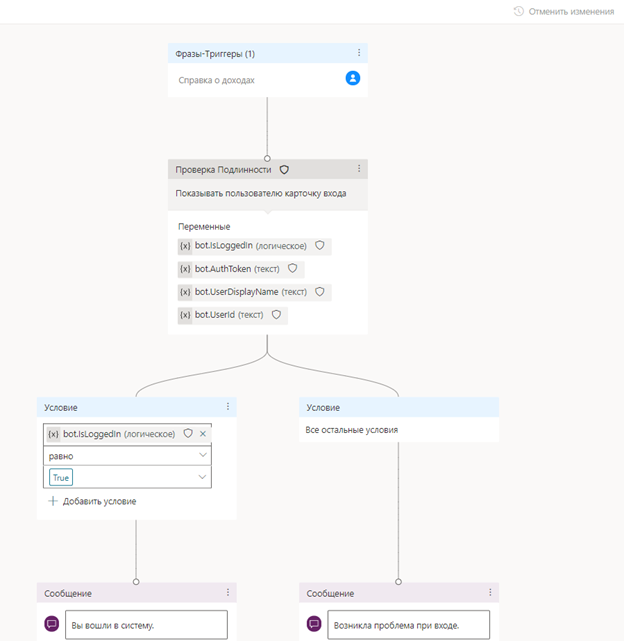
If the authorization is successful, then we will ask a couple of questions. For example, let's ask for what year the certificate is required and in how many copies it is needed.
After that, we will create a Power Automate flow and pass the parameters from the bot dialog into it. Having received the parameters, use the SharePoint cube to create an item in the list, passing the parameters from the dialog to it.

Let's go back to the bot and link our dialog to the stream we just created.

Now let's move on to publishing the bot. Click Publish, navigate to the Microsoft Teams channel and click Submit Bot for Administrator Approval.

Next, in the file manifest settings, we write the Azure Active Directory application identifier and the resource URI from the "Expose an API" scope of the Azure AD application.
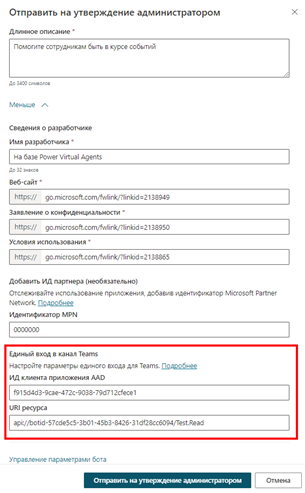
Click "Submit for Administrator Approval". After processing the request, go to the Microsoft Teams admin center and check the status of the application. We expose him to the status published and allowed.

We check our bot. Open Teams, go to the organization's app store, and install the bot.

We write the trigger phrase and answer all the questions. The application is registered, our chat bot with output to Microsoft Teams using Azure Active Directory is ready.

In conclusion, I would like to note that within the ecosystem of Microsoft 365 and Microsoft Azure, you can create various solutions with support for many functions, such as creating a chat bot and then displaying it in Microsoft Teams. In the following articles, we will analyze even more similar solutions based on Microsoft services. Have a nice day everyone and thank you for your attention!