Data center engineers are often faced with the task of initial server configuration. Moreover, most often it is necessary to configure not one or two pieces of equipment, but several tens or even hundreds. Every time new equipment comes to us, we must not only thoroughly check it before putting it into operation, but also adjust it accordingly to work with our internal systems.
Before proceeding with the rather trivial procedure for setting up the BIOS and IPMI, we must make sure that each server component has the required firmware version. In most cases, with rare exceptions, an up-to-date version is required, available on the website of the manufacturer of specific components. Today we will tell you how we came up with the idea of using the now popular "raspberry" to speed up the process.
What is the difficulty
It would seem that the task is very simple. Well, let's take some live Linux distribution, roll it out onto a USB flash drive and boot from it and perform the required procedures. But it was not there.
The problem is that each vendor has their own methods and utilities for updating the firmware. Moreover, not all of them are capable of working correctly under Linux. Some components, for example, BIOS for SuperMicro servers, it is desirable to sew from under MS-DOS. For some components, for example, Mellanox network cards, in some cases you need to use Windows, and some support firmware directly from Linux.
Thus, we will need to either collect a multiboot image and write it to several dozen flash drives, then boot from them for a long time and persistently, or come up with something more interesting and fast. And this is where the use of server network cards with support for PXE (Preboot eXecution Environment, pronounced pixie) comes to mind.
We take a "raspberry", deploy a DHCP and TFTP server there, prepare the required images for loading. To massively load several dozen servers, we simply temporarily use an unmanaged 48-port gigabit switch and voila. By default, most servers allow PXE booting without additional configuration, so this is ideal.
I took an excellent article as a basis. from Romanenko_Eugene, but with corrections for the features of the Raspberry Pi and the tasks being solved. Let's get started!
Raspberry jam
The first time I did this, the most advanced version of the Raspberry Pi was the third with a 100 Mbps network card. This is frankly not enough for the mass distribution of heavy images, so I strongly recommend using the currently available Raspberry Pi 4 with a 1 Gbps port. Another recommendation is to use a fast and capacious memory card whenever possible.
Now about the initial setup. A graphical interface for such a thing is absolutely not required, so you can download the simplest Lite version of the Raspberry Pi OS operating system. We unpack the image and upload the image to the MicroSD card in any convenient way, for example, using dd:
sudo dd if=<_> of=/dev/mmcblk0 bs=1M
During the configuration process, you can either configure in the traditional way by connecting a keyboard and monitor, or via SSH. To make the SSH service work at startup, create an empty file named ssh in the / boot section .
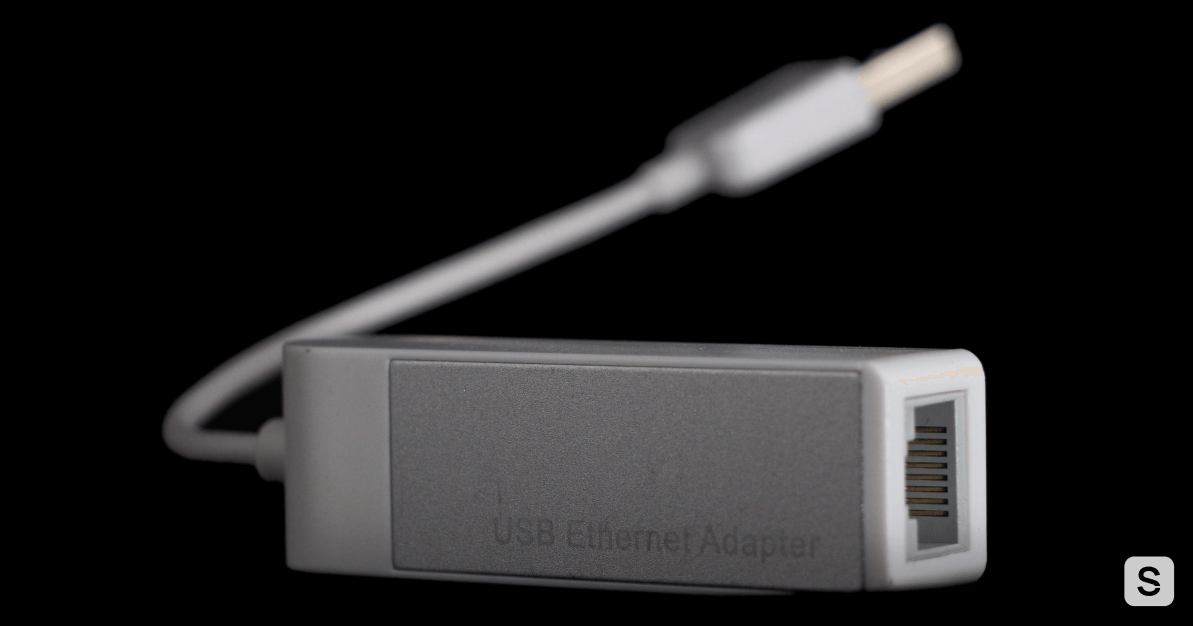
Since the network port will be used for DHCP operation, you can either use a Wi-Fi connection to access the Internet, or connect another network card to the Malinka via USB. Here's one, for example:
Now we launch the Raspberry Pi, connect it to the Internet and update the repositories and software packages:
sudo apt update
sudo apt upgrade
Since I'm using another network card, the built-in one must be set to a static IP address. Open the config:
sudo nano /etc/dhcpcd.conf
Add the following lines:
interface eth0 static ip_address=192.168.50.1/24
Here eth0 is the Raspberry Pi's onboard network card. It is with the help of it that the distribution of IP addresses and network loading will be carried out. Now install the tftp server:
sudo apt install tftpd-hpa
After installation, open the configuration file:
sudo nano /etc/default/tftpd-hpa
We bring the line to the following form:
TFTP_OPTIONS="--secure -l -v -r blksize"
In general, one could leave everything as it is, but testing each time on a separate machine is sometimes not very convenient. The -l -v -r blksize options let you test all this in a VirtualBox VM without any problems, fixing some compatibility issue. Now we install a DHCP server for distributing IP addresses:
sudo apt install isc-dhcp-server
Open the first configuration file isc-dhcp-server:
sudo nano /etc/default/isc-dhcp-server
We explicitly indicate the interface on which the DHCP server is supposed to work:
INTERFACESv4="eth0"
Now open the second config dhcpd.conf :
sudo nano /etc/dhcp/dhcpd.conf
We set the necessary server parameters, the subnet to be distributed, and also pass the name of the bootloader file:
default-lease-time 600; max-lease-time 7200; ddns-update-style none; authoritative; subnet 192.168.50.0 netmask 255.255.255.0 { range 192.168.50.2 192.168.50.250; option broadcast-address 192.168.50.255; option routers 192.168.50.1; filename "pxelinux.0"; }
We save the file and now we have to actually download the bootloader, the necessary modules and form the PXE menu. Let's start by downloading a set of Syslinux loaders, in my case version 5.01 is the most convenient:
wget https://mirrors.edge.kernel.org/pub/linux/utils/boot/syslinux/syslinux-5.01.zip
Unpacking:
unzip syslinux-5.01.zip
Now we need to find and extract the memdisk module , which can load entire ISO images into RAM, the pxelinux.0 loader and the rest of the comboot modules . We sequentially execute the commands that will find and copy everything found in the / srv / tftp directory:
find ./ -name "memdisk" -type f|xargs -I {} sudo cp '{}' /srv/tftp/
find ./ -name "pxelinux.0"|xargs -I {} sudo cp '{}' /srv/tftp/
find ./ -name "*.c32"|xargs -I {} sudo cp '{}' /srv/tftp/
After this operation, we need to create a configuration file directly for the menu displayed on the PXE screen. Go to our directory:
cd /srv/tftp
Create a directory named pxelinux.cfg and navigate to it:
sudo mkdir pxelinux.cfg
cd pxelinux.cfg
We create a configuration file:
sudo nano default
As an example, let's take the excellent live GRML distribution and download it via PXE. Below is a finished configuration example:
UI vesamenu.c32 PROMPT 0 MENU TITLE Raspberry Pi PXE Server MENU BACKGROUND bg.png LABEL bootlocal menu label Boot from HDD kernel chain.c32 append hd0 0 timeout 0 TEXT HELP Boot from first HDD in your system ENDTEXT LABEL grml menu label GRML Linux KERNEL grml/boot/grml32full/vmlinuz APPEND root=/dev/nfs rw nfsroot=192.168.50.1:/srv/tftp/grml/ live-media-path=/live/grml32-full boot=live lang=us nomce apm=power-off noprompt noeject initrd=grml/boot/grml32full/initrd.img vga=791 LABEL reboot menu label Reboot kernel reboot.c32 TEXT HELP Reboot server ENDTEXT
It is probably worth stopping a little here and figuring out what each line does:
- UI vesamenu.c32 - use the vesamenu.c32 module to display the menu;
- PROMPT 0 - highlight the zero menu item;
- MENU TITLE Raspberry Pi PXE Server - set the general name of the menu;
- MENU BACKGROUND bg.png - design element, use bg.png as a background image.
The background image can be made in advance. By default, a 640x480 picture with a color depth of no more than 24 bits, in PNG or JPG format, is suitable. It must be copied to / srv / tftp in advance . Now let's take a look at each section. The first section has been introduced for convenience. If you need to boot from the first hard drive, then we register:
- LABEL bootlocal - internal section name;
- menu label Boot from HDD - how the user menu will be displayed;
- kernel chain.c32 - we use the chain.c32 module, which can boot from various media;
- append hd0 0 - explicitly indicate that loading should be from the first partition of the first hard disk;
- timeout 0 - here you can either set a timeout in seconds, after which the download will automatically start, or by specifying 0 to remove the timer.
- TEXT HELP - indicate the beginning of the help text for the user;
- Boot from first HDD in your system - hint text;
- ENDTEXT - indicate the end of the hint text.
In approximately the same way, we form the section for reloading. The only difference will be the call to the reboot.c32 module, which actually sends the car to reboot. Well, before examining what the third section, which loads the GRML distribution, does, let's talk about what will actually be loaded and how.
Everything is a file
The ISO image itself is available on the website of this live distribution. Download it and rename it for convenience, in the example we will take the 32-bit version:
wget https://download.grml.org/grml32-full_2020.06.iso
mv grml32-full_2020.06.iso grml.iso
Now we need to somehow force this image to boot. On the one hand, you can use the memdisk module and force it to first load all the "raw" contents of the image directly into RAM and then transfer control over the boot. But this method is only good for very small images, for example, it is convenient to boot MS-DOS this way. Large images take a long time to load into memory and do not always work adequately.
Therefore, you should still "gut" the image and transfer only the kernel and livefs to boot. But further files from the disk can be provided to the system upon request using the NFS server. This approach works much faster and more adequately, but requires additional gestures, such as installing an NFS server.
It is done in an elementary way:
sudo apt install nfs-kernel-server
In order not to make a mess of files, create a separate directory for grml:
sudo mkdir /srv/tftp/grml
We'll need to mount the ISO, so we'll take care of the temporary mount point:
sudo mkdir /tmp/iso
We mount the image. The system will warn you that the image is mounted in Read-Only mode:
sudo mount -o loop grml.iso /tmp/iso
Recursively copy the contents of the image to our separate directory:
sudo cp -R /tmp/iso/* /srv/tftp/grml
To avoid problems with access rights, we change the owner and recursively assign this directory rights from the series "Free home, live whoever you want":
sudo chown -R nobody:nogroup /srv/tftp/grml/
sudo chmod -R 755 /srv/tftp/grml/
Now it's easy to tell the NFS server that it should provide the / srv / tftp / grml directory to any IP address from our subnet:
sudo nano /etc/exports
We register the line:
/srv/tftp/grml 192.168.50.0/24(rw,sync,no_subtree_check)
Update the list and restart the NFS server:
sudo exportfs -a
sudo systemctl restart nfs-kernel-server
Now we finally have the opportunity to correctly divide the download process into two conditional stages. The first step is loading the kernel and the live-filesystem. The second stage is pulling all other files over NFS. It's time to take a look at the remaining section:
- LABEL grml - section name;
- menu label GRML Linux - display in the menu;
- KERNEL grml / boot / grml32full / vmlinuz - specify the path to the kernel, relative to the root / srv / tftp ;
- APPEND root = / dev / nfs rw nfsroot = 192.168.50.1: / srv / tftp / grml / live-media-path = / live / grml32-full boot = live lang = us nomce apm = power-off noprompt noeject initrd = grml /boot/grml32full/initrd.img vga = 791 - here we say that we are using NFS, write the paths to the conditional root, set some additional parameters recommended in the documentation and indicate the relative path to initrd.
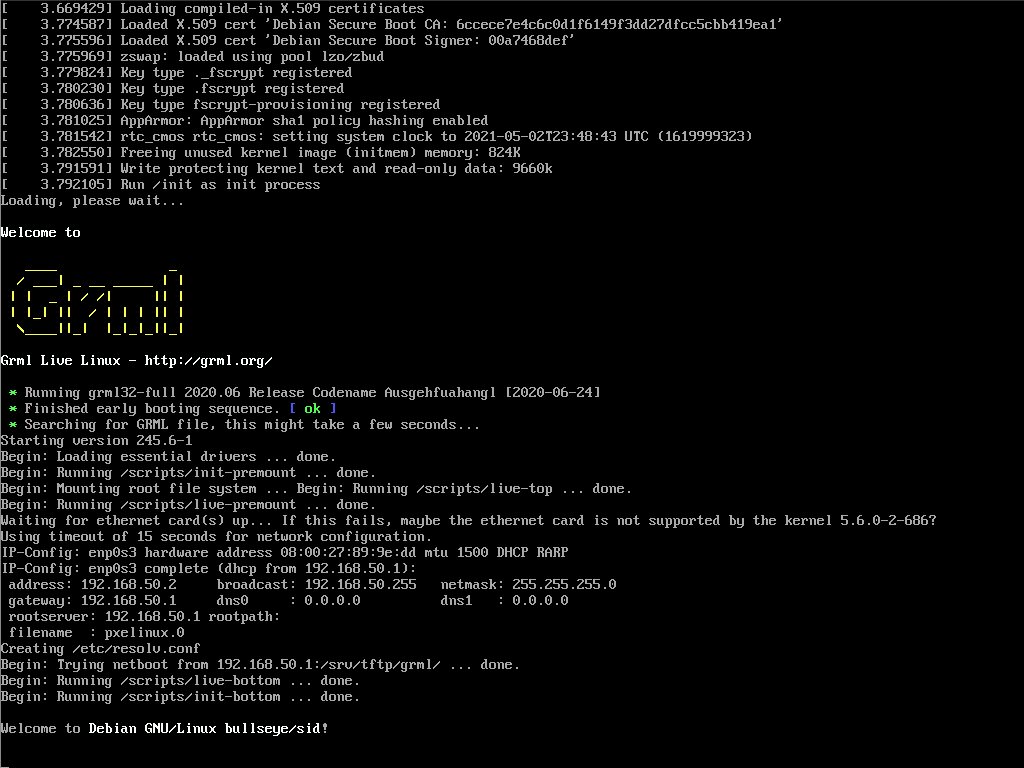
Now all that remains is to start the TFTP and DHCP server sequentially and you can try to boot into PXE. If everything is done correctly, then you will see the created menu:

Selecting the GRML Linux item, press Enter and see that we have a successful image loading process:
Thus, we got the ability to network boot the GRML distribution, which is popular among system administrators. But what about the same MS-DOS and how you can independently prepare an image for flashing the BIOS. Let's talk about this further.
In DOS We Trust
Is the operating system from the 80s of the last millennium still in use in the 21st century? No matter how strange it may seem, but for some specific tasks MS-DOS is still relevant and quite useful for itself. One of these tasks is updating the BIOS firmware on servers.
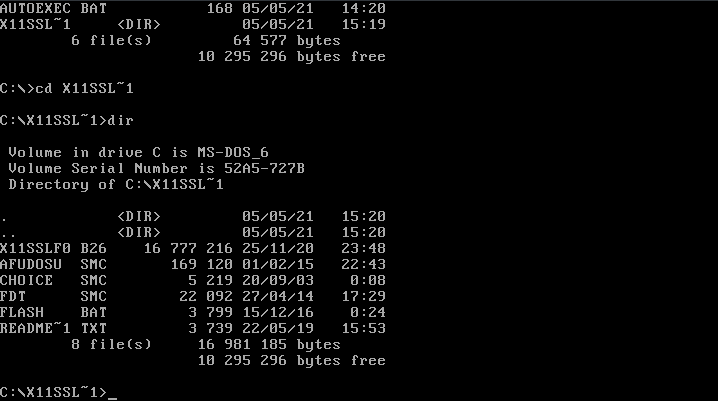
Take, for example, some motherboard, for example, Supemicro X11SSL-F and download the BIOS update from the official site. Inside we see a similar set of files:
user@linux:~//X11SSLF0_B26> ls -l 16592 -rw-r--r-- 1 user users 169120 1 2015 AFUDOSU.SMC -rw-r--r-- 1 user users 5219 20 2003 CHOICE.SMC -rw-r--r-- 1 user users 22092 27 2014 FDT.smc -rw-r--r-- 1 user users 3799 15 2016 FLASH.BAT -rw-r--r-- 1 user users 3739 22 2019 Readme for UP X11 AMI BIOS.txt -rw-r--r-- 1 user users 16777216 25 23:48 X11SSLF0.B26
We see that we already have a ready-made BAT file that allows us to flash the BIOS. But in order to do this, you must have a server already loaded into MS-DOS. Now we will show you exactly how to do this.
First of all, we need to prepare a small raw image of the hard disk with the operating system. Create a new virtual machine via Oracle VM VirtualBox with a small 32 megabyte disk. We choose the format QCOW, after all the manipulations it can be easily converted to raw.
Surely you all know where you can get images of floppy disks with MS-DOS, so mount them inside the virtual machine and run the installation:
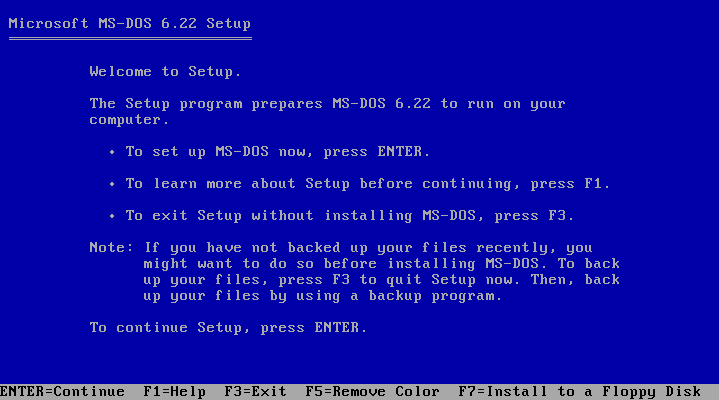
We change the floppy images in the virtual drive twice and after literally 20 seconds we have a qcow image with a fresh MS-DOS 6.22 OS:

The easiest way now to copy files to this disk is to mount it to any other virtual machine running Windows or Linux. After this operation, we re-mount the disk to the MS-DOS virtual machine and check that the files are visible:
If you wish, you can even configure autoload to execute a BAT file so that the BIOS is flashed automatically. But remember that this is a potentially dangerous operation and you do it at your own peril and risk. Now we turn off the virtual machine and convert it to a raw image using qemu-img.
qemu-img convert -f qcow -O raw DOS.qcow dos.img
Copy the resulting IMG image to a separate directory of our TFTP server:
sudo mkdir /srv/tftp/dos
sudo cp dos.img /srv/tftp/dos
Now open the configuration /srv/tftp/pxelinux.cfg/default for editing and add one more item to the menu:
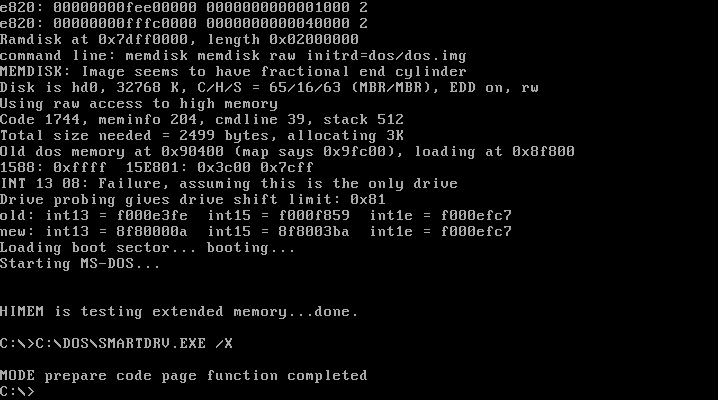
LABEL DOS kernel memdisk initrd dos/dos.img append raw
We save the configuration and now we have a new menu item in the PXE menu, by selecting which we load the created image:
In the same way, you can create images containing both utility utilities and for fun with old DOS games.
In Windows Veritas
Let's now try to boot the Live image from WinPE (Windows Preinstallation Environment). It is often simply not required to download a full-fledged version, only a limited number of functions are enough. This thing finds real use when flashing some devices.
The same Mellanox, absorbed by Nvidia a year ago, releases the Mellanox Firmware Tools utility for flashing its network cards in different versions for WinPE. Of course, now there are already various MFT options available, but a couple of times we were faced with the need to sew through the WinPE version.
Creating your own WinPE image and integrating the necessary software there is not too difficult a task, but its explanation is beyond the scope of this article. To master this process in detail, you can visit the excellent resource winpe.ru . As an example, we will take any ready-made assembly to demonstrate the launch process.
Often such assemblies are either iso images or rar archives with iso images. Before picking out such an image, we need to get the appropriate bootloader.
wimboot is a fairly simple bootloader capable of loading images in wim (Windows Imaging Format) format. It can be used either in conjunction with syslinux, or with a more advanced sibling, iPXE... Create a separate directory in / srv / tftp :
sudo mkdir wimboot
cd wimboot
Download the bootloader itself:
wget https://github.com/ipxe/wimboot/releases/latest/download/wimboot
Now it's time to mount the image. Create a temporary directory in / tmp :
sudo mkdir winpe
Go to the directory with the downloaded ISO-image of the assembly and execute:
sudo mount -o loop <_> /tmp/winpe
Create a directory in / srv / tftp , where we will put the files we need:
sudo mkdir /srv/tftp/winpe
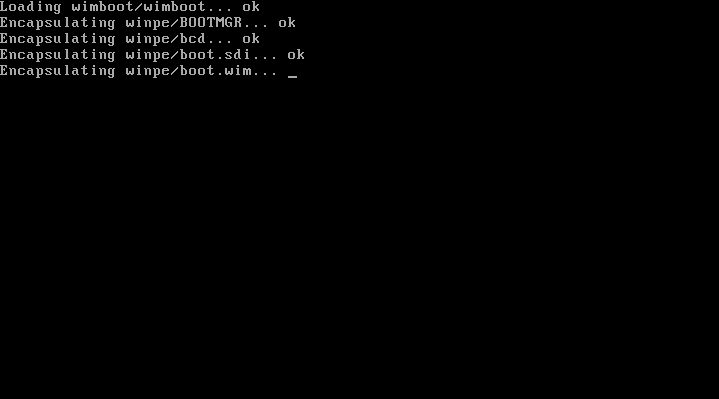
Now we search in the assembly and copy 4 files:
sudo cp BOOTMGR /srv/tftp/winpe
sudo cp bcd /srv/tftp/winpe
sudo cp boot.sdi /srv/tftp/winpe
sudo cp boot.wim /srv/tftp/winpe
The matter is small - add the following section to the configuration file /srv/tftp/pxelinux.cfg/default :
LABEL WinPE menu label WinPE com32 linux.c32 wimboot/wimboot append initrdfile=winpe/BOOTMGR,winpe/bcd,winpe/boot.sdi,winpe/boot.wim
In fact, we use the linux.c32 module to load the bootloader,
It is important to take into account that files are uploaded via TFTP, which is not very fast and convenient. In general, you can slightly modify the configuration and stretch them in a different way. But for simple utilitarian tasks this is quite enough.

Instead of a conclusion
There is no know-how in this article, but when the need arose, the Raspberry Pi did a great job. She didn’t need to look for an additional power outlet, the USB port of the nearest free server was perfect. There are no additional problems with finding a place in a rack crammed to the eyeballs. It works exactly as it should, and its small size allows you to always have it at hand.
There are actually many tutorials on the net for setting up netboot. The only problem is that different means and different approaches are used for different images. Choosing the right approach can sometimes take a lot of time, and I really hope this material will help a lot of people save time when solving various tasks related to the need to quickly deploy PXE on a Raspberry Pi single board computer.
