
There is, however, one point that I would like to talk about in more detail.
In the previous article, we wrote that as part of the implementation of SGX support, it was necessary to teach the Nova service to generate an XML file with the necessary settings for the guest domain. This problem turned out to be complex and interesting: while working on its solution, we had to understand in detail, using the libvirt example, how programs in general interact with instruction sets in x86 processors. There are very, very few detailed and most importantly - clearly written materials on this topic. We hope that our experience will be useful to everyone involved in virtualization. However, first things first.
First attempts
Let us repeat the formulation of the task once again: we needed to pass the SGX support parameters to the XML configuration file of the virtual machine. When we just started solving this problem, there was no SGX support in OpenStack and libvirt, respectively, it was impossible to transfer them to the XML of the virtual machine natively.
We first tried to solve this problem by adding a Qemu command-line block to the script to connect to the hypervisor via libvirt, as described in the Intel developer guide :
<qemu:commandline>
<qemu:arg value='-cpu'/>
<qemu:arg value='host,+sgx,+sgxlc'/>
<qemu:arg value='-object'/>
<qemu:arg value='memory-backend-epc,id=mem1,size=''' + epc + '''M,prealloc'/>
<qemu:arg value='-sgx-epc'/>
<qemu:arg value='id=epc1,memdev=mem1'/>
</qemu:commandline>
But after that, a second processor option was added to the virtual machine:
[root@compute-sgx ~] cat /proc/$PID/cmdline |xargs -0 printf "%s\n" |awk '/cpu/ { getline x; print $0 RS x; }'
-cpu
Skylake-Client-IBRS
-cpu
host,+sgx,+sgxlc
The first option was set normally, and the second was added directly by us in the Qemu command-line block . This led to an inconvenience when choosing a processor emulation model: whichever processor model we substituted into cpu_model in the configuration file of the Nova compute node, we saw the display of the host processor in the virtual machine.
How to solve this problem?
In search of an answer, we first tried experimenting with the line < qemu: arg value = 'host, + sgx, + sgxlc'/> and try to transfer the processor model to it, but this did not cancel the duplication of this option after the VM was started. Then it was decided to use libvirt to assign CPU flags and control them through the Nov'y configuration file of the computational node using the cpu_model_extra_flags parameter .
The task turned out to be more difficult than we expected: we needed to study the Intel IA-32 - CPUID instruction, as well as find information on the required registers and bits in the Intel documentation on SGX.
Further search: digging deeper into libvirt
The developer documentation for the Nova service states that the CPU flag mapping must be supported by libvirt itself.
We found a file that describes all the CPU flags - this is x86_features.xml (relevant since libvirt 4.7.0). After reviewing this file, we assumed (as it turned out later, erroneously) that we only need to get the hex addresses of the required registers in the 7th sheet using the cpuid utility. From the Intel documentation, we learned in which registers the instructions we need are called: sgx is in the EBX register, and sgxlc is in the ECX.
[root@compute-sgx ~] cpuid -l 7 -1 |grep SGX
SGX: Software Guard Extensions supported = true
SGX_LC: SGX launch config supported = true
[root@compute-sgx ~] cpuid -l 7 -1 -r
CPU:
0x00000007 0x00: eax=0x00000000 ebx=0x029c6fbf ecx=0x40000000 edx=0xbc000600
After adding the sgx and sgxlc flags with the values obtained using the cpuid utility, we received the following error message:
error : x86Compute:1952 : out of memory
The message, to put it bluntly, is not very informative. To somehow understand what the problem is, we opened an issue in gitlab libvirt. The libvirt developers noticed that an incorrect error was displayed and fixed it, indicating that libvirt could not find the correct instruction that we were calling and guessed where we might be wrong. But to understand what exactly we needed to indicate so that there was no error, we did not succeed.
I had to dig into the sources and study, it took a long time. It was possible to figure it out only after studying the code in a modified Qemu from Intel:
[FEAT_7_0_EBX] = {
.type = CPUID_FEATURE_WORD,
.feat_names = {
"fsgsbase", "tsc-adjust", "sgx", "bmi1",
"hle", "avx2", NULL, "smep",
"bmi2", "erms", "invpcid", "rtm",
NULL, NULL, "mpx", NULL,
"avx512f", "avx512dq", "rdseed", "adx",
"smap", "avx512ifma", "pcommit", "clflushopt",
"clwb", "intel-pt", "avx512pf", "avx512er",
"avx512cd", "sha-ni", "avx512bw", "avx512vl",
},
.cpuid = {
.eax = 7,
.needs_ecx = true, .ecx = 0,
.reg = R_EBX,
},
.tcg_features = TCG_7_0_EBX_FEATURES,
},
[FEAT_7_0_ECX] = {
.type = CPUID_FEATURE_WORD,
.feat_names = {
NULL, "avx512vbmi", "umip", "pku",
NULL /* ospke */, "waitpkg", "avx512vbmi2", NULL,
"gfni", "vaes", "vpclmulqdq", "avx512vnni",
"avx512bitalg", NULL, "avx512-vpopcntdq", NULL,
"la57", NULL, NULL, NULL,
NULL, NULL, "rdpid", NULL,
NULL, "cldemote", NULL, "movdiri",
"movdir64b", NULL, "sgxlc", NULL,
},
.cpuid = {
.eax = 7,
.needs_ecx = true, .ecx = 0,
.reg = R_ECX,
},
From the above listing, you can see that in the .feat_names blocks, instructions from EBX / ECX registers of the 7th sheet are listed bit by bit (from 0 to 31); if the instruction is not supported by Qemu or this bit is reserved, then it is filled with a NULL value . Thanks to this example, we made the following assumption: perhaps we need to specify not the hex address of the required register in libvirt, but specifically the bit of this instruction. It's easier to understand this by reading the table from Wikipedia . On the left is a bit and three registers. We find our instruction in it - sgx. In the table, it is indicated under the second bit in the EBX register:

Next, we check the location of this instruction in the Qemu code. As we can see, she is the third in the list of feat_names, but this is because the bit numbering starts from 0:
[FEAT_7_0_EBX] = {
.type = CPUID_FEATURE_WORD,
.feat_names = {
"fsgsbase", "tsc-adjust", "sgx", "bmi1",
You can look at other instructions in this table and make sure, when counting from 0, that they are under their own bit in the given listing. For example: fsgsbase goes under bit 0 of the EBX register and is listed first.
In the Intel documentation, we found confirmation of this and made sure that the required set of instructions can be called using cpuid, passing the correct bit when accessing the register of the desired sheet, and in some cases, the sublist.
We began to understand in more detail the architecture of 32-bit processors and saw that such processors have sheets that contain the main 4 registers: EAX, EBX, ECX, EDX. Each of these registers contains 32 bits reserved for a specific set of CPU instructions. A bit is a power of two and can most often be passed to a program in hex format, as is done in libvirt.
For a better understanding, consider another example with the nested VMX virtualization flag from the x86_features.xml file used by libvirt:
<feature name = 'vmx ' >
<cpuid eax_in = ' 0x01 ' ecx = ' 0x00000020 '/> # 2 5 = 32 10 = 20 16
</ feature>
The reference to this instruction is carried out in the 1st sheet to the ECX register under bit 5 and you can verify this by looking at the Feature Information table in Wikipedia.
Having dealt with this and having formed an understanding of how flags are eventually added to libvirt, we decided to add other SGX flags (in addition to the main ones: sgx and sgxlc) that were present in the modified Qemu:
[root@compute-sgx ~] /usr/libexec/qemu-kvm -cpu help |xargs printf '%s\n' |grep sgx
sgx
sgx-debug
sgx-exinfo
sgx-kss
sgx-mode64
sgx-provisionkey
sgx-tokenkey
sgx1
sgx2
sgxlc
Some of these flags are no longer instructions, but attributes of the Enclave Data Control Structure (SECS); you can read more about this in the Intel documentation . In it, we found that the set of SGX attributes we need is in sheet 0x12 in sublist 1:
[root@compute-sgx ~] cpuid -l 0x12 -s 1 -1 CPU: SGX attributes (0x12/1): ECREATE SECS.ATTRIBUTES valid bit mask = 0x000000000000001f0000000000000036
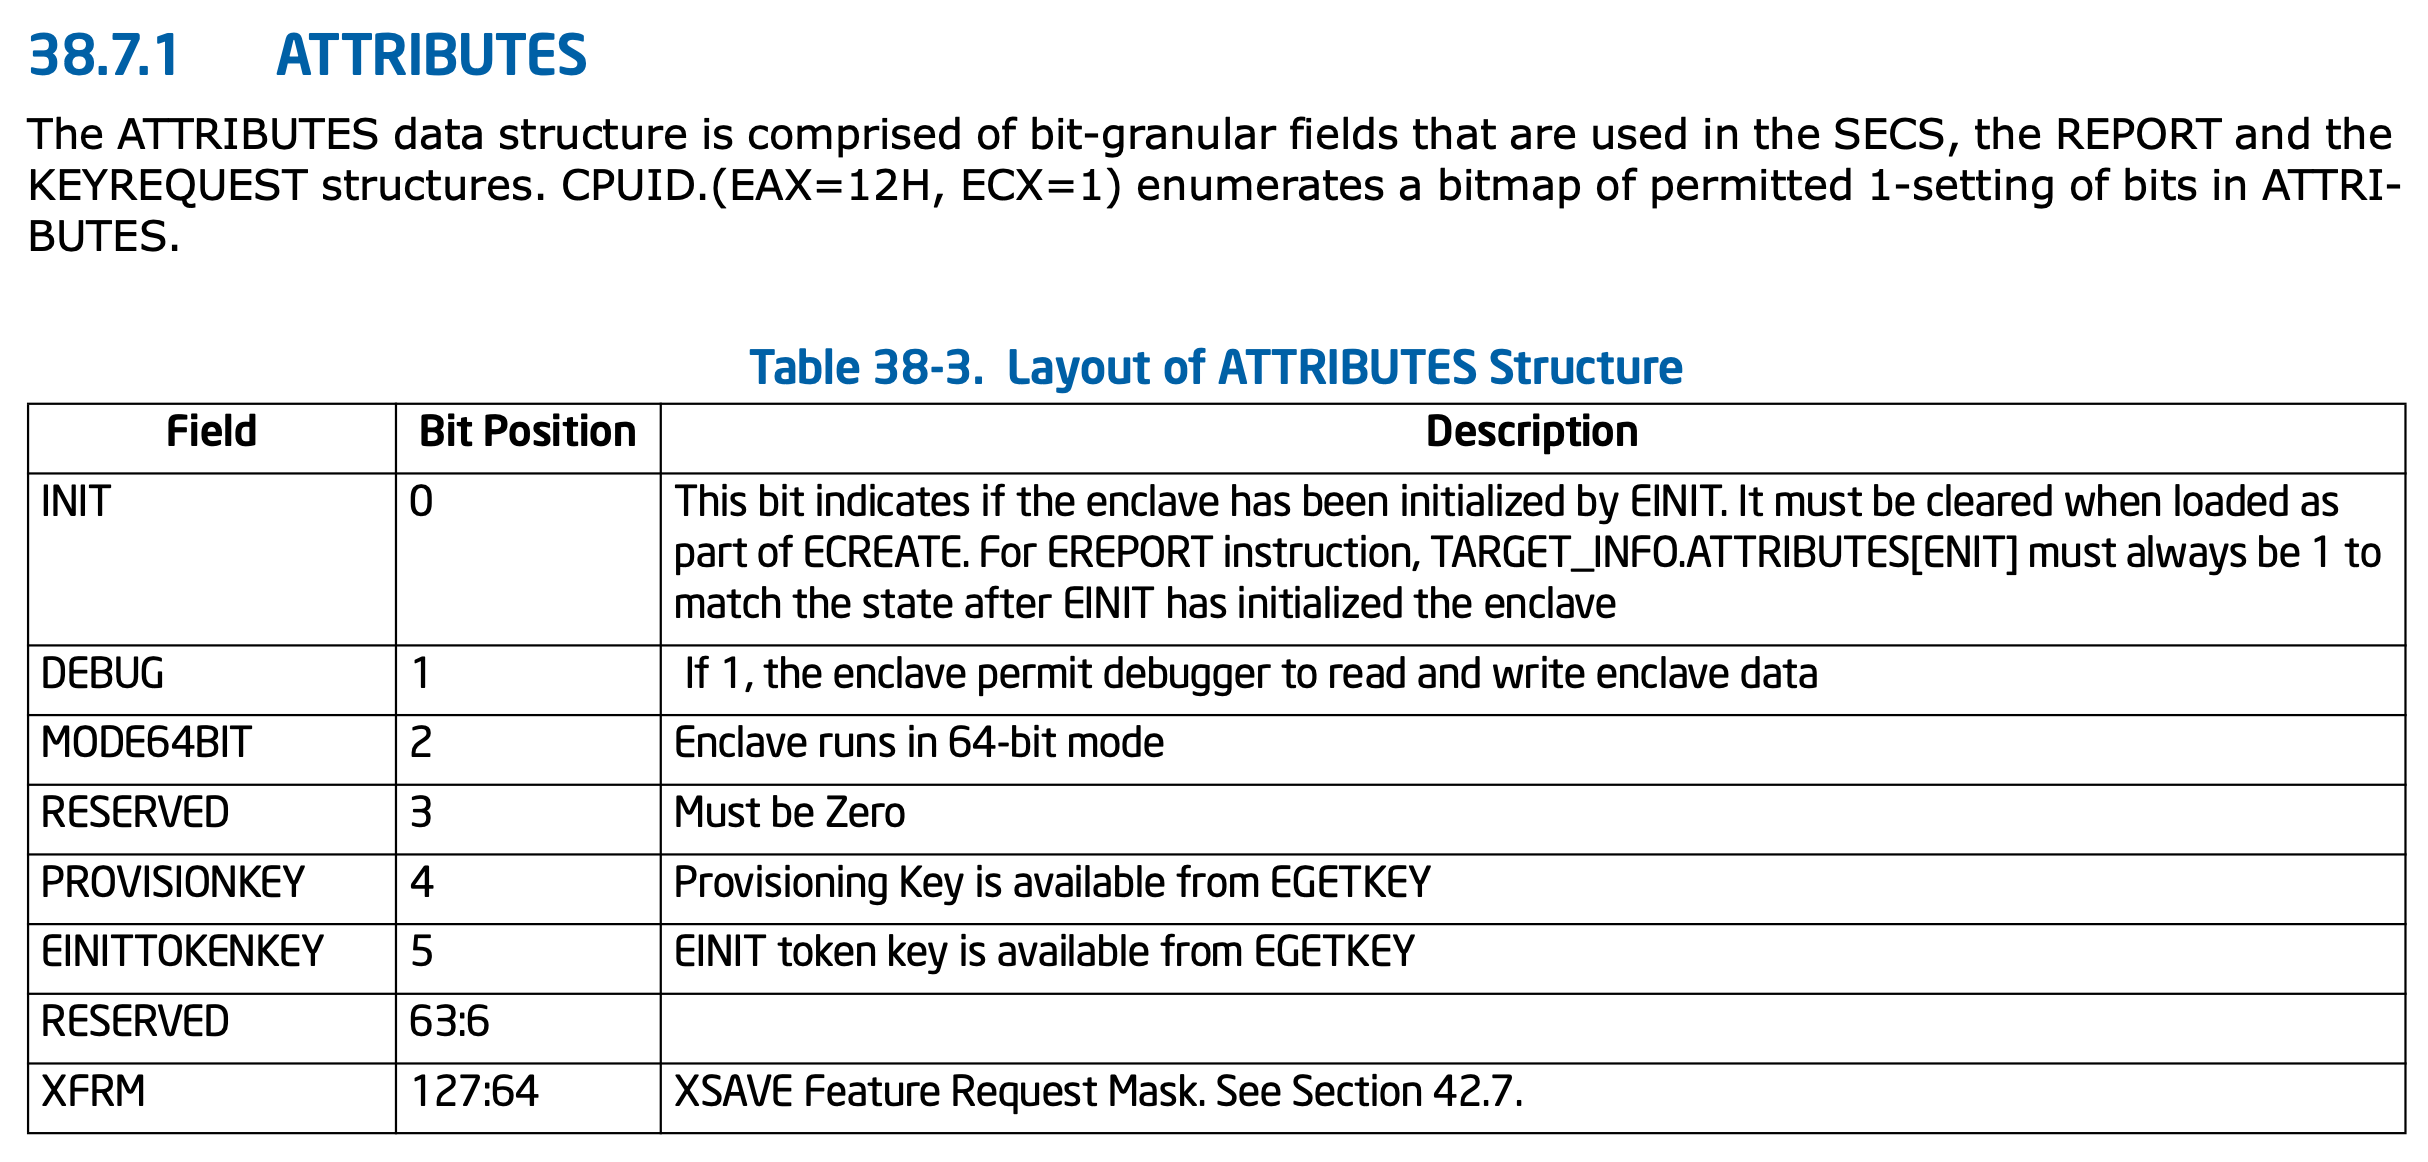
In the screenshot of Table 38-3, you can find the attribute bits we need, which we will specify later as flags in libvirt: sgx-debug, sgx-mode64, sgx-provisionkey, sgx-tokenkey. They are located under bits 1, 2, 4 and 5.
We also understood from the answer in our issue : libvirt has a macro for checking flags for their support directly by the processor of the computational node. This means that it is not enough to specify the necessary sheets, bits and registers in the x86_features.xml file if libvirt itself does not support an instruction set sheet. But fortunately for us, it turned out that the libvirt code has the ability to work with this sheet:
/* Leaf 0x12: SGX capability enumeration
*
* Sub leaves 0 and 1 is supported if ebx[2] from leaf 0x7 (SGX) is set.
* Sub leaves n >= 2 are valid as long as eax[3:0] != 0.
*/
static int
cpuidSetLeaf12(virCPUDataPtr data,
virCPUx86DataItemPtr subLeaf0)
{
virCPUx86DataItem item = CPUID(.eax_in = 0x7);
virCPUx86CPUIDPtr cpuid = &item.data.cpuid;
virCPUx86DataItemPtr leaf7;
if (!(leaf7 = virCPUx86DataGet(&data->data.x86, &item)) ||
!(leaf7->data.cpuid.ebx & (1 << 2)))
return 0;
if (virCPUx86DataAdd(data, subLeaf0) < 0)
return -1;
cpuid->eax_in = 0x12;
cpuid->ecx_in = 1;
cpuidCall(cpuid);
if (virCPUx86DataAdd(data, &item) < 0)
return -1;
cpuid->ecx_in = 2;
cpuidCall(cpuid);
while (cpuid->eax & 0xf) {
if (virCPUx86DataAdd(data, &item) < 0)
return -1;
cpuid->ecx_in++;
cpuidCall(cpuid);
}
return 0;
}
From this listing, you can see that when accessing the 2nd EBX bit of the 7th leaf register (i.e. the SGX instruction), libvirt can use leaf 0x12 to check the available attributes in sublists 0, 1, and 2.
Conclusion
After the research done, we figured out how to properly add the x86_features.xml file. We converted the necessary bits to hex format - and this is what we got:
<!-- SGX features -->
<feature name='sgx'>
<cpuid eax_in='0x07' ecx_in='0x00' ebx='0x00000004'/>
</feature>
<feature name='sgxlc'>
<cpuid eax_in='0x07' ecx_in='0x00' ecx='0x40000000'/>
</feature>
<feature name='sgx1'>
<cpuid eax_in='0x12' ecx_in='0x00' eax='0x00000001'/>
</feature>
<feature name='sgx-debug'>
<cpuid eax_in='0x12' ecx_in='0x01' eax='0x00000002'/>
</feature>
<feature name='sgx-mode64'>
<cpuid eax_in='0x12' ecx_in='0x01' eax='0x00000004'/>
</feature>
<feature name='sgx-provisionkey'>
<cpuid eax_in='0x12' ecx_in='0x01' eax='0x00000010'/>
</feature>
<feature name='sgx-tokenkey'>
<cpuid eax_in='0x12' ecx_in='0x01' eax='0x00000020'/>
</feature>
Now, to pass these flags to the virtual machine, we can specify them in the Nova config file using cpu_model_extra_flags :
[root@compute-sgx nova] grep cpu_mode nova.conf
cpu_mode = custom
cpu_model = Skylake-Client-IBRS
cpu_model_extra_flags = sgx,sgxlc,sgx1,sgx-provisionkey,sgx-tokenkey,sgx-debug,sgx-mode64
[root@compute-sgx ~] cat /proc/$PID/cmdline |xargs -0 printf "%s\n" |awk '/cpu/ { getline x; print $0 RS x; }'
-cpu
Skylake-Client-IBRS,sgx=on,sgx-mode64=on,sgx-provisionkey=on,sgx-tokenkey=on,sgx1=on,sgxlc=on
Having gone the hard way, we learned how to add support for SGX flags to libvirt. This helped us solve the problem of duplicating processor options in the XML file of the virtual machine. We will use the experience gained in our future work: if a new set of instructions appears in Intel or AMD processors, we can add them to libvirt in the same way. Familiarity with the CPUID instruction will also be useful for us when writing our own solutions.
If you have any questions - welcome to the comments, we will try to answer. And if you have something to add - all the more, write, we will be very grateful.