
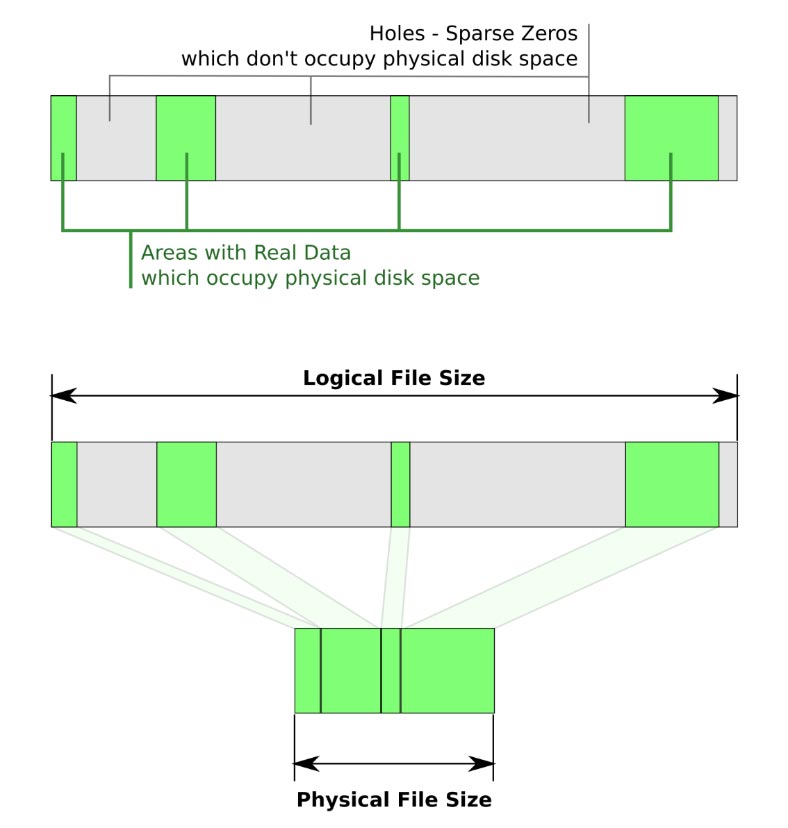
Sparse files are special files that use the file system more efficiently; they do not allow the filesystem to take up free disk space on the media when the partitions are not full. That is, the "empty space" will be used only when necessary. Empty information in the form of zeros will be stored in the FS metadata block. Therefore, sparse files initially take up less media space than their actual size.
This type supports most file systems: BTRFS, NILFS, ZFS, NTFS, ext2, ext3, ext4, XFS, JFS, ReiserFS, Reiser4, UFS, Rock Ridge, UDF, ReFS, APFS, F2FS.
This type supports most file systems: BTRFS, NILFS, ZFS, NTFS, ext2, ext3, ext4, XFS, JFS, ReiserFS, Reiser4, UFS, Rock Ridge, UDF, ReFS, APFS, F2FS.
All these FS fully support this type, but at the same time do not provide direct access to their functions through their standard interface. Their properties can be controlled only through command line commands.
Difference between compression and sparse files
All of the file systems I have named above also support the standard compression feature. Both of these tools offer the advantage of saving disk space, but achieve this goal in different ways. The main disadvantage of using compression is that it can slow down system read / write performance. Since additional resources will be used to decompress or compress the data. However, some software products do not support compression.
Advantages and disadvantages
The biggest advantage of sparse files is that the user can create large files that take up very little storage space. Storage space is automatically allocated as data is written to it. Large sparse files are created in a relatively short time because the file system does not need to pre-allocate disk space to write zeros.
The benefits are limited only by the applications that support them. If the program does not have the ability to recognize or use them, then it will keep them in their original - uncompressed state, which will give no benefit. You also need to be careful with them, as a sparse file that is only a few megabytes in size can suddenly grow to several gigabytes when unsupported applications copy it to its destination.
Another disadvantage is that you cannot copy or create such a file if its nominal size exceeds the available free space (or quota limits imposed on user accounts). For example, if the original size (with all zero bytes) is 500 MB, and there is a 400 MB quota limit for the user account used to create it. This will throw an error even if the actual disk space it occupies is only 50 MB of disk space.
As for the drives that store such data, they are also prone to fragmentation, since the file system will write data to sparse files as needed. Over time, this can lead to performance degradation. In addition, some disk management utilities may not accurately display the amount of free space available. When the file system is nearly full, this can lead to unexpected results. For example, disk full errors can occur when data is copied over an existing portion that has been marked as sparse.
Create a sparse file on Windows
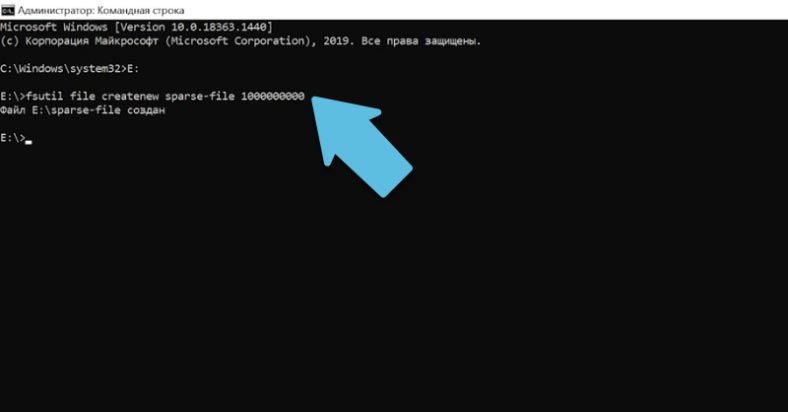
To do this, in Windows OS we will use the command line. In the search, we write cmd and run it as administrator.
Windows uses the fsutil program (a file system utility) to manage this data. When create is executed, by default the file is created as usual. Go to the folder where you need to create it and enter:
fsutil file createnew sparse-file 1000000000
Where sparse-file is the name, and at the end its size is indicated in bytes.
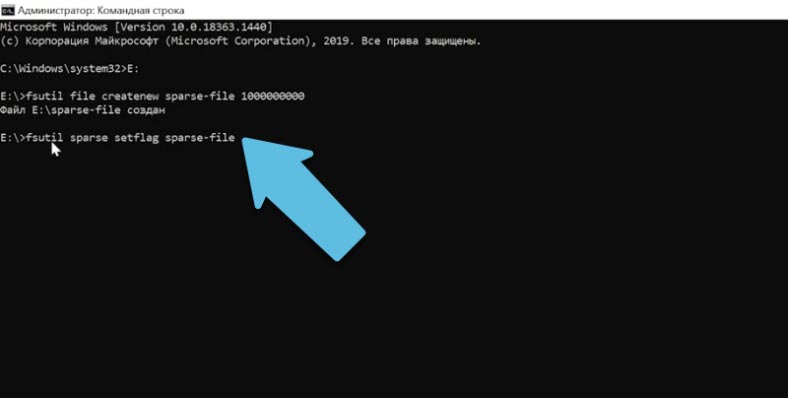
To assign the value "sparse" to the file, enter:
fsutil sparse setflag sparse-file
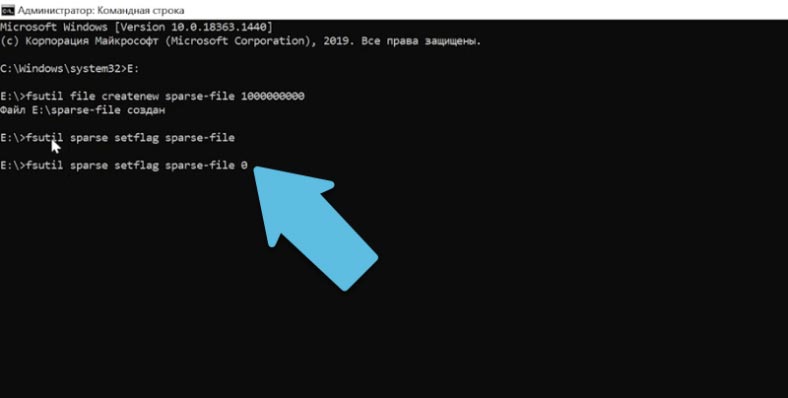
To remove this flag, execute the following command:
fsutil sparse setflag sparse-file 0
And to assign the attribute again:
fsutil sparse setflag sparse-file
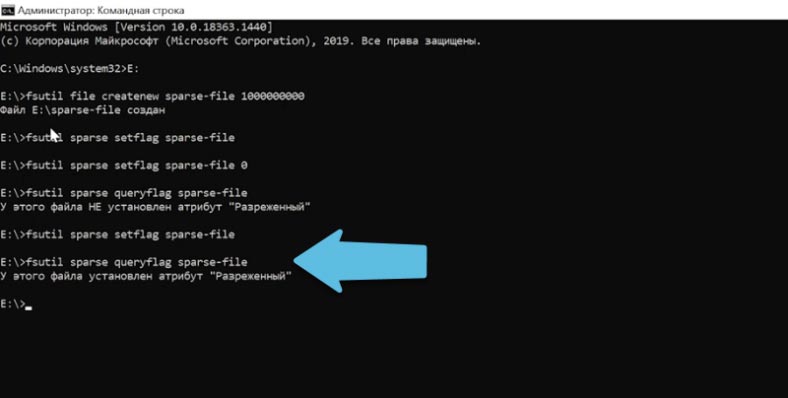
Check:
fsutil sparse queryflag sparse-file
By itself, the attribute does not yet save disk space. To do this, you need to mark up an empty area that will be freed inside.
To mark a blank area, enter:
fsutil sparse setrange sparse-file 0 1000000000
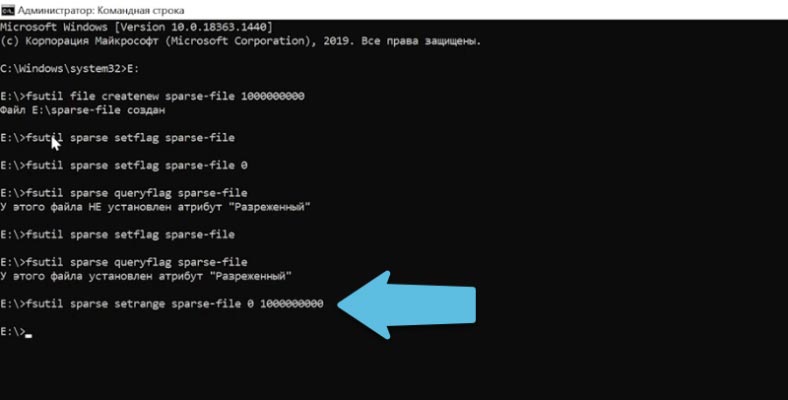
At the end, the offset and length are specified in bytes. In my case, from zero to 1GB.
To install a completely sparse file, specify the full size. If necessary, you can expand the file by specifying a larger value here.
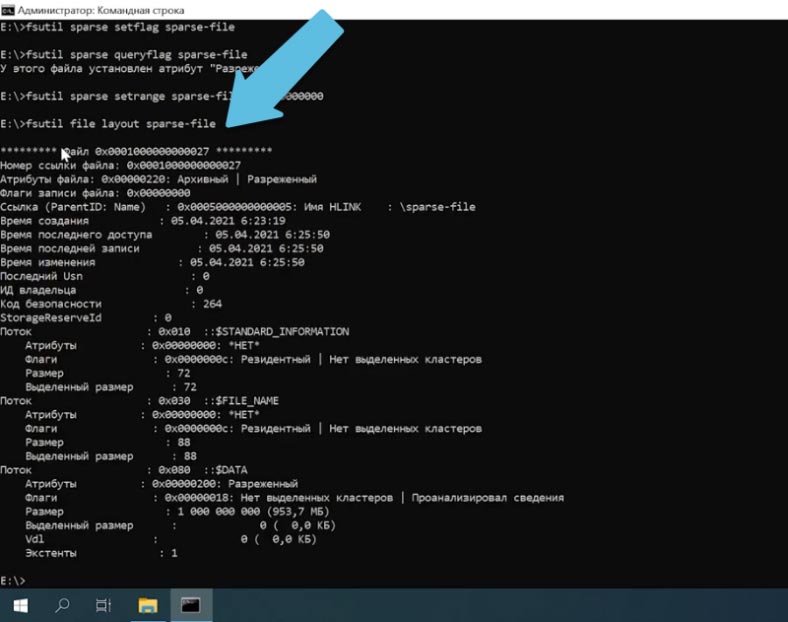
In order to make sure that the given attribute is assigned to the file, let's execute layout
fsutil file layout sparse-file
Such Attribute can be set to any file. Just run this command with its name and set the size you want.
In the properties of the previously created file, you can see that with a size of 1GB. the file occupies 0 bytes on disk.
This set of commands is suitable for all Windows file systems that support this data type (NTFS, ReFS, etc.).
How to create a sparse file in Linux
On Linux, the process of creating these data types is a little easier as there are several commands for creating them. This set will fit all Linux file systems.
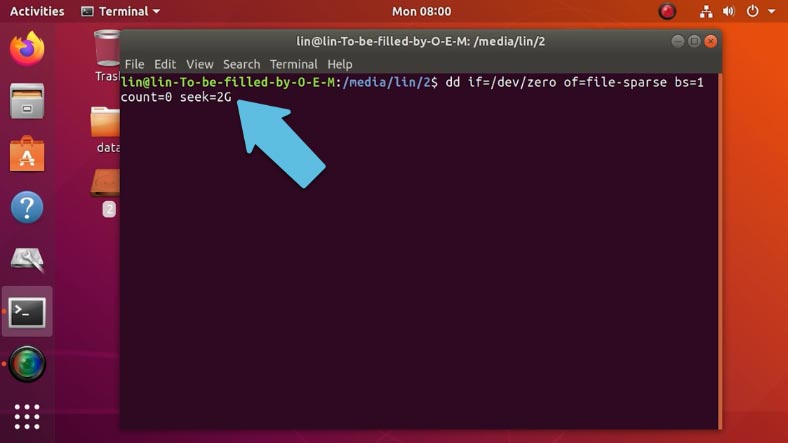
Here you can use the dd or truncate command.
The first command looks like this:
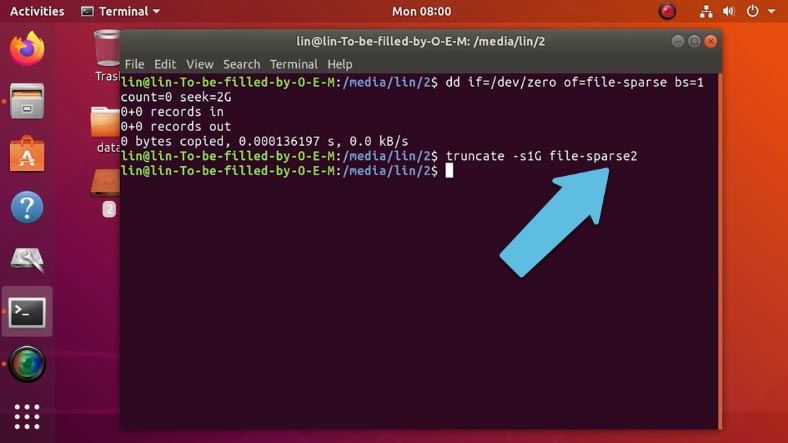
dd if=/dev/zero of=file-sparse bs=1 count=0 seek=2G
Where file-sparse is a name, and its size is indicated at the end, can be specified in bytes, megabytes, etc.
The second command is simpler, it looks like this:
truncate -s2G file-sparse
Where the s value indicates the size, followed by the name.
Compared to Windows, in Linux, when such a file is created by one of the commands, it will be "sparse" by default.
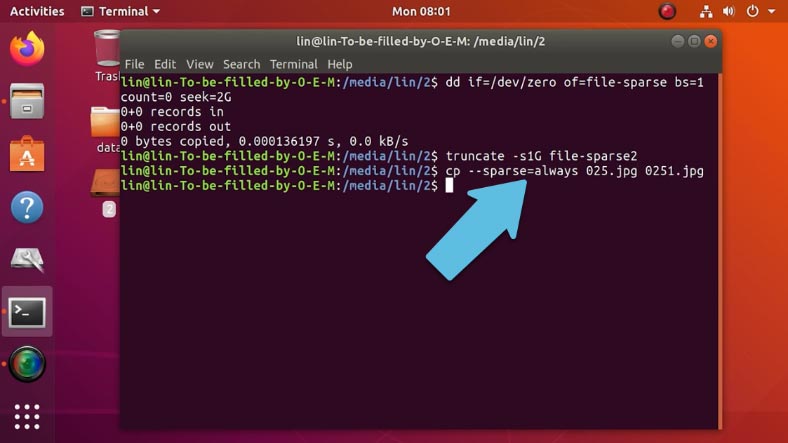
To convert normal to sparse, there is a separate command:
cp --sparse=always ./025.jpg ./0251.jpg
Where 025.jpg is the first regular name.
0251.jpg - and the middle name of the sparse.
How to increase
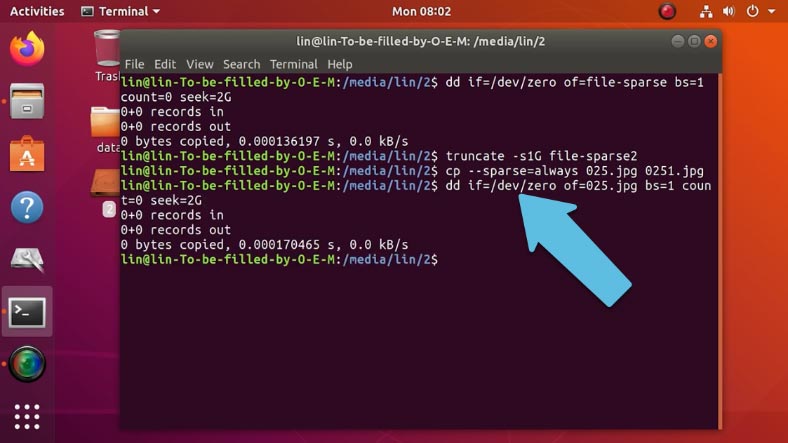
If you need to enlarge an existing file, use the first command, here replace the name and specify the desired size.
dd if=/dev/zero of=025.jpg bs=1 count=0 seek=2G
This will increase its size to 2GB.
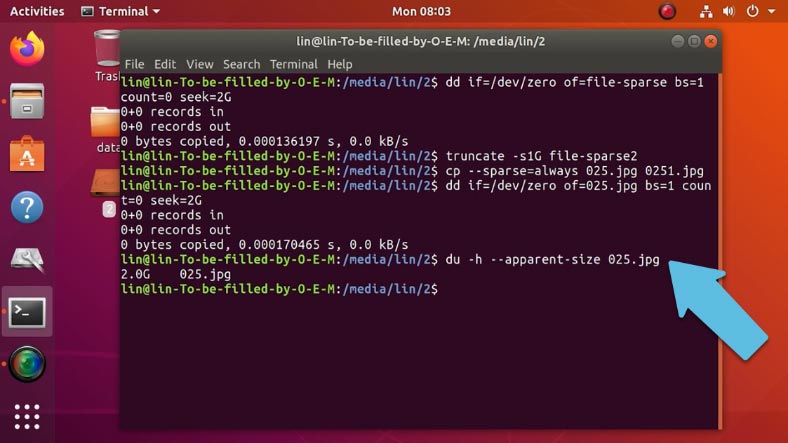
To check the size, run the following command:
du -h --apparent-size 025.jpg
Sparse files in ApFS
In fact, this set of commands is also suitable for the apple file system - ApFS, since Linux and MacOS are based on the Unix kernel architecture, they both provide access to Unix commands and the Bash shell.
Launch a terminal and run any of the commands I used on Linux.
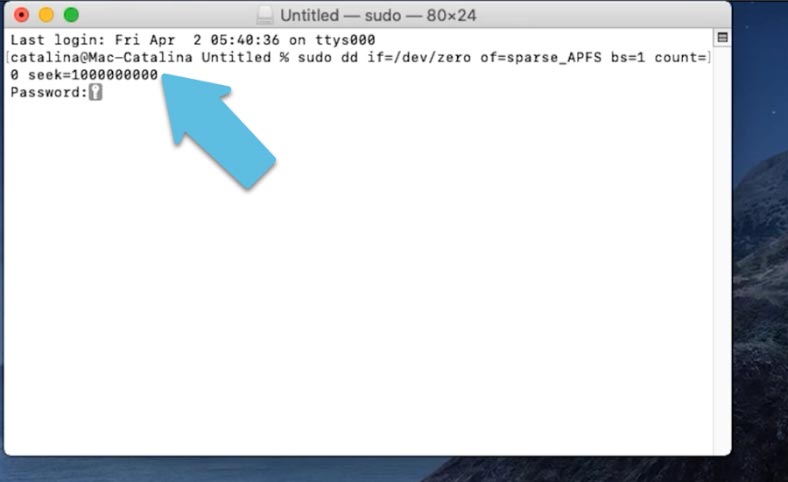
On macOS Catalina, only the first command works, and the size must be specified in bytes, otherwise the command will result in an error.
sudo dd if=/dev/zero of=sparse_APFS bs=1 count=0 seek=1000000000
The ApFS file system, subject to certain conditions, creates sparse files by default, so to increase any file, you can use the command:
dd if=/dev/zero of=187.jpg bs=1 count=0 seek=500000000
Let's set the size, for example, 500MB, in MacOS the size must be specified in bytes.
In the properties you can see that its size has increased to 500 Mb.
Conclusion
Before using this functionality in any OS, it is extremely important for you to know all their advantages and disadvantages. Knowing these features is guaranteed to help you avoid potential future problems.
See the source for the full article with all additional video tutorials . And also go to our Youtube channel , there are more than 400 training videos collected.