- relative ease of creation (both in time and labor costs),
- inexpensive components,
- available software,
- the ability to remotely control, including via the Internet,
- the ability to move silently,
- availability a webcam that:
> broadcasts to the network
> can be remotely controlled (PTZ camera along the x and y axes, pan-tilt)
> has the ability to take photos, videos, save to disk and download media data
> can be controlled settings (exposure, balance, etc.)
> Supports day | night
> Can save pictures when there is motion (motion detection).
- the ability to control the operating mode to save the battery, including wake up and fall asleep, control the battery charge.

Small introductory
...This project was created more than 3 years ago and during these 3 years a lot has happened to it. Arduins were born and died, a speech interface was added and also left to the forefathers, engine drivers, power supplies, parts of the Soviet iron designer, cameras for raspberry pi changed.
There was only a lack of a way to save energy, since the battery (powerbank) of the robot lasted for 8-10 hours without too active driving, but with a constantly working camera and motors in ready-to-go mode.
And now, relatively recently, a solution has appeared for the task at hand. This decision required once again to plow the entire project in order to remember what and how was implemented there.
Therefore, let's follow fresh tracks.
Some solutions may seem strange, but practice led to them, so there will be appropriate explanations.
List of accessories
...
- truck (chassis) - as an option - the link
is better to take it tracks as the wheels, as well as omni-wheels at home not well expressed, slipping or getting stuck. In addition, the wider and higher the base of the tank, the better the passability through the rapids. Plus - the ability to place the battery under the base, making the tank even more stable.
Trucks can be taken "naked" without any arduino, remotes, etc.

- raspberry pi 3b +
The main single board on which everything will work. It is advisable to take a case for it with the ability to access gpio. Without a case, everything will get dusty and rust much faster.
Let's immediately answer related questions:
Why not a raspberry pi 4? - more energy-consuming, you need a cooler, a non-standard powerbank, etc. Why not pi zero - the video slows down a little, but, in principle, everything should start on it too.
Why not other single-board devices (bananas, oranges, odroids, etc.) - it happened historically.

- combs for gpio raspberry pi (8PCS, 2X20 (40 Pin) Extra Tall Female 0.1 Inch Pitch Stacking Header for Raspberry Pi A + / B + / Pi 2 / Pi 3 Extra Tall Header) - as an option - link

- Witty Pi 3 Mini - how option - link
This is the only "header" for the raspberry pi. She will just be responsible for the power supply, as well as the mode of operation of the robot.
* for the cap, you can also take the LM29150 and solder it onto the board. This will allow the raspberry to be powered not only from 5V, but also higher (up to 8V). This is described in the instructions in the header.
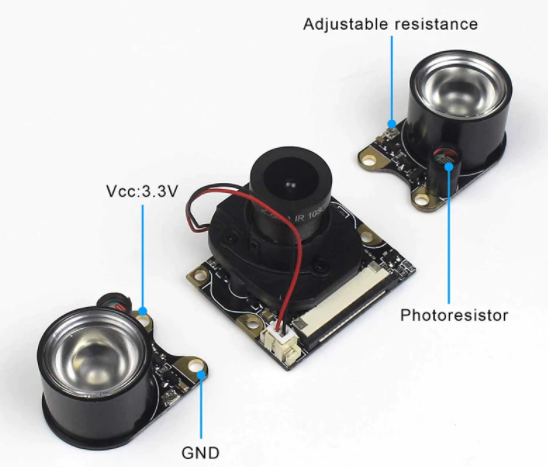
- csi camera for raspberry pi . Faster than USB camera, takes up less space. Better to take a "fisheye" with automatic day / night switching (typical posting from the camera in the photo) - as an option - link .

- sg-90 servos - 2 pcs. Flimsy, but they can be directly controlled from the gpio raspberry pi without fear of burning the pins.

- plastic hanger for serv(Servo bracket PT Pan / Tilt Camera Platform Anti-Vibration Camera Mount for Aircraft FPV dedicated nylon PTZ for 9G SG90) - as an option - link .
There are special pan-tilt hats for the raspberry pi, but they are much more expensive.

- l298n - 1 pc. - motor driver.

- usb boost converter from 5V to 12V - 1pc. (DC-DC 5V to 12V 5W USB Step Up Power Supply Module Boost Converter Voltage Board 4.2V-5.2V) - as an option - link
- powerbank with 2 usb outputs (for powering motors and raspberry pi).

- wires, made by the Soviet designer as a means of fasteners , racks .
Everything. There are no 18650 batteries and arduin.
Budget: up to 15t.r., the most expensive - trucks.
How to put everything together.
We will not dwell on how to assemble the chassis, since, depending on the option chosen, the assembly may differ. In addition, as a rule, the truck seller provides an instruction or a link to it. For example this - to see .
The only remark: several wires go from the engines at once. We only need red-black pairs, power and ground.
We will not dwell on how to assemble the gimbal together with the sg-90. It is only necessary to keep in mind that the servos must be in the middle position (angle - 90 degrees) before being fixed in the suspension. This is necessary so that the suspension has a course of movement in all directions, and does not have a bias in one of them. So it's best to set up the servos first, and then fix them.
Also about the serv. The project has the ability to control two servos at once (left-right, up-down).
But practice has shown that it is better not to use left-right for two reasons:
- you can lose the direction of the robot,
- sg-90 fasteners are flimsy and wear out quickly.
Let's take a look at the connection diagram:

In principle, there is nothing complicated. On the l298n motor driver, the ENA and ENB pins are not used and must have jumpers on them.
The PWM signal is not used and the robot will not be able to smoothly accelerate and decelerate. This was done on purpose, since with poor wi-fi or other delays, the robot reacted differently to control signals. Instead, script pauses are used. How this is implemented will be shown later.
A powerbank is meant instead of a battery pack. This is where a 5V to 12V usb boost converter comes in handy.
The raspberry pi is powered via wittypi 3 mini. It is not necessary to additionally power the single board and servos.
In conclusion, a little
Photo
:


To be continued.