Interactive demo PS5.js
Here's a demo of the PS5 UI created with JavaScript and CSS animations that we'll be writing in this tutorial. An interactive example can be touched in the original article.
Put an asterisk or forknite project ps5.js 35.9 KB on GitHub.
I wrote a tweet about the PS3 demo when I was building the basic version of the PS 3 console UI in JavaScript . I don't have the code yet, but I plan to post it. Moreover, this tutorial is built on the knowledge gained while creating the first job.
Training
In order not to complicate our life, we will not use any frameworks.
But even if you use frameworks or libraries, you still need to develop your own pattern for solving the problem. In this UI tutorial, I'll walk you through the very concept behind development. This approach can be easily adapted to React, Vue, or Angular.
I used this template HTML file with pre-built flex styles. It contains everything you need and the general structure of the application to get started. This is not React or Vue, but this is the minimum configuration required to create an application. I use this blank every time I need to start working on a new vanilla app or website.
HTML and CSS
In this section, I will explain some of the basics of stubbing an HTML file.
Simple DIY CSS Framework
I'm not a big fan of CSS frameworks and prefer to start from scratch. However, after thousands of hours of coding, you start to notice frequently recurring patterns anyway. Why not create some simple classes to cover the most common cases? This prevents us from typing the same property names and values hundreds of times.
.rel { position: relative }
.abs { position: absolute }
.top { top: 0 }
.left { left: 0 }
.right { right: 0 }
.bottom { bottom: 0 }
/* flex */
.f { display: flex; }
.v { align-items: center }
.vs { align-items: flex-start }
.ve { align-items: flex-end }
.h { justify-content: center }
.hs { justify-content: flex-start }
.he { justify-content: flex-end }
.r { flex-direction: row }
.rr { flex-direction: row-reverse }
.c { flex-direction: column }
.cr { flex-direction: column-reverse }
.s { justify-content: space-around }
.zero-padding { padding: 0 }
.o { padding: 5px }
.p { padding: 10px }
.pp { padding: 20px }
.ppp { padding: 30px }
.pppp { padding: 50px }
.ppppp { padding: 100px }
.m { margin: 5px }
.mm { margin: 10px }
.mmm { margin: 20px }
.mmmm { margin: 30px }
These CSS classes speak for themselves.
Our first CSS styles
Now that we have a basic CSS set up, let's add a few styles to change the appearance of hidden and displayed menu containers. Remember that since we have a lot of menus and can switch between them, we need to somehow indicate which menus are "on" and which are "off".
By multiple menus, I mean that each menu has its own screen, defined by a separate HTML element. When switching to the next menu, the previous container is hidden and the new one is displayed. CSS transitions can also be used to create smooth UX transitions by changing opacity, position, and scale.
All containers with a
.menu
default class will be in the "off" state (that is, hidden). Any element with classes
.menu
and
.current
will be in the “on” state and displayed on the screen.
Other elements, such as the buttons selectable in the menu, themselves use the class
.current
, but in a different context of the CSS hierarchy. We will explore their CSS styles in the next parts of the tutorial.
#ps5 {
width: 1065px;
height: 600px;
background: url('https://semicolon.dev/static/playstation_5_teaser_v2.jpg');
background-size: cover;
}
/* default menu container - can be any UI screen */
#ps5 section.menu {
display: none;
opacity: 0;
// gives us automatic transitions between opacities
// which will create fade in/fade out effect.
// without writing any additional JavaScript
transition: 400ms;
}
#ps5 section.menu.current {
display: flex;
opacity: 1;
}
section.menu
is again the standard parent container for all menu layers we create. This could be the "game browser" screen or the "settings" screen. It is invisible by default until we apply the
classlist
class to the element property
.current
.
A
section.menu.current
indicates the currently selected menu. All other menus must be invisible and the class
.current
must never be applied to more than one menu at the same time!
Html
Our homemade tiny CSS framework simplifies HTML a lot. Here's the main skeleton:
<body>
<section id = "ps5" class = "rel">
<section id = "system" class = "menu f v h"></section>
<section id = "main" class = "menu f v h"></section>
<section id = "browser" class = "menu f v h"></section>
<section id = "settings" class = "menu f v h"></section>
</section>
</body>
An element
ps5
is the main container of the application.
The main part
flex
is
f v h
for centering the elements, so we will see this combination often.
Also we will meet
f r
instead of
flex-direction:row;
and
f c
instead of
flex-direction:column;
.
Subsections are separate areas of a menu that require a class
menu
. We can switch between them.
In the code, they will be enumerated by the frozen object (we will see this below).
Replacing the background
One of the first tasks I wanted to deal with was the background change function. If I can implement it first, then I'll just integrate it later into all future functions that need to change the background. For this, I decided to create two
div
.
When the new background becomes active, I simply swap two
div
, replacing the property value
style.background
with the URL of the new image, and apply a class to the new background
.fade-in
, removing it from the previous one.
I started with the following CSS:
#background-1, #background-2 {
position: absolute;
top: 0;
left: 0;
width: inherit;
height: inherit;
background: transparent;
background-position: center center;
background-size: cover;
pointer-events: none;
transition: 300ms;
z-index: 0;
opacity: 0;
transform: scale(0.9)
}
/* This class will be applied from Background.change() function */
.fade-in { opacity: 1 !important; transform: scale(1.0) !important; z-index: 1 }
/* set first visible background */
#background-2 { background-image: url(https://semicolon.dev/static/playstation_5_teaser_v2.jpg); }
Then I created a helper static function
.change
that originates from a class
Background
that swaps two
div
and fade them in or out (the function takes one argument, the URL of the next image):
class Background {constructor() {}}
Background.change = url => {
console.log(`Changing background to ${url}`)
let currentBackground = $(`.currentBackground`);
let nextBackground = $(`.nextBackground`);
// set new background to url
nextBackground.style.backgroundImage = `url(${url})`
// fade in and out
currentBackground.classList.remove('fade-in')
nextBackground.classList.add('fade-in')
// swap background identity
currentBackground.classList.remove('currentBackground')
currentBackground.classList.add('nextBackground')
nextBackground.classList.remove('nextBackground')
nextBackground.classList.add('currentBackground')
}
Now, every time I need to show a new background, I will simply call this function with the URL of the image to be displayed:
Background.change('https://semicolon.dev/static/background-1.png')
Fade in will be done automatically because it
transform: 300ms
has already been applied to each background and the class
.fade-in
is doing the rest.
How to create the main navigation menu
Now that the basic framework is ready, we can start building the rest of the UI. But we also need to write a class to manage the UI. Let's call this class
PS5Menu
. I will explain how to use it below.
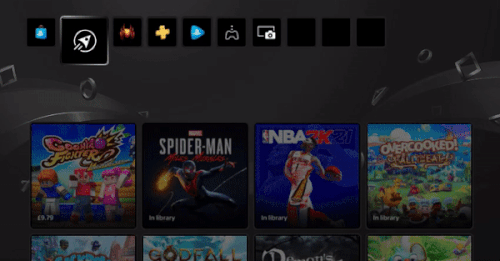
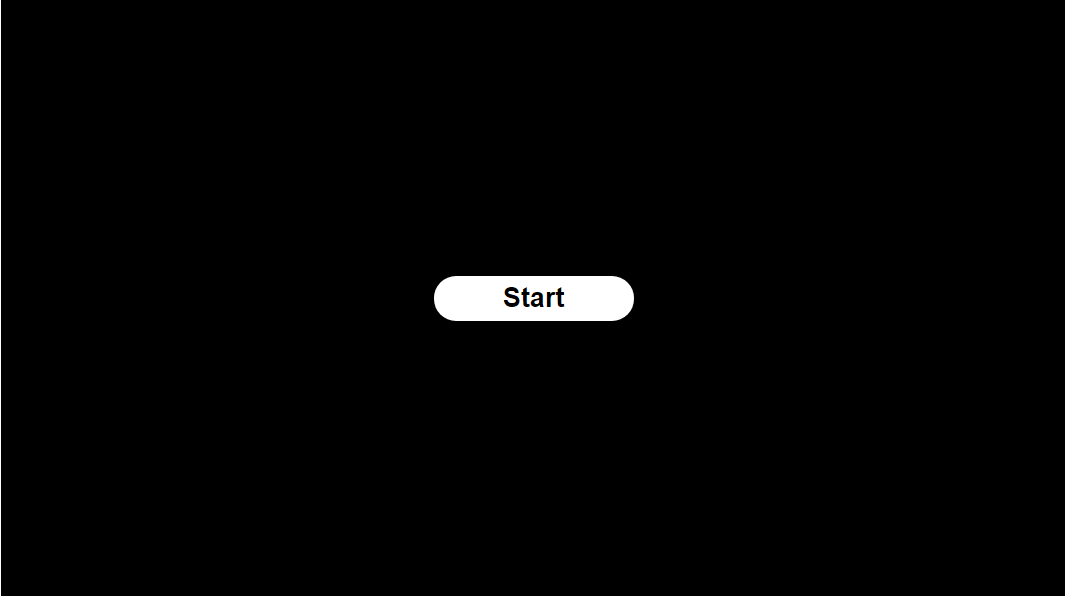
System screen
Simple CSS was used to create the Start button . After pressing the button by the user, we go to the main menu of the PS5. Let's place the Start button in the first menu on the screen - in the System menu:
<section id = "system" class = "menu f v h">
<div id = "start" class = "f v h">Start</div>
</section>
Likewise, the content of all other menus will be located in the corresponding parent container elements.
We'll get to that later. Now we need to figure out how to organize multiple menu screens.
At this point, we need to learn about the concept of enqueuing multiple menus. The PS5 has several layers of different navigation UIs. For example, when you select Settings, a new, completely different menu opens, and keyboard controls are transferred to this new menu.
We need an object to keep track of all these menus that are constantly being opened, closed, and then replaced with a new or previous menu.
You can use the built-in method
push
Array object in JavaScript to add a new menu to the queue. And when we need to return, we can call the
pop
array method to return to the previous menu.
We list the menu by
id
element attribute :
const MENU = Object.freeze({
system: `system`,
main: `main`,
browser: `browser`,
settings: `settings`,
/* add more if needed*/
});
I used
Object.freeze()
so that none of the properties change after they are set. Some types of objects are best frozen. These are the objects that definitely shouldn't change over the life of the application.
Here, each value is the name of the property in string format. This way we can link to menu items by
MENU.system
or
MENU.settings
. There is nothing but syntactic aesthetics in this approach, and it is also a simple way to avoid storing all menu objects "in one basket".
PS5Menu class
First, I created a class
PS5Menu
. Its constructor uses a
this.queue
type property
Array
.
// menu queue object for layered PS5 navigation
class PS5Menu {
constructor() {
this.queue = []
}
set push(elementId) {
// hide previous menu on the queue by removing "current" class
this.queue.length > 0 && this.queue[this.queue.length - 1].classList.remove(`current`)
// get menu container
const menu = $(`#${elementId}`)
// make the new menu appear by applying "current" class
!menu.classList.contains(`current`) && menu.classList.add(`current`)
// push this element onto the menu queue
this.queue.push( menu )
console.log(`Pushed #${elementId} onto the menu queue`)
}
pop() {
// remove current menu from queue
const element = this.queue.pop()
console.log(`Removed #${element.getAttribute('id')} from the menu queue`)
}
}
How do I use the PS5Menu class?
This class has two methods, a setter and a static function . They will do almost the same thing as array methods and do with our array . For example, to create an instance of the class menu and add or remove it from the menu of the stack, we can call methods and directly from an instance of the class.
push(argument)
pop()
.push()
.pop
this.queue
push
pop
// instantiate the menu object from class
const menu = new PS5Menu()
// add menu to the stack
menu.push = `system`
// remove the last menu that was pushed onto the stack from it
menu.pop()
Class setter functions like this
set push()
cannot be called with
()
. They assign a value using an assignment operator
=
. The class setter function
set push()
will execute with this parameter.
Let's combine everything we've already done:
/* Your DOM just loaded */
window.addEventListener('DOMContentLoaded', event => {
// Instantiate the queable menu
const menu = new PS5Menu()
// Push system menu onto the menu
menu.push = `system`
// Attach click event to Start button
menu.queue[0].addEventListener(`click`, event => {
console.log(`Start button pressed!`)
// begin the ps5 demo!
menu.push = `main`
});
});
Here we have created an instance of the class
PS5Menu
and stored its object instance in a variable
menu
.
Then, we queued up multiple menus with the first menu with an id
#system
.
Next, we attached an event to the Start button
click
. When we click on this button, we make the main menu (with
id
, equal to
main
) our current menu. In this case, the system menu will be hidden (the menu is currently in the menu queue) and the container will be displayed
#menu
.
Note that since our menu container class
.menu.current
has the property
transform: 400ms;
, then with a simple addition or removal of a class
.current
from an element, the newly added or removed properties will animate within 0.4 milliseconds.
Now you need to think about how to create content for the main menu.
Note that this step is performed in the "Content Loaded" (
DOMContentLoaded
) DOM event . It should be the entry point for any UI application. The second entry point is an event
window.onload
, but in this demo we do not need it. It waits for the media (images, etc.) to finish downloading, which can happen much later than the DOM elements are available.
Splash screen
Initially, the main UI is a series of several elements. The entire row appears from the right edge of the screen. When it first appears, it animates by dragging it to the left.
I have embedded these elements into the container
#main
like this:
<section id = "main" class = "menu f v h">
<section id = "tab" class = "f">
<div class = "on">Games</div>
<div>Media</div>
</section>
<section id = "primary" class = "f">
<div class = "sel t"></div>
<div class = "sel b current"></div>
<div class = "sel a"></div>
<div class = "sel s"></div>
<div class = "sel d"></div>
<div class = "sel e"></div>
<div class = "sel"></div>
<div class = "sel"></div>
<div class = "sel"></div>
<div class = "sel"></div>
<div class = "sel"></div>
</section>
</section>
The first PS5 menu is placed inside a parent container, styled as follows:
#primary {
position: absolute;
top: 72px;
left: 1200px;
width: 1000px;
height: 64px;
opacity: 0;
/* animate at the rate of 0.4s */
transition: 400ms;
}
#primary.hidden {
left: 1200px;
}
By default, in its hidden state
#primary
, it is intentionally not shown; it is moved far enough to the right (by 1200px).
We had to go through trial and error and use our intuition. It looks like 1200px is a good fit. This container also inherits
opacity:0
from the class
.menu
.
So when it
#primary
appears for the first time, it slides and increases its brightness at the same time.
Here again the value
transform:400ms;
(equivalent
0.4s
) is used, because most microanimations look nice with
0.4s
. Value
0.3s
also works well, but may be too fast and
0.5s
too slow.
Using CSS transitions to control UI animations
Instead of manually manipulating CSS styles every time we need to change the style or position of the UI block, we can simply assign and remove classes:
// get element:
const element = $(`#primary`)
// check if element already contains a CSS class:
element.style.classList.contains("menu")
// add a new class to element's class list:
element.style.classList.add("menu")
// remove a class from element's class list:
element.style.classList.remove("menu")
This is an important strategy that will save tons of time and keep your code clean in any vanilla project. Instead of changing the property,
style.left
we'll just remove the class
.hidden
from the element
#primary
. Since it has
transform:400ms;
, the animation will play automatically.
We will use this tactic to change almost every state of UI elements.
Secondary Slide-Out Animation
When working with UX design, there are different types of animations. Some animations are triggered when switching to a new menu. They usually start after a short period of time, shortly after switching to a new screen.
There are also hover animations that fire when the mouse or controller selects a new adjacent item in the current navigation menu.
Attention to detail is important, especially when you are looking to create a quality product.
Using the setTimeout function to control animation states
A small secondary animation plays as the items are pulled out . To simulate this double effect, a JavaScript function was used
setTimeout
immediately after the DOM tree was fully loaded.
Since this is the first menu screen to appear shortly after clicking the Start button , we now need to update the Start
click
button event in the DOMContentLoaded event just after . The following code will sit at the bottom of an already existing event function (see the source code example shown above):
menu.push = `main`
DOMContentLoaded
/* Your DOM just loaded */
window.addEventListener('DOMContentLoaded', event => {
/* Initial setup code goes here...see previous source code example */
// Attach click event to Start button
menu.queue[0].addEventListener(`click`, event => {
console.log(`Start button pressed!`)
// begin the ps5 demo!
menu.push = `main`
// new code: animate the main UI screen for the first time
// animate #primary UI block within #main container
primary.classList.remove(`hidden`)
primary.classList.add(`current`)
// animate items up
let T1 = setTimeout(nothing => {
primary.classList.add('up');
def.classList.add('current');
// destroy this timer
clearInterval(T1)
T1 = null;
}, 500)
});
});
What came of it
All the code we wrote resulted in this initial animation:
Create selectable items
We have already created the CSS for the selectable elements (class
.sel
).
But it still looks rustic, not as shiny as the PS5 interface.
In the next section, we'll look at the possibilities for creating a nicer interface. We will elevate the UI to the professional look and feel of the PlayStation 5 navigation system.
Standard animation of the "selected" or "current" element
Three types of animations for the currently selected item
In the PS5 console UI, the currently selected items have three visual effects. A rotating outline - a "halo", a random spot of light moving in the background, and, finally, a "light wave" - an effect that looks like a wave moving in the direction of the direction button pressed on the controller.
In this section, we'll learn how to create the classic PS5 button outline effect with a spot of light in the background and a wave of light. Below is an analysis of each type of animation and the CSS classes we need for all of these types:
Animated halo with gradient
This effect adds an animated border that revolves around the selected item.
In CSS, this can be simulated by rotating a tapered gradient.
Here's a general CSS outline for the selectable element:
.sel {
position: relative;
width: 64px;
height: 64px;
margin: 5px;
border: 2px solid #1f1f1f;
border-radius: 8px;
cursor: pointer;
transition: 400ms;
transform-style: preserve-3d;
z-index: 3;
}
.sel.current {
width: 100px;
height: 100px;
}
.sel .under {
content:'';
position: absolute;
width: calc(100% + 8px);
height: calc(100% + 8px);
margin: -4px -4px;
background: #1f1f1f;
transform: translateZ(-2px);
border-radius: 8px;
z-index: 1;
}
.sel .lightwave-container {
position: relative;
width: 100%;
height: 100%;
transition: 400ms;
background: black;
transform: translateZ(-1px);
z-index: 2;
overflow: hidden;
}
.sel .lightwave {
position: absolute;
top: 0;
right: 0;
width: 500%;
height: 500%;
background: radial-gradient(circle at 10% 10%, rgba(72,72,72,1) 0%, rgba(0,0,0,1) 100%);
filter: blur(30px);
transform: translateZ(-1px);
z-index: 2;
overflow: hidden;
}
I tried to use pseudo-elements
::after
and
::before
, but I could not achieve the results I want in simple ways, and their browser support is in question; in addition, JavaScript has no native way to access pseudo-elements.
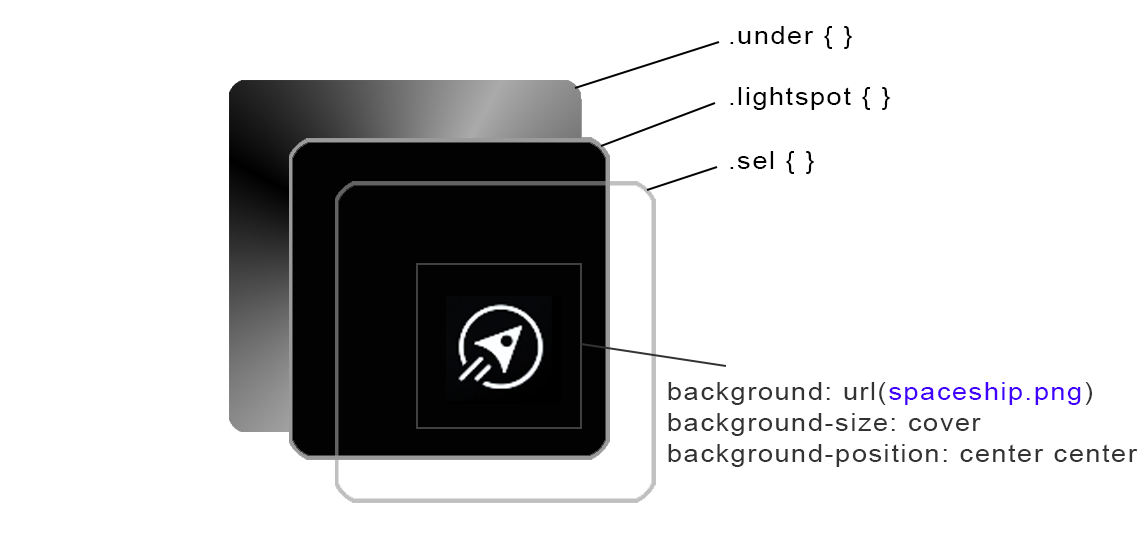
Instead, I decided to create a new element
.under
and decrease its Z position by -1 using
transform: translateZ(-1px)
; thus, we moved it away from the camera, allowing its parent to appear on top of it.
You may also need to add a
.sel
property to parent elements identified by the element
transform-style: preserve-3d;
to enable z-order in the element's 3D space.
Ideally, we would like to
.under
parent the layer to the element and create a spot of light with the actual button element within it. But the trick has
translateZ
a higher priority, and that's also how I started building the UI. It can be reworked, but it is not necessary at this stage.
HTML is pretty simple. The important thing here is that we now have a new element
.under
. This is the element on which the rotating conical gradient will be rendered to create a subtle glowing border.
.lightwave-container
will help us implement the effect of moving light with
overflow: hidden
.
.lightwave
- this is the element on which the effect will be rendered, it is a larger div that goes beyond the borders of the button and contains an offset radial gradient.
<div id = "o0" data-id = "0" class = "sel b">
<div class = "under"></div>
<div class = "lightwave-container">
<div class = "lightwave"></div>
</div>
</div>
As of early March 2021, CSS animations do not support gradient background rotation.
To work around this issue, I used a built-in JavaScript function
window.requestAnimationFrame
. It smoothly animates the background property according to the monitor frame rate, which is usually 60FPS.
// Continuously rotate currently selected item's gradient border
let rotate = () => {
let currentlySelectedItem = $(`.sel.current .under`)
let lightwave = $(`.sel.current .lightwave`)
if (currentlySelectedItem) {
let deg = parseInt(selectedGradientDegree);
let colors = `#aaaaaa, black, #aaaaaa, black, #aaaaaa`;
// dynamically construct the css style property
let val = `conic-gradient(from ${deg}deg at 50% 50%, ${colors})`;
// rotate the border
currentlySelectedItem.style.background = val
// rotate lightwave
lightwave.style.transform = `rotate(${selectedGradientDegree}deg)`;
// rotate the angle
selectedGradientDegree += 0.8
}
window.requestAnimationFrame(rotate)
}
window.requestAnimationFrame(rotate)
This function is responsible for animating the rotating border and the larger light wave element.
The Event Listener Paradigm
Since we are not using React or other frameworks, we need to deal with the event listeners ourselves. Each time we switch the menu, we need to detach all mouse events from all items inside the parent container of the previous menu, and attach mouse event listeners to all interactive items inside the parent container of the new selected menu.
Each screen is unique. The easiest way is to hard code the events for each screen. This is not a hack, but simply code specific to each unique navigation system. For some things, there are simply no convenient solutions.
The next two functions will enable and disable events from different screens.
See full PS5.js source codeto understand how everything works in general.
function AttachEventsFor(parentElementId) {
switch (parentElementId) {
case "system":
break;
case "main":
break;
case "browser":
break;
case "settings":
break;
}
}
function RemoveEventsFrom(parentElementId) {
switch (parentElementId) {
case "system":
break;
case "main":
break;
case "browser":
break;
case "settings":
break;
}
}
This ensures that we never listen for more mouse events than we have so that the UX code runs optimally for each individual menu screen.
Navigating with the keyboard
Keyboard controls are rarely used in web applications and websites. So I created a vanilla JS keyboard library that recognizes basic keys and allows you to simply hook up key press events.
We need to intercept the following keys:
- Enter or Space - Selects the currently selected item.
- Left , Right , Up , Down - navigation through the currently selected menu.
- Escape - Cancels the current queued menu and returns to the previous menu.
You can bind all basic keys to variables as follows:
// Map variables representing keys to ASCII codes
const [ A,B,C,D,E,F,G,H,I,J,K,L,M,N,O,P,Q,R,S,T,U,V,W,X,Y,Z ] = Array.from({ length: 26 }, (v, i) => 65 + i);
const Delete = 46;
const Shift = 16;
const Ctrl = 17;
const Alt = 18;
const Left = 37;
const Right = 39;
const Up = 38;
const Down = 40;
const Enter = 13;
const Return = 13;
const Space = 32;
const Escape = 27;
And then create a keyboard event handler:
function keyboard_events_main_menu(e) {
let key = e.which || e.keyCode;
if (key == Left) {
if (menu.x > 0) menu.x--
}
if (key == Right) {
if (menu.x < 3) menu.x++
}
if (key == Up) {
if (menu.y > 0) menu.y--
}
if (key == Down) {
if (menu.y < 3) menu.y++
}
}
And connect it to the document object:
document.body.addEventListener("keydown", keyboard_events_main_menu);
Sound API
Still working on it ...
In the meantime, you can download here a simple sound API library on vanilla JS.