In this material, it is proposed, with a little effort, to connect python 3.7 + flask + tensorflow 2.0 + keras + small inclusions of js and display a certain interactivity on the web page. The user, drawing on the canvas, will send numbers for recognition, and the previously trained model using the CNN architecture will recognize the resulting drawing and output the result. The model is trained on the well-known set of handwritten digits MNIST, therefore, it will recognize only digits from 0 to 9 inclusive. Windows 7 is used as the system on which all this will spin.
Small introduction
The sad thing about machine learning books is that the code becomes outdated almost as soon as the book itself is published. And it's good if the author of the publication supports his child by maintaining and updating the code, but often everything is limited to what they write - here's the requirements.txt, install outdated packages, and everything will work.
It happened this time too. Reading Hands-On Python Deep Learning for the Web by Anubhav Singh, Sayak Paul, everything went well at first. However, after the first chapter, the holiday was over. The most unpleasant thing was that the stated requirements in the requirements were generally complied with.
The developers of the tensorflow and keras packages themselves added fuel to the fire. One package works only with a certain other, and either downgrade one of them or the shaman's tambourine.
But that's not all. It turns out that some packages are also architecture dependent!
So, in the absence of an alternative to hardware, tensorflow 2.0 was installed on a platform with Celeron j1900 and, as it turned out, there is no AVX2 instruction there:

And the option via pip install tensorflow did not work.
But not everything is so sad with the desire and the Internet!
The variant with tensorflow 2.0 was implemented through wheel - github.com/fo40225/tensorflow-windows-wheel/tree/master/2.0.0/py37/CPU/sse2 and x86 installation: vc_redist.x86.exe, x64: vc_redist.x64. exe (https://support.microsoft.com/en-us/help/2977003/the-latest-supported-visual-c-downloads).
Keras was installed with the minimum version with which it "became compatible" with tensorflow - Keras == 2.3.0.
therefore
pip install tensorflow-2.0.0-cp37-cp37m-win_amd64.whl
and
pip install keras==2.3.0
Main application
Let's consider the code of the main program.
flask_app.py
#code work with scipy==1.6.1, tensorflow @ file:///D:/python64/tensorflow-2.0.0-cp37-cp37m-win_amd64.whl,
#Keras==2.3.0
from flask import Flask, render_template, request
import imageio
#https://imageio.readthedocs.io/en/stable/examples.html
#from scipy.misc import imread, imresize
#from matplotlib.pyplot import imread
import numpy as np
import tensorflow as tf
from tensorflow.keras.models import model_from_json
from skimage import transform,io
json_file = open('model.json','r')
model_json = json_file.read()
json_file.close()
model = model_from_json(model_json)
model.load_weights("weights.h5")
model.compile(loss='categorical_crossentropy',optimizer='adam',metrics=['accuracy'])
#graph = tf.get_default_graph()
graph = tf.compat.v1.get_default_graph()
app = Flask(__name__)
@app.route('/')
def index():
return render_template("index.html")
import re
import base64
def convertImage(imgData1):
imgstr = re.search(r'base64,(.*)', str(imgData1)).group(1)
with open('output.png', 'wb') as output:
output.write(base64.b64decode(imgstr))
@app.route('/predict/', methods=['GET', 'POST'])
def predict():
global model, graph
imgData = request.get_data()
convertImage(imgData)
#print(imgData)
#x = imread('output.png', mode='L')
#x.shape
#(280, 280)
x = imageio.imread('output.png',pilmode='L')
#x = imresize(x, (28, 28))
#x = x.resize(x, (28, 28))
x = transform.resize(x, (28,28), mode='symmetric', preserve_range=True)
#(28, 28)
#type(x)
#<class 'numpy.ndarray'>
x = x.reshape(1, 28, 28, 1)
#(1, 28, 28, 1)
x = tf.cast(x, tf.float32)
# perform the prediction
out = model.predict(x)
#print(np.argmax(out, axis=1))
# convert the response to a string
response = np.argmax(out, axis=1)
return str(response[0])
if __name__ == "__main__":
# run the app locally on the given port
app.run(host='0.0.0.0', port=80)
# optional if we want to run in debugging mode
app.run(debug=True)
Uploaded packages:
from flask import Flask, render_template, request
import imageio
#https://imageio.readthedocs.io/en/stable/examples.html
#from scipy.misc import imread, imresize
#from matplotlib.pyplot import imread
import numpy as np
import tensorflow as tf
from tensorflow.keras.models import model_from_json
from skimage import transform,io
As imread found out, imresize has been deprecated since scipy == 1.0. It is unclear how everything worked for the author, given that the book is relatively new (2019). With modern scipy == 1.6.1, the bookish version of the code didn't work.
We load from disk, compile the neural network model:
json_file = open('model.json','r')
model_json = json_file.read()
json_file.close()
model = model_from_json(model_json)
model.load_weights("weights.h5")
model.compile(loss='categorical_crossentropy',optimizer='adam',metrics=['accuracy'])
#graph = tf.get_default_graph()
graph = tf.compat.v1.get_default_graph()
Here we have replaced it with tf.compat.v1.get_default_graph () due to incompatibility.
Next is the flask server part. "Drawing" of the page template:
@app.route('/')
def index():
return render_template("index.html")
The part that converts the image to a numeric array:
import re
import base64
def convertImage(imgData1):
imgstr = re.search(r'base64,(.*)', str(imgData1)).group(1)
with open('output.png', 'wb') as output:
output.write(base64.b64decode(imgstr))
Main prediction function:
def predict():
global model, graph
imgData = request.get_data()
convertImage(imgData)
#print(imgData)
#x = imread('output.png', mode='L')
#x.shape
#(280, 280)
x = imageio.imread('output.png',pilmode='L')
#x = imresize(x, (28, 28))
#x = x.resize(x, (28, 28))
x = transform.resize(x, (28,28), mode='symmetric', preserve_range=True)
#(28, 28)
#type(x)
#<class 'numpy.ndarray'>
x = x.reshape(1, 28, 28, 1)
#(1, 28, 28, 1)
x = tf.cast(x, tf.float32)
# perform the prediction
out = model.predict(x)
#print(np.argmax(out, axis=1))
# convert the response to a string
response = np.argmax(out, axis=1)
return str(response[0])
The lines were commented out, which were replaced with working ones, and also the conclusions of separate lines were left for clarity.
How it works
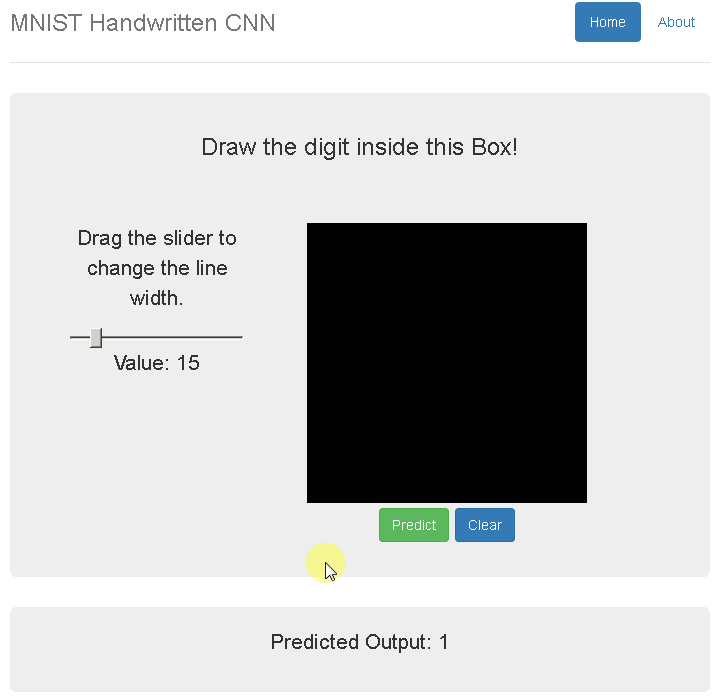
After starting with the python flask_app.py command , the local flask server is launched, which displays index.html interspersed with js.
The user draws a number on the canvas, clicks "predict". The picture "flies" to the server, where it is saved and converted into a digital array. Next, CNN enters the battle, recognizing the digit and returning the answer in the form of a digit.
The network does not always give the correct answer, because studied for only 10 eras. This can be observed if you draw a "controversial" figure, which can be interpreted in different ways.
* You can turn the slider to increase or decrease the thickness of the outline of the number for recognition purposes.
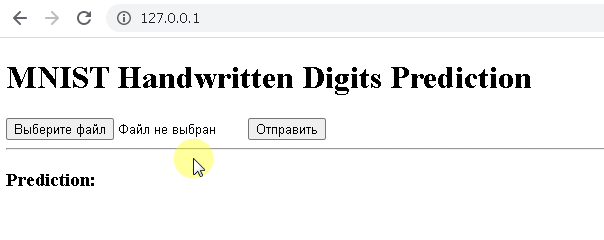
The second version of the program is via API, curl
The user uploads his image with a number for recognition to the server and clicks "submit":
Let's replace index.js with the following:
index.js:
$("form").submit(function(evt){
evt.preventDefault();
var formData = new FormData($(this)[0]);
$.ajax({
url: '/predict/',
type: 'POST',
data: formData,
async: false,
cache: false,
contentType: false,
enctype: 'multipart/form-data',
processData: false,
success: function (response) {
$('#result').empty().append(response);
}
});
return false;
});
The page template will also change:
index.html
<!DOCTYPE html>
<html lang="en">
<head>
<title>MNIST CNN</title>
</head>
<body>
<h1>MNIST Handwritten Digits Prediction</h1>
<form>
<input type="file" name="img"></input>
<input type="submit"></input>
</form>
<hr>
<h3>Prediction: <span id="result"></span></h3>
<script
src='https://code.jquery.com/jquery-3.6.0.min.js'></script>
<script src="{{ url_for('static',filename='index.js') }}"></script>
</body>
</html>
The main program will also change slightly:
flask_app2.py
#code work with scipy==1.6.1, tensorflow @ file:///D:/python64/tensorflow-2.0.0-cp37-cp37m-win_amd64.whl,
#Keras==2.3.0
from flask import Flask, render_template, request
import imageio
#https://imageio.readthedocs.io/en/stable/examples.html
#from scipy.misc import imread, imresize
#from matplotlib.pyplot import imread
import numpy as np
import tensorflow as tf
from tensorflow.keras.models import model_from_json
from skimage import transform,io
json_file = open('model.json','r')
model_json = json_file.read()
json_file.close()
model = model_from_json(model_json)
model.load_weights("weights.h5")
model.compile(loss='categorical_crossentropy',optimizer='adam',metrics=['accuracy'])
#graph = tf.get_default_graph()
graph = tf.compat.v1.get_default_graph()
app = Flask(__name__)
@app.route('/')
def index():
return render_template("index.html")
import re
import base64
def convertImage(imgData1):
imgstr = re.search(r'base64,(.*)', str(imgData1)).group(1)
with open('output.png', 'wb') as output:
output.write(base64.b64decode(imgstr))
@app.route('/predict/', methods=['POST'])
def predict():
global model, graph
imgData = request.get_data()
try:
stringToImage(imgData)
except:
f = request.files['img']
f.save('image.png')
#x = imread('output.png', mode='L')
#x.shape
#(280, 280)
x = imageio.imread('image.png',pilmode='L')
#x = imresize(x, (28, 28))
#x = x.resize(x, (28, 28))
x = transform.resize(x, (28,28), mode='symmetric', preserve_range=True)
#(28, 28)
#type(x)
#<class 'numpy.ndarray'>
x = x.reshape(1, 28, 28, 1)
#(1, 28, 28, 1)
x = tf.cast(x, tf.float32)
# perform the prediction
out = model.predict(x)
#print(np.argmax(out, axis=1))
# convert the response to a string
response = np.argmax(out, axis=1)
return str(response[0])
if __name__ == "__main__":
# run the app locally on the given port
app.run(host='0.0.0.0', port=80)
# optional if we want to run in debugging mode
app.run(debug=True)
Everything starts similarly - python flask_app2.py
Curl option (for windows)
Download curl
In the windows command line, send the command:
curl -X POST -F img=@1.png http://localhost/predict/
where 1.png is a picture with a number (or it is with a path to it).
A recognized digit will arrive in response.
Files for downloading - download .