
I'm sure many have heard of NVM Express , or just NVMe . Initially, these were just fast drives for me. Then I realized that this is the interface for connecting these drives. Then he began to understand NVMe as a protocol for transferring data over the PCIe bus. And not just a protocol, but a protocol designed specifically for solid state drives!
Little by little, I came to realize that this is a whole specification . And away we go ... How many interesting features of use, it turns out, exist in NVMe. How many things were invented ... It was even a little offensive that such a layer of information passed by me.
So what exactly is NVMe? Let's take a closer look.
It all started with the SATA interface . In fact, before it there were a lot of other interfaces - SCSI, UltraSCSI, ATA, PATA and others, but these are things of bygone days. In this article, we will consider only the currently relevant interfaces.
The data transfer speed via the SATA interface reaches 560 MB / s, which is more than enough for HDD disks, the performance of which varies from 90 to 235 MB / s (there are some prototypes, the speed of which reaches 480 MB / s). But this is not enough for SSD drives, already now their performance reaches from 3000 to 3500 MB / s. SAS interface will not work either, its maximum speed is only 1200 MB / s.
In order to realize the full potential of solid state drives, great minds have decided to use the PCIe interface . Now it allows you to transfer data at speeds from 8 to 32 GB / s. To unify the connection of SSDs to PCIe interfaces, the NVMe specification was developed. In the same way as the specification for connecting USB-Flash-drives was created in due time.
We will not completely disassemble NVMe. In this article, I want to share with you a feature that interested me greatly - NVMe Namespaces , or Namespaces .
Hopefully there are those among the readers who are interested in exploring this technology. Experienced users' comments will be welcome. And if you, like me, are just starting to understand the topic, I recommend that you read the series of articles on the history of SSD. At one time, she helped me tamp and sort out a lot of rubbish in my head.
Closer to NVMe
NVMe on Linux
I'll start from afar. To study and search for information about namespaces, I was prompted by the question: "Why are NVMe disks in Linux called that way?"
Everyone is used to labeling disks in Linux as block devices. They are file descriptors that provide an interface for interacting with physical or virtual devices. And such devices do not have a random, but quite strict name that contains some information. Let's look at the following output from devfs :
root@thinkpad-e14:~$ ls -l /dev/ | grep -E "nvme"
crw-------  1 root    root    241,   0  25 22:04 nvme0
brw-rw----  1 root    disk    259,   0  25 22:04 nvme0n1
brw-rw----  1 root    disk    259,   1  25 22:04 nvme0n1p1
brw-rw----  1 root    disk    259,   2  25 22:04 nvme0n1p2
brw-rw----  1 root    disk    259,   3  25 22:04 nvme0n1p3
All NVMe devices connected to the working machine are listed here. Consider the block device / dev / nvme0n1p1 . The nvme part , oddly enough, is used for NVMe devices. The following number indicates the serial number of the disk controller , which is responsible for all operations performed with the drive. The trailing p1 indicates the partition number on the disk. Finally, the part that deserves our attention is n1. This is the number of the space.
For simplicity, you can also draw some analogy with ordinary SSDs:
/ dev / sda - analogue of / dev / nvme0n1
/ dev / sda1 - analogue of / dev / nvme0n1p1
Pay attention to the / dev / nvme0 device. This is an NVMe controller. It is a character device. Thus, we can refer to it by sending certain commands, which we will use further.
Namespace vs Partition
You may be wondering: how is namespace different from partition? Let's drop all the features and benefits of NVMe Namespace. Partition is a host-level disk partition . Namespace is a controller-level section . That is, the Namespace is a kind of logical space with which the host works like a block device.
Another level of partitioning adds flexibility to the organization of the storage system, which allows the use of various technologies aimed at increasing the reliability, performance and security of data. We'll look at them later.
NVMe controller parameters
All data operations are handled by a special NVMe controller. In addition, in its memory, it stores metadata about itself and the internal structure of information: serial number, model, all kinds of disk settings, spaces assigned to it, data format, and so on.
I propose to examine them under a microscope. To do this, I sent a special command to the controller, in response to which it returned the metadata. I'll explain how to do this later, but for now take a look at them. Since there is a lot of data, I did not insert it entirely, but you must know that the parameters that I will talk about later actually exist :
{
  "vid" : 5197,
  "ssvid" : 5197,
  "sn" : "00000000000000",
  "mn" : "00000000000000000000000000",
  "fr" : "7L1QFXV7",
  "rab" : 2,
  "ieee" : 9528,
  "cmic" : 0,
  "mdts" : 9,
  "cntlid" : 5,
  "ver" : 66304,
  "rtd3r" : 100000,
  "rtd3e" : 8000000,
  "oaes" : 512,
  "ctratt" : 0,
  "rrls" : 0,
  "crdt1" : 0,
  "crdt2" : 0,
  "crdt3" : 0,
  "oacs" : 23,
  "tnvmcap" : 256060514304,
  "unvmcap" : 0,
  ...
}
Metadata is stored in the controller as a sequence of bytes in order from high to low, so further I will adhere to the following recording format:
[interval in bytes (Big-Endian format)] / parameter name / decryption.
An example for better understanding. The following record means that from 71 to 64 bytes the value of the fr parameter is stored , which stands for firmware revision :
[71:64] / fr / firmware revision.
[23: 4] / sn / serial number. Contains the serial number of the controller.
[63:24] / mn / model number. Contains the model number, or part number.
[71:64] / fr / firmware revision.Contains the revision number of the controller firmware.
[257: 256] / oacs / optional admin command support. Indicates the presence of additional commands and controller functions. It consists of 16 bits, each of which is responsible for a specific command. If the bit is 1, then the controller makes it possible:
- [15:10] - reserved;
- [9] - get LBA status;
- [8] - get access to the "Doorbell Buffer Config" ;
- [7] - to manage virtualization ("Virtualization Management") ;
- [6] - use the NVMe-Mi Recieve and NVMe-Mi Send commands ("NVMe Management Interface" );
- [5] - use directives ("Directives") ;
- [4] — («Self-Test Commands»);
- [3] — («Namespace Management»);
- [2] — ( «Firmware Commit» «Firmware Download»);
- [1] — («NVM Format»);
- [0] — («Security Send», «Security Receive»).
In this article, we will only touch on those functions that are related to namespaces, namely "Namespace Management" and "NVM Format" . If you are interested in details about other features, you can refer to the NVM Express Revision 1.4 specification .
NVMe space parameters
Now let's look at the metadata of NVMe spaces:
{
  "nsze" : 500118192,
  "ncap" : 500118192,
  "nuse" : 233042000,
  "nsfeat" : 0,
  "nlbaf" : 0,
  "flbas" : 0,
  "mc" : 0,
  "dpc" : 0,
  "dps" : 0,
  "nmic" : 0,
  "rescap" : 0,
  ...
  ]
}
[7: 0] / nsze / namespace size. This is the maximum amount of space in logical blocks. In this case - 500118192 512-byte blocks, which, by the way, is indicated in the blockdev output :
root@thinkpad-e14:~$ sudo blockdev --getsz /dev/nvme0n1
500118192
[15: 8] / ncap / namespace capacity . This is the number of logical blocks currently allocated to storage space.
[23:17] / nuse / namespace use. This is the number of logical blocks currently occupied by data.
Note that the nsze and ncap options are equal. What is the point of specifying the maximum volume and volume that is currently allocated? Does this mean that at the moment there may be less allocated than available? Yes!
The fact is that namespaces support Thin Provisioning technology. ... This means that only a fraction of the specified volume is allocated to the space. The other part will remain in the shared pool and be allocated to this or other spaces on demand: when the allocated volume is full or when a critical threshold is reached. In general, this technology allows for more efficient use of storage resources. More details and more clearly with this technology can be found in this article .
In our situation nsze and ncap equal, because the space was created without the support of the fine distribution. Such space on the disk will look like this:
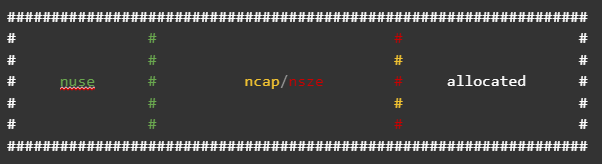
ncap and nsize will point to one一 total amount of space . In the case of using thin distribution on the disk, the space will look like this:

Here nsze indicates the maximum volume, nca p - the allocated, and nuse in both cases shows only what is occupied. When the value of nuse reaches ncap , the ncap increase, but not more than nsze .
It is worth noting that to support this technology, appropriate configuration of the namespace is required, as well as support for thin distribution from the controller side.
[24:24] / nsfeat / namespace features.This parameter is especially interesting. It indicates the presence of additional features of the space. It consists of 8 bits (they are also listed in Big Endian), each of which is responsible for a specific function. If the bit value is 1, then the function is active, 0 - not:
- [7: 5] - reserved;
- [4: 4] - support for additional fields to optimize I / O ;
- [3: 3] - disable reuse of the NGUID field ;
- [2: 2] - support for deleted and unwritten blocks ("Context Attributes") ;
- [1: 1] - support for additional fields for atomic recording ("Atomic Operations") ;
- [0: 0] - support for thin distribution .
[26:26] / flbas / formatted lba size . This parameter points to an LBA structure. Also consists of 8 bits:
- [7: 5] - reserved;
- [4: 4] - if set to 1: indicates that metadata will be stored at the end of the block; with a value of 0: metadata is transferred in a separate buffer ;
- [3: 0] - allows you to select one of 16 possible LBA formats.
[29:29] / dps / end-to-end data protection type settings . Indicates the type of end-to-end data protection. Consists of 8 bits:
- [7: 4 ] - reserved;
- [3: 3] - indicates the type of metadata transfer ;
- [2: 0] - indicates the presence of data protection and its type.
[30:30] / nmic / namespace multi-path and Namespace Sharing Capabilities . This field indicates support for features related to multi-access to namespaces:
- [7: 1] - reserved;
- [0: 0] - a value of 1 indicates that this space is public (public namespace) and can communicate with several controllers , and a value of 0 indicates that the space is private (private namespace) and is bound to only one .
This concludes your brief overview of the parameters. Their number is huge, which allows you to very finely configure namespaces for various tasks, which we will consider at the end of the article. A detailed description of each parameter can be found in the NVM Express Revision 1.4 specification .
Public and private spaces
The article has already mentioned terms such as public spaces and private spaces . But I did not clarify their meaning, so I consider it necessary to devote a little time to them.
One of the steps in creating a space is to assign it to an NVMe controller. Access to the space will be carried out through the controller to which it is assigned. But the space can be assigned not only to one controller - private, but also to several controllers - public.
If a private space can be called ordinary, since nothing interesting can be made of it, then a public space allows you to use such an opportunity as namespace multi-path...
Interoperability with NVMe
Let's get down to the question of interacting with NVMe devices: how to send various commands to the controller, create namespaces, format them, etc. For this, in the Linux world, there is a utility called nvme-cli. With its help, you can perform these operations.
nvme list
To list NVMe devices, it is not necessary to access devfs in this way:
root@thinkpad-e14:~$ ls /dev/ | grep "nvme"
nvme0
nvme0n1
nvme0n1p1
nvme0n1p2
nvme0n1p3
Or use lspci to find out what is connected to the machine:
root@thinkpad-e14:~$ lspci | grep -E "NVMe|Non-Volatile"
07:00.0 Non-Volatile memory controller: Samsung Electronics Co Ltd Device a809
It is enough to use the nvme list command :
root@thinkpad-e14:~$ nvme list -o json
{
  "Devices" : [
    {
      "NameSpace" : 1,
      "DevicePath" : "/dev/nvme0n1",
      "Firmware" : "9L1QFXV7",
      "Index" : 0,
      "ModelNumber" : "SAMSUNG MZALQ256HAJD-000L1",
      "ProductName" : "Non-Volatile memory controller: Samsung Electronics Co Ltd Device 0xa809",
      "SerialNumber" : "00000000000000",
      "UsedBytes" : 38470483968,
      "MaximumLBA" : 500118192,
      "PhysicalSize" : 256060514304,
      "SectorSize" : 512
    }
  ]
}
I have outputted the information in JSON format as an example . As you can see, not only a list of devices is displayed here, but also various information about them. I think that some of the attributes (for example, DevicePath or ModelNumbe r) do not need comments, so I pay attention only to a few:
- Index - controller number;
- UsedBytes The amount of space used in bytes.
- PhysicalSize - the maximum amount of space in bytes;
- SectorSize - LBA or logical block format - the smallest addressable data block;
- MaximumLBA is the maximum number of logical blocks.
nvme id-ctrl, nvme id-ns
Earlier in the article, to get metadata about a device, I sent the Identify command to the controller . To do this, I used the nvme id-ctrl command to identify the controller:
root@thinkpad-e14:~$ nvme id-ctrl /dev/nvme0
And nvme id-ns to identify the space:
root@thinkpad-e14:~$ nvme id-ns /dev/nvme0n1
Note that you need to specify a device - a controller or namespace.
nvme create-ns, nvme delete-ns
Namespaces are created in several stages. First, you need to shape it. To do this, use the nvme create-ns command :
root@thinkpad-e14:~$ nvme create-ns /dev/nvme0 --nsze 1875385008 --ncap 1875385008 --flbas 0 --nmic 1 --dps 0
create-ns: Success, created nsid:1
You are already familiar with the arguments given to this command. We examined them in the section "NVMe-Spaces Settings".
To delete a space, use the nvme delete-ns command :
root@thinkpad-e14:~$ nvme delete-ns /dev/nvme0n1
delete-ns: Success, deleted nsid:1
nvme attach-ns, nvme detach-ns
The second stage of creating NVMe spaces is binding the generated space to the controller. To do this, use the nvme attach-ns command :
root@thinkpad-e14:~$ nvme attach-ns /dev/nvme0 --namespace-id 1 --controllers 1
attach-ns: Success, nsid:1
With this command, we bind the space with the identifier 1 to the controller / dev / nvme0 . Also notice the --controllers argument . This lists the IDs of the NVMe controllers to which the space can be mapped. This argument is optional and is used when creating public spaces.
For some reason, the numbering of controllers starts from 1, that is, the controller / dev / nvme0 has an identifier of 1, which is specified in the --controllers argument. Hopefully this will help you avoid wasting time researching the following error:
root@thinkpad-e14:~$ nvme attach-ns /dev/nvme0 --namespace-id 1 --controllers 0
NVMe Status:CONTROLLER_LIST_INVALID: The controller list provided is invalid(211c)
To untie the space, use the nvme detach-ns command :
root@thinkpad-e14:~$ nvme detach-ns /dev/nvme0n1 --namespace-id 1 --controllers 1
detach-ns: Success, nsid:1
The space then disappears from the block device list and becomes unusable. You also need to specify only the controllers from which you want to decouple the space in the --controllers argument.
nvme reset
Once a space has been bound to a controller, it can usually be used for work. However, it happens that the controller cannot see the space. In this case, it must be restarted - use the nvme reset command .
nvme format
If it is necessary to change the LBA format for a space, the nvme format command comes to the rescue :
root@thinkpad-e14:~$ nvme format /dev/nvme0n1 --lbaf 0
Success formatting namespace:1
The --lbaf argument indicates LBA format.
However, this command can also be used to securely erase data on an NVMe drive:
root@thinkpad-e14:~$ nvme format /dev/nvme0n1 --ses 1 -r
Success formatting namespace:1
The --ses argument indicates the grout level:
- 1 - delete all data;
- 2 - delete encrypted data.
The -r argument indicates that the controller will restart after a safe grout.
Application
There are many possible uses for the spaces. They are mainly used to increase performance, redundancy and are used in storage systems, but there are more mundane use cases.
Spare Area
Let's start with a fairly common usage practice. The Spare Area, or Reserve Area, was invented even before NVMe. This is a special space on the SSD that is used by the controller itself for internal operations and is not available to the host.
By resizing the spaces, we can also resize the fallback area. The fact is that the entire volume of the disk is equal to the sum of the volumes of all spaces and the volume of the spare area:
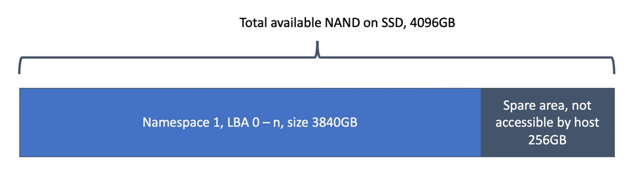
Accordingly, if we reduce the total volume of spaces, then the remaining volume will go in favor of the spare area.
If you want to know more about the backup area, you can refer to this article .
Encryption and isolation
NVMe drives support OPAL SEDs . Moreover, different encryption keys are used for each namespace.
The controller also provides write protection. There are three levels:
- read-only until next reboot;
- read-only until the next reboot after disabling the write-protect function;
- read-only throughout the entire work.

It is often used in stationary and mobile PCs. For example, a bootloader can be placed in a read-only space to avoid damaging it. Other important data can be protected in the same way.
Multiple Using
As mentioned earlier, spaces are controller-level partitions that are visible to the end host as a separate device. Is it possible to divide a large NVMe drive into several private spaces, each of which is then allocated to different hosts? Can! And using the network protocol NVMe-oF (NVMe Over Fabrics) , these spaces can be allocated not only to virtual hosts, but also to physical ones.
With this use of the drive, the partitioning scheme will look like this:
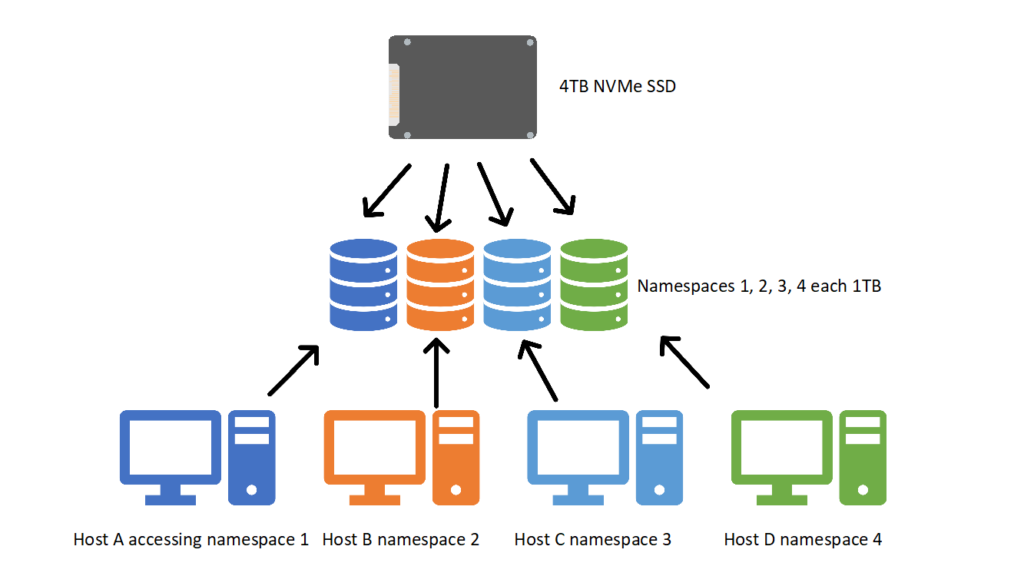
The NVMe controller will make sure that the spaces are isolated from each other: data will be stored in separate areas of the drive, each host will have its own I / O queue. However, the spare area , or spare areas , will still be shared.
Namespace Multi-path and Namespace Sharing
Namespace Sharing, or Public Namespaces, means that one or more hosts can share a space through two or more controllers.

What is it for? The figure shows a diagram of the use of public spaces. Yes, interesting: we can access the NS B space through the NVMe Controller 1 and NVMe Controller 2. But I don't see any usefulness in this ... until the diagram looks like this:

Here we see that the controllers are on completely different hosts and we have several independent paths to the data: through the host controllers Host A (blue controllers) and Host B (purple controllers). Now this can be used for redundancy or for increasing performance: if the blue path is heavily loaded, then we will go along the purple one.
This approach allows you to organize high-performance and highly reliable flexible software-defined storage systems from conventional server platforms using NVMe-oF.
Outcome
NVMe Namespaces are
In this article, we have not covered all the aspects and subtleties of using namespaces. It turned out, rather, a review or acquaintance. However, I hope this helps you to get started with a deeper study of the technology if you wish.
Afterword
When writing this article I was faced with
- Samsung 970 EVO / 970 EVO Plus drives with 2b2qexe7 / 2b2qexm7 firmware do not implement the reset and format commands;
- Samsung 970 EVO / 970 EVO Plus drives with firmware 2b2qexe7 / 2b2qexm7 do not implement space management using the create-ns, delete-ns, detach-ns, atach-ns commands;
- Samsung PM991 drives with 9L1QFXV7 firmware have a bug due to which restarting the controller using the reset command results in an error;
- Samsung PM991 drives with 9L1QFXV7 firmware have a bug due to which formatting the space using the format command results in an error;
- Samsung PM991 drives with firmware 9L1QFXV7 do not implement space management using the create-ns, delete-ns, detach-ns, atach-ns commands.
I am sure that disks from the corporate segment are free from these problems, but not everyone can afford to purchase such pieces of hardware, so study the disks and manuals for them in detail when buying. And if there is an opportunity to examine the disks before purchasing and see the parameters of the NVMe controller, be sure to use it.
Helpful Sources
- SSD: device, components and principles of operation
- A Quick Tour of NVM Express
- NVMe 1.4 Specification
- NVMe Namespaces
- Base NVM Express — Part One
- NVMe Command Line Interface (NVMe-CLI)
- NVMe Over Fabrics
