I want to tell you how I put together a cross-compiler for the Raspberry Pi4 using crosstool-ng. Perhaps the topic will seem too primitive and boring to someone. At first I myself thought that I could quickly assemble a cross-compiler, but I had to tinker and study the issue, some of the nuances were unexpected for me. Then I'll tell you what and how I did.
Perhaps the first question you need to ask yourself is: "What is a cross-compiler for?" In fact, the Raspberry Pi4 is pretty fast and you can compile programs right on it. If the project is simple, then it is quite possible to do so. But when the project grows and becomes more complex, then it is already better to switch to cross-compilation. Then it is easier to solve other issues, for example, you can organize the auto-assembly of the project on the integration server. Cross-compiling on a fast PC can significantly increase the build speed, and you can find better tools for editing programs on a PC.
Second question: “Can I take a ready-made cross-compiler? Why collect your own? " To tell you the truth, I haven't found a normal cross-compiler for Raspberry. Maybe I was looking badly? On github from Rasberrythere is a tools project and there are several cross-compilers, but they are ancient! Well, what is there? Version 4.9.3? Somehow not serious. On the Linaro download page, I see only version 7.5, already better, but, firstly, on the Raspberry Buster OS itself, version 8.3 is already, and secondly, the Linaro compiler worked for me only after some patches. It's kind of strange ...
It was after trying to run the Linaro compiler that I thought that I could probably build my own cross-compiler myself. I already had some experience with crosstool-ng. I was doing a cross compiler for Amber SoC .
What is the complexity of the assembly? The crosstool-ng tool has many different settings that are not always clear. Building the cross compiler on my laptop takes approximately 45 minutes. If you make a mistake with the settings, then the resulting cross-compiler somehow does not work that way, does not collect something, or collects, but the resulting binary does not run on Raspberry. After checking the resulting cross-compiler, I again had to change something in the settings and again generate it from the beginning. Well, I made a few tries until it worked out the way I wanted.
Perhaps the main thing that I did not really understand at first is that the compiler must match the operating system. It looks a little strange, but it turns out that way. Indeed, the OS already contains the standard c / c ++ libraries. They export a set of functions. The code generated by the cross-compiler must contain calls to these library functions. Therefore, the versions of the libraries in the cross-compiler itself and in the OS for which the code will be generated must match.
Let's try to create a cross compiler.
The procedure will be as follows:
1) Check that the following packages are installed on our host system (I am using Ubuntu 18):
gcc g++ gperf bison flex texinfo help2man make libncurses5-dev python3-dev autoconf automake libtool libtool-bin gawk wget bzip2 xz-utils unzip patch libstdc++6 rsync git
If something is missing, then you need to install via sudo apt install.
2) Download crosstool-ng version 1.24.0 from their website:
wget http://crosstool-ng.org/download/crosstool-ng/crosstool-ng-1.24.0.tar.bz2
3) Unpack the resulting archive:
tar xjf crosstool-ng-1.24.0.tar.bz2 cd crosstool-ng-1.24.0
4) Putting together crosstool-ng:
./configure make make install
5) Patching crosstool-ng
This is a rather strange action, but without it I didn’t get a good result. Without this patch, the cross-compiler refused by default to look for libraries in the / usr / lib / arm-linux-gnueabihf folder relative to sysroot.
The patch must be obtained at the very raspberry.
On the raspberry pi4 with OS Buster installed (this is important, I am making a cross-compiler for this particular OS), you need to take the binutils sources:
sudo apt install binutils-source
and see
/usr/src/binutils/patches/129_multiarch_libpath.patch
This file we put in the crosstool-ng-1.24.0 / packages / binutils / 2.31.1 folder on our host computer. It is important to put it in this folder, since on the Raspberry Pi OS Buster itself, the binutils version is 2.31.1. Check this with a command in the console on the raspberry:
ld --version
In addition, you need to check which GLIB is on your OS for the squeeze:
ldd --version
I have 2.28 in Buster, which means crosstool-ng itself will need to be configured in this version of GLIB 2.28, there is a different version by default. If this is not done, then the cross-compiler will generate code that will not run on Raspberry in Buster OS - the binary can refer to non-existent functions in external libraries.
6) Prepare the initial crosstool-ng configuration
There are already quite a few typical configurations in crosstool-ng itself. Including, there is a configuration very similar to what we need for the Raspberry Pi3.
A list of all possible configurations can be viewed with the command:
./ct-ng list-samples
Then the selected configuration must be “activated” with the command:
./ct-ng armv8-rpi3-linux-gnueabihf
A new configuration file .config will appear, which completely defines the properties of the future cross-compiler. Now it needs to be corrected a little. You can edit it manually, but it's easier to fix from the menu:
./ct-ng menuconfig
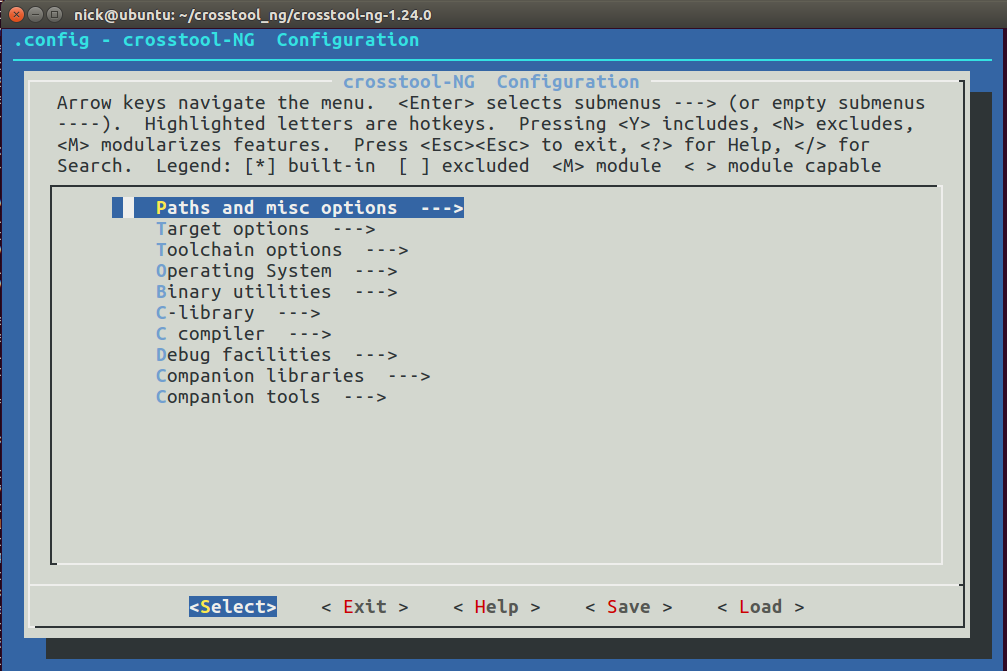
The very first menu looks like this:

7) Next, we change the strange option, possibly optional.
Almost everywhere where at least something is written about creating a cross-compiler for Raspberry, they write to uncheck the "Render the toolchain read-only" option. This setting is in the "Paths and misc options" menu. The crosstool-ng documentation says that by default the resulting compiler will be read-only so that the compiled program is not inadvertently installed in the sysroot of the compiler itself. In my opinion, this is a perfectly reasonable decision. I don't know why any authors write to remove the tick from here ...
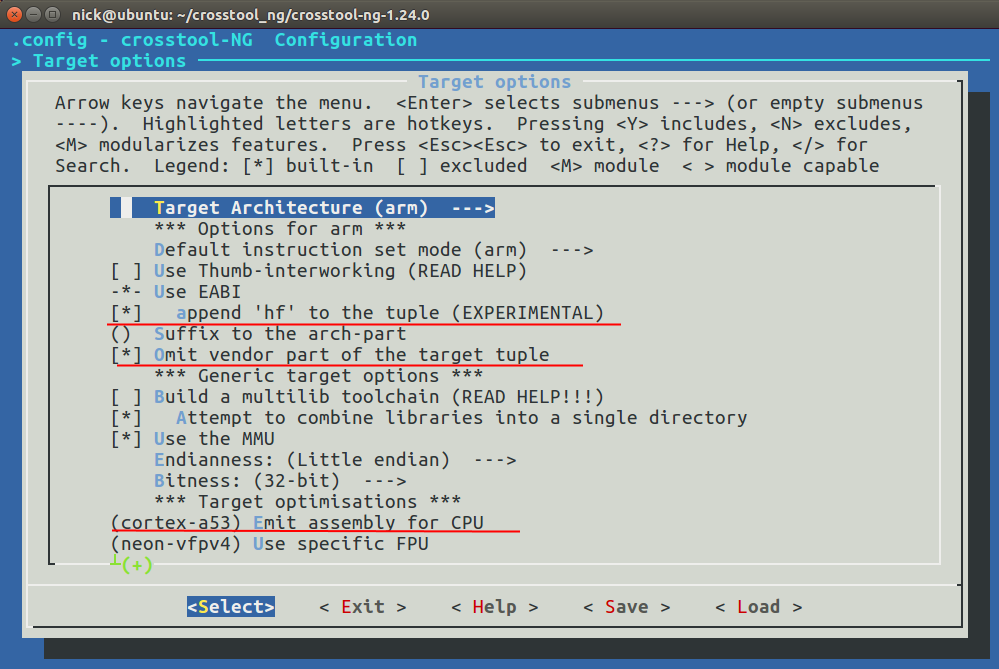
8) Next. Go to the "Target options" item and set the values according to the screenshot:

I must say that, in fact, the Raspberry Pi4 has a Cortex-A72 processor and this can be assigned here in the menu. However, I kept the Cortex-A53 for myself because I will compile not only for Pi4, but also for Pi3. Although, the exact setting can be specified already when starting the gcc compiler using the -mcpu = cortex-a72 command line parameter
I also want to add that I prefer the cross-compiler to have exactly the same tuple as the compiler on the Raspberry board itself. That is, the final compiler will be arm-linux-gueabihf and nothing else. It's easier for me. Many existing packages include ready-made cmake files, where the compiler is assigned to arm-linux-gnueabihf. We don’t want to fix all these cmake files by hand and write something like armv8-mygcc-linux-gnueabihf there? To do this, I turn off the "Omit vendor part of target tuple" option.
9) Go to the "Binary utilities" menu and install the binutils 2.31.1 version (Remember that we still have a patch for it?)

10) Go to the "Operating system" menu and install the kernel version 4.20

In fact, Raspberry Buster OS already has a 5.10 kernel, but the maximum is that you can install it only 4.20
11) Go to the "C-libraries" menu and install the GLIB 2.28 version

12) Go to the "C-compiler" menu

Install the desired version of the future cross-compiler 8.3.0 and add the --enable-multiarch option to the core gcc extra config compiler settings. It is important that the cross-compiler finds the libraries in sysroot along the path / usr / lib / arm-linux-gnueabihf
Now we exit all menus, save the changes made when asked and start building.
13) The assembly is performed with simple commands:
export DEB_TARGET_MULTIARCH=arm-linux-gnueabihf ./ct-ng build
Will have to wait. It took me about 45 minutes to assemble on my laptop. After building, your new cross-compiler is located in the path ~ / x-tools / arm-linux-gnueabihf
You can check which library paths will be used by the cross-compiler by default. Will it look in the path / usr / lib / arm-linux-gnueabihf?
To do this, run the command:
~/x-tools/arm-linux-gnueabihf/bin/arm-linux-gnueabihf-ld --verbose | grep "SEARCH"
The command should return something like this:
SEARCH_DIR("=/usr/local/lib/arm-linux-gnueabihf"); SEARCH_DIR("=/lib/arm-linux-gnueabihf"); SEARCH_DIR("=/usr/lib/arm-linux-gnueabihf"); SEARCH_DIR("=/usr/local/lib"); SEARCH_DIR("=/lib"); SEARCH_DIR("=/usr/lib"); SEARCH_DIR("=/home/nick/x-tools/arm-linux-gnueabihf/arm-linux-gnueabihf/lib");
Note that the paths start with the "=" sign. This means that these are sysroot-relative paths if specified when running gcc with the --sysroot = PATH_TO_YOUR_SYSROOT command line option.
That's probably all. It remains to decide where to get sysroot. The easiest way is to install all the necessary development packages on the Raspberry Pi and then, pulling out the SD card from the device, transfer it to the host PC. But there are also some nuances.
Now that we have a cross-compiler, we can build some sort of parser-specific program. For example, the userland demos from Raspberry itself:
git clone https://github.com/raspberrypi/userland.git cd userland export PATH=${HOME}/x-tools/arm-linux-gnueabihf/bin:$PATH ./buildme
The compilation result will be in the build / bin folder.
At the end of the article, I would like to give a table of additional parameters for gcc compilers when building projects for different versions of raspberry:
Raspberry Pi 1: -mcpu=arm1176jzf-s -mfloat-abi=hard -mfpu=vfp (alias for vfpv2) Raspberry Pi 2: -mcpu=cortex-a7 -mfloat-abi=hard -mfpu=neon-vfpv4 Raspberry Pi 3: -mcpu=cortex-a53 -mfloat-abi=hard -mfpu=neon-fp-armv8 -mneon-for-64bits Raspberry Pi 4: -mcpu=cortex-a72 -mfloat-abi=hard -mfpu=neon-fp-armv8 -mneon-for-64bits
I hope that my article will be useful to someone.