As a rule, the image analysis by computer vision algorithms goes through the following stages (but some stages may not be there):
1. Image preprocessing. At this stage, image quality improvements can occur, such as increasing the contrast, sharpening, or vice versa, blurring the image to remove noise and small minor details from it. All this is necessary in order to make it easier to analyze the image in the future.
2. Intermediate filtration. At this stage, various filters are applied to the image in order to indicate areas of interest on the image or to facilitate the work of special image analysis algorithms.
3. Revealing of special signs (features).This can be the selection of special points, the selection of contours or some other features.
4. High-level analysis. At this stage, according to the found features on the images, specific objects are determined, and, as a rule, their coordinates. Also at this stage, segmentation or some other high-level processing can occur.
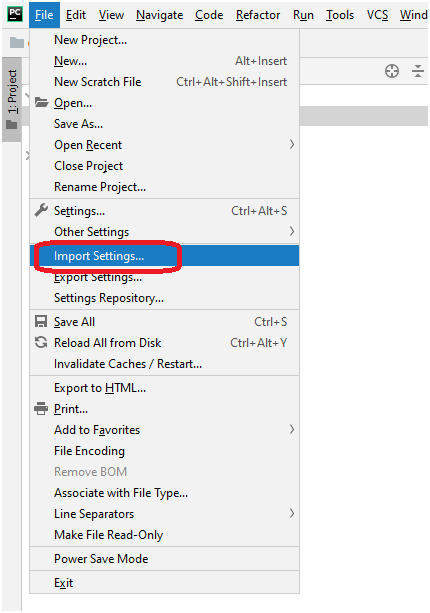
Now let's get down to business. We will look at working with Python + OpenCV in the PyCharm environment. First we need to install OpenCV. To do this, go to ImportSettings:
Next, in the ProjectInterpreter and click on the plus sign there:
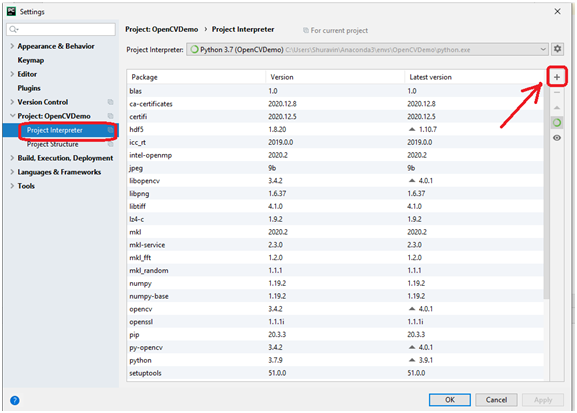
We are looking for opencv there and install it:

Now we will write our "Hello, World" - a program that will display a picture:
import cv2
my_photo = cv2.imread('MyPhoto.jpg')
cv2.imshow('MyPhoto', my_photo)
cv2.waitKey(0)
cv2.destroyAllWindows()
This is the window that this program will open:

What does the program do? It loads an image from a file, displays it, and waits for the ESC key to exit.
Let's try something with this image. For example, you can resize it. Let's say we want to make an image 200 wide. To do this, let's calculate its height and use this data to scale it:
import cv2
my_photo = cv2.imread('MyPhoto.jpg')
cv2.imshow('MyPhoto', my_photo)
#
final_wide = 200
r = float(final_wide) / my_photo.shape[1]
dim = (final_wide, int(my_photo.shape[0] * r))
#
resized = cv2.resize(my_photo, dim, interpolation = cv2.INTER_AREA)
cv2.imshow("Resized image", resized)
cv2.waitKey(0)
cv2.destroyAllWindows()
Here's what we got:

Often, to facilitate image analysis, you need to make the picture black and white. One of the ways is to upload a picture at once in black and white space:
import cv2
img = cv2.imread('MyPhoto.jpg', cv2.IMREAD_GRAYSCALE)
cv2.imshow('MyPhoto', img)
cv2.waitKey(0)
cv2.destroyAllWindows()
If you need to convert an already loaded image, you can use the cvtColor function, which converts an image from one color space to another:
import cv2
img = cv2.imread('MyPhoto.jpg', cv2.IMREAD_GRAYSCALE)
cv2.imshow('MyPhoto', img)
cv2.waitKey(0)
cv2.destroyAllWindows()
This is how it will look:

So, to summarize.
We learned how to install OpenCV, load from a file and display an image, as well as do simple transformations in it, such as scaling and converting a color image to black and white. If this lesson "comes in" it will be continued.