Greetings.
It so happened that for the last few years I have been engaged in web development, however, recently there has been an opportunity and desire to try myself in development for mobile devices. There were several reasons for this, ranging from the understanding that desktops are playing an ever-smaller role, and this trend continues, to the trivial desire to try something new. Besides, there were a couple of ideas for ret-projects that assumed the use of the capabilities of mobile platforms. How it was and what came of it - under the cut.
Introduction
In view of the fact that at the time of the planned transition to mobile development, the main development tools for me were ReactJS, it was decided to start with it. In addition, I used the Expo application building platform, which solved a significant part of the configuration problems - building the application was carried out in literally a few commands.
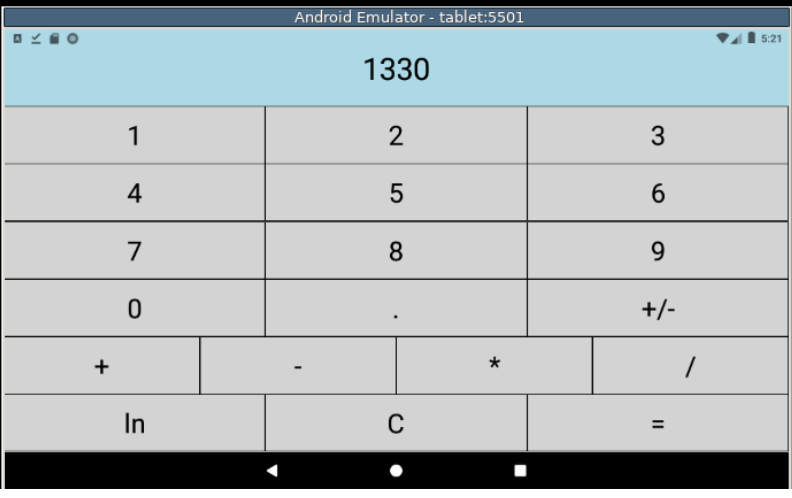
The first relatively serious (at least working, and not showing the performance of QuickStart) application for me was a calculator - about the same as in each of the smartphones. The calculator was supposed to contain one screen, which has 2 sections - display and keyboard, the display - displays information, and the keyboard allows you to enter it.
Screenshots of the resulting application are located under the spoiler. I admit, it doesn't look like a design masterpiece, but not much worse than the built-in calculator. This is not of interest here
Spoiler


The online version of the emulator is used to launch, but on several home devices with android, as well as in the browser version of Expo, it looks approximately the same.
Source code analysis
In order for the application to be "hardcoded" to a minimum, I moved all the buttons that should be on the keyboard into a separate two-dimensional array. At the same time, since the label on each button is unique, it is also used as an id, i.e. it is on this that the handler function is bound.
let labels=[
    ["1","2","3"],
    ["4","5","6"],
    ["7","8","9"],
    ["0", ".","+/-"],
    ["+","-","*","/"],
    ["ln","C", "=",]
]
, - - , .
- , , - . - . - .
Spoiler
let functionMapping = {
        "+":()=>{
            setOperation(()=>(a,b)=>{return a+b})
            setFirstOperand(display);
            setDisplay("")
        },
        "-":()=>{
            setOperation(()=>(a,b)=>{return a-b})
            setFirstOperand(display);
            setDisplay("")
        },
        "*":()=>{
            setOperation(()=>(a,b)=>{return a*b});
            setFirstOperand(display);
            setDisplay("")
        },
        "/":()=>{
            setOperation(()=>(a,b)=>{return a/b});
            setFirstOperand(display);
            setDisplay("");
        },
        "ln":()=>{
            setOperation(()=>(a,b)=>{return Math.log(a)});
            setFirstOperand(display);
        },
        "C":()=>{
            setFirstOperand("");
            setsecondOperand("");
            setOperation(null);
            setDisplay("");
        },
        "+/-":()=>{
            setDisplay((+display)*(-1)+"");
        },
        ".":()=>{
            if (display.indexOf(".")===-1)
                setDisplay(display+".")
        },
        "=":()=>{
            setsecondOperand(display);
            let rezult = operation(+firstOperand, +display);
            setDisplay(rezult);
        }
    }
    for (let i =0; i<10; i++) {
        functionMapping[i+""]=()=>{setDisplay(display+i)};
    }
setOperation(()=>(a,b)=>{return a * b})
, - ,
setOperation(()=>{return ab})
.
, - , , .
, - , .
, 4 , ( , ).
    const [operation, setOperation] = useState(null);
    const [firstOperand, setFirstOperand] = useState("");
    const [secondOperand, setsecondOperand] = useState("");
    const [display, setDisplay] = useState("");
, firstOperand secondOperand , display , , operation .
, - .
, , .
Spoiler
<View style={styles.root}>
      <View style = {styles.display}>
          <Text style={{fontSize: 40}}>
              {display}
          </Text>
      </View>
        <View style={styles.keyboard}>
        {labels.map((value, index, array)=>{
          return <View style={styles.row}>
              {value.map((item)=>{
                  return <TouchableOpacity style={styles.cell} onPress={()=>{functionMapping[item]()}}>
                      <Text style={{fontSize: 35}}>{item}</Text>
                  </TouchableOpacity>
              })}
          </View>
        })}
      </View>
    </View>
const styles = StyleSheet.create({
  root: {
      flex: 1,
      backgroundColor: '#fff',
      alignItems: 'center',
      justifyContent: 'center',
      fontSize:40
  },
  display:{
      flex: 2,
      backgroundColor: "lightblue",
      width: "100%",
      justifyContent: "space-around",
      alignItems: "center"
  },
  keyboard:{
      flex: 9,
      width: "100%",
      backgroundColor:"lightgrey",
      justifyContent:"space-around",
      alignItems:"center"

  },
  row:{
      flex: 1,
      flexDirection:"row",
      justifyContent:"space-around",
      alignItems:"center",
      width:"100%",
  },
  cell:{
      flex:1,
      borderWidth:1,
      width:"100%",
      height:"100%",
      justifyContent:"space-around",
      alignItems:"center",
    }
});
-
Expo quickstart. , App.js, . - , .. Java ( , ). web-, Expo, - .
. , . - , - , . , Picker, , - . ( , ). , - , - , "", .
- , , .
- flex , - . "" CSS, , , .
- . , , - , , ...
, , React-native . , - , . , , , React over TypeScript - . , , react-native , .
P.S. C , - , - , .
PPS The target audience of this article is not web development gurus, but rather subcontractors like me.
Source codes