/ HP-41 Advanced Programming Tips /
As many know, at the end of the 1980s, programmable microcalculators compatible with B3-34 were very popular in the USSR: MK-54, MK-61, MK-52 . For them, they created programs, games, explored undocumented features, wrote articles. I myself went through this in due time. And just recently I thought: but in the USA, too, there should have been something similar, close in spirit to everything that happened around our programmable calculators. And yes - I was right. Meet the HP-41.
Like the B3-34, the HP-41 is a programmable RPN calculator (RPN - reverse Polish notation, calculations in the form "2 2 +", not "2 + 2 =") with a similar ideology, but much more functional. It appeared almost at the same time as our B3-34 - 1979 and soon became a cult year: many programs were written for it, books - including about undocumented features, and even add-on modules are still being released. A total of 1.5 million of these calculators were produced.
To a similar fate, we can add that, just as our MK-52 flew on the Soyuz as a backup computing device, so did the HP-41 fly on the Shuttle.
Although there are three modifications of the HP-41 (C, CV, CX), they can be considered fully compatible, since they differ very slightly - in fact, only in the amount of memory. HP calculators with other numbers are not compatible with the HP-41, although they have some common features.
One of the features of the HP-41 is a 14-segment indicator, which is quite rare for calculators. This allows you to display letters and various symbols on the HP-41, which, along with sound and expansion modules, is a great advantage over the B3-34.
The HP-41C memory from the user's point of view is 63 registers, 7 bytes each. In this case, you can choose how much is used for the program and how much for the data. Expansion modules increase the available memory - say 82106A - that's 64 more registers. Maximum with the help of such modules you can get about 2kb if you occupy all four slots.
The processor is its own, specific. It is most commonly referred to as NUT CPU, although this is a generic name for several different processors. Clock frequency 0.35 MHz. As for the bit depth, as is often the case with calculators, due to the specifics of the architecture, it is difficult to name the exact figure.
In addition to memory modules (for HP-41C), there are many other expansion modules - libraries of programs on ROM, a magnetic card writer / reader, a barcode reader, etc.
Along with the traditional command mode for all calculators, when calculations are performed directly, there are three ways to program the HP-41.
The first and main one is the standard language of the programmable calculator. Ideologically, it is similar to the B3-34 language and, although it is called FOCAL, it has nothing to do with the programming language of the same name - the word stands for “Forty One Calculator Language”. FOCAL commands are, in fact, calls to subroutines in machine codes - something like instructions in a virtual machine, sharpened for calculations, decimal system and floating point.
The second, very popular, method is called Synthetic programming and is a set of undocumented FOCAL extensions based on exploiting a vulnerability in the calculator's firmware that allows creating new commands.
The third, rare way is programming directly in the machine codes of the calculator's microprocessor, called MCODE. This method is quite complicated for the reasons that will be discussed below.
In this article, I will talk mainly about the first method, I will touch on the other two only briefly.
Keyboard and command mode
Despite the advanced alphanumeric indicator, the calculator's keyboard is the most common. That, with a huge number of different modes and functions, makes entering the program and operations with it a very tedious task (quite comparable to that for B3-34 compatible calculators).
Each key has three functions (in some cases more). For example, the "0" button, in addition to the number 0, is intended to enter a space and the number Pi.
Not all functions are available through combinations of buttons - some need to be typed in letters, in the "ALPHA" mode. The letters are labeled at the bottom of the buttons in the order "ABCDEF ...".

I must say that the keyboard is made of very high quality. A typical technique for HP hardware is used - the button has an axis at the bottom and when pressed rotates around it. The indicator, despite the lack of backlighting, is also quite readable. Only slow image refresh is straining (which is most likely due to a slow processor).
It is interesting that operators available through a combination of buttons can also be entered letter by letter. For example, the beep ("BEEP") is obtained by pressing SHIFT 4, but you can press the XEQ button, then ALPHA, spell the word "BEEP", press ALPHA again.
Actually, XEQ (from the word "execute") allows you to immediately execute any built-in function or call an existing one in RAM or ROM - including in an expansion module.
A list of all functions actually available in the calculator can be obtained via SHIFT CATALOG 3 (view control via R / S, SST, BST)
Registers and work with them
Below we are talking about the registers directly accessible to the user of the calculator. These are not microprocessor registers!
ALPHA register (A) - can store up to 24 characters and its contents are displayed on the screen.
0,1,2,3, ... - data registers, can store either one number or up to 6 characters (or up to 7 program steps)
X, Y, Z, T - stack registers (in fact, also data registers, but organized in stack view). X - top.
L - the last, before the change, the contents of the X register is stored
PC - the current program step
The display usually shows the contents of the X or ALPHA register, but others can be displayed.
If you just type a number on the keyboard, it falls into the X register (accordingly, it is displayed on the screen).
If you type a string of characters on the keyboard (after pressing the ALPHA button), the string is placed in the ALPHA register (similarly, it is displayed on the screen).
However, the very presence of any information on the screen does not mean that it is in the register. This applies, for example, to error messages and VIEW results. They kind of close the displayed register on top. In such cases, to clear the message without changing the contents of the registers, use the "<-" key.
In the case when the contents of the register are displayed on the screen, the same "<-" key deletes its contents.
Pressing ENTER pushes a copy of the number onto the stack. That is, if you type 1 ENTER, then 1 will appear in both the X register and the Y register. If you then type 2, then the X register will be 2, the Y register will be 1.
CLX clears X, CLA clears ALPHA
X <> Y swaps the contents of X and Y
+, -, *, / perform an operation on the contents of X and Y and put the result in X, while what was in the Y register is lost, and what was in X is placed in the L register (can be copied back to X with the LASTX command if necessary).
RCL register_number - copies the contents of the data register with the specified number to X (i.e., maps it)
ARCL register_number - appends the contents of the data register with the specified number to the ALPHA register
ASHF shifts the contents of the ALPHA register left by 6 characters (the first 6 characters are lost).
You can view the contents of the register without placing it in the displayed X. To do this, use the VIEW command (to view the stack registers) and AVIEW (to view the ALPHA register).
It should be noted that there are no other operations with strings in the command system. And this is no coincidence - the fact is that there is so little memory that working with strings, even with a memory expansion module, does not make much sense. However, there are extension modules where string operations are implemented.
STO register_number - Copies the contents of the X register into the specified data register
ASTO register_num - copies the contents of the ALPHA register (only the first 6 characters!) Into the specified data register
For RCL and STO to work with named stack registers, add ".": STO .Z
The SIZE command sets the number of data registers that can be used (respectively, the number of available program steps increases or decreases):
The smaller the SIZE, the more space for the code.
To clear all memory, you need to turn on the calculator by holding down the "<-" button and after turning it on immediately release it. The message "MEMORYLOST" should appear (not very stable).
Program mode
Switching to the programming mode (and back) - by pressing the PRGM key. If there is no program, "00 REG nn" is displayed. The number nn shows the number of registers available for program steps (see above about SIZE). As you type the program, the calculator sometimes writes PACKING to try to compact the code. If there is not enough memory for the next command, write TRY AGAIN.
When entering a program, the current step is shown on the left. One step - one command (it does not matter, entered by one key or letter by letter). But it should be borne in mind that one step can take up different amounts of memory - little if it is a simple command like CLA, and a lot if it is, say, a long text string.
Moving in steps - SST (forward) and BST (backward). Deleting the current step - "<-".
The program is started from command mode (ie PRGM must be pressed again) with the R / S key. She also stops.
In the program mode, almost all the functions available in the command mode are available. Entering the commands that are marked on the keys is done by simply pressing. The rest of the commands are entered through XEQ. For example, to enter TONE 3, press XEQ, then press ALPHA, then type TONE letter by letter, press ALPHA again and then press 3.
Erasing the program: CLP label (erased from the label to END)
Go to a specific step: GTO.002 (you must first exit the program mode).
Go to the beginning: SHIFT RTN
You can find out the current position from the command mode by pressing and holding the R / S or SST key
Labels, which can then be jumped to, are set through the "LBL label" and are of two types - global (text names, entered in ALPHA mode) and local (numeric or single-letter text names). Digits take up less memory.
Jump to label "GTP label"
It is useful to always put a label in the first step of the program. This allows you to run it without going to the beginning every time - through an XEQ label or a GTO label.
There is also an indirect transition to GTO IND (HP-41 fans cite this as evidence that the Turing machine is complete;).
At the end of the program, GTO… is entered (the message PACKING appears). At this point, END appears on the screen
For example, a program for multiplying any number by 2 looks like this:
LBL "PRGNAME"
2
*
END
Working with subroutines (up to six nesting is allowed):
XEQ 04
...
LBL 04
......
RTN
Conditional branches:
X=Y?
2
1
In this example, if X is equal to Y, then 2 is pushed onto the stack (register X). Otherwise 1
In other words, if the condition is not met, then the command following the check is skipped. ISG
Loops
- Increment and Skip if Greater
DSE - Decrement and Skip if Equal to or less than
Example
1.00301
STO 01
LBL 01
BEEP
ISG 01
GTO 01
This snippet can be used in an interview instead of manhole covers. With the question "How many times will BEEP run and why?" The correct answer is 3 times.
Explanation: The loop parameters are specified with a single fractional number that is pushed onto the stack. The number has the format iiiii.fffcc, where:
iiii - the initial, it is the current, counter value (index),
fff - the final value
cc - step
Thus, 1.00301 means the count from 1 to 3 with a step of 1
Obviously, such a peculiar solution allows you to save memory, although the readability of the code, let's say, suffers slightly.
A little about displaying strings:
AVIEW displays the ALPHA register, VIEW displays the X register.
The APPEND command appends the specified characters to a string in the ALPHA register. It is entered from the keyboard as SHIFT K, in the source it looks like> "TEXT"
Example:
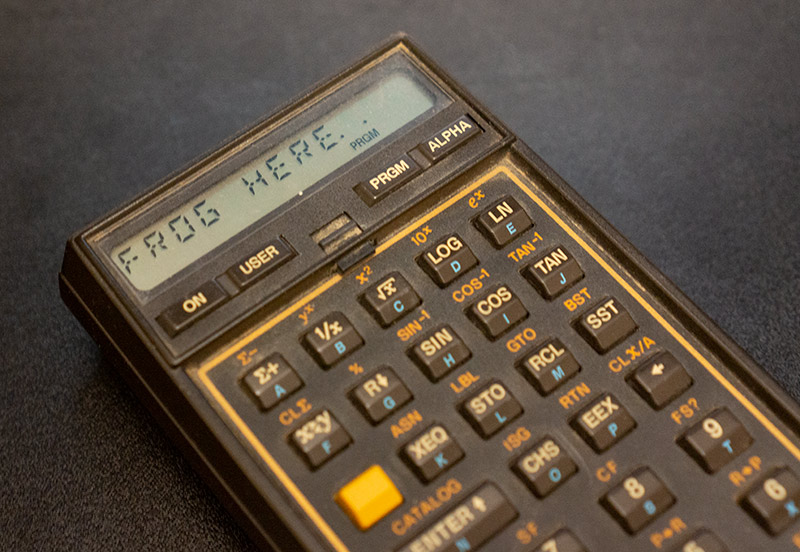
"HELLO WORLD!"	;   ALPHA
AVIEW ;
PSE ;
CLD ;
When the screen is cleared, the standard "flying goose" symbol returns to indicate that the program is running. If there is text on the screen, the goose does not appear.
Although the screen has 12 character spaces, the maximum line length in one program step is 15. Using APPEND, you can get 24 (that is, the full length of the ALPHA register). When a long line is displayed on the screen, it will automatically scroll:
"1234567890"
>"ABCDEFGHIJKLMN"
AVIEW
Operations with strings are limited to three commands:
ASTO X - puts the first 6 characters from ALPHA into the specified register
ARCL X - appends to the end of ALPHA a string from the specified register
ASHF - shift ALPHA 6 characters to the left (they are lost)
Data input:
PROMPT - displays the contents of the ALPHA register and stops the program (respectively, you can enter something and press R / S, thus continuing the execution)
PSE - pauses the program execution for about a second. In this case, if numbers or letters were pressed, the pause is extended for another second, and the total value is placed in a register for further processing.
About sound:
BEEP - plays a standard sequence of the same four notes
TONE number - a short squeak of one of 10 frequencies (0 - lowest ... 9 - highest). The frequencies are chosen in a rather strange way. Apparently, this was due to memory savings.
One explanation
«The biggest problem is the fact that the high or low time of the signal driving the piezo element has to be a multiple of the instruction cycle time. This cycle time is nominally 155.6uS. So, for example TONE 9 has a three-instruction low and high time, giving a frequency of 1071Hz. TONE 8 has a four-instruction low and high time, giving a frequency of 803Hz. TONE 7 has a five-instruction low and high time, giving a frequency of 643Hz. These tones are individually coded. The remainder of the tones use a common routine to save code space. This common routine is 6+n instruction time long (for each phase of the piezo drive). And n is set by the TONE number as follows: TONE 6 has n=2, TONE 5 has n=4, and so on, down to TONE 0 with n=14. So, you could get better control at the low end of the frequency range, but it would take more code space. I guess that what they came up with was a reasonable compromise.»
Periphery
Peripheral devices include memory expansion modules, ROM with ready-made programs, magnetic tape reader / writer (HP 82161A), magnetic cards (HP82104A), barcode reader, infrared port, printer, plotter, clock, HP-IL interface (via which can connect the calculator to various equipment) and more.
I got a magnetic card reader / writer complete with HP-41. Cards are strips of magnetic tape on a paper base (the Moscow metro used to have a similar type of travel card).

Each strip has two tracks - i.e. it can be inserted with the left or right side. 112 bytes fit on each side. A typical program spans several cards.
You can protect the side of the card from writing by cutting off the corner.
When a module is inserted into the calculator, its ROM is used. Accordingly, many new commands for working with maps appear in the calculator. You can read and write programs, registers, etc. You can even protect the program being recorded from being viewed (i.e. you can download and run it, but you cannot see the program itself).
Here you can see how the magnetic card drive works.
Unfortunately, this device is unreliable and very battery-hungry (powered by the calculator itself). Mine didn’t work - it hummed with a motor, but did not stretch the tape. It turned out that the pressure roller inside did not just fall apart, but completely disappeared, leaving behind only a drop of viscous dirt. I changed the roller to a homemade one, but it obviously stretches the tape with difficulty - you need to accurately adjust the diameter. The problem is so common that ebay even sells kits of these videos.
Another interesting device. Also quite common among HP-41 owners is a barcode reader, which is used, among other things, to download programs to the calculator directly from books. Imagine - no long driving in programs from the keyboard! .. It looks like this:
Development
Of course, you can write in FOCAL directly on the calculator. But this is rather tedious - it is much more convenient to write the program in a text file. But the situation with compilers and emulators is complicated. All of them are rather strange and not very stable. Of those that run under Win10, there are sim41 and v41 (v.7b). The first one is launched only from Visual Runfox, but it has a separate program editor (i.e. it is not necessary to enter and edit it from the calculator's keyboard).
The second one is launched without preludes, it emulates the calculator much better (although not at the hardware level, which is indicated, for example, by the desynchronization of sound with the code), but the program must be entered either completely manually, or loaded as a binary .raw, which is not machine code , and the binary representation FOCAL). The problem is that to compile a text source into raw, you will have to use the HP41UC.EXE utility, which can only be run from under DOS. I used vDos with a batch file, having mapped the required directory to disk via use f: c: \ tmp
Compiling the source into a binary:
hp41uc /t=test.txt /r=test.raw
Decompiling the binary into a source:
hp41uc /r=text.raw / t = text.txt
To get a better feel for the platform, I wrote a small 256 byte intro for the DiHALT demo party.
It is 256 bytes, simply because the calculator would not fit more, even with an installed RAM expansion module. It is clear that one should not expect any special visual effects from the calculator. The output of various lines is used, including automatic scrolling of long lines. Animation with a face - output two lines in a loop. DTMF is simulated very conditionally, the music is also completely different from the original - due to the fact that it will not be possible to choose either the desired key or duration. Nevertheless, it still sounds like music. At the end, a standard calculator feature is used - to display a "flying goose" when the processor is busy and the ALPHA register is empty.
Initially, the intro was twice as long, even using subroutines. But when everything was debugged in the emulator and I began to drive this case into the calculator, it turned out that it did not fit in there (I hoped that the emulator would report a lack of memory, but no). I had to shorten and rewrite.
Here you can see both sources.
Synthetic programming
Synthetic programming is a technique based on exploiting a vulnerability found in the calculator program editor. Regular standard instructions are encoded in the calculator's memory in several bytes. The vulnerability allows (after a rather complicated preparatory procedure) to change these bytes, receiving new instructions with various functionality. For example, you can get more sounds from the TONE command than is allowed by default. You can display more characters (from a set in ROM), access system flags and a number of other useful things. Again, it is difficult and tedious to use this technique in practice. True, there are modules with subroutines that facilitate this.

Situations may arise when, as a result of incorrect or inaccurate synthetic actions, the calculator will freeze (for example, will not respond to keys) until it is necessary to remove and insert the batteries. This has happened to me. It is interesting that in the literature there are warnings that, in some cases, in order for the calculator to turn on again, the batteries must be pulled out for two days (!).
Another problem with synthetic instructions is that sometimes they are made up of non-ASCII characters. There, specific difficulties arise both with their input and with printing such a program on a standard HP-41 printer. Yes, even just publishing such a program in a book or magazine is a whole problem (usually next to the commands they write explanations of how they should be understood). One of the solutions to the problem is to read each character using a barcode reader from a special table:

Actually, synthetic programming is very close in spirit to the "egogology" in B3-34 compatible calculators. As an illustration, you can see this letter .
People even wrote poetry on this subject! (taken from Synthetic Programming for the HP41C (WCWickes)
KEYBOARDLOCKY
KEYBOARDLOCKY
'Twas octal, and the synthetic codes
were scanned without a loss.
In and out of PRGM mode,
Byte-jumpers nybbled the CMOS.
«Beware 0 STO c, my son,
The MEMORY LOST, the keyboard lock.
Beware the NNN, and shun
The curious phase 1 clock.»
He took his black box codes in hand,
Long time the backwards goose he sought;
The secret beast from Aitchpee land--
All searches came to nought.
In demented thought he stood, and then:
The goose, with LCD's alight,
A leap for every LBL 10,
Came honking left-to-right!
STO b! STO d!, and RCL P!
His keyboard went clickety-clack.
With the proper code in number mode
The goose came flapping back.
«And hast thou found the phantom fowl?
Come to my arms, my binary boy.
Let Corvallis hear us howl
As we chortle in our joy!»
'Twas octal, and the synthetic codes
Were scanned without a loss.
In and out of PRGM mode,
Byte-jumpers nybbled the CMOS.
--Apologies to Lewis Carroll
'Twas octal, and the synthetic codes
were scanned without a loss.
In and out of PRGM mode,
Byte-jumpers nybbled the CMOS.
«Beware 0 STO c, my son,
The MEMORY LOST, the keyboard lock.
Beware the NNN, and shun
The curious phase 1 clock.»
He took his black box codes in hand,
Long time the backwards goose he sought;
The secret beast from Aitchpee land--
All searches came to nought.
In demented thought he stood, and then:
The goose, with LCD's alight,
A leap for every LBL 10,
Came honking left-to-right!
STO b! STO d!, and RCL P!
His keyboard went clickety-clack.
With the proper code in number mode
The goose came flapping back.
«And hast thou found the phantom fowl?
Come to my arms, my binary boy.
Let Corvallis hear us howl
As we chortle in our joy!»
'Twas octal, and the synthetic codes
Were scanned without a loss.
In and out of PRGM mode,
Byte-jumpers nybbled the CMOS.
--Apologies to Lewis Carroll
MCODE
Machine code executed directly by the microprocessor in HP-41 calculators called MCODE - it is 5-120 times faster than standard FOCAL.
To run on the calculator, the program in MCODE must be written to ROM (or to a ROM emulator). There are special modules that allow you to load code via USB or RS232 and even write to M-CODE directly on the calculator. They are collectively called MLDL and are both ancient, from HP itself, and modern .
From cross-assemblers, I found only the ancient one - for DOS.
A few words about the processor architecture. Since it is focused mainly on mathematics, there are specificities. The main registers (and the processor registers are not the registers used in FOCAL!) A, B, C, N, M are 56-bit.
There are also shorter registers for flags, keyboard, speaker, pointers, a 16-bit instruction counter, and a four-level return stack (four 16-bit registers).
In the ROM, which is connected to the processor by a serial bus and where the calculator's control program written in MCODE is located, the bytes are 10 bits wide. The processor addresses 64K of ROM, of which 12K is occupied by the operating system. As for the RAM, it is not mapped into the address space and is a peripheral device for the processor. The RAM bytes are 8 bits wide, but logically the processor treats RAM as 56-bit registers.
Since I did not write in MCODE (strangled by a toad for $ 250 for a ROM emulator), I cannot share my personal experience of programming in MCODE.
The instructions there are quite traditional, although many of the mnemonics are quite specific. For example:
B=A	;    A  B
A<>C	;   A  C
A=A+B 	;  A  B     A
A=B=C=0	;  0   A,B,C
C=0 M	;  0   ( 3-12)  C
?A<C	;   ,  A  C
JC -02	;   ,
READ n	;     ( 1  15)   C
PUSH addr	;
GOSUB 815B ;
An example MCODE analogue of the FOCAL command TONE n:
178 C=REG 5/M	; recalls status register M
358 ST=C	; rightmost byte (nybbles 1 and 0 ) are loaded in status bits (flags 0 to 7)
379 *
05A NCGO 16DE ;     XTONE
As for the control of the indicator, its controller does not allow turning on and off arbitrary segments - you can display only the symbols existing in the character generator. This also became the reason why I did not bother with the ROM emulator and programming in MCODE.
To display characters, you need to select the indicator by the PRPH SLCT FD processor instruction and then work with the indicator registers via WRIT / READ
Epilogue
To be honest, the calculator's logic and command system are rather confusing. In my opinion, for a person who can master this, there is no problem simply to write in machine codes of some simple processor. In our B3-34 compatible calculators, everything, of course, is also not easy, but there are much fewer possibilities, which is why there was no feeling of such confusion.
Basically, the argument for piling up pseudo-code on top of a microprocessor in the HP-41 is the need for mathematical calculations, since, after all, this should be easy for the typical calculator user.
The same applies to the keyboard - it would be possible to make a regular alphanumeric keyboard right away, without hanging commands on the buttons. After all, the functionality of letter-by-letter command input has already been implemented (however, calculators with a full-fledged keyboard soon began to be produced).
I have collected various HP41 documentation in one archive, if anyone is interested, you can download it (I posted it for a while, then I will remove it).