Part 1. Selection of computers and components
The main requirements for a home server were compactness and low power consumption. As a computer, I considered various single-board devices, I even thought about single-board devices on x64 architecture. The main search criteria were excess RAM from 8 GB, modern ports: usb3.0 and gigabit LAN. The idea was to bolt it all up in some kind of miniATX box, using usb-sat interfaces for hard drives. I didn't like this realization aesthetically, and I was in no hurry to implement it. Suddenly I came across a US whale for the 4th raspberry from the Chinese from Radha.
As I understand it, the sata hat itself was already presented some time ago and even very quickly sold out in a limited edition. But this time, the Chinese also offered a box. The whole structure looked very compact and as pretty as my not-so-even hands could never do it myself. I googled this box, found one paid review on YouTube and, in principle, it suited me. I decided not to think for a long time, because, most likely, the batch will be quickly sold out, and the power supply was given free of charge for the promotion. A box of sata hat with express delivery from Shenzhen cost me € 125.23 at the time of purchase. The choice of the box automatically narrowed down the choice of computers to the 4th raspberry, which I purchased on Amazon for € 79.97 for the model with 8 GB of RAM. Also on Amazon were purchased 2 hard drives VD 2.5 ”2 TB at € 63.81 each,and a Samsung EVO 120 SD card for € 15.25 on aliexpress. Total € 348.07, I thought the reader would be interested in the financial question.
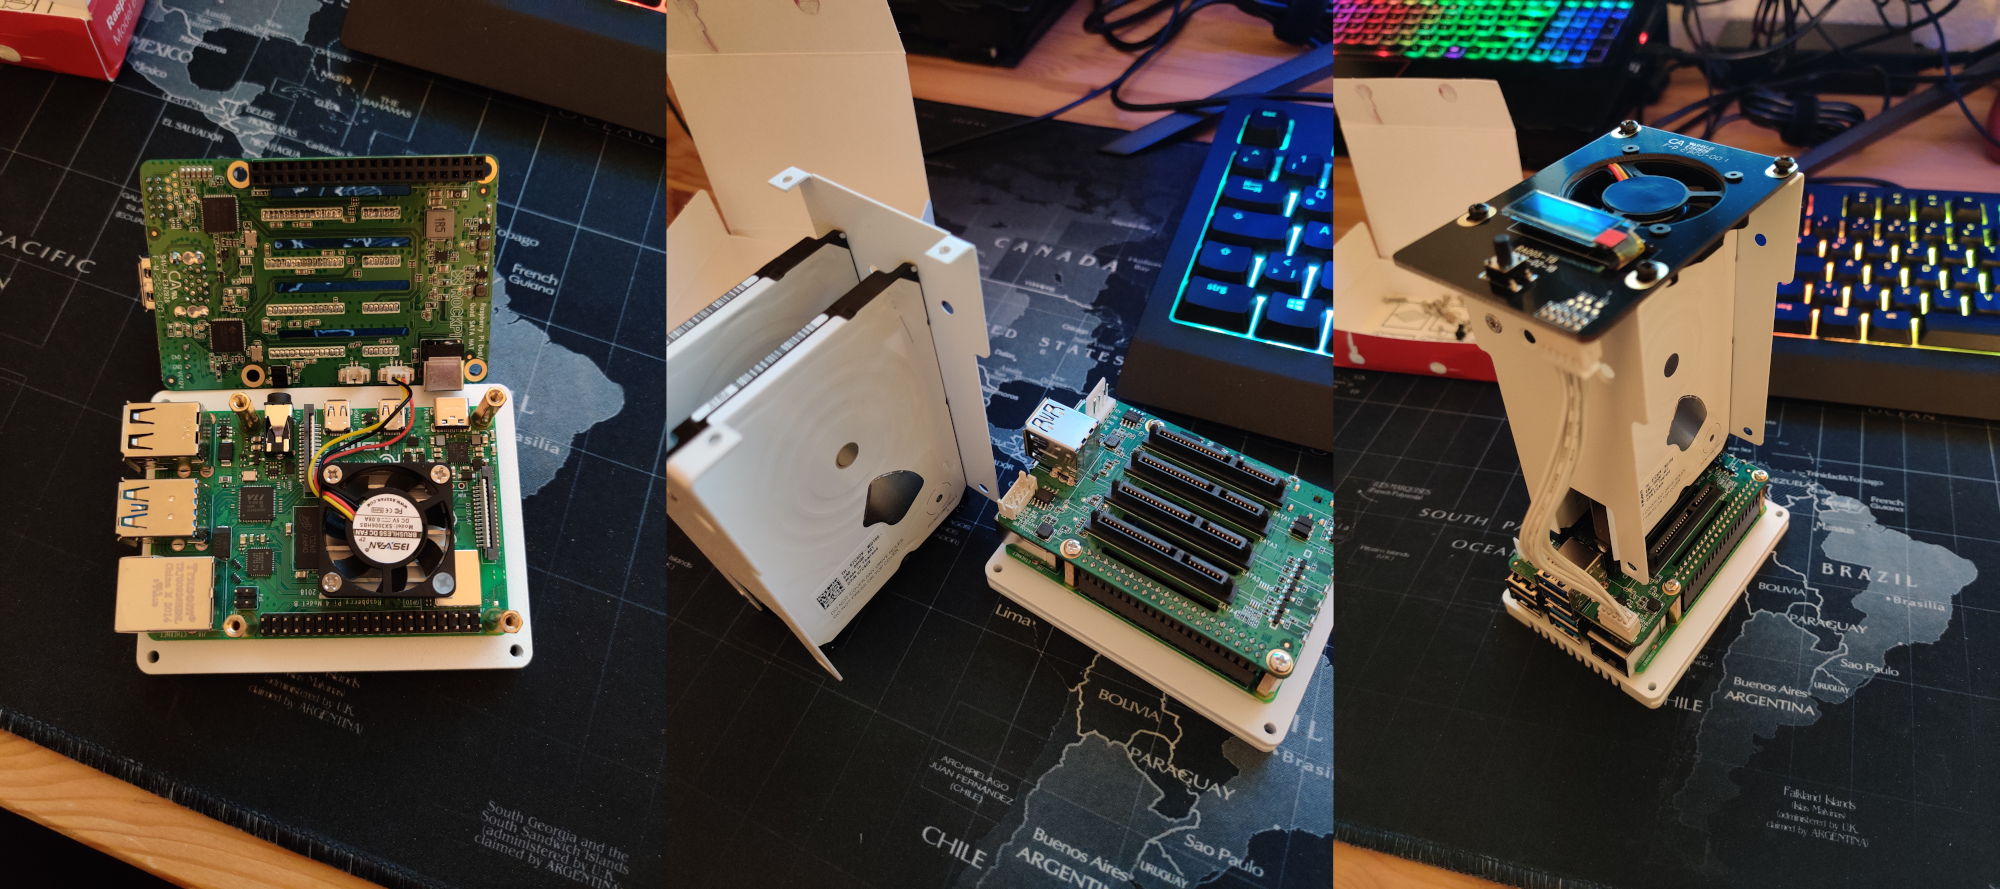
All this good is assembled very simply, dear Chinese comrades have taken care of everything, an example can be seen in the image below. I also recorded a couple of short videos of the assembled device. Of the pleasant moments that I was not aware of at the time of ordering the device:
- the body is made of a single piece of metal, painted on the outside with white paint;
- the bottom with ventilation holes is also metal;
- mounting screws and nuts: metal (not metal, only the upper plastic translucent cover with holes for a large fan);
- sata hat of the next revision, and not the one that the vlogger had on YouTube, and has a battery connector;
- a small icy screen displays information about the state of the system;
- a large fan and an ice screen work by installing Radha's software, which is python scripts, and is installed by entering one command in the terminal.
By default, the upper fan has 4 modes of operation depending on the processor temperature, which differ in the intensity of rotation and the noise produced: at level 1 it is almost inaudible, level 2 is audible, 3-4 is audible too well. For this, in fact, python scripts are responsible.
In general, I was pleased with this device, but I had one comment. The kit uses a running glazed screen, which can be easily ordered from Alishechka, but the screen is soldered to the board, the Chinese did not need to use the FPC / FCC connector on the board. This would greatly simplify the replacement of the ice screen in case of burnout, for example.
2.
Well, everything is assembled, let's start setting up the software. I will not flood copy-paste, so general points will be presented by links to hauta from the search line, I will skip some, but you can dwell on the pitfalls in more detail.
I chose the operating system ubuntu server 20.04.1, a wonderful guide for installing Kanonikl written yourself. Next, we install software from Radha according to their mana . Here there was a pitfall number 1. The fact is that for certain torrenting needs I needed to use VPN, but my VPN provider does not support IPv6. When I set up openvpn for my provider, I found that my anonymity, let's say, flows precisely through IPv6. Well, okay, at the system level, IPv6 can be turned off in Ubuntu quite simply.
How exactly
It is necessary to fix the config of the sysctl utility
:
, 6 , :
:
:
$ sudo nano /etc/sysctl.conf
net.ipv6.conf.all.disable_ipv6=1 net.ipv6.conf.default.disable_ipv6=1 net.ipv6.conf.lo.disable_ipv6=1
:
$ sudo sysctl -p
, 6 , :
$ sudo nano /etc/rc.local
:
#!/bin/bash
# /etc/rc.local
/etc/sysctl.d
/etc/init.d/procps restart
exit 0
:
$ sudo chmod 755 /etc/rc.local
But then the unexpected happened, the large fan from the box stopped working at all.
Having excluded the possibility of a hardware failure, I began to look for a software cause. The status output of the rockpi-sata service was showing errors related to the fan.py python script:
ubuntu@ubuntu:~$ sudo service rockpi-sata status
● rockpi-sata.service - Rockpi SATA Hat
Loaded: loaded (/lib/systemd/system/rockpi-sata.service; enabled; vendor preset: enabled)
Active: active (running) since Fri 2020-12-25 17:16:07 CET; 11min ago
Main PID: 1879 (python3)
Tasks: 4 (limit: 9252)
CGroup: /system.slice/rockpi-sata.service
├─1879 /usr/bin/python3 /usr/bin/rockpi-sata/main.py on
├─2896 /usr/bin/python3 /usr/bin/rockpi-sata/main.py on
├─2897 /usr/bin/python3 /usr/bin/rockpi-sata/main.py on
└─2898 /usr/bin/python3 /usr/bin/rockpi-sata/main.py on
Dec 25 17:16:57 ubuntu python3[2899]: self._target(*self._args, **self._kwargs)
Dec 25 17:16:57 ubuntu python3[2899]: File “/usr/bin/rockpi-sata/fan.py”, line 81, in running
Dec 25 17:16:57 ubuntu python3[2899]: change_dc(get_dc())
Dec 25 17:16:57 ubuntu python3[2899]: File “/usr/bin/rockpi-sata/fan.py”, line 75, in change_dc
Dec 25 17:16:57 ubuntu python3[2899]: gpio.hardware_PWM(12, 25000, dc * 10000)
Dec 25 17:16:57 ubuntu python3[2899]: File “/usr/local/lib/python3.8/dist-packages/pigpio.py”, line 2044, in hardware_PWM
Dec 25 17:16:57 ubuntu python3[2899]: return _u2i(_pigpio_command_ext(
Dec 25 17:16:57 ubuntu python3[2899]: File “/usr/local/lib/python3.8/dist-packages/pigpio.py”, line 1062, in _pigpio_command_ext
Dec 25 17:16:57 ubuntu python3[2899]: sl.s.sendall(ext)
Dec 25 17:16:57 ubuntu python3[2899]: AttributeError: ‘NoneType’ object has no attribute ‘sendall’
Which is nothing interesting except for the GPIO initialization method. For this, a whole class is written there:
class MockPigpio:
@classmethod
def pi(cls):
try:
host = misc.check_output("netstat -l | grep -o '\S*:8888' | tr -d ':8888'")
gpio = pigpio.pi(host=host)
except Exception:
gpio = cls()
return gpio
def __init__(self):
syslog.syslog('PWM of pigpio is not available. Use on/off to control the fan.')
syslog.syslog('If you use pre-release kernel, please go back to stable release.')
def hardware_PWM(self, pin, _, dc):
misc.set_mode(pin, bool(dc))
gpio = MockPigpio.pi()
I wondered what this value is used to initialize the host, which is displayed by the command netstat -l | grep -o '\ S *: 8888' | tr -d ': 8888'?
ipv6-localhost
If IPv6 is disabled, then the command outputs an empty line, and the script does not work. Frankly, I went the long way at first. I looked into the python module pigpio.py, in which the initialization of the host was described in detail, found out that, in principle, the pigpio.pi () method does not need any argument. Having unsuccessfully tried the options for calling this method without an argument, with the lcoalhost argument and other options that I don't remember anymore, inside the fan.py script, I realized that I was not smarter than the authors, and went the easy way. The fact is that the PIGPIO module can be called in IPv4 mode, for this you only need to edit one file:
$ sudo nano /lib/systemd/system/pigpiod.service
And fix the ExecStart parameter to the following value
ExecStart=/usr/local/bin/pigpiod -l -m -n 127.0.0.1 -p 8888
Now the command netstat -l | grep -o '\ S *: 8888' | tr -d ': 8888' prints:
localhost
and the fan is running!
Part 3. Separating traffic
Further, raid type 1, samba, openvpn, transmission demon and killswitch for ufv were set up. The description of these procedures, I think the average reader is able to google on their own.
The performance of the resulting device is in principle normal. Although I do not understand where the speed drops when copying. Here is an example of copying a daddy containing 39 anime episodes with a total size of about 40 GB.
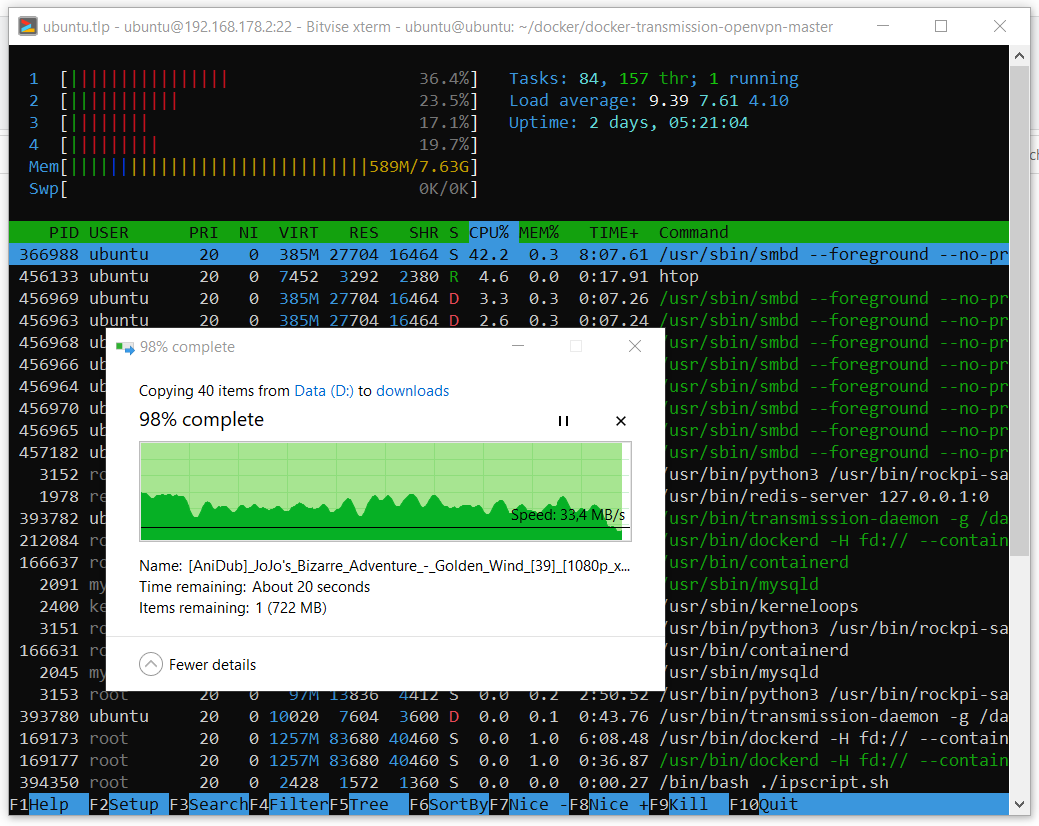
And here is an example of downloading one large file.
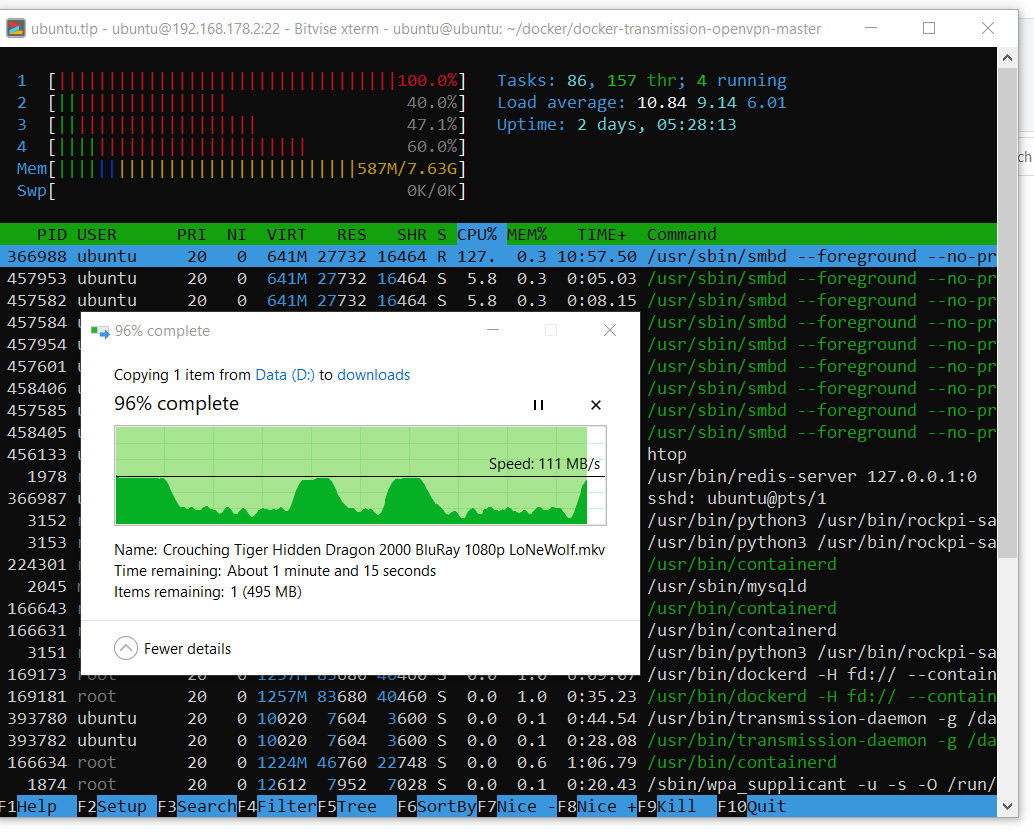
It can be seen that the system can use the entire gigabit network resource whenever it wants. I haven’t dealt with drawdowns in copying speed yet.
The second pitfall does not apply to the sata hat, but, in fact, to the Linux server as an object of material culture. The task was that the server is used for different tasks: there will be a web server (cloud), which I will knock on from outside, and an unselected bit stream pump via vpn. The problem turned out to be that I needed to somehow separate the traffic so that everything worked in parallel. My first thought was to set up a firewall. I used the following rules:
$ sudo ufw default deny incoming
$ sudo ufw default deny outgoing
$ sudo ufw allow in on eth0 from 192.168.178.1
$ sudo ufw allow out on eth0 to 192.168.178.1
$ sudo ufw allow in on eth0 from 192.168.178.20
$ sudo ufw allow out on eth0 to 192.168.178.20
$ sudo ufw allow in on eth0 from any to any port 22,443 proto tcp
$ sudo ufw allow out on eth0 from any to any port 22,443 proto tcp
$ sudo ufw allow in on eth0 from any to any port 1194 proto udp
$ sudo ufw allow out on eth0 from any to any port 1194 proto udp
$ sudo ufw allow out on tun0 from any to any
$ sudo ufw allow in on tun0 from any to any
Naively believing that everything will work fine. The idea was that maybe the firewall will redirect all connections through tun0, except for some through ez0, which I use on the local network, and a couple of ports that I need to knock on the server from the outside. This config works fine on a local network or if vpn is disabled: no connections other than allowed ones go through. When vpn is on, it is impossible to establish a connection outside. Packages arrive, but responses are not redirected through ez0, but still they are sent through tun0. I spent 2 days but still did not figure out how to fix it, and then I decided to try docker, since the container I needed is already there.
This was my first experience with docker. It was difficult for me, I did not understand where to start, what is the difference between docker and docker-compose, what is the content of the git from the link, what is the image, what is the container, I still don’t understand how I managed to build this container locally and what the docker compose downloaded from the Internet, but this thing worked.
After unpacking the repository, you need to edit the docker-compose.yml file. And change its content to:
version: '2' services: transmission: image: haugene/transmission-openvpn container_name: vpntrans cap_add: - NET_ADMIN devices: - /dev/net/tun restart: always ports: - "9092:9091" dns: - 8.8.8.8 - 8.8.4.4 # sysctls: - net.ipv6.conf.all.disable_ipv6=1 volumes: - /etc/localtime:/etc/localtime:ro - /mnt/raid0/downloads/:/data environment: - OPENVPN_PROVIDER=SURFSHARK - OPENVPN_CONFIG=mk-skp_udp - OPENVPN_USERNAME=*your username* - OPENVPN_PASSWORD=*your password* - OPENVPN_OPTS=--inactive 3600 --ping 10 --ping-exit 60 - LOCAL_NETWORK=192.168.178.0/24 # proxy: - WEBPROXY_ENABLED=false - TRANSMISSION_PORT_FORWARDING_ENABLED=true - TRANSMISSION_PEER_PORT=51413 - PUID=1000 - PGID=100
In this config, if you want to use it for your needs, you will have to pay attention to the values of the external (for the container) port, the path to your one, in which the transmission daemon will save data, and where you can edit its settings, enter the parameters of your local network. You will also need to configure your VPN provider from the list . I use a surfshark, the value of the OPENVPN_CONFIG parameter determines the choice of the configuration (in fact, this value is the name of the required config file) * .ovpn file of the specific server to which you want to connect. In this example, the server is in the Republic of North Macedonia.
Next, we build and run the container with our settings:
$ sudo docker-compose up
If everything goes well, you will see at the end of the client openvpn log about successful connection establishment. Well or not, you never know you use another VPN provider that requires additional man-hours. But if everything is fine, you can press cntrl-s and start the container as a process in the background. By the way, the container already knows how to start itself at system startup and restart in case of an error.
$ sudo docker start vpntrans
To calm the paranoia, you can go to the console inside the container:
$ sudo docker exec -ti vpntrans /bin/bash
And check the public ip address:
$ curl ifconfig.co/json
If everything went well, the conclusion should be like this:

Nevertheless, such a test is of little use to calm down the heavily swung paranoia, so I used a shark and watched the connections while downloading a torrent with some popular Linux distribution, say, ubunta. Having excluded from the output unrelated connections to devices on the local network, the vpn server, as well as some automatic broadcasts, nothing suspicious happened during the download of the ubuntu image:
sudo tshark -i eth0 | grep -v "192.168.178.1" | grep -v "192.168.178.20" | grep -v "185.225.28.109" | grep -v "AVMAudio" | grep -v "SSDP" | grep -v "MDNS" | grep -v "LLMNR"

But what happens if openvpn loses its connection or the service suddenly stops? The top utility is running inside the container, its output looks something like this:

Kill the openvpn process:
$ kill -9 6
After that, the container restarted. I later read somewhere on the forums that the container is configured in such a way that if the connection with openvpn is lost or this process ends, then the container is simply restarted. Such is the killswitch. I was satisfied.
Part 4. Cloud
I selected the NextCloud cloud and installed it one guide at a time . The main difference between my setup is that I used other apache and pkhp turnips:
$ sudo add-apt-repository ppa:ondrej/apache2 $ sudo add-apt-repository ppa:ondrej/php
After configuring the NextCloud, I recommend checking the warnings in the admin panel and fixing them.

Fixes
. . :
:
, . - , , . :
:
:
:
:
, :
);
:
:
$ cd /var/www/nextcloud/
$ sudo -u www-data php occ db:add-missing-indices
:
$ sudo apt install php-bcmath php-imagick
, . - , , . :
$ sudo apt install redis-server php-memcached memcached php-apcu -y
:
$ sudo systemctl start redis-server
$ sudo systemctl enable redis-server
$ sudo systemctl start memcached
$ sudo systemctl enable memcached
:
$ sudo nano /etc/redis/redis.conf
:
port 0 unixsocket /var/run/redis/redis.sock unixsocketperm 700
:
$ sudo usermod -aG redis www-data
, :
$ sudo nano /var/www/nextcloud/config/config.php
);
'memcache.local' => '\OC\Memcache\APCu', 'memcache.locking' => '\\OC\\Memcache\\Redis', 'redis' => array ( 'host' => '/var/run/redis/redis.sock', 'port' => 0, 'timeout' => 0, 'password' => '', 'dbindex' => 0, ),
:
$ sudo nano /etc/php/7.4/apache2/php.ini
opcache.enable=1 opcache.enable_cli=1 opcache.interned_strings_buffer=8 opcache.max_accelerated_files=10000 opcache.memory_consumption=128 opcache.save_comments=1 opcache.revalidate_freq=1
:
$ sudo systemctl restart apache2
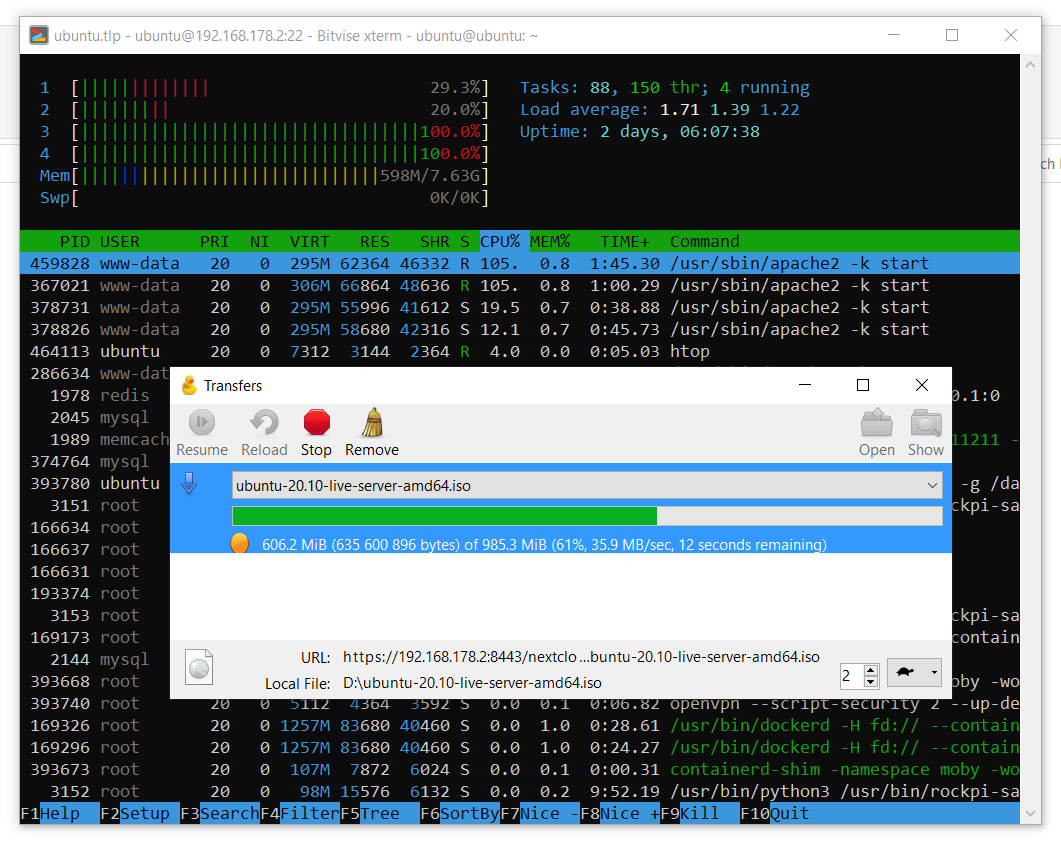
The cloud can theoretically be connected as a network drive via WebDAV, but for some reason not in Windows 10. Using the Cyberduck utility, I tested the operation of the cloud on a local network. As you can see in the screenshots below, cloud upload speeds reach an acceptable 12 MB / s, and cloud uploads reach a decent 35 MB / s. The speed data was obtained with encryption enabled in the cloud with the pca4096 key.

Part 5. Power consumption
Initially, I wanted to give this server a week to run in order to bring statistics using the power meter. But, unfortunately, I did not figure out how to properly configure this power meter, so I will give an image with data from the indicator. As you can see, in idle mode, the system consumes 8.5 W of energy, and during active synchronization with the cloud (a folder with personal data about 200 GB in size) up to 16.88 W. Detailed statistics would allow us to calculate the average value of the power consumption per day, but due to its absence and on the assumption that the server is idle most of the time, I take 10 W for the average value of the power consumption at a glance, which gives:
At current prices of € 0.31 per 1 kWh, the cost of maintaining the server per month will be about € 2.23, which should not greatly affect my average energy consumption.

Once we figured out consumption and costs, I propose to conduct a small assessment of financial investments and compare with the offers of virtual servers on the market. Unfortunately, I did not get an equivalent comparison, because, as I understand it, the virtual server market offers either performance servers or storage servers. Suppose that the resulting home server is comparable in performance to storage servers and analyze the current prices. As seen from the link, renting a server with 2 TB of disk space will cost € 100 per year. The annual electricity bill for my home mini-server on the 4th raspberry should cost about € 27.16. With € 348.07 spent, it turns out that the payback of the home server will take:
That is a long time, and the reader, in principle, will be right in deciding that it is not worth it.
Let's consider another option with an upgrade to 4 TB of disk space. In the case of a home server, I would buy an additional 2 disks of 2 TB each, which at current prices on Amazon will amount to an additional € 127.62. Server consumption will have to grow and, let's say, will average 18 watts. This will give an annual electricity bill of € 48.88. Now let's compare with the cost of a 4 TB storage server (€ 340 per year) and estimate the return on investment:
That is short-lived and no longer looks like a contradictory investment.
Conclusion
In this post, we learned about a wonderful sata hat for the 4th raspberry and about a cute whale based on it for a home server. We looked at the performance of this system using the example of copying files over the network, as well as the performance of the NextCloud cloud running on this server. The issues of power consumption, cost and expenses for this server are also not left aside. Thank you for reading this material. Critical comments on the solutions presented are welcome.
In particular, I would like to ask the reader to share his experience on the following issues:
- ZFS?
- Network copy speed drops, what to do about it?
- Apache or all the same nginks?
- Which oops to choose?
- Why is docker bypassing VPN rules?