Some fun with computer vision and CNN with a small database.
My hobby is board games, and since I have a little knowledge about CNN, I decided to make an app that could beat people at a card game. I wanted to build a model from scratch using my own database to see how good the model would go from scratch with a small database. The decision was made to start with a not too difficult game, Spot it! (she, Couples ).
, , : , . Spot it!, . . , . 55 , , .
?
data science . , . 330 . . : (CNN)? !
, , ? , : . , . . , : , ( ) ( ) , ( ) ( ) . .
Lab . L , a , b — . OpenCV:
import cv2
import imutils
imgname = 'picture1'
image = cv2.imread(f’{imgname}.jpg’)
lab = cv2.cvtColor(image, cv2.COLOR_BGR2LAB)
l, a, b = cv2.split(lab)
, :
clahe = cv2.createCLAHE(clipLimit=3.0, tileGridSize=(8,8))
cl = clahe.apply(l)
limg = cv2.merge((cl,a,b))
final = cv2.cvtColor(limg, cv2.COLOR_LAB2BGR)
:
resized = cv2.resize(final, (800, 800))
#
cv2.imwrite(f'{imgname}processed.jpg', blurred)
!
. OpenCV. -, ( , 190), . :
image = cv2.imread(f’{imgname}processed.jpg’)
gray = cv2.cvtColor(image, cv2.COLOR_RGB2GRAY)
thresh = cv2.threshold(gray, 190, 255, cv2.THRESH_BINARY)[1]
#
cnts = cv2.findContours(thresh.copy(), cv2.RETR_EXTERNAL, cv2.CHAIN_APPROX_SIMPLE)
cnts = imutils.grab_contours(cnts)
output = image.copy()
#
for c in cnts:
cv2.drawContours(output, [c], -1, (255, 0, 0), 3)
, , : . , .
# ,
cnts = sorted(cnts, key=cv2.contourArea, reverse=True)[0]
#
mask = np.zeros(gray.shape,np.uint8)
mask = cv2.drawContours(mask, [cnts], -1, 255, cv2.FILLED)
#
fg_masked = cv2.bitwise_and(image, image, mask=mask)
# ( )
mask = cv2.bitwise_not(mask)
bk = np.full(image.shape, 255, dtype=np.uint8)
bk_masked = cv2.bitwise_and(bk, bk, mask=mask)
#
final = cv2.bitwise_or(fg_masked, bk_masked)
! , — . , . :
# ( )
gray = cv2.cvtColor(final, cv2.COLOR_RGB2GRAY)
thresh = cv2.threshold(gray, 195, 255, cv2.THRESH_BINARY)[1]
thresh = cv2.bitwise_not(thresh)
cnts = cv2.findContours(thresh.copy(), cv2.RETR_EXTERNAL, cv2.CHAIN_APPROX_SIMPLE)
cnts = imutils.grab_contours(cnts)
cnts = sorted(cnts, key=cv2.contourArea, reverse=True)[:10]
#
i = 0
for c in cnts:
if cv2.contourArea(c) > 1000:
# ,
mask = np.zeros(gray.shape, np.uint8)
mask = cv2.drawContours(mask, [c], -1, 255, cv2.FILLED)
#
fg_masked = cv2.bitwise_and(image, image, mask=mask)
mask = cv2.bitwise_not(mask)
bk = np.full(image.shape, 255, dtype=np.uint8)
bk_masked = cv2.bitwise_and(bk, bk, mask=mask)
finalcont = cv2.bitwise_or(fg_masked, bk_masked)
#
output = finalcont.copy()
x,y,w,h = cv2.boundingRect(c)
# squares io rectangles
if w < h:
x += int((w-h)/2)
w = h
else:
y += int((h-w)/2)
h = w
#
roi = finalcont[y:y+h, x:x+w]
roi = cv2.resize(roi, (400,400))
#
cv2.imwrite(f"{imgname}_icon{i}.jpg", roi)
i += 1
! . , , 57 ( 57 ). :
symbols ├── test │ ├── anchor │ ├── apple │ │ ... │ └── zebra ├── train │ ├── anchor │ ├── apple │ │ ... │ └── zebra └── validation ├── anchor ├── apple │ ... └── zebra
, ( 2500)! , GitHub. , …
(CNN)
. . softmax 57 .
:
#
from keras import layers
from keras import models
from keras import optimizers
from keras.preprocessing.image import ImageDataGenerator
import matplotlib.pyplot as plt
# , 57 ( )
model = models.Sequential()
model.add(layers.Conv2D(32, (3, 3), activation='relu', input_shape=(400, 400, 3)))
model.add(layers.MaxPooling2D((2, 2)))
model.add(layers.Conv2D(64, (3, 3), activation='relu'))
model.add(layers.MaxPooling2D((2, 2)))
model.add(layers.Conv2D(128, (3, 3), activation='relu'))
model.add(layers.MaxPooling2D((2, 2)))
model.add(layers.Conv2D(256, (3, 3), activation='relu'))
model.add(layers.MaxPooling2D((2, 2)))
model.add(layers.Conv2D(256, (3, 3), activation='relu'))
model.add(layers.MaxPooling2D((2, 2)))
model.add(layers.Conv2D(128, (3, 3), activation='relu'))
model.add(layers.Flatten())
model.add(layers.Dropout(0.5))
model.add(layers.Dense(512, activation='relu'))
model.add(layers.Dense(57, activation='softmax'))
model.compile(loss='categorical_crossentropy', optimizer=optimizers.RMSprop(lr=1e-4), metrics=['acc'])
. — . , , , . Keras:
#
train_dir = 'symbols/train'
validation_dir = 'symbols/validation'
test_dir = 'symbols/test'
# ImageDataGenerator Keras ( )
train_datagen = ImageDataGenerator(rescale=1./255, rotation_range=40, width_shift_range=0.1, height_shift_range=0.1, shear_range=0.1, zoom_range=0.1, horizontal_flip=True, vertical_flip=True)
test_datagen = ImageDataGenerator(rescale=1./255)
train_generator = train_datagen.flow_from_directory(train_dir, target_size=(400,400), batch_size=20, class_mode='categorical')
validation_generator = test_datagen.flow_from_directory(validation_dir, target_size=(400,400), batch_size=20, class_mode='categorical')
, :
, .
history = model.fit_generator(train_generator, steps_per_epoch=100, epochs=100, validation_data=validation_generator, validation_steps=50)
#
model.save('models/model.h5')
, , . :
, . ( ) . .
: . , 0,995 .
. , , , . :
- : .
( ).
. ( ).
GitHub , main.py.
:
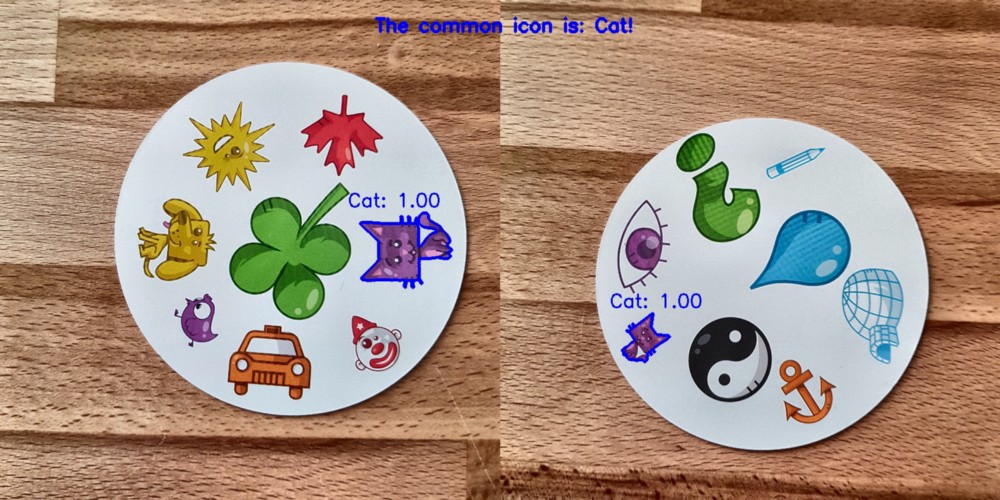
? , ! , . ! :
? : , ! : 55 . 1485 . 140 . , !
I don't think it is really difficult to create a 100% model. This can be done using transfer learning, for example. To understand what the model is doing, we can render the layers for the test image. What to try next time!
Hope you enjoyed reading this post! ❤