Welcome to the most confusing project architecture. Yes, I can write an introduction ...
Let's try to make a small minecraft demo in the browser. Knowledge of JS and three.js will come in handy.
A bit of convention. I'm not claiming to be the best app of the century. This is just my implementation for this task. There is also a video version for those who are too lazy to read (there is the same meaning, but in different words).
Here is the video version
There are all the links you need at the end of the article. I will try as little water as possible in the text. I will not explain how each line works. Now you can start.
To begin with, to understand what the result will be, here is a demo of the game .
Let's divide the article into several parts:
- Project structure
- Game loop
- Game settings
- Map generation
- Camera and controls
Project structure
This is how the project structure looks like.
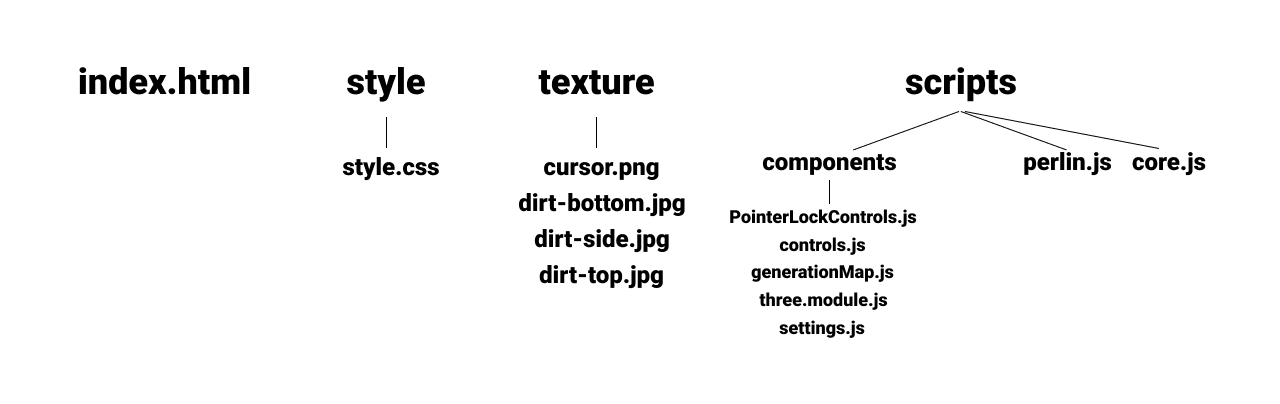
index.html - The location of the canvas, some interface and the connection of styles, scripts.
style.css - Styles for appearance only. The most important is the custom cursor for the game, which is located in the center of the screen.
texture - This contains the textures for the cursor and the ground block for the game.
core.js - The main script where the project is initialized.
perlin.js - This is a library for Perlin noise.
PointerLockControls.js - Camera from three.js.
controls.js - Camera and player controls.
generationMap.js - World generation.
three.module.js - Three.js itself as a module.
settings.js - Project settings.
index.html
<html lang="en">
<head>
	<meta charset="UTF-8">
	<meta name="viewport" content="width=device-width, initial-scale=1.0">
	<link rel="stylesheet" href="style/style.css">
	<title>Minecraft clone</title>
</head>
<body>
	<canvas id="game" tabindex="1"></canvas>
	<div class="game-info">
		<div>
			<span><b>WASD: </b></span>
			<span><b>: </b>  </span>
			<span><b>: </b>  </span>
		</div>
		<hr>
		<div id="debug">
			<span><b></b></span>
		</div>
	</div>
	<div id="cursor"></div>

	<script src="scripts/perlin.js"></script>
	<script src="scripts/core.js" type="module"></script>
</body>
</html>
style.css
body {
	margin: 0px;
	width: 100vw;
	height: 100vh;
}
#game {
	width: 100%;
	height: 100%;
	display: block;
}
#game:focus {
    outline: none;
}
.game-info {
	position: absolute;
	left: 1em;
	top: 1em;
	padding: 1em;
	background: rgba(0, 0, 0, 0.9);
	color: white;
	font-family: monospace;
	pointer-events: none;
}
.game-info span {
	display: block;
}
.game-info span b {
	font-size: 18px;
}
#cursor {
	width: 16px;
	height: 16px;
	position: fixed;
	top: 50%;
	left: 50%;
	transform: translate(-50%, -50%);
	background-image: url("../texture/cursor.png");
	background-repeat: no-repeat;
	background-size: 100%;

	filter: brightness(100);
}
Game loop
In core.js, you need to initialize three.js, configure it and add all the necessary modules from the game + event handlers ... well, start the game loop. Considering that all the settings are standard, there is no point in explaining them. You can talk about map (it takes the game scene to add blocks) and contorls. it takes several parameters. The first is a camera from three.js, a scene for adding blocks and a map so you can interact with it. update is responsible for updating the camera, GameLoop is the game loop, render is the standard from three.js for updating the frame, the resize event is also the standard for working with the canvas (this is the implementation of the adaptive).
core.js
import * as THREE from './components/three.module.js';
import { PointerLockControls } from './components/PointerLockControls.js';

import { Map } from "./components/generationMap.js";
import { Controls } from "./components/controls.js";

//   three.js
const canvas				= document.querySelector("#game");
const scene 				= new THREE.Scene();
scene.background 			= new THREE.Color(0x00ffff);
scene.fog 					= new THREE.Fog(0x00ffff, 10, 650);
const renderer 				= new THREE.WebGLRenderer({canvas});
renderer.setSize(window.innerWidth, window.innerHeight);
const camera 				= new THREE.PerspectiveCamera(75, window.innerWidth / window.innerHeight, 0.1, 1000);
camera.position.set(50, 40, 50);

//
let mapWorld = new Map();
mapWorld.generation(scene);

let controls = new Controls( new PointerLockControls(camera, document.body),  scene, mapWorld );

renderer.domElement.addEventListener( "keydown", (e)=>{ controls.inputKeydown(e); } );
renderer.domElement.addEventListener( "keyup", (e)=>{ controls.inputKeyup(e); } );
document.body.addEventListener( "click", (e) => { controls.onClick(e); }, false );

function update(){
	// /
	controls.update();
};

GameLoop();

//
function GameLoop() {
	update();
	render();
	requestAnimationFrame(GameLoop);
}

//  (1 )
function render(){
	renderer.render(scene, camera);
}

//
window.addEventListener("resize", function() {
	camera.aspect = window.innerWidth / window.innerHeight;
	camera.updateProjectionMatrix();
	renderer.setSize(window.innerWidth, window.innerHeight);
});
Settings
It was possible to take out other parameters into the settings, for example, the three.js settings, but I did without them and now there are only a couple of parameters responsible for the block size.
settings.js
export class Settings {
	constructor() {
		//
		this.blockSquare 		= 5;
		//
		this.chunkSize 			= 16;
		this.chunkSquare 		= this.chunkSize * this.chunkSize;
	}
}
Map generation
In the Map class, we have several properties that are responsible for the material cache and parameters for Perlin noise. In the generation method, we load textures, create geometry and mesh. noise.seed is responsible for the starting grain for map generation. You can replace random with a static value so that the cards are always the same. In a loop along the X and Z coordinates, we begin to arrange the cubes. The Y coordinate is generated by the pretlin.js library. Finally, we add the cube with the desired coordinates to the scene via scene.add (cube);
generationMap.js
import * as THREE from './three.module.js';
import { Settings } from "./settings.js";

export class Map {
    constructor(){
		this.materialArray;

		this.xoff = 0;
		this.zoff = 0;
		this.inc = 0.05;
		this.amplitude = 30 + (Math.random() * 70);
    }
    generation(scene) {
		const settings = new Settings();

		const loader = new THREE.TextureLoader();
		const materialArray = [
			new THREE.MeshBasicMaterial( { map: loader.load("../texture/dirt-side.jpg") } ),
			new THREE.MeshBasicMaterial( { map: loader.load('../texture/dirt-side.jpg') } ),
			new THREE.MeshBasicMaterial( { map: loader.load('../texture/dirt-top.jpg') } ),
			new THREE.MeshBasicMaterial( { map: loader.load('../texture/dirt-bottom.jpg') } ),
			new THREE.MeshBasicMaterial( { map: loader.load('../texture/dirt-side.jpg') } ),
			new THREE.MeshBasicMaterial( { map: loader.load('../texture/dirt-side.jpg') } )
		];

		this.materialArray = materialArray;

		const geometry = new THREE.BoxGeometry( settings.blockSquare, settings.blockSquare, settings.blockSquare);

		noise.seed(Math.random());

		for(let x = 0; x < settings.chunkSize; x++) {
			for(let z = 0; z < settings.chunkSize; z++) {

				let cube = new THREE.Mesh(geometry, materialArray);

				this.xoff = this.inc * x;
				this.zoff = this.inc * z;
				let y = Math.round(noise.perlin2(this.xoff, this.zoff) * this.amplitude / 5) * 5;

				cube.position.set(x * settings.blockSquare, y, z * settings.blockSquare);
				scene.add( cube );

			}
		}
	}
}
Camera and controls
I already said that controls take parameters in the form of a camera, scene and map. Also in the constructor we add an array of keys for the keys and a movingSpeed for speed. For the mouse, we have 3 methods. onClick determines which button is clicked, and onRightClick and onLeftClick are already responsible for actions. Right click (block deletion) goes through raycast and search for intersected elements. If they are not there, then we stop working, if there are, then we delete the first element. Left click works on a similar system. First, let's create a block. We start raycast and if there is a block that crossed the ray, then we get the coordinates of this block. Next, we determine from which side the click occurred. We change the coordinates for the created cube in accordance with the side to which we add the block. gradation in 5 units because this is the block size (yes, you could use a property from settings here).
How does camera control work ?! We have three methods inputKeydown, inputKeyup and update. In inputKeydown, we add the button to the keys array. inputKeyup is responsible for clearing the buttons from the array that have been pressed. In update, the keys are checked and moveForward is called on the camera, the parameters that the method takes are the speed.
controls.js
import * as THREE from "./three.module.js";
import { Settings } from "./settings.js";

export class Controls {
	constructor(controls, scene, mapWorld){
		this.controls = controls;
		this.keys = [];
		this.movingSpeed = 1.5;
		this.scene = scene;
		this.mapWorld = mapWorld;
	}
	//
	onClick(e) {
		e.stopPropagation();
		e.preventDefault();

		this.controls.lock();

		if (e.button == 0) {
			this.onLeftClick(e);
		} else if (e.button == 2) {
			this.onRightClick(e);
		}
	}
	onRightClick(e){
		//

		const raycaster = new THREE.Raycaster();

		raycaster.setFromCamera( new THREE.Vector2(), this.controls.getObject() );
		let intersects = raycaster.intersectObjects( this.scene.children );

		if (intersects.length < 1)
			return;
		this.scene.remove( intersects[0].object );
	}
	onLeftClick(e) {

		const raycaster = new THREE.Raycaster();
		const settings = new Settings();

		//
		const geometry = new THREE.BoxGeometry(settings.blockSquare, settings.blockSquare, settings.blockSquare);
		const cube = new THREE.Mesh(geometry, this.mapWorld.materialArray);

		raycaster.setFromCamera( new THREE.Vector2(), this.controls.getObject() );
		const intersects = raycaster.intersectObjects( this.scene.children );
		if (intersects.length < 1)
			return;
		const psn = intersects[0].object.position;
		switch(intersects[0].face.materialIndex) {
			case 0:
				cube.position.set(psn.x + 5, psn.y, psn.z);
				break;
			case 1:
				cube.position.set(psn.x - 5, psn.y, psn.z);
				break;
			case 2:
				cube.position.set(psn.x, psn.y + 5, psn.z);
				break;
			case 3:
				cube.position.set(psn.x, psn.y - 5, psn.z);
				break;
			case 4:
				cube.position.set(psn.x, psn.y, psn.z + 5);
				break;
			case 5:
				cube.position.set(psn.x, psn.y, psn.z - 5);
				break;
		}

		this.scene.add(cube);
	}
	//
	inputKeydown(e) {
		this.keys.push(e.key);
	}
	//
	inputKeyup(e) {
		let newArr = [];
		for(let i = 0; i < this.keys.length; i++){
			if(this.keys[i] != e.key){
				newArr.push(this.keys[i]);
			}
		}
		this.keys = newArr;
	}
	update() {
		//
		if ( this.keys.includes("w") || this.keys.includes("") ) {
			this.controls.moveForward(this.movingSpeed);
		}
		if ( this.keys.includes("a") || this.keys.includes("") ) {
			this.controls.moveRight(-1 * this.movingSpeed);
		}
		if ( this.keys.includes("s") || this.keys.includes("") ) {
			this.controls.moveForward(-1 * this.movingSpeed);
		}
		if ( this.keys.includes("d") || this.keys.includes("") ) {
			this.controls.moveRight(this.movingSpeed);
		}
	}
}
Links
As I have promised. All the material that comes in handy.
If you wish, then you can add your functionality to the project on the github.
perlin.js
three.js
GitHub