In our new translated article, we understand KinD with a practical example.
Building a Kubernetes cluster is getting easier over time. There are several turnkey solutions available on the market, and now no one chooses the difficult path!

It's worth noting that Minikube was one of the main clusters that developers used to quickly develop and test containers. While Minikube currently supports multisite clustering on an experimental basis, it is not yet available in the General Access (GA).
Consequently, this limits the ability to integrate and test components, which is why most organizations use Kubernetes managed cloud services for this.
To integrate Kubernetes into the CI / CD pipeline (continuous integration and deployment) and perform testing, you need the following tools: Terraform, depending on the cloud provider, and of course, a CI / CD tool like Jenkins, GitLab, or GitHub.
For large companies with a sufficient budget, these are suitable options, however developers are often looking for something to help them get started quickly. Deploying a Kubernetes cluster in the cloud also takes some time (~ 10 minutes), which can be an obstacle for CIs who need to get assemblies quickly.
Kubernetes in Docker or KinD is an implementation of the Docker-in-Docker (DinD) approach for Kubernetes. This tool creates containers that act as Kubernetes hosts and you only need to install Docker on your machine.
It allows you to deploy a multi-node cluster in a couple of minutes without depending on other tools or cloud providers. This makes it useful not only for local development, but also for CI / CD.
KinD architecture
Kubernetes in Docker uses the Docker-in-Docker (DinD) approach to run a Kubernetes cluster. It runs several Docker containers that function as Kubernetes hosts. Docker containers mount a docker.sock volume in Docker running on your machine to communicate with the underlying container runtime.
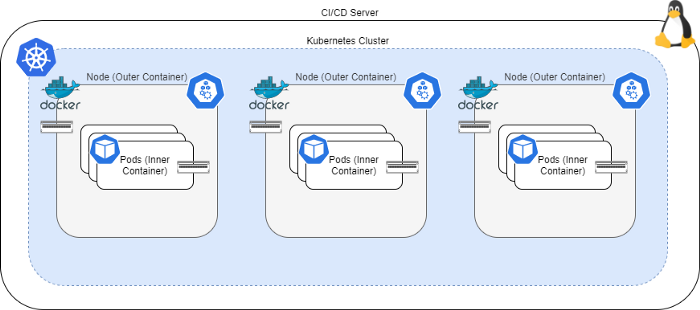
KinD has passed the compliance test and received the CNCF certificate. It uses Kubeadm to bootstrap the cluster, and it also generates Kube config files for the user through whom you manage your cluster, allowing you to use kubectl to interact with the clusters. Other Kubernetes components like Helm and Istio also work great on KinD clusters.
The downside to KinD is that it doesn't work with LoadBalancer services , so you'll have to use NodePort to forward your services externally.
In addition, DinD is currently not the most secure solution, so only use KinD clusters on local development machines and CI / CD pipelines. Never use KinD in a production environment!
Installing KinD
KinD consists of a simple command line utility that you can download and put in your path. Then you can interact with KinD using the kind commands :
sudo curl -sL https://kind.sigs.k8s.io/dl/v0.9.0/kind-linux-amd64 -o /usr/local/bin/kind
sudo chmod +x /usr/local/bin//kind
Then you can create your cluster using the following command:
kind create cluster --wait 10m
This command will create a single node cluster. But if you want to define a multi-node cluster, you can use a cluster configuration file similar to the one below:
# three node (two workers) cluster config
kind: Cluster
apiVersion: kind.x-k8s.io/v1alpha4
nodes:
- role: control-plane
- role: worker
- role: worker
Then create a cluster with a configuration file using the following command:
kind create cluster --wait 10m --config kind-config.yaml
You can also create clusters with multiple management levels by specifying multiple roles in the nodes section.
Since KinD automatically generates a Kube configuration file, you can use kubectl commands just like with other clusters.
Removing a KinD cluster is also easy. Run the following command:
kind delete cluster
Getting Started
Without further ado, let's figure out in practice how the CI / CD pipeline uses KinD. We'll take GitHub Actions as our CI / CD tool because it's easy to use, doesn't require any additional infrastructure, and can be run by anyone with a laptop and an internet connection.
Let's create a simple NGINX application labeled "Hello World".
We perform the following actions:
- We create a dev version of the application.
- We start testing the components in the KinD cluster.
- If the test is successful, we translate the image into release and push it to Docker Hub.
The necessary conditions
- GitHub account
- Docker Hub account
Quick Start Guide
- Fork this repository this repository.
- Go to the repository and create two secrets : DOCKER_USER and DOCKER_PW . They should contain your Docker Hub username and account password, respectively.
- Go to GitHub Actions and rerun the tasks. Alternatively, you can modify the README.md file and run it to trigger the action.
Long version
Let's take a look at the build-pipeline.yml file on GitHub Actions to understand how it works:
name: Docker Image CI

on: [push]
     # Environment variables available to all jobs and steps in this workflow
env: # Or as an environment variable
      docker_username: ${{ secrets.DOCKER_USER }}
      docker_password: ${{ secrets.DOCKER_PW }}

jobs:

  build-docker-image:
    runs-on: ubuntu-latest
    steps:
    - uses: actions/checkout@v2
      with:
        fetch-depth: 0
    - name: Build the Docker image
      run: docker build -t $docker_username/nginx:dev .
    - name: Login to Docker
      run: echo "$docker_password" | docker login -u "$docker_username" --password-stdin
    - name: Push the docker image
      run: docker push $docker_username/nginx:dev

  kubernetes-component-test:
    runs-on: ubuntu-latest
    needs: build-docker-image
    steps:
    - uses: actions/checkout@v2
      with:
        fetch-depth: 0
    - name: Run KIND Test
      run: sudo sh build-test.sh $docker_username

  promote-and-push-docker-image:
    runs-on: ubuntu-latest
    needs: kubernetes-component-test
    steps:
    - uses: actions/checkout@v2
      with:
        fetch-depth: 0
    - name: Pull the Docker image
      run: docker pull $docker_username/nginx:dev
    - name: Tag the Docker image
      run: docker tag $docker_username/nginx:dev $docker_username/nginx:release
    - name: Login to Docker
      run: echo "$docker_password" | docker login -u "$docker_username" --password-stdin
    - name: Push the docker image
      run: docker push $docker_username/nginx:release
The assembly pipeline runs three tasks in sequence:
- The build-docker-image task builds a Docker image for development and pushes it to the Docker Hub on successful build. In this task, you can run your unit testing.
- The kubernetes-component-test task sets up a KinD cluster and runs a component test for the application.
- The promote-and-push-docker-image task pulls the development image, marks it to release, and pushes the release to Docker Hub.
Let's take a look at the Dockerfile to understand what it creates:
FROM nginx
RUN echo 'Hello World' > /usr/share/nginx/html/index.html
The second step is key, it runs the build-test.sh script . Now let's take a look at the script:
#! /bin/bash
docker_username=$1
set -xe
curl -sL https://kind.sigs.k8s.io/dl/v0.9.0/kind-linux-amd64 -o /usr/local/bin/kind
chmod 755 /usr/local/bin//kind
curl -sL https://storage.googleapis.com/kubernetes-release/release/v1.17.4/bin/linux/amd64/kubectl -o
chmod 755 /usr/local/bin//kubectl
curl -LO https://get.helm.sh/helm-v3.1.2-linux-amd64.tar.gz
tar -xzf helm-v3.1.2-linux-amd64.tar.gz
mv linux-amd64/helm /usr/local/bin/
rm -rf helm-v3.1.2-linux-amd64.tar.gz
kind version
kubectl version --client=true
helm version
kind create cluster --wait 10m --config kind-config.yaml
kubectl get nodes
docker build -t $docker_username/nginx:dev .
kind load docker-image $docker_username/nginx:dev
kubectl apply -f nginx-deployment.yaml
kubectl apply -f nginx-service.yaml
NODE_IP=$(kubectl get node -o wide|tail -1|awk {'print $6'})
NODE_PORT=$(kubectl get svc nginx-service -o go-template='{{range.spec.ports}}{{if .nodePort}}{{.node
sleep 60
SUCCESS=$(curl $NODE_IP:$NODE_PORT)
if [[ "${SUCCESS}" != "Hello World" ]];
then
 kind -q delete cluster
exit 1;
else
 kind -q delete cluster
echo "Component test succesful"
fi
What the script does:
- Downloads and installs the kind , kubectl and helm utilities on the CI server.
- Creates a multi-node cluster using the kind-config.yaml file .
- Docker docker build.
- Docker KinD. KinD, Docker Hub.
- deployment NodePort NodePortservice.
- IP- , , «Hello World».
- , KinD, «Component test successful» ( ) . , KinD .
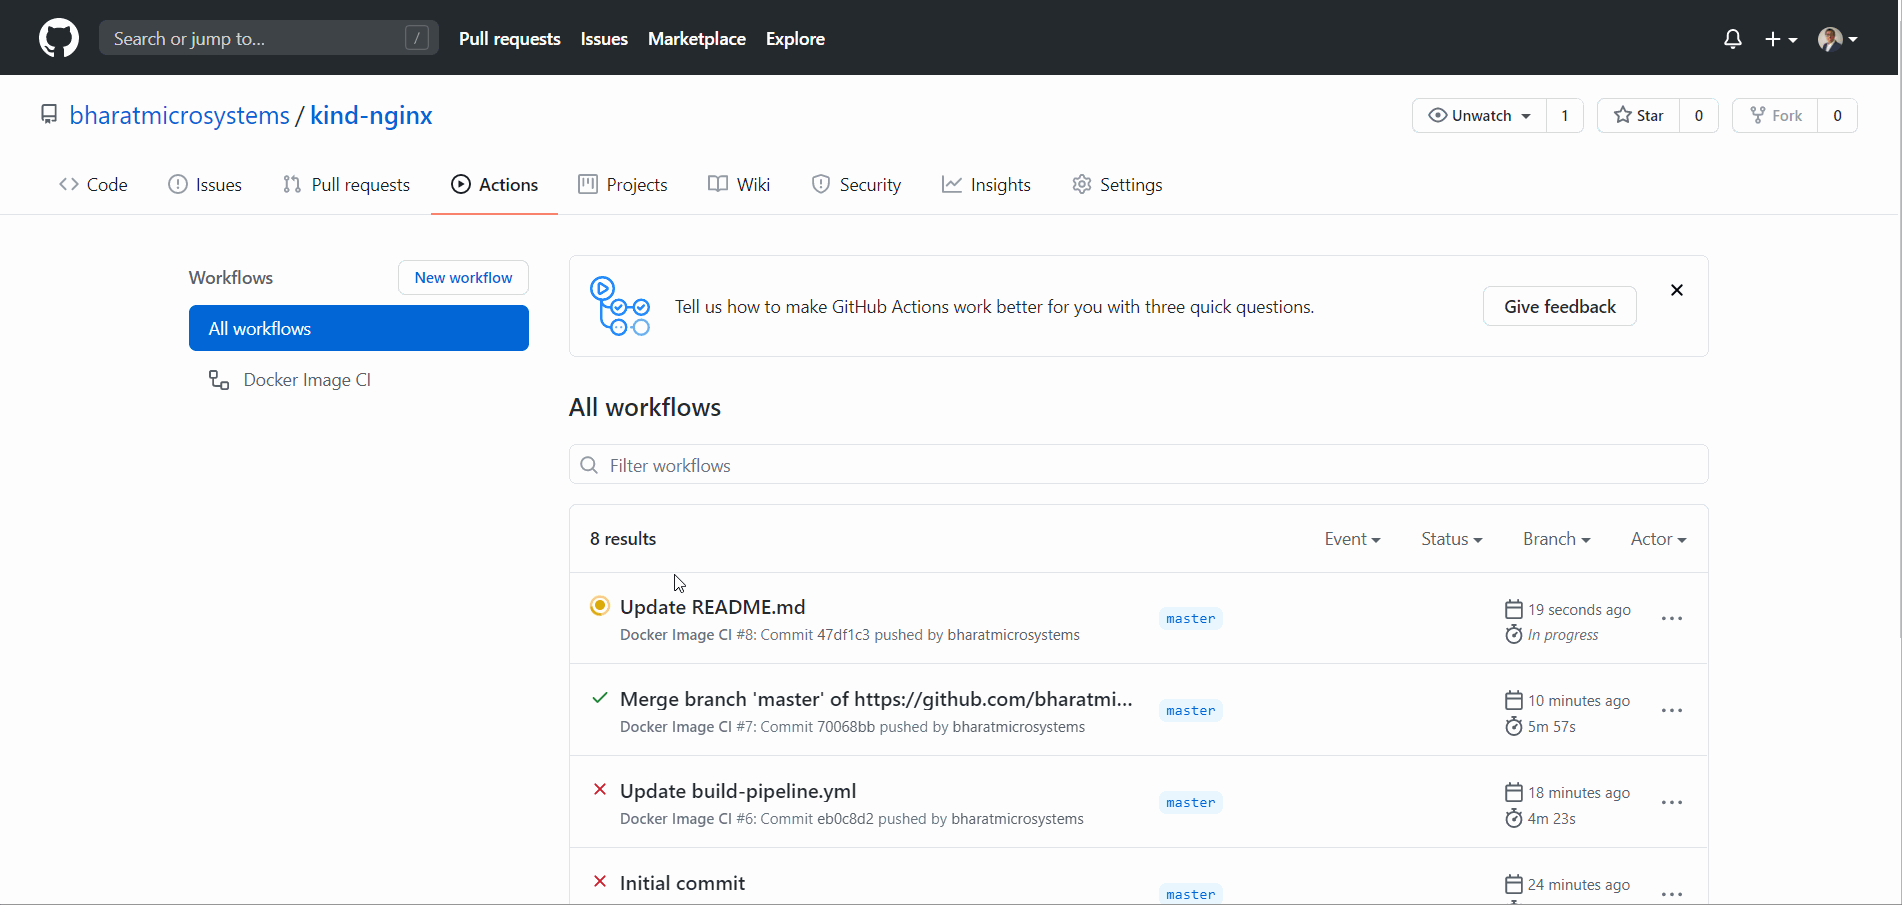
When we start working with a pipeline, GitHub Actions automatically starts the entire pipeline:
This is undoubtedly an improvement and a convenient way to perform continuous integration and deployment using Docker and Kubernetes. Kubernetes in Docker not only simplifies local development, but is also a great tool for CI / CD.
Thanks for reading the article! I hope you enjoyed it!