Memory overclocking is voluntary. How to understand what the memory overclocking depends on, what are the subtleties in the selection of components and how to "drive" the memory so that you will not be ashamed of it!
Research, analysis and selection are the three ingredients for success in memory overclocking. You don't have to be a specialist to start overclocking memory without diving into the abyss of technical knowledge. Half of the success depends on the platform, the second part is the correct choice of rank, the number of modules and frequencies of Kingston and HyperX memory.
Intel Chipsets
From Intel's side, the manufacturer offers a scattering of processors from entry to top-end - there is plenty to choose from. There are now 2 generations of chipsets as the basis for blue systems, and their capabilities in terms of overclocking the CPU and memory are very trivial. Intel officially considers only one chipset model suitable for overclocking and that is the Z 390/490 family. All the others pass by.
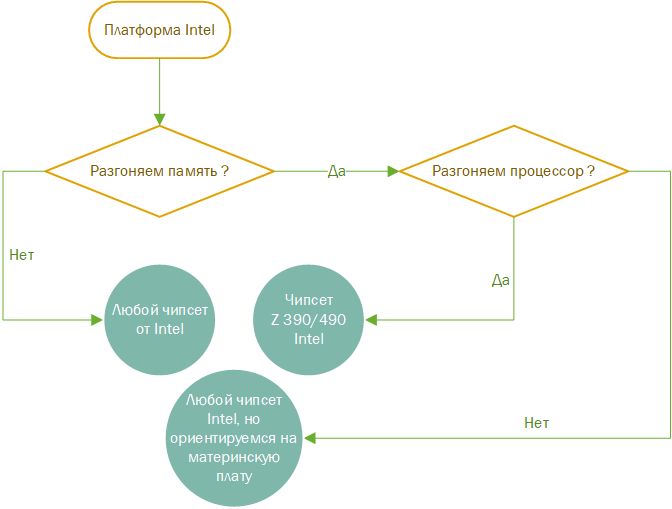
However, because of this, the selection process is reduced to a seemingly simple choice, but no. With the Z 390/490 everything is simple - we decided on the number of interfaces, PCIe / USB connectors, etc. Found a suitable motherboard and bought it. We entered the BIOS or an overclocking program and entered a mysterious new world of amazing discoveries. If overclocking is not needed, then we buy any suitable board. And with the third option, let's slow down. Although Intel does not officially recognize memory overclocking on any versions of the chipset, except for the two previously mentioned, manufacturers are trying to reveal hidden opportunities to users. Memory timings and dividers (only below the frequency listed in the Intel specification for the selected processor) may be available depending on the model. For example,some successful versions of motherboards based on the B460 / H470 chipset are nevertheless endowed with options for fine tuning memory timings and forcing Turbo modes on processors, the so-called fixing PL modes (switching the processor to constantly maintaining the turbo frequency).
By the way, about the available memory frequencies on the lower B460 / H410 / H470: in fact, the motherboards either independently set the memory frequency according to Intel specifications (you can easily check it by finding the processor you are interested in on the ark.intel.com website and look at the “Memory types” line) or at the first boot the minimum frequency is set according to the JEDEC specification (usually all settings of the supported frequencies are recorded in the SDP chip). Q470 is a chipset analogous to Z490 in peripheral interfaces, but without overclocking the processor. The W480 that remains on the list stands out. It supports memory overclocking and you can set higher multipliers for Dram, but you can hardly find motherboards with it on sale.
The subtleties of the memory controller and PCB layout
If everything were simple in the computer world, then life would be easier! Alas, or fortunately, this is not the case. Besides loading your head with types of chipsets for overclocking memory, other characteristics of the components are also important. It's worth starting with the second component and this is the memory controller in the processor. For the last 5 generations, this hardware block is directly connected to the System Agent on the CPU and to the bus. Objectively, despite the constancy in the choice of those. process (14 nm and various improvements +, ++, +++), the company is constantly improving their ability to handle higher frequencies without prohibitively high voltages. Remembering memory overclocking on processors from Kaby Lake to Comet Lake, it cannot be denied that the process has been simplified, and the final frequencies have increased.This is not least due to a more thorough approach to writing timing and sub-timing tables in XMP memory kits. This greatly simplifies the motherboard's initial boot algorithm, although some manufacturers either add too short a list of timings, forgetting about secondary / tertiary ones, or greatly increase the voltage on the memory controller and the system agent. Such actions lead the system to an unstable state, and often the increased voltage overheats the processor. Therefore, you should be careful when choosing a memory kit. Besides the previously announced overclocking components, Dram almost lost sight of the correct layout of the slots.forgetting about secondary / tertiary, or greatly increase the voltage on the memory controller and system agent. Such actions lead the system to an unstable state, and often the increased voltage overheats the processor. Therefore, you should be careful when choosing a memory kit. Besides the previously announced overclocking components, Dram almost lost sight of the correct layout of the slots.forgetting about secondary / tertiary, or greatly increase the voltage on the memory controller and system agent. Such actions lead the system to an unstable state, and often the increased voltage overheats the processor. Therefore, you should be careful when choosing a memory kit. Besides the previously announced overclocking components, Dram almost lost sight of the correct layout of the slots.
Topology
For DDR4, two types of slot wiring are usually used - Daisy chain and T-topology.

T-Topology possesses rare motherboards and is adapted for better overclocking of 4 memory modules. T-Topology layout allows you to reach frequencies over 4 GHz at once on 4 Dram bars, while the Daisy chain with 2 modules gets in the hands of users up to a frequency of over 4.5 GHz.

Daisy chain - layout is optimized for 2 memory modules. Providing a good processor and well-overclocked memory, it is better to choose such motherboards with 2 occupied Dimm slots. The second layout can be indirectly distinguished by the manufacturer's recommendations to install memory first in the last slots, which are kind of the first in line in the logical branch chain from the memory controller.
Ranks
With the channel layout topologies sorted out, let's move on to memory ranks ... A memory
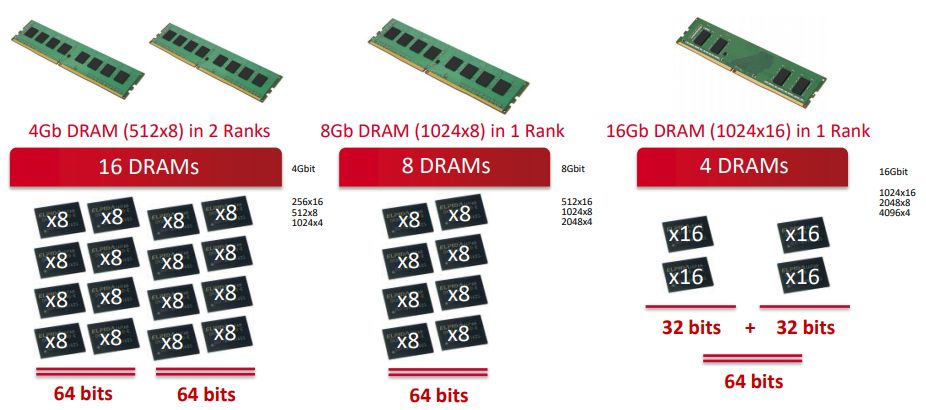
rank is a block or data area that is created using several or all of the memory chips in a module. A rank is a 64-bit block of data. Do not confuse the ranks with the location of the memory chips on the PCB. The results of overclocking the memory with two ranks are rather sad, the memory controller and the bus are hard to cope with the four ranks. The maximum that is available is from 3466 MHz at CL14 to 3600 MHz at CL16. The only plus from the four ranks is the impressive amount of RAM and the technology of alternating ranks, which will increase the system's performance in games. You can find out about the number of ranks from the decoding of the modules on the manufacturer's website, or through the Thaiphoon / Aida64 / CPU-Z utilities.
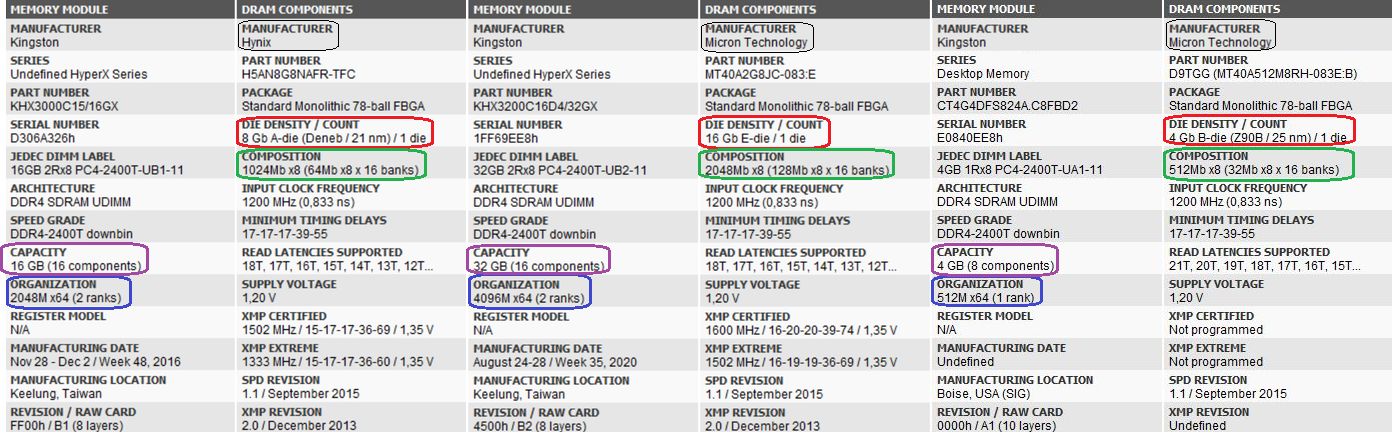
In Thaiphoon, it is easy to determine the chip manufacturer, memory module organization, rank and other parameters.
• Manufacturer - manufacturer of microcircuits;
• Die Density / Count - The capacity of one microcircuit in Gbit and the code name. It is usually used in specialized forums for orientation among different versions of microcircuits. Usually they say Samsung B-die or Micron E-die;
• Composition - organization of banks in one memory chip (2048 Mbit * 8 = 16 Gbit);
• Capacity - the capacity of the entire memory module, the number of microcircuits is indicated in brackets;
• Organization - in this field you can find out exactly the rank of your memory (1/2 ranks);
Gradually, starting at the end of 2019, Kingston is switching to using 16Gb memory chips. Therefore, capacious Dram kits are organized from 16 Gbit peer-to-peer chips with a capacity of 16 GB and a dual-rank 32 GB.
Subtotal
In short, for motherboards with a layout:
Daisy chain is the best option for overclocking 2 memory modules with peer organization, slightly worse than the bar with two ranks. The next combination, consisting of 4 Dimm with one rank, and then with two ranks.
For T-topology - 4 peer memory modules are suitable for overclocking, but 2 modules with dual ranks can be installed. A completely inappropriate combination of 2 or 4 modules with two ranks.
In terms of overclocking according to world statistics: 8 GB B-die> 8 GB Micron Rev. E> 8 GB CJR> 4 GB E-die> 8 GB AFR> 4 GB D-die> 8 GB MFR> 4 GB S-die.
AMD Chipsets

Easy to choose, hard to overclock! With the AMD AM4 platform, on the one hand, everything is simple in the matter of choosing a chipset, and on the other, it is many times more complicated. Any modern AMD chipset supports memory and processor overclocking, even the ultra-budget A520. Another thing is that some motherboard manufacturers cut down menu items in the BIOS, for example, the PBO mode editor. But in general, starting from the B450 overclocking is fully possible.
About the controller
Zen 2/3 Gen Ryzen features a memory controller that dates back to Bulldozer. Of course, changes have been made to it for DDR4, but the controller is built on the same 12-nm process technology. In Zen 3, it has not undergone any changes, however, thanks to the new layout of the Zen 3 cores, it lost one intermediate IF bus, which positively affected the access time to RAM.
AMD ?
Due to the use of a special Infinity Fabric bus, which connects individual blocks in the processor, called CCX. The Infinity Fabric has its own clock domain that is synchronized with the physical memory frequency. Starting with the second generation, Zen received an additional mode, when the IF frequency takes the value of the memory frequency, as well as 1/2 MEMCLK, which will significantly increase the frequency potential of DRAM during overclocking. The ideal IF mode of operation for maximum performance is still 1: 1. We will not go into details, but for games the ratio of memory and IF operation 1 to 1 gives several options for optimal frequencies - 3600, 3800 MHz. Depending on your luck, if you come across a lucky ticket to pull out a processor with a stable functioning IF at 4 GHz, then we can congratulate you, you are a unique person.
A smart choice for Ryzen 3xxx processors has been and remains the use of DDR4-3600 or DDR4-3733 memory modules. The limiting frequency of the Infinity Fabric bus was 1800-1867 MHz. Then the divider was switched, which allowed the memory to be overclocked higher, but the system did not receive dividends. All this also applies to the new Ryzen 5xxx series. This happens because, together with IF, the frequency of the L3 cache increases synchronously, thereby increasing the throughput inside the processor.
About memory for AMD
Now you are familiar with the nuances of the memory controller, IF bus and L3 cache, and what about the choice of a motherboard. Like the previously mentioned topologies (Daisy chain and "T"), for AMD processors, manufacturers produce both types of boards with a large advantage towards the Daisy chain. Therefore, the optimal memory recommendations are as follows:

Purchase of peer-to-peer memory in the amount of 2 pieces of maximum size for maximum overclocking. The chipset is not important, whether it be B550 or X470 / 570. This advice applies to 90% of any configurations with AMD processors. Quite ambiguous overclocking results are achieved with dual-rank memory modules. In between there is a kit with four peer modules. The parade ends with a system with four two-rank memory sticks. How to determine the topology of a motherboard for AMD? Thank you, the Internet, everything is determined for us. It is enough to follow the link and find the motherboard of interest .
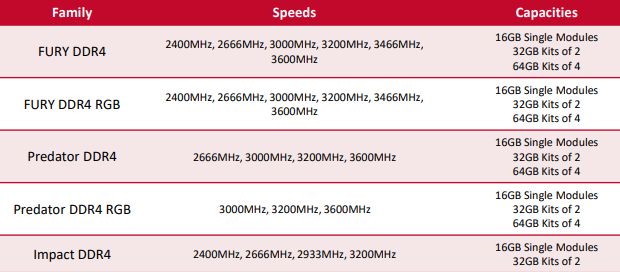
Let's go back to the selection of memory based on the topology of the purchased motherboard. Of course, having installed memory in the system and running the program, we will say with 100% certainty how many ranks are in our memory. But there is a tool and easier, without buying a "pig in a poke". We go to the memory page , select the parameters we are interested in (timings, color, volume, backlight) and look at the description. As an example, consider two Fury X kits of 32GB and 64GB.
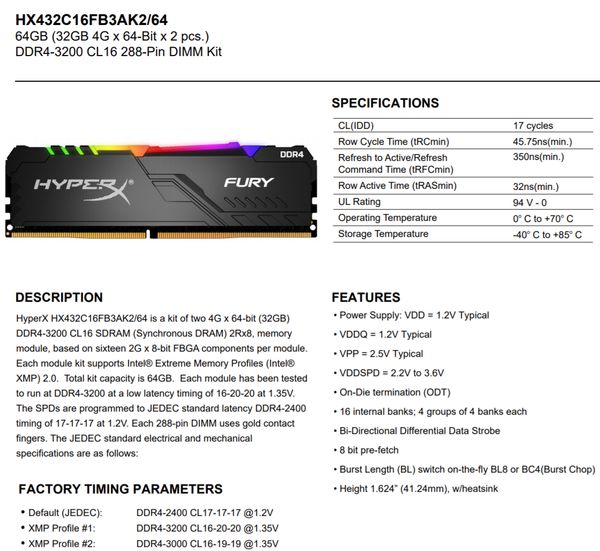
The 64 GB HyperX FURY DDR4 RGB kit, consisting of only 2 modules, is created in a dual-rank configuration. The inscription 2Rx8 informs us about it.
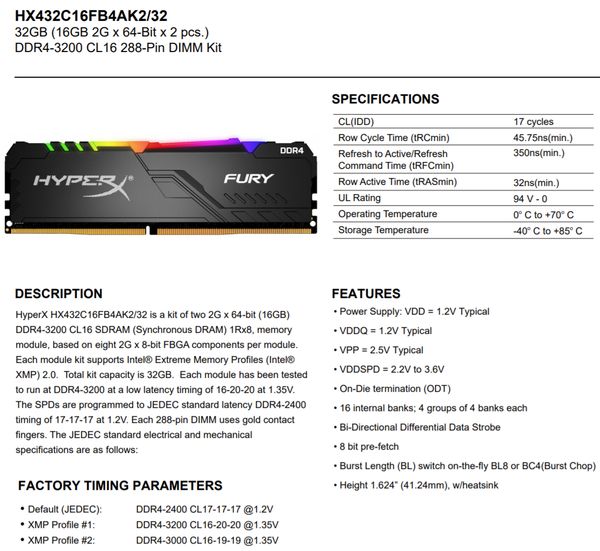
In the case of a similar kit, but with a volume of 32 GB, the organization of the planks turns into a peer-to-peer type (1R). Here's a simple way to determine the ranks used in memory.
, ,
Intel
Memory can not always start from ready-made XMP settings, especially high-frequency ones. So start by applying the XMP profile first, but at 3200 MHz. In the BIOS, be sure to remove MRC Fast boot. Write down the main timings and open the typhoon program to see what chips you are dealing with. Run TestMem5 and do a short test. To reduce the coarse tuning time, do not wait for hours; with a stability of several minutes, you can go and lower the timings. Reduce and change them one at a time, looking for unstable indicators. Be sure to write down the values which timings were unstable. Don't try to set extremely low timings or high memory frequency right away. With two modules and a high frequency (more than 4 GHz), set CR to 2, if it is 1. With 4 modules, you can immediately start a test at CR 2.Timing changes are best started with CL and RCD. Many chips do not "like" synchronous values, for them CL will always be less than RCD. Try RAS immediately according to the formula RCD + CL + 4, before this value there is a significant difference from it, then the influence disappears. CWL <= CL. Valid values are 9,10,11,12,14,16,18,20. Set FAW to 16, then gradually lower RRD to 4. In case of errors, use the formula FAW = RRDL * 4. Keep in mind that usually RRD_L> = RRD_S, CKE = 5, CCDL> = 4.Keep in mind that usually RRD_L> = RRD_S, CKE = 5, CCDL> = 4.Keep in mind that usually RRD_L> = RRD_S, CKE = 5, CCDL> = 4.
RDRD_DD and similar values need attention when using all 4 Dimm slots. The value is determined by experience and testing. These are fine settings to stabilize the performance of all 4 bars.
Lower RDWR_SG (DG) and similar menu items in BIOS to the minimum, but working values. For stability, do +2 to them.
RFC can be configured at the very end. It does not need to be lowered or raised excessively, just find a number in a stable range, which usually ranges from +20 to +40 points from the baseline.
REFi requires fitting with testing and generally performs more is better. It depends on the RFC value. The latter describes the status of memory rest time, and the former describes work.
Test thoroughly, including cold and reboot tests.
• Asrock Timing Configurator 4.0.4 - view timings;
• Asus MemTweakIt 2.02.44 - view timings;
• TestMem5 - test memory for stability and errors;
For AMD platform
We open the typhoon program and see which memory chips are used. Next, launch the DRAM Calculator for Ryzen and select the starting frequency (starting at 3200 MHz) and your memory chips. Without fail, we go through the timings from the calculator and manually enter them in the BIOS. Download Ryzen Master, TestMem5, optionally Aida64. We will need Ryzen Master to track timings and resistances, TestMem5 to check stability, and Aida64 to quickly and comparatively measure memory performance. If the system does not start even with a frequency of 3200 MHz, then we change procodt and tRTP upwards, before that we set tRFC2 and tRFC4 in automatic mode. Successful passing of the TestMem5 test will allow you to choose two ways of further actions: with a small number of errors, you can increase the memory voltage,if not, try to raise the frequency. When you reach 3600 MHz, we advise you to start squeezing the timings.
• DRAM Calculator for Ryzen - a database of ready-made kits for overclocking and selection of memory timings;
• ZenTimings - checking primary, secondary and additional memory timings;
• AMD Ryzen Master - the official program from AMD for overclocking processors and memory;
• TestMem5 0.12 1usmus V3 config - test memory for stability and errors;
• Ryzen Timing Checker - check primary, secondary and additional memory timings;
conclusions

Memory overclocking is like walking through a minefield without a metal detector, based only on your own heightened instinct. To cut down on minutes, the process should start by choosing the right motherboard, the right memory kit, and other people's expertise. Collective intelligence and tens of thousands of hours spent searching for optimal combinations of settings and parameters flooded the FAQ. Let's say you perfectly understand which memory kits are suitable for daisy chain or T-topology of motherboards. Distinguish between 1 and 2 rank memory. We learned how to determine the manufacturer of microcircuits, but it will be important to note the existence of QVL compatibility sheets from motherboard manufacturers. However, if you do not find the required memory kit, do not get upset. Experience, mistakes, attentiveness will allow you to find the same settings in n-th number of hours,in which 2 different Kingston kits (2 ranks) with a total volume of 96 GB will work stably in an unsuitable motherboard.
For more information on Kingston Technology products, visit the company's official website .