
Cloud services have long and tightly entered our life, now it is already unthinkable to imagine a modern existence in the digital space without them, they significantly simplify life and lower the threshold for entering IT for small companies, freeing them from the need to purchase and set up their own infrastructure. Smartphones and computers are connected to the clouds, and more and more data and services are transferred to them.
IDEs haven't escaped migration to the cloud either. About ten years ago it was a gimmick, Cloud IDEs were just beginning to develop, but then the largest players in the IT industry drew attention to them.
Amazon bought and develops Cloud9 service :
Google has built in its cloud platform Cloud Shell Editor :
Microsoft initially created their own cloud-based development platform, but then abandoned it in favor of the solution that GitHub is now preparing - Codespaces :
All of them are united by one idea: "Use development tools anywhere and on any platform!" IDE performance is no longer dependent on a personal computer, there is no need to buy a powerful and expensive desktop or an even more expensive laptop - the cloud will do the computing. And the user will receive a development environment that does not depend on his system, does not require local configuration, you can work in the cloud IDE even on a tablet, if you connect a mouse and keyboard to it. And it will not be vi through a mean console, but a full-fledged GUI application.
There are also less common cloud-based development environments, from simple sandboxes like CodePen to more advanced ones like Codenvy , which Red Hat has taken under its wing.
But all of these solutions have a few more things in common: they run on their own servers; some require payment for part of the working functionality; their interface takes some getting used to. You can solve these problems by installing the familiar Cloud IDE on a rented VPS. Payment will be made only for renting a server with the required capacity, no restrictions on capabilities, and the interface will be familiar and familiar to a huge number of developers, because it is nothing else than Microsoft Visual Studio Code . This opportunity has recently appeared thanks to the code-server project . This article will describe the step-by-step installation of VC Code on the RuVDS virtual server.
Preparing the server for installation
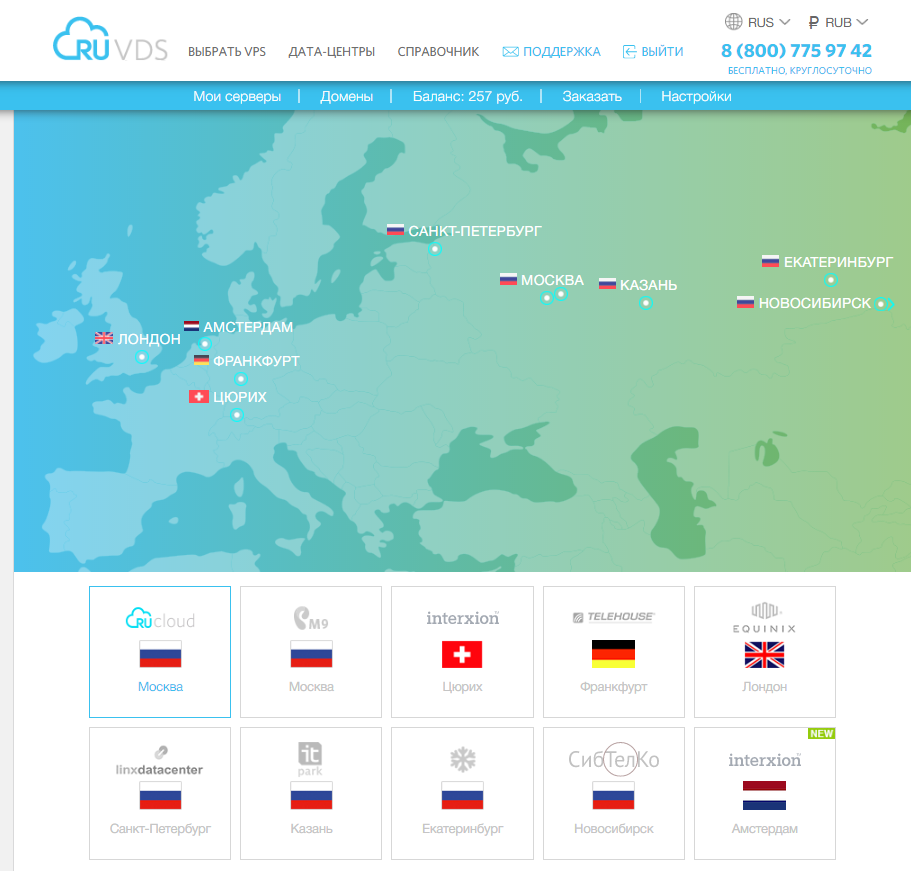
First you need to select and run a test VPS . For the demonstration, I chose the RUCLOUD virtual server in Moscow to reduce the ping:
ping -c4 194.87.103.124 PING 194.87.103.124 (194.87.103.124) 56(84) bytes of data. 64 bytes from 194.87.103.124: icmp_seq=1 ttl=55 time=4.98 ms 64 bytes from 194.87.103.124: icmp_seq=2 ttl=55 time=5.27 ms 64 bytes from 194.87.103.124: icmp_seq=3 ttl=55 time=14.3 ms 64 bytes from 194.87.103.124: icmp_seq=4 ttl=55 time=5.30 ms --- 194.87.103.124 ping statistics --- 4 packets transmitted, 4 received, 0% packet loss, time 3003ms rtt min/avg/max/mdev = 4.984/7.487/14.384/3.984 ms
The most affordable option with an SSD disk system:
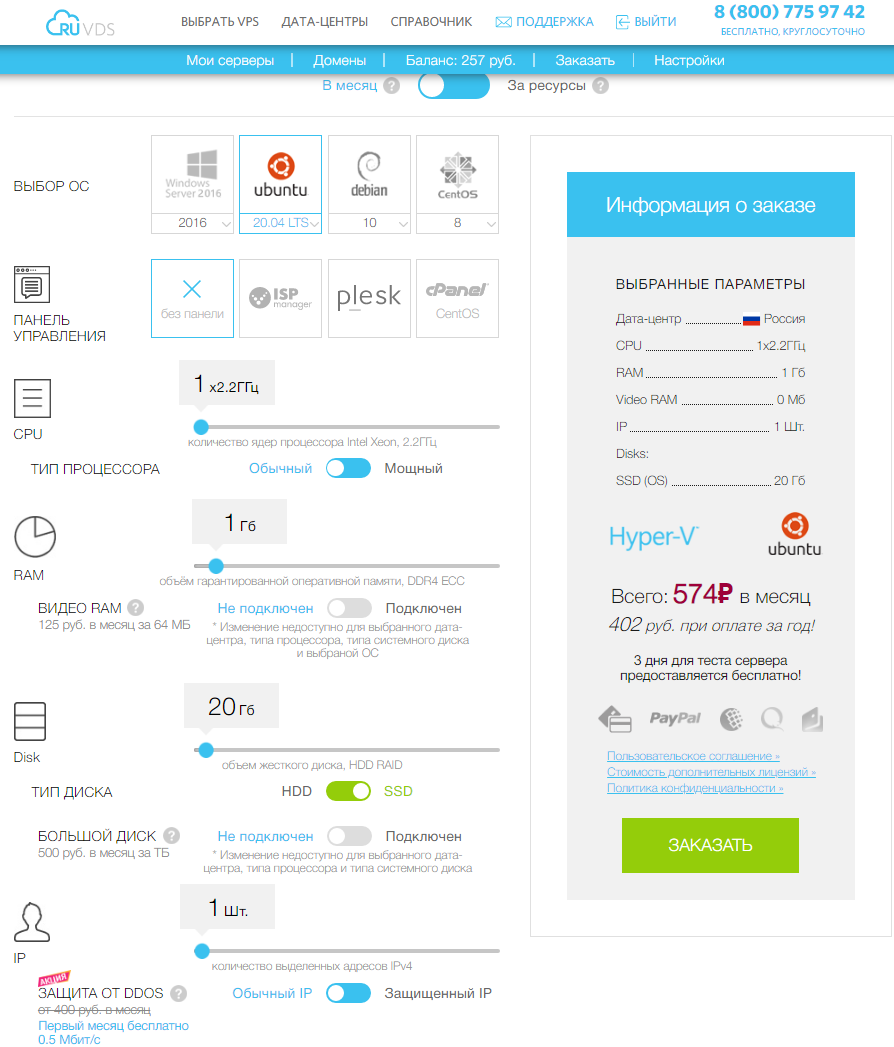
This is enough to test the functioning of the Cloud IDE and work on the simplest projects that do not require a lot of computing power.
After connecting to a fresh server with the root user , let's carry out the initial configuration. First, we will create a new user <user-name> and add it to the sudo group : Then disable the root user authorization via SSH, for this in the / etc / ssh / sshd_config file, you need to change the PermitRootLogin yes parameter to no
adduser <user-name>
adduser <user-name> sudo
nano /etc/ssh/sshd_config
To simplify the description, we will leave the password entry, without generating keys. Then we fix the host file by adding the name of the virtual machine to it so as not to receive the warning " sudo: unable to resolve host ruvds-xx12x: Name or service not known" :
echo 127.0.0.1 $HOSTNAME >> /etc/hosts
After that, we disconnect from the server, connect as a new user and
complete the configuration by setting the rules for the firewall:
sudo ufw allow OpenSSH sudo ufw enable
Let's check the settings with the sudo ufw status command .
sudo ufw status
The program output should be like this:
Status: active To Action From -- ------ ---- OpenSSH ALLOW Anywhere OpenSSH (v6) ALLOW Anywhere (v6)
Let's update the system and install the nginx web server :
sudo apt update sudo apt upgrade sudo apt install nginx
After that, several new profiles will be added to the firewall, which can be viewed with the command sudo ufw app list:
sudo ufw app list Available applications: Nginx Full Nginx HTTP Nginx HTTPS OpenSSH
To check the web server settings, we need both types of connection, we activate them:
sudo ufw allow 'Nginx Full'
Let's make sure everything is included correctly:
sudo ufw status Status: active To Action From -- ------ ---- OpenSSH ALLOW Anywhere Nginx HTTP ALLOW Anywhere OpenSSH (v6) ALLOW Anywhere (v6) Nginx HTTP (v6) ALLOW Anywhere (v6)
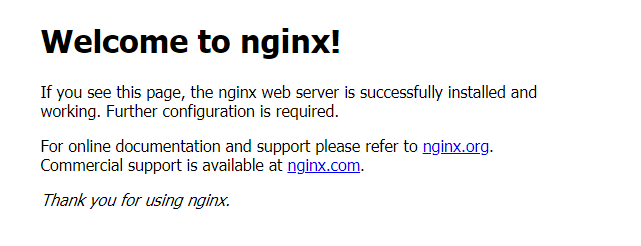
Check that the web server is running:
systemctl status nginx
The output should be something like this: Check in the browser if the server is serving the page of our site ( <your_server_ip> is the address of your VPS): The following text should appear:
nginx.service - A high performance web server and a reverse proxy server
Loaded: loaded (/lib/systemd/system/nginx.service; enabled; vendor preset: enabled)
Active: active (running) since Fri 2020-04-20 16:08:19 UTC; 3 days ago
Docs: man:nginx(8)
Main PID: 2369 (nginx)
Tasks: 2 (limit: 1153)
Memory: 3.5M
CGroup: /system.slice/nginx.service
├─2369 nginx: master process /usr/sbin/nginx -g daemon on; master_process on;
└─2380 nginx: worker process
http://<your_server_ip>
The initial setup is complete, let's start installing the development environment.
First, let's create a directory where all the IDE data will be stored and go to it:
mkdir ~/code-server cd ~/code-server
Then download the latest version of the project release and unpack it. The release number can be found at: https://github.com/cdr/code-server/releases . At the moment it is v3.8.0, and the file for it is called: code-server-3.8.0-linux-amd64.tar.gz
wget https://github.com/cdr/code-server/releases/download/v3.8.0/code-server-3.8.0-linux-amd64.tar.gz tar -xzvf code-server-3.8.0-linux-amd64.tar.gz
The resulting directory must be copied to / usr / lib / code-server
sudo cp -r code-server-3.8.0-linux-amd64 /usr/lib/code-server
Then make a sim-link to the IDE executable file and create a directory where user data will be stored:
sudo ln -s /usr/lib/code-server/bin/code-server /usr/bin/code-server sudo mkdir /var/lib/code-server
It's time to set up the cloud development environment service. Create a file code-server.service in the editor and add the following lines there: Be sure to set the password <your_password> , it will be used to log into the IDE, it is better to choose one that does not match the password for the account. Almost everything is ready, you can start the service:
sudo nano /lib/systemd/system/code-server.service
[Unit]
Description=code-server
After=nginx.service
[Service]
Type=simple
Environment=PASSWORD=<your_password>
ExecStart=/usr/bin/code-server --bind-addr 127.0.0.1:8080 --user-data-dir /var/lib/code-server --auth password
Restart=always
[Install]
WantedBy=multi-user.target
sudo systemctl start code-server
Let's check the status of her work.
sudo systemctl status code-server
If everything was done correctly, then it will be Active: active (running) : In order for the service to restart itself in case of failures, run the following command:
code-server.service - code-server
Loaded: loaded (/lib/systemd/system/code-server.service; disabled; vendor preset: enabled)
Active: active (running) since Mon 2020-12-21 07:28:53 MSK; 4s ago
Main PID: 32357 (node)
Tasks: 22 (limit: 1094)
Memory: 55.6M
CGroup: /system.slice/code-server.service
├─32357 /usr/lib/code-server/lib/node /usr/lib/code-server --bind-addr 127.0.0.1:8080 --user-data-dir /var/lib/code-server --aut>
└─32390 /usr/lib/code-server/lib/node /usr/lib/code-server --bind-addr 127.0.0.1:8080 --user-data-dir /var/lib/code-server --aut>
sudo systemctl enable code-server
It remains to bind a domain to our server, protect it by installing a certificate from Let's Encrypt and configure Nginx to work with it. A free domain is easy to get at https://www.freenom.com and is enough to get our environment up and running. You can read about how to bind it in the RuVDS help section .
Create a configuration file in the editor:
sudo nano /etc/nginx/sites-available/code-server.conf
And add the following lines there: In place of <vc-code.domain> you need to substitute your domain that you registered for the IDE. For the configuration to work, you need to make a symbolic link to it in the / etc / nginx / sites-enabled directory .
server {
listen 80;
listen [::]:80;
server_name <vc-code.domain>;
location / {
proxy_pass http://localhost:8080/;
proxy_set_header Upgrade $http_upgrade;
proxy_set_header Connection upgrade;
proxy_set_header Accept-Encoding gzip;
}
}
sudo ln -s /etc/nginx/sites-available/code-server.conf /etc/nginx/sites-enabled/code-server.conf
Just in case, let's check the validity of the settings:
sudo nginx -t
If everything is in order, then we will see the following text in the console:
nginx: the configuration file /etc/nginx/nginx.conf syntax is ok nginx: configuration file /etc/nginx/nginx.conf test is successful
Over the past few years, we have been taught that sites must be protected and work over HTTPS, a site that works without SSL seems strange and it looks awkward, as if the administrator is too lazy to write a couple of lines in the console. Therefore, we will take a certificate from the well-known company Let's Encrypt and the cloud IDE will be ready to use.
Let's install one of the most common setup bots:
sudo apt install certbot python3-certbot-nginx
And then, with its help, we will register and install a certificate for our domain <vc-code.domain> :
sudo certbot --nginx -d <vc-code.domain>
During the configuration process, we will have to answer several questions: enter your email address email, agree to the terms of service, share (or not) the email address with Electronic Frontier and set up a forced redirect to HTTPS (recommended). Following up, you can install Git:
sudo apt install git
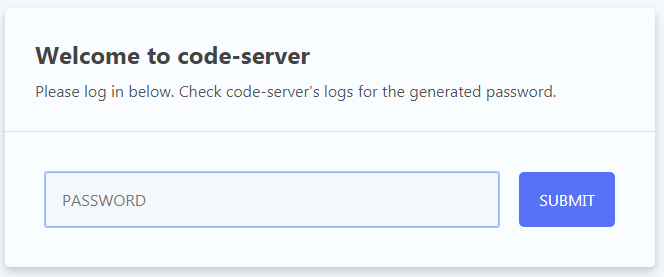
Everything is ready!
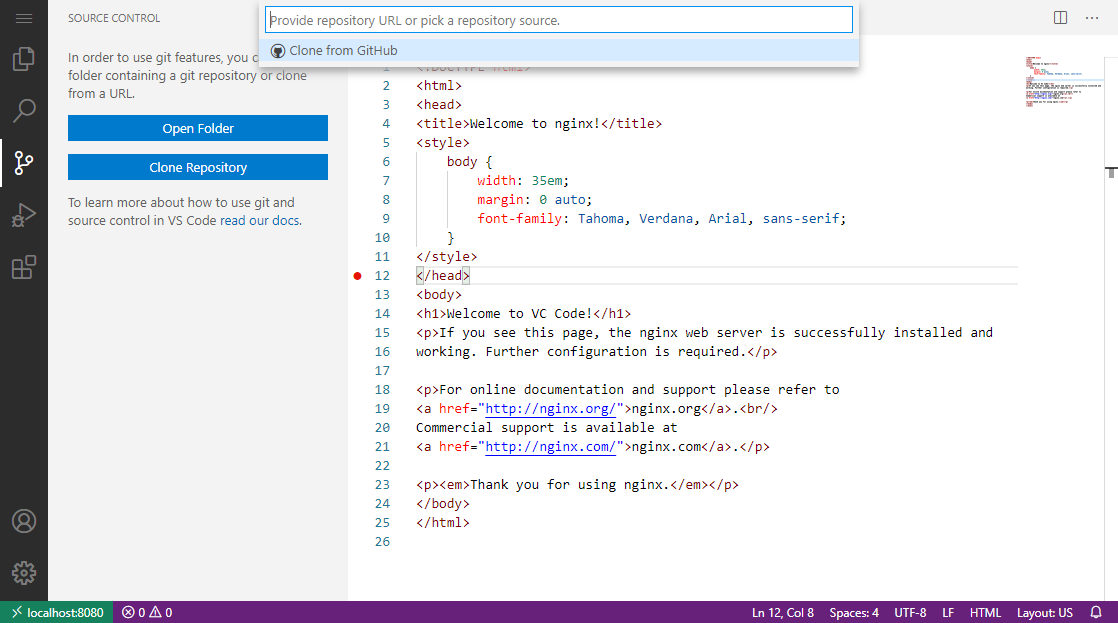
Open your site in the browser and you will receive an invitation from VC Code to enter the password that was specified in the configuration file
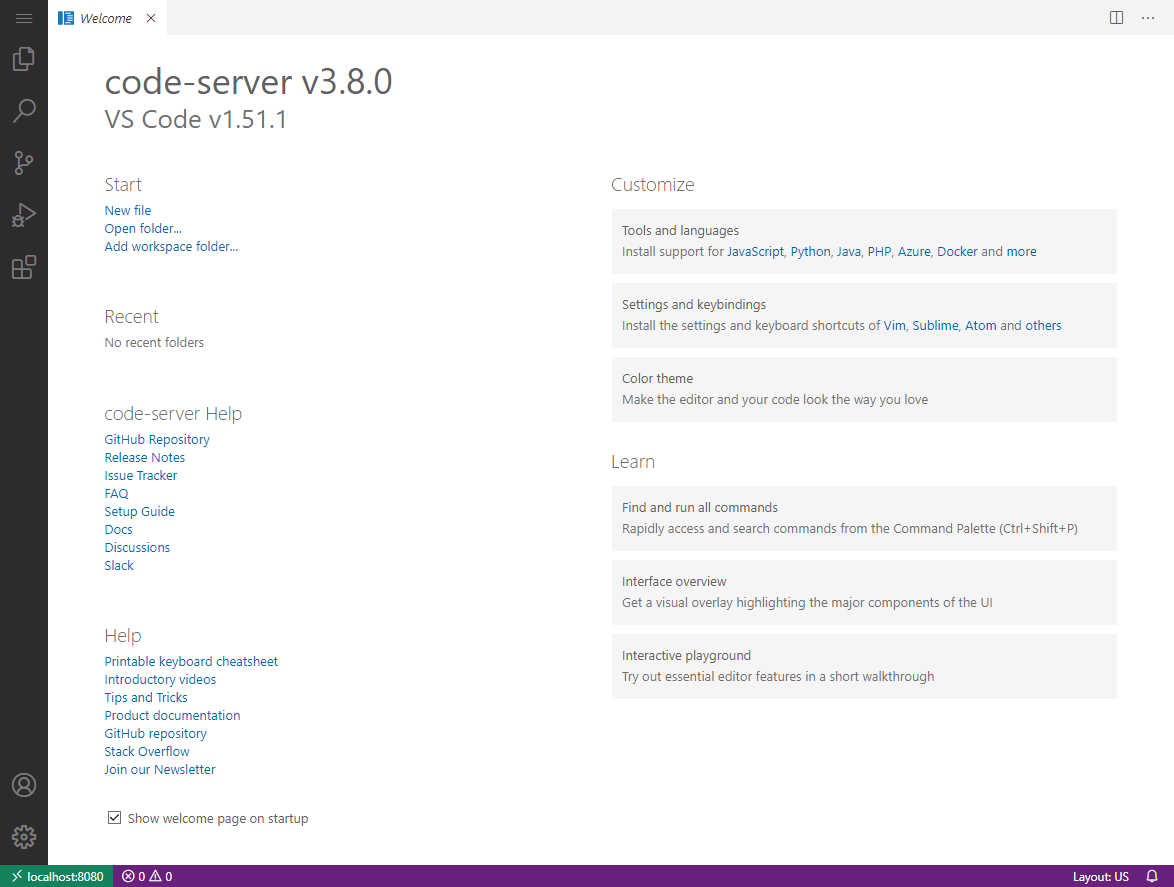
The environment is running, we see the familiar VC Code interface:
You can get to work. As a test, let's try to edit the file with the standard Nginx prompt.

Let's replace nginx with VC Code, and update the page that the server issues in response to a direct call to the IP address:
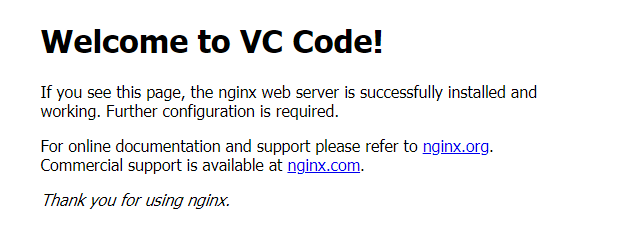
Everything is working!
This is a fully functional and familiar VC Code, it will work with a version control system:
You can connect plugins to it:
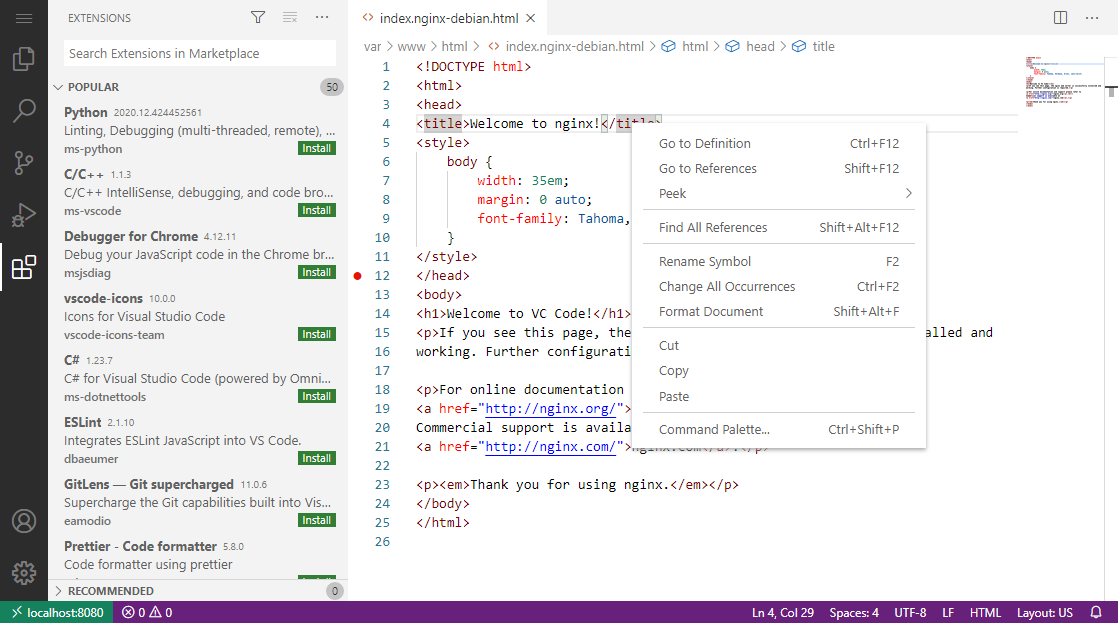
An IDE is no different from a desktop application, except that it runs on a remote server and runs in a browser.
Good luck in the cloud! :)