Hello everyone!
Today I have an article about how, with the help of Yandex-speakers Alice and Arduino, you can open a door connected to an intercom. If you are interested, then please, under cat.
It often happens that someone calls the intercom, and at this moment you are busy with something, or just too lazy to come up to open the door. A familiar situation, isn't it?
And my intercom does not open the door at all without picking up the handset, and if you do not pick up the handset within 30 seconds after the call, the door opening button will cease to be active until a new call arrives. Since the intercom is not cheap (at that time), the toad choked me to change it to another. And I decided to fight it.
The first idea to simplify my life appeared 10 years ago, I decided to make an intercom-phone adapter so that the call from the intercom would be duplicated to my home phone. Drew a diagram, assembled a prototype on a breadboard. Everything worked, but I never got past this prototype. Everything is still lying around in the trash to this day.
The second project was implemented on a TL-MR3020 router with CyberWRT firmware and BareSIP software SIP phone. When you pressed the button of the outdoor panel, the router, in parallel with the intercom call, called the mobile phone and it was possible even while in another city to talk to the person standing near the door of your apartment, but the soft phone or the router itself worked extremely unstable and had to be abandoned.
But here, to my happiness, last year for my birthday they gave me a voice assistant Alice and I had a new idea - to open the door with my voice, through a Yandex column.
And today came the day when I undertook to implement my idea.
A little about how the door station of the video intercom works
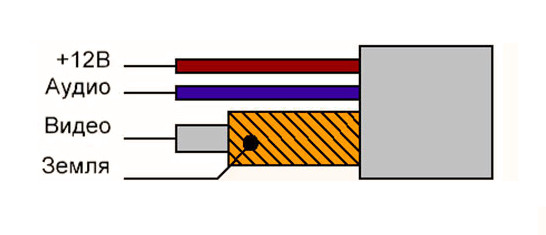
The outdoor panel is connected to the intercom monitor using 4 wires GND, +12 V, audio and video.
If on the calling panel, close the Audio wire through a 100 Ohm resistor to GND, then a call signal will be heard. And if +12 V is applied to the Audio wire, the relay for opening the electromagnetic lock will work.
The image below shows the connection diagram of the outdoor panel with the doorphone.

If you use a special intercom cable to connect the door station to the monitor, then it is usually connected according to the following instructions:
GND - braiding
+ 12V - red wire
Audio - blue wire
Video - central core of the coaxial cable
Scheme
It can be seen from the diagram that to connect the device on the Arduino to the intercom, you need to connect only 2 wires. To connect these wires, I used what I had at hand. Instead of a relay, you can use a key on an NPN transistor or PC817 optocoupler.
I used an IR receiver, the first one that caught my eye, which I once dropped from an old TV and which had been lying on my shelf in the trash for many years.

Components used
Arduino Nano
Relay module
IR receiver 38 kHz
Dupont wires
Instead of Arduino nano, you can use any other microcontroller from the Arduino line. I used Arduino nano because I have a lot of them.
Source for Arduino
The code is quite simple and straightforward.
To receive and save the code of the pressed button, you need to put the Arduino controller into the mode of adding a remote button. You will need to set a jumper on the D2 and GND pins and press the reset button on the Arduino, after which the system LED on the controller board will light up and the controller will wait for the button on the remote control to be pressed.
I recommend using the TV remote control, so that in addition to voice control, you can open the door from the remote control without getting up from the sofa. On the remote, it is best to choose a button that you rarely use, as a rule, these are four colored buttons designed for teletext. After receiving the code, Arduino will blink cheerfully with an LED and go back to standby mode.
You can press the buttons as much as you like, but the Arduino will only remember the last press. To exit the code memorization mode, just remove the jumper and press the "Reset" button on the microcontroller.
Code for Arduino
#include <IRremote.h>
#include <EEPROM.h>
//#define TOLERANCE 35 //
#define IR_RECEIVE_PIN 11 //
#define RELAY_PIN 12 //
#define SET_PIN 2 //
IRrecv irrecv(IR_RECEIVE_PIN);
decode_results results;
void setup()
{
irrecv.enableIRIn(); //
pinMode(RELAY_PIN, OUTPUT);
digitalWrite(RELAY_PIN, LOW);
pinMode(SET_PIN, INPUT_PULLUP); //D10 , « »
pinMode(LED_BUILTIN, OUTPUT);
digitalWrite(LED_BUILTIN, LOW);
// Serial.begin(115200);
while(!digitalRead(SET_PIN)) // D2 GND
{
set_command();
}
}
void loop()
{
if (irrecv.decode(&results)) //
{
if(LoadEEPROM()==results.value) // (ir_command==results.value)LoadEEPROM();
{
digitalWrite(RELAY_PIN, HIGH); //
digitalWrite(LED_BUILTIN, HIGH);
delay(500);
digitalWrite(LED_BUILTIN, LOW);
digitalWrite(RELAY_PIN, LOW); //
}
irrecv.resume(); //
}
}
void set_command() //
{
digitalWrite(LED_BUILTIN, HIGH);
if (irrecv.decode(&results))
{
digitalWrite(LED_BUILTIN, LOW);
SaveEEPROM(results.value); // EEPROM
irrecv.resume(); //
}
delay(100);
}
void SaveEEPROM(unsigned long ir_code) // EEPROM
{
EEPROM.write(0, ir_code & 0xFF);
EEPROM.write(1, (ir_code & 0xFF00) >> 8);
EEPROM.write(2, (ir_code & 0xFF0000) >> 16);
EEPROM.write(3, (ir_code & 0xFF000000) >> 24);
}
unsigned long LoadEEPROM() // EEPROM
{
byte val = EEPROM.read(3);
unsigned long ir_code=val;
val = EEPROM.read(2);
ir_code= (ir_code << 8) | val;
val = EEPROM.read(1);
ir_code= (ir_code << 8) | val;
val = EEPROM.read(0);
ir_code= (ir_code << 8) | val;
return ir_code;
}
When publicly placing the code I posted above, please indicate the link to the source.
Connecting to Yandex.Station Alice
To connect to a smart speaker, you need Yandex Smart Remote.

It is not necessary to buy it from a Russian search engine and partners, the remote control can be bought on Aliexpress a little cheaper. But the difference is not big enough to play the lottery buying the remote from the Chinese. I will not tell you how to connect the remote control to the station, since there are a lot of detailed instructions on this topic on the Internet, you can easily find them from the same Yandex. I'll just tell you how to set up interaction between Yandex.Station and the Arduino opener.
To do this, you need to go to the application Yandex.Browser - All services - Devices - Device management - Remote control - Add a device - Configure manually - enter the name "Door" - Add a command - enter the name of the voice command "Open" - take the remote control from any household appliances, send it to Yandex. and press the required button. After the blue LED on the remote control goes out, the column is ready to execute this command. Now you can check, say the phrase "Alice open the door", she, after a little thought, will carry out your order.
Conclusion
Using Yandex remote control in a smart home will allow you to control any household appliances, which include a remote control. And it is also quite easy, having assembled the simplest circuit on the Arduino, to integrate the control of any other devices that do not have a remote control. It's simple, reliable and doesn't require these devices to be connected to the internet.
If you liked my article, you can subscribe to my channel so as not to miss the next publication.
If you have any questions, you can ask them in the comments.