What is Release Management?
Release management covers all phases of software release, from development and testing to deployment. Release management is required every time a new product is requested, or even a change to an existing product. There are five basic release management steps we take in this situation:
- Release planning
- Release build
- Acceptance user testing
- Release preparation
- Deploy the release.
Release planning
The planning phase is in most cases intensive, since it is at this stage that our entire release is organized from start to finish. A solid release plan helps you stay on track and ensure that standards and requirements are properly adhered to.
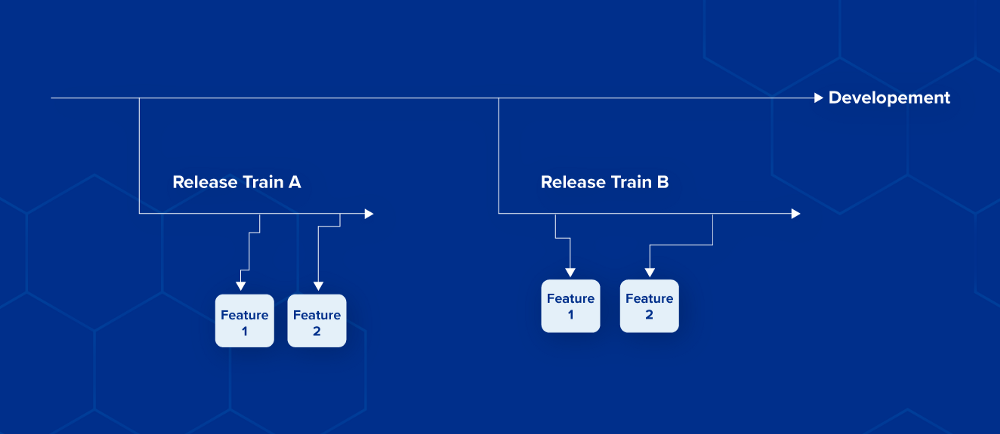
When planning releases, we believe that applications developed by multiple teams need a consistent approach that should be released in advance. This is where the concept of "train release" comes into play. By following a train release approach, teams can schedule changes based on releases and submit them to the Play Store.
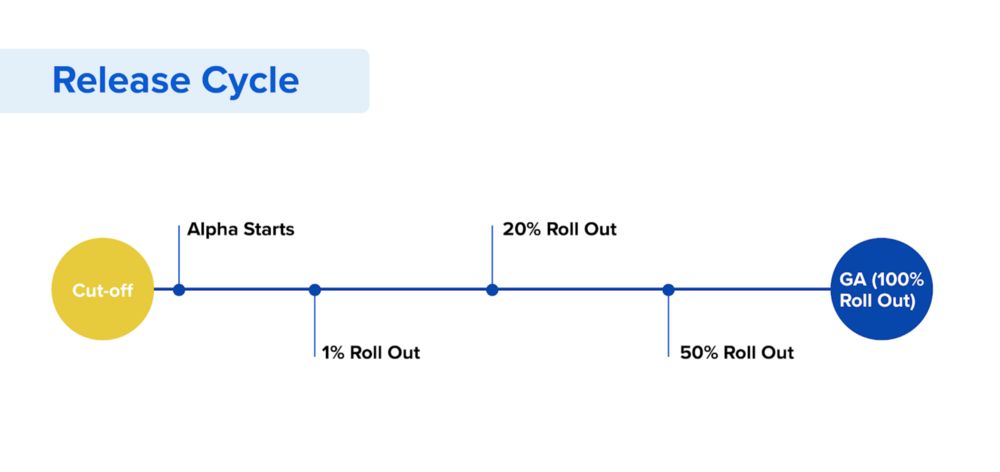
The very first step, even before we start implementing the train release, is to define the time intervals for each stage. In our case, the development stage is two weeks. Then you need to determine how much time you want to spend on integration testing and the deployment steps. Below is our example of spacing:
- Clipping: starts day 1.
- Internal testing of alpha / UAT versions: Three days.
- Phased deployment [1%] Submission for review.
- Review duration: 3 days.
- One day at 20% of users.
- One day with 50% of users, on the same day, growth to 100% of users.
Based on the example above, it will take a total of 10 days until a new version of the application is generally available.
The next step towards releases is creating a workflow that both our teams and key stakeholders can refer to throughout the release.
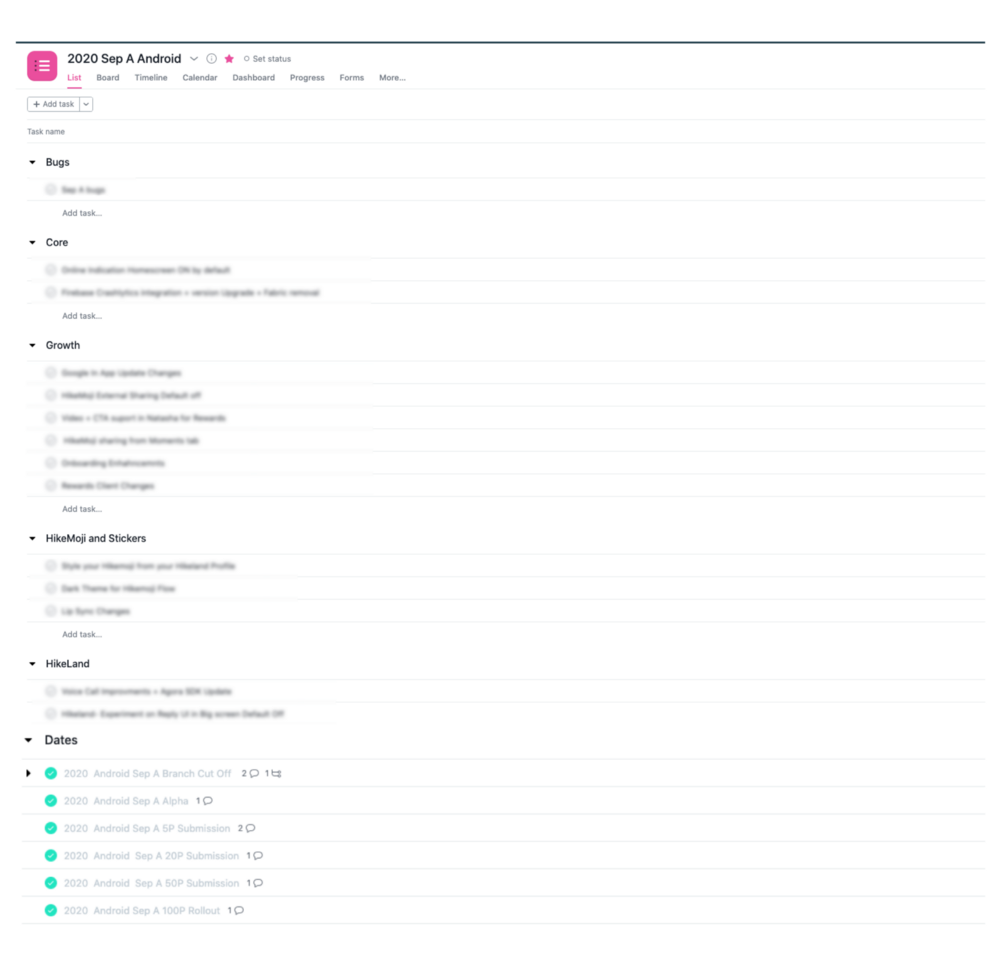
The workflow immediately explains how the entire release works and what role each team member plays. We use the Asana tool to display these details as listed below:
- Timing
- Estimated delivery time
- Requirements
- Overall scale of the project
After developing the plan, we submit it to all stakeholders (release group, product manager and high-level leaders) for consideration. We then get their feedback on any gaps or problems they see in the requirements or application.
Once the plan is approved and finalized, the fun begins!
Important aspects of release planning
Creating and using a train release sounds great, but keeping the process up and running while planning a train release can be tricky. Here are some details of this process:
- The release manager manages and coordinates the release.
- We only accept reviewed and tested code.
- There is an implementation stage in the process.
- We are monitoring the released version of the application.
Release building
Once the release plan is ready, you can start testing the product for release. This will be the actual “user level testing” of the product based on the requirements outlined in the release plan.
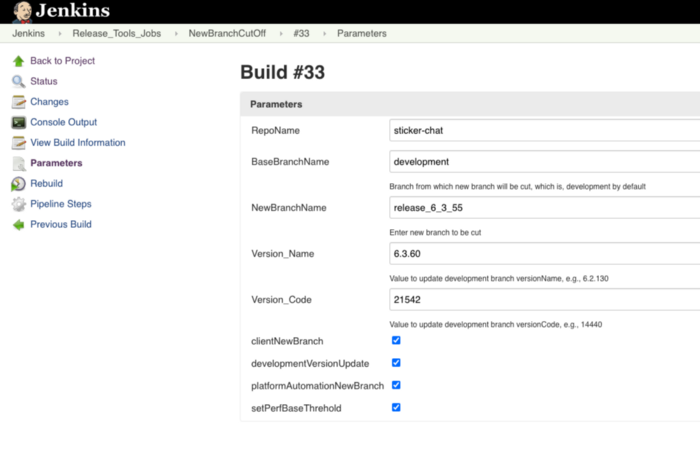
On a certain day and time (say, Monday, at 15:00), the code is frozen / clipped. Up to this point, teams have time to look, test and merge features into the development branch, which should be part of the train release. At 15:00 the release manager will create a release branch from the development branch. This step is automated with Jenkins.
By automating the branch transition, we check all performance thresholds, benchmarks and automation from previous releases to the market are set to the current one as a basis for comparison, and the train release is blocked from further changes.
Once the code is frozen, a new development cycle begins, and all participating teams begin a new sprint and continue development. The great thing about a train release is that everyone knows about the next planned release, and it helps people plan their work accordingly.

Branch release and version control
Product development usually doesn't stop when development for a release is finished, so the first thing we think about is how to freeze the build under test and at the same time work on new features for the next release. What happens if an error appears in the release build? How to fix the error if you have already added a bunch of new things before the error was found?
This is where the clever branching strategy comes in, which has the concept of branching. As the name suggests, branching code means that, just like branches of a tree, the code of the branches matches up to a certain point and then splits into two copies.
Each branch can develop independently of the other. In this case, one copy - the release branch - remains frozen where you left off. This is what we call a clipped branch. Another branch (development branch) can be changed with new code and bug fixes without affecting the release branch at all. If a bug is found in a release candidate, a fix can be developed and added to the release branch. Thus, the next build that you build from the release branch again may be identical to the first, except for one bug fix. This way, you can minimize the risk of new bugs in the release and isolate bugs from new code. A fix is also applied to the development branch to ensure that the same bug does not make it into the next release.Another benefit of release branching is that once you actually publish your code, you have a “frozen” branch, which is an exact copy of the published codebase. You can come back to this code at any time for reference.

User acceptance testing
User acceptance testing is the most critical step for release management due to the amount of data collected and the fixes required to make the build exactly what it needs to be officially launched.

As the name suggests, when it comes to this type of testing, the key figure is the user. Users are exactly the people who will use the application. Therefore, it is imperative to make users part of the overall quality assurance strategy in the software development process. This is where UAT comes in handy. This type of testing puts user needs at the center of product development like no other. Here are some of the questions such testing tries to answer:
- Can users work with the app?
- Does the application behave as expected?
- Does the app solve the user problem?
Without effective UAT (User Acceptance Testing), the chances of success for the project being developed are significantly reduced. This is why custom is such an important part of the delivery process. As noted earlier, UAT is part of an iterative process. As errors are identified, the team comes back to fix them. The bug is fixed in the release branch and then merged back to the development branch. The build must go through the UAT stage so that it can be examined for final implementation and release.
Pro Tip: Always Include Internal Testing In UAT Planning!
One of the ways to speed up the UAT release for us was to use the internal test tracks provided by Google. This helps us to quickly distribute tickets to colleagues and capture their feedback by automatically generating JIRA tickets. The team also makes sure that feedback is taken into account before submitting the final test.
Preparation and release
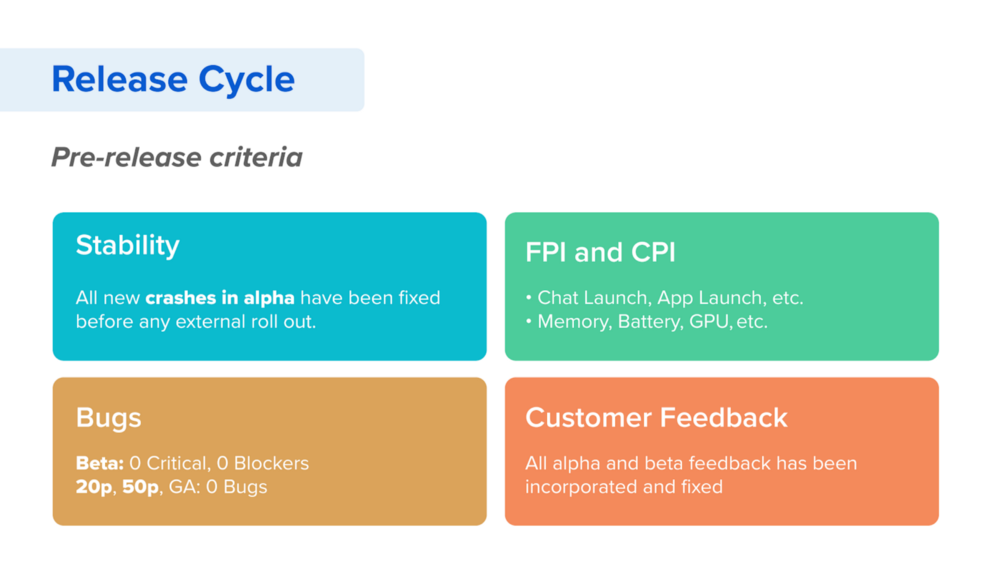
This step is to put the finishing touches on the product, taking into account everything that was understood in UAT. Release preparation also includes a final quality check by the QC team. During the inspection, the QA team conducts final checks to ensure that the assembly meets the minimum acceptance standards and business requirements from the release plan.
After the review is complete, the release group will complete the release to begin deployment. Before an assembly can be deployed in a live environment, it must be approved by the relevant responsible teams such as the design team. UAT ensures that the result is validated before being passed to the next stage.
Deploying a release
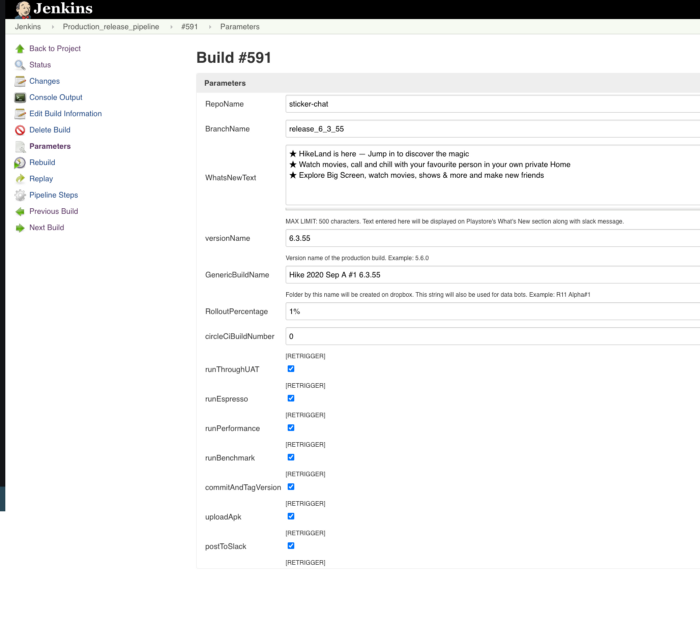
Finally, the big day came when all of our team's hard work paid off. It's time to release our product into the wild for production. In addition to simply sending the assembly to the production environment, the implementation phase also contains training on how to work with the product for both the end user and the company as a whole. For example, users must be notified of changes in a release, and this is where “What's New” does not appear in the field of view. We have an automated Jenkins process that contains the following steps:
- Creation of the final assembly [specifying the branch and version name].
- "What's New" added in release.
- Adding a deployment percentage.
- Each stage has manual input of signals (red / green) from each of the commands [UAT, benchmark, performance, automation].
As soon as the signals allow the build, the build is automatically uploaded to the Play Store with a defined deployment percentage. The internal steps of committing and setting the version tag, saving assemblies to Dropbox, publishing and updating to the appropriate Slack channel are also done through the same pipeline.
In this case, we start by deploying to 1%. At each stage, it is necessary to follow the review, as well as the tools for monitoring release falls in order to identify possible problems.
If the error becomes noticeable at 1%, the team has a chance to react to the problem and decide whether to fix it quickly. If so, then the train release should not reach the next deployment step of 5%. Instead, the problem is solved for 1% of users. Once the problem is fixed and the solution is verified, the train release can go to the 5% stage.
As with the simple version of the train release, only the release engineer or release team takes care of the release process after the code is frozen. All other teams continue with "normal" development.
Post-release analysis
The release management work does not end when the code is published, continuing until you are ready to release the release again. If you want your application to be successful, it needs a good review, you also need to follow the release in production to fix bugs, implement features that people need, and solve user problems. To do this, we use Firebase Crashlytics, where we track any crashes that require immediate fix.
Plus, app reviews provide insight into your product that's much more difficult to get with other approaches. Both Google Play and the App Store provide app developers with the ability to respond to reviews, which can be an incredibly useful tool for learning more about app issues from users. Testimonials can identify issues users are experiencing with your app and inform about future changes.
Let's sum up
Release management oversees an extremely dynamic process. Each release is an opportunity to refine everything, from our workflow to our checklist, as we discover areas for improvement with it. Here are some of the benefits we got:
- Enhanced our productivity by improving communication and coordination.
- Our releases are delivered faster, which also reduces risks. These changes involve a team that can deliver quality releases at high speed on a regular basis.
- Release management also supports the systematization and optimization of the development and operation method.

We also saw that our release management process made it easier for people across the board - from developers and product owners to executives - to review the high-level plan and get a snapshot of their progress, work in sync.
- DevOps course
- Data Science profession training
- Data Analyst training
- Python for Web Development Course
More courses
- Profession Web developer
- Frontend developer
- Profession Ethical hacker
- C ++ developer
- Advanced Course "Machine Learning Pro + Deep Learning"
- Machine Learning Course
- Course "Mathematics and Machine Learning for Data Science"
- Unity
- JavaScript
- Java-
- iOS-
- Android-