MegaFon has chosen the opportunity to work with unstable communications as one of its important growth points. There are places in Russia where communication is temporarily disconnected or lost for a long time. And it is necessary that even in this case the application works without failures.
Valentin spoke about how this task was performed over the past five months, how the architecture of the project was chosen and implemented, what technologies were used, as well as what they achieved and what was planned for the future, Valentin spoke at the Apps Live 2020 Conference of Mobile Applications Developers.

A task
The business said - we go offline so that the user can successfully interact with the application in an unstable network connection. We, as a development team, had to guarantee Offline first - the application will work even with an unstable or completely absent Internet. Today I will tell you about where we started and what first steps we took in this direction.
Technology stack
Besides the standard MVC architecture, we use:
Swift + Objective-C
Most of the code (80% of our project) is written in Objective-C. And already we write new code in Swift.
Modular architecture
We logically divide the global code chunks into modules to achieve faster compilation, project launch and development.
Submodules (libraries)
We connect all additional libraries via git submodule to get more control over the libraries used. Therefore, if support for any of them suddenly stops, we will be able to correct the situation on our own.
Core Data for local storage
When choosing, the main criterion for us was nativeness and integration with iOS frameworks. And these advantages of Core Data were decisive:
- Autosave the stack and the data we receive;
- , ( , ..)
- ;
- ;
- ;
- ;
- UI (FRC);
- (NSPredicates).
UIManaged document
The UI kit has a built-in class called UIManagedDocument, which is a subclass of UIDocument. Its main difference is that when a managed document is initialized, a URL is specified for the location of the document in local or remote storage. The document object then completely creates a Core Data stack right out of the box, which is used to access the persistent storage of the document using the object model (.xcdatamodeld) from the main application package. It is convenient and makes sense, even though we already live in the 21st century:
- UIDocument autosaves the current state itself, at a specific frequency. For especially critical sections, we can manually trigger the save.
- . - — , , - , — , , .
- UIDocument .
- Core data .
- iCloud . , .
- .
- The Document based app paradigm is used - representing the data model as a container for storing this data. If we look at the classic MVC model in the Apple documentation, we can see that Core data was created precisely to manipulate this model and help us work with data at a higher level of abstraction. At the model level, we work by connecting the UIManagedDocument with the entire created stack. And we consider the document itself as a container that stores Core data and all data from the cache (from screens, users). Plus it can be pictures, videos, texts - any information.
We consider our application, its launch, user authorization and all its data as a kind of large document (file), which stores the history of our user:

Process
How we designed the architecture
Our design process takes place in several stages:
- Analysis of technical specifications.
- Rendering a UML diagram. We mainly use three types of UML diagrams: class diagram, flow chart, sequence diagram. This is the direct responsibility of senior developers, but developers with less experience can also do this. This is even welcome, as it allows you to dive into the task well and learn all its subtleties. That helps to find any flaws in the technical assignment, as well as to structure all the information on the task. And we try to take into account the cross-platform nature of our application - we work closely with the Android team, drawing the same diagram on two platforms and trying to use the main generally accepted design patterns from the gang of four.
- Review of architecture. As a rule, a colleague from an adjacent team conducts the review and assessment.
- Implementation and testing on the example of one UI module.
- Scaling. If testing is successful, we scale the architecture to the entire application.
- Refactoring. To check if we missed anything.
Now, after five months of developing this project, I can show our entire process in three stages: what happened, how it changed and what happened as a result.
What happened
Our starting point was the standard MVC architecture - these are interconnected layers:
- UI layer, fully programmed using Objective C;
- Presentation class (model);
- The service layer where we work with the network.
The activity indicator was located in the place of the diagram where the process of receiving data is sensitive to the Internet speed - the user wants a quick result, but is forced to look at some loaders, indicators and other signals. These were our points of growth in the user experience:

Transition period
During the transition period, we had to implement caching for screens. But since the application is large and contains a lot of legacy Objective C code, we cannot just take and delete all services and models by inserting Swift code - we must take into account that in parallel with caching, we still have many other product tasks in development.
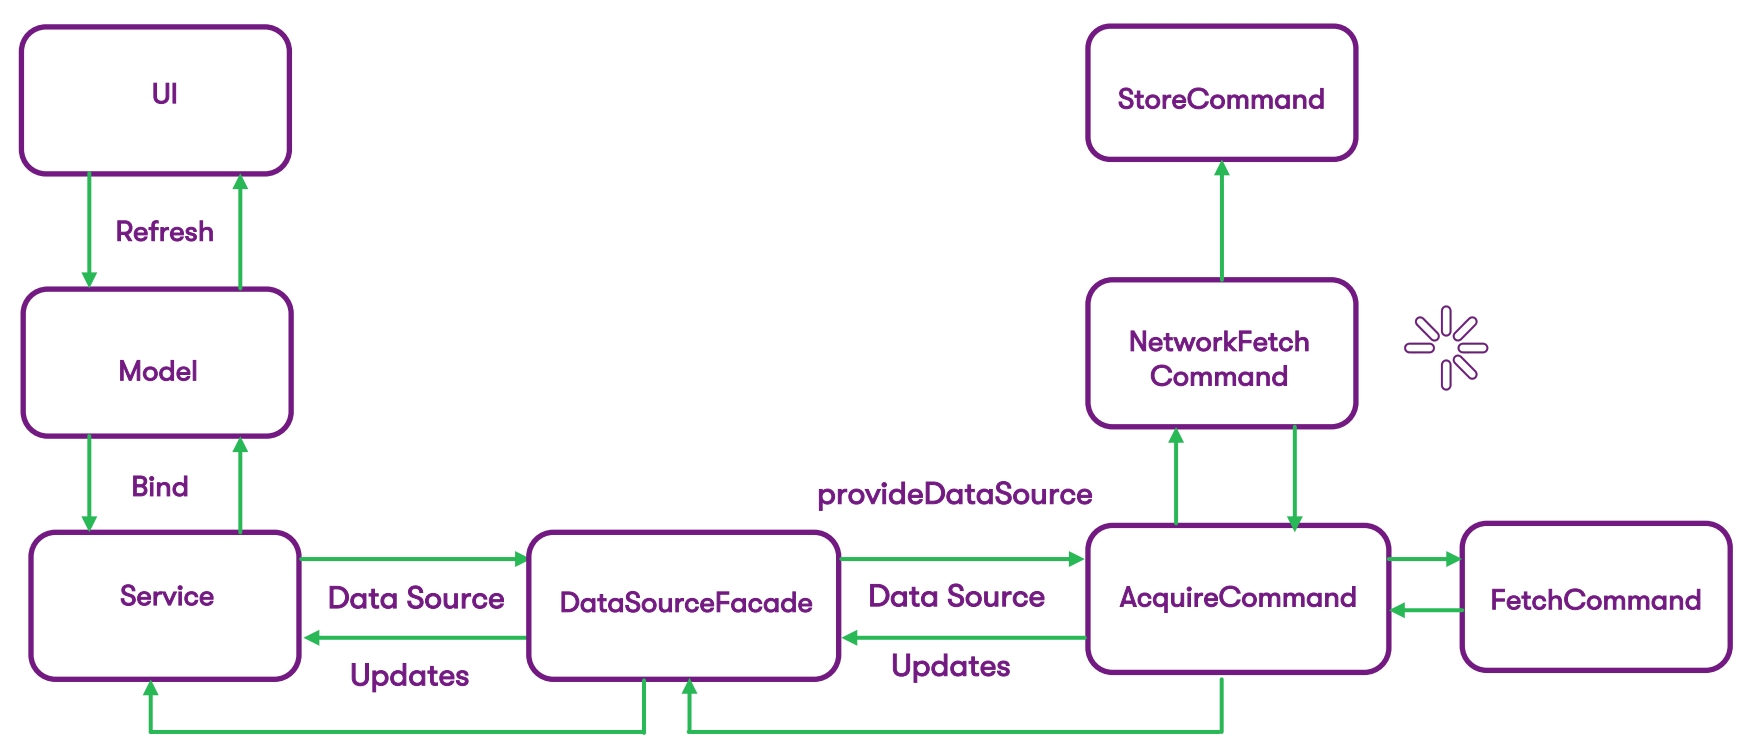
We found a painless way to integrate into the current code as efficiently as possible, without breaking anything, and carry out the first iteration as smoothly as possible. On the left side of the previous diagram, we have completely removed everything related to network requests - the service now communicates with the DataSourceFacade through the interface. And now this is the facade with which the service works. It expects from the DataSource the data that it previously received from the network. And in the DataSource itself, the logic for extracting this data is hidden.
On the right side of the diagram, we have broken down data acquisition into commands - the Command pattern is aimed at executing some basic command and getting the result. In the case of iOS, we use the heirs of NSOperation:

Each command that you see here is an operation that contains a logical unit of the expected action. This is getting data from a database (or network) and storing this data in Core data. For example, the main task of AcquireCommand is not only to return the data source to the facade, but also to give us the ability to design code in such a way as to receive data through the facade. That is, interaction with operations goes through this facade.
And the main task of operations is to pass DataSource data to DataSourceFacade. Of course, we build the logic in such a way as to show the data to the user as quickly as possible. Typically, inside the DataSourceFacade, we have an operational queue where we start our NSOperations. Depending on the configured conditions, we can decide when to show data from the cache, and when to receive from the network. When we first request a data source in the facade, we go to the Core data database, get the data from there through FetchCommand (if any) and instantly return it to the user.
At the same time, we launch a parallel request for data through the network, and when this request is executed, the result comes to the database, is stored in it, and after that we receive an update of our DataSource. This update is already included in the UI. This way we minimize the waiting time for data, and the user, receiving them instantly, does not notice the difference. It will receive the updated data as soon as the database receives a response from the network.
How did it become
We go to such a more laconic scheme (and we will come in the end):

Now from this we have:
- UI layer,
- the facade through which we provide our DataSource,
- the command that returns this DataSource together with updates.
What is a DataSource and why we talk about it so much
DataSource is an object that provides data for the presentation layer and follows a predefined protocol. And the protocol should be adjusted to our UI and provide data for our UI (it doesn't matter for a specific screen or for a group of screens).
A DataSource typically has two main responsibilities:
- Providing data for display in the UI layer;
- Notifying the layer's UI of data changes and sending the necessary batch of changes to the screen when we receive an update.
We use several variants of the DataSource here, because we have a lot of Objective C legacy code - that is, we cannot easily stick our Swift DataSource everywhere. We also do not use collections everywhere yet, but in the future we will rewrite the code specifically to use CollectionView screens.
An example of one of our DataSource:

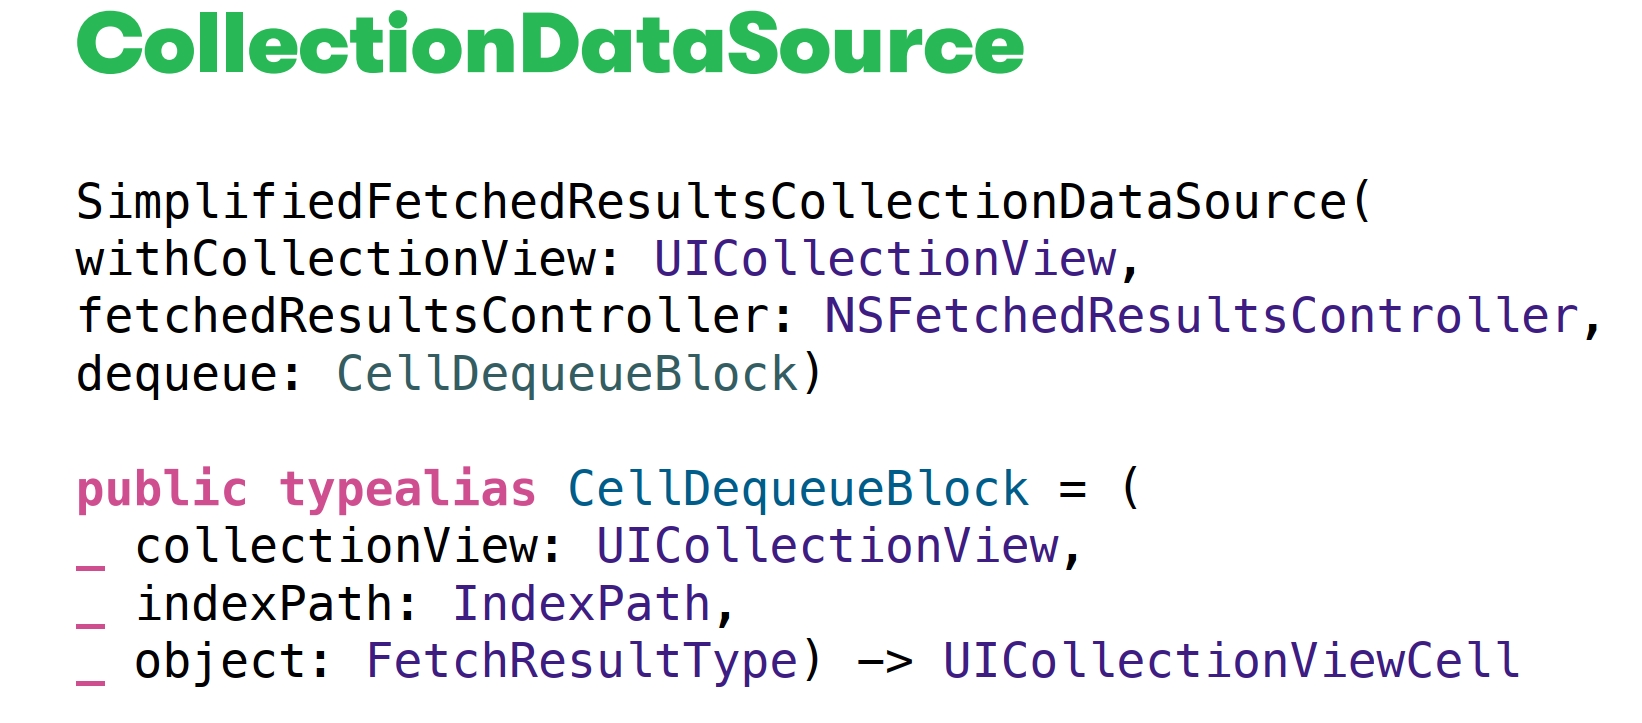
This is a DataSource for a collection (it is called CollectionDataSource) and this is a fairly simple class from an interface point of view. It takes in a collection configured by a fetchedResultsController and a CellDequeueBlock. Where CellDequeueBlock is a type alias in which we describe the strategy for creating cells.
That is, we created the DataSource and assigned it to the collection by calling performFetch on the fetchedResultsController, and then all the magic is assigned to the interaction of our DataSource class, fetchedResultsController and the ability of the delegate to receive updates from the database:

FetchedResultsController is the heart of our DataSource. You will find a lot of information on working with it in the Apple documentation. As a rule, we receive all data with its help - both new data and data that have been updated or deleted. At the same time, we simultaneously request data from the network. As soon as the data was received and stored in the database, we received an update from the DataSource, and the update came to us in the UI. That is, with one request, we receive data and display it in different places - cool, convenient, native!
And wherever it is possible to use ready-made DataSource with tables or with collections, we do it:

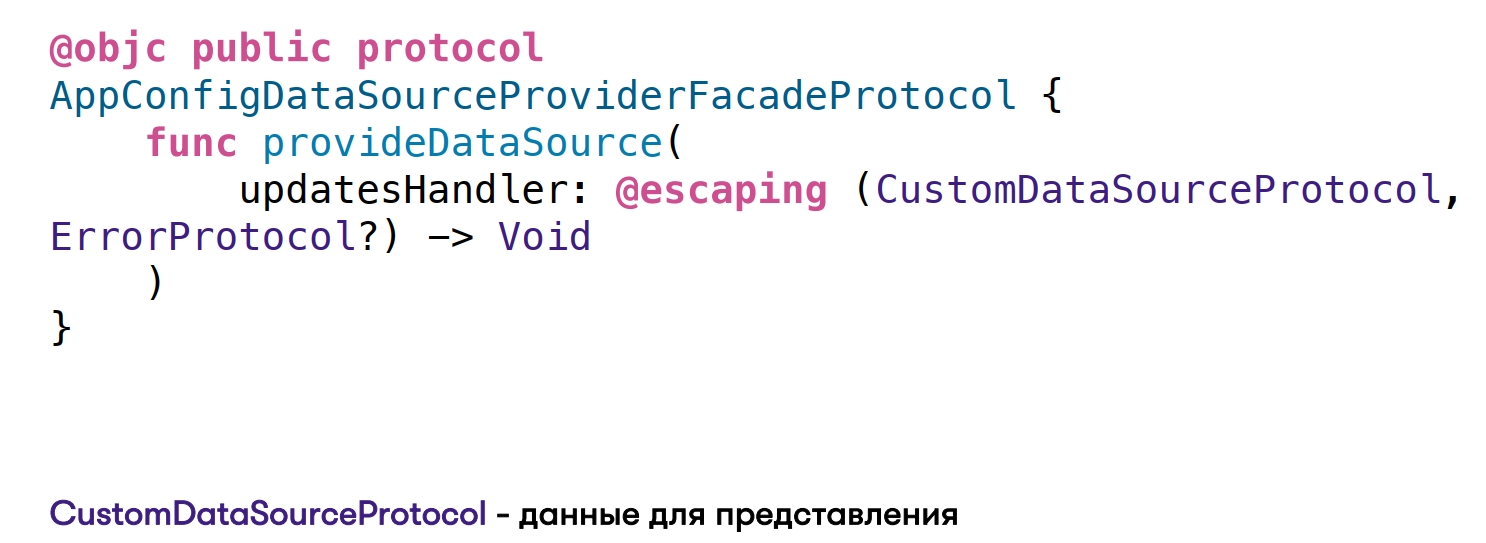
In those places where we have a lot of screens and do not use tables and collections (and use Objective C software layout), we evaluate what data we need for the screen, and through the protocol we describe our DataSource. After that, we write the facade - as a rule, this is also a public Objective C protocol through which we request our DataSource. And then the entrance to the Swift code is already in progress.
As soon as we are ready to transfer the screen completely to the Swift implementation, it will be enough to remove the Objective C wrapper - and, thanks to the custom DataSource, we can work directly with the Swift protocol.
We are currently using three main variants of DataSources:
- TableViewDatasource + cell strategy (strategy for creating cells);
- CollectionViewDatasource + cell strategy (option with collections);
- CustomDataSource is a custom option. We use it the most now.
results
After all the steps to design, implement and interact with legacy code, the business received the following improvements:
- The speed of data delivery to the user has significantly increased due to caching. This is probably an obvious and logical result.
- We are now one step closer to the offline first paradigm.
- The processes of an architectural cross-platform review have been set up within the iOS & Android teams - all developers involved in this project have information and easily exchange experience between the teams.
- . , , legacy , .
- , — . , , , , , .
The bonus for us was that we understood how working with architecture and diagrams can be interesting and fun (and this makes development easier). Yes, we spent a lot of time drawing and aligning our architectural approaches, but when it came to implementation, we scaled very quickly across all screens.
Our path to Offline first continues - we need not only caching to be offline, but also the user can act without a network connection, with further synchronization with the server after the Internet appears.
Links
- Document-based programming guide . This is a rather old document and Apple no longer recommends using it. But I would recommend looking at least for additional development. There is a lot of useful information there.
- Document-based WWDC:
- DataSources
Apps Live 2020 .
— Android iOS, . , , .