In my last article, I talked about how to quickly deploy your Minecraft server from an image under Windows. And a lot of people rightly pointed out that Windows is not very suitable for deploying this type of server. And PowerShell over RDP is some kind of abnormal perversion.
Therefore, we made a new image, under the Centos with preference and poetesses, taking into account all your comments. Plus, right out of the box for you, our card with a secret, by completing a small quest, you can get a prize! More details!
We deploy the server
As I said, we realized that a Windows gaming server might not be the best idea. It works great, and I have several servers from this image, but still Windows in console mode is not very suitable for such purposes.
Linux is much better, and better suited for this. Therefore, we have made a new image in our Marketplace .

If you open the description of this image , then there will be a fairly complete description of how to use this image, and how to initially configure it.
But still let's go over the main points. We create a server from the Marketplace, with the recommended parameters. If your budget allows, then I recommend from personal experience to set at least 4-6 GB of RAM. But, even in the basic version, everything will work like a clock (there may be brakes when traveling).

After successful creation, we will need to connect via ssh to agree with the EULA and start the server. It's not difficult even if you don't know anything about it. In the Windows operating system, you can connect to the server using the Putty utility, according to our manual . In linux, it's simple, open the console and write:
ssh root@your_server_ip
Denying root login
After connecting, I highly recommend disabling the ability to log in via ssh for the root user and create a new user, and then connect through it. This is an optional procedure, but I highly recommend doing it if you don't want your server to be hacked quickly.
Create a new user:
adduser your_nickname
Do not forget to set the correct, long password. Now you need to add the ability for administrator rights to this account.
usermod -aG sudo your_nickname
Now, after logging in, you can enter sudo in front of commands to execute them as superuser.
After we have created our user, we can connect and perform operations on his behalf (do not forget about administrator rights). Now the task is to disable the ability to login root via ssh. To do this, edit the file
sshd_config
.
sudo nano /etc/ssh/sshd_config
Find the line containing the PermitRootLogin and change it to no.
PermitRootLogin no
There are also other possibilities, for example, disabling a login by password, but I see no point in describing it in this article. That's it, save and restart the ssh daemon to apply the changes.
sudo service sshd reload
Now we can end the session and connect with our user.
Starting the server directly
After we have configured everything, we can start the server. First, we accept a Minecraft license (this is done once, only when creating a server).
mc_accepteula
And after that, you can already start the server.
systemctl start minecraft
That's it, immediately after that the server will start, with our pre-installed map. And you can start playing.

The server is ready to receive people.
Please note that the server is started with literally two commands. Or "one", as they tried to convince me:
mc_accepteula && systemctl start minecraft
If you do not want to use the pre-installed map, you can immediately delete the world with the following command before starting the server:
mc_wipe
And after that already start the server, then a new unique world will be created. Still, I recommend at least looking at our map, there is a prize for attentive players.
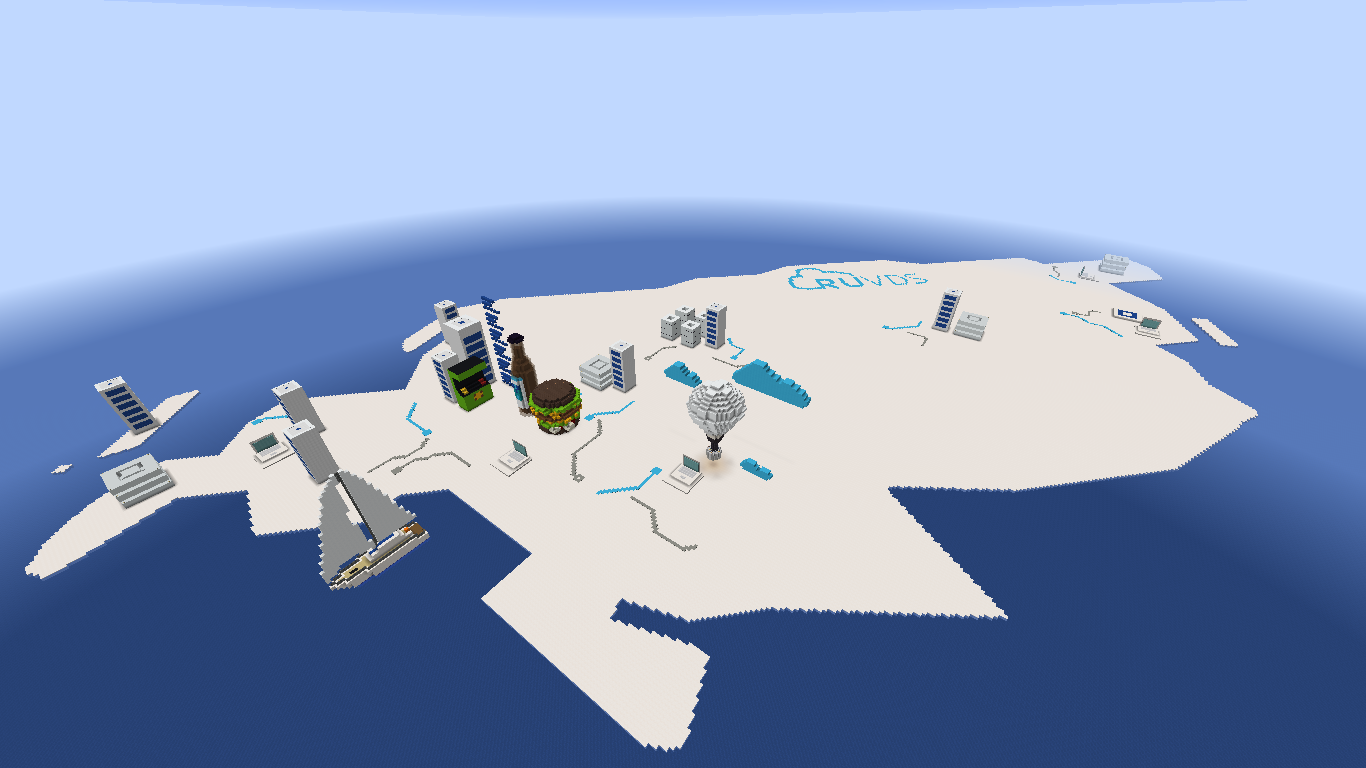
Our Minecraft map
Many of us who visited our blog on Habré saw this map in the header.

In fact, the map is not simple, many of our achievements are symbolically marked here. You can read about many of them in this article . And we decided to bring this map to the world of Minecraft. Plus, hide prizes on it so that players can find them on this map. Everything in order.
The same map in the Minecraft world.
This map will be launched by default after creating the server. I wrote above how to avoid this, just an extra simple body movement. We decided to make not only a map, for the sake of show-off. There is a secret room in one of the structures, in which you will find netherite armor, a flying cloak, fireworks for flying, and everything you need to find a secret. There will be a sign of what needs to be done.

Secret room.
Hurry up, the number of prizes is limited.
A few words about how this map was created
The map was created manually, in creative mode, on minecraft 1.16.3. It turned out to be quite difficult to transfer the design idea to the Minecraft world. Moreover, if you look, then the drawn map has angles not strictly 90 degrees, from this there were all the difficulties.

The first built object on the map is a buter.
For measuring the distance, the smallest object on the map was chosen, and the measurements were simply carried out in the graphical editor gimp, and the rest of the objects were already drawn on them.

An example of measuring distances.
The most difficult thing was to make a body of rotation out of cubes, such as a balloon. It took a particularly long time to tinker with the ball and the inscription. Especially with an inscription, because the cubes are at an angle of about 30 degrees to the inscription line. But we did it.
A body of revolution made of squares can be represented as follows.

We chose the second option as it was more "round". After that, we tried for a very long time to understand the “real” size of the balloon.

Size estimates (wrong).
But in the end, by trial and error, they established the size of the ball projected onto the plane.

Further, it was relatively simple. We recall the institute's knowledge of drawing and translate the sections of the ball from bottom to top, using a compass.


And so, having drawn all the sections on a piece of paper, we began to build the ball itself.

Ball shape estimation.
Well, then, it’s a matter of technology to “smear” it.
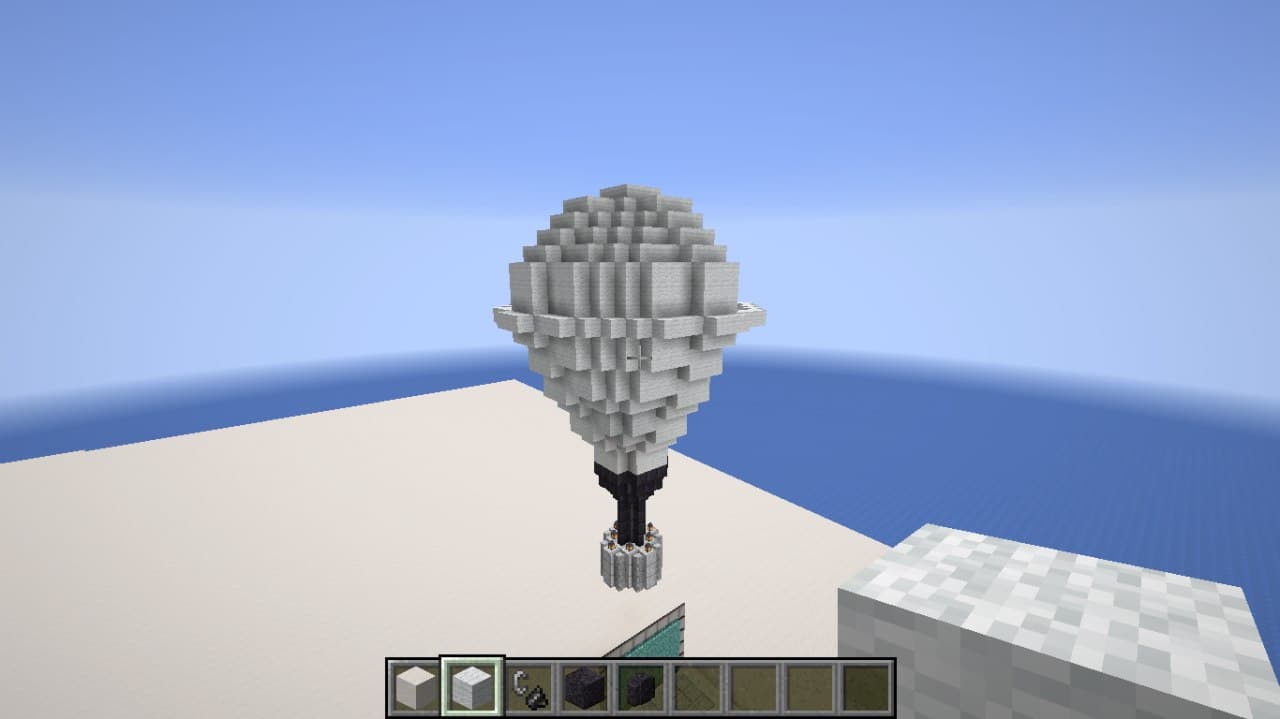
Finished ball.
I don't even want to talk about the inscription, I drank so much blood that it was just horror. But we did it. In the same way, the inscription was translated on paper into a cage and made sure that it looked correct. It took a lot of time and effort (almost 30% of the entire map).
And finally, a couple of frames of intermediate map construction.


What if you want to play on other maps or even with mods?
A few words on how to change the version of minecraft and install a different map.
All minecraft lives in the folder:
/opt/minecraft

If we are talking about vanilla, then first you need to stop the server, then delete the old world.
systemctl stop minecraft
You can view the list of available versions of minecraft with the command.
mc_version show
Then we reset the world (it just deletes the current world).
mc_wipe
And we put the latest version of vanilla minecraft.
mc_version 1.16.4
Then we start the server with the command.
systemctl start minecraft

That's it, this will be the last version of minecraft.
If you need to install mods, you can install Forge (it is already preinstalled on the server, and you only need to copy the mods to it).
Stop the server, delete the world, specify the required version, if necessary, copy the necessary mods to the server in the mods folder and start the server, for example, for version forge-1.12.2:
systemctl stop minecraft
mc_wipe
mc_version forge-1.12.2
systemctl start minecraft
For ease of configuration, we even filmed a video of the primary configuration of the minecraft server. To make it more convenient.
Unfortunately, the video is a bit behind the final changes to our image in the marketplace (see the current version of the configuration in our marketplace, there is a comprehensive manual). But nevertheless, it will help a lot to get started, how to create a server and work with it!
Good luck with the game!