Thanks to the implementation of the ESIA, government and commercial organizations, developers and owners of online services were able to speed up and make more secure operations related to the input and verification of user data. Rusfinance Bank also decided to use the potential of the system and, when finalizing the online loan processing service (the bank specializes in car loans), implemented integration with the platform.
This was not so easy to do. It was necessary to fulfill a number of requirements and procedures, to solve technical difficulties.
In this article, we will try to tell you about the main points and methodological guidelines that are important to know for those who want to independently implement integration with the ESIA, as well as provide code fragments in the Java language that will help overcome difficulties during development (part of the implementation is omitted, but the general sequence of actions is clear).
We hope our experience will help Java developers (and not only) save a lot of time when developing and familiarizing themselves with the methodological recommendations of the Ministry of Telecom and Mass Communications.
Why do we need integration with ESIA?
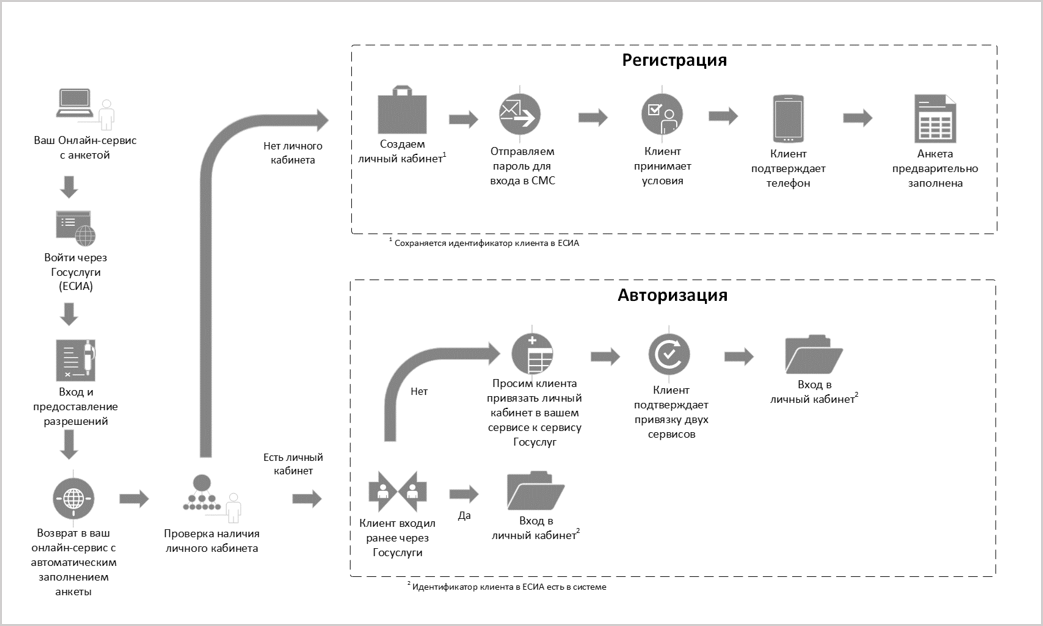
In connection with the coronavirus pandemic, the number of offline transactions in many areas of lending began to decline. Customers began to "go online" and it was vital for us to strengthen our online presence in the car loan market. In the process of finalizing the Autocredit service (Habré already has an article about its development ), we decided to make the interface for placing loan applications on the bank's website as convenient and simple as possible. Integration with ESIA has become a key moment in solving this problem, since it made it possible to automatically obtain the client's personal data.
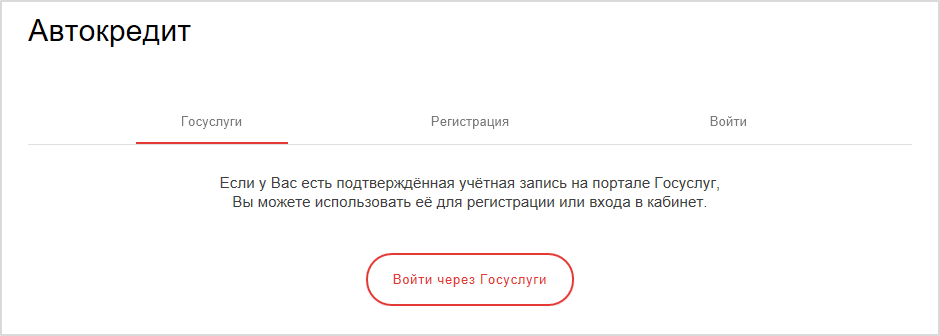
For the client, this solution also turned out to be convenient, since it made it possible to use a single login and password to register and enter the online approval service for applications for purchasing a car on credit.
In addition, integration with ESIA allowed Rusfinance Bank to:
- reduce the time for filling out online questionnaires;
- reduce the number of user bounces when trying to fill in a large number of fields manually;
- to provide a stream of "quality", verified clients.
Despite the fact that we tell about the experience of our bank, the information can be useful not only for financial institutions. The government recommends using the ESIA platform for other types of online services (more details here ).
What to do and how?
At first, it seemed to us that there was nothing special in integration with the ESIA from a technical point of view - a standard task associated with obtaining data through the REST API. However, upon closer examination, it became clear that not everything is so simple. For example, it turned out that we have no idea how to work with the certificates required to sign multiple parameters. I had to waste time and figure it out. But first things first.
To begin with, it was important to outline a plan of action. Our plan included the following main steps:
- register on the ESIA technology portal;
- submit applications for the use of the ESIA software interfaces in a test and industrial environment;
- independently develop a mechanism for interaction with the ESIA (in accordance with the current document "Methodological recommendations for the use of ESIA");
- test the operation of the mechanism in the test and industrial environment of the ESIA.
We usually develop our projects in Java. Therefore, for software implementation we chose:
- IntelliJ IDEA;
- CryptoPro JCP (or CryptoPro Java CSP);
- Java 8;
- Apache HttpClient;
- Lombok;
- FasterXML / Jackson.
Getting the redirect URL
The first step is to obtain an authorization code. In our case, this is done by a separate service with a redirect to the authorization page of the State Services portal (we will tell you about this in a little more detail).
First, we initialize the variables ESIA_AUTH_URL (the ESIA address) and API_URL (the address to which the redirect occurs in case of successful authorization). After that, we create the EsiaRequestParams object, which contains the parameters of the request to the ESIA in its fields, and form the esiaAuthUri link.
public Response loginByEsia() throws Exception {
  final String ESIA_AUTH_URL = dao.getEsiaAuthUrl(); //
  final String API_URL = dao.getApiUrl(); // ,
  EsiaRequestParams requestDto = new EsiaRequestParams(API_URL);
  URI esiaAuthUri = new URIBuilder(ESIA_AUTH_URL)
          .addParameters(Arrays.asList(
            new BasicNameValuePair(RequestEnum.CLIENT_ID.getParam(), requestDto.getClientId()),
            new BasicNameValuePair(RequestEnum.SCOPE.getParam(), requestDto.getScope()),
            new BasicNameValuePair(RequestEnum.RESPONSE_TYPE.getParam(), requestDto.getResponseType()),
            new BasicNameValuePair(RequestEnum.STATE.getParam(), requestDto.getState()),
            new BasicNameValuePair(RequestEnum.TIMESTAMP.getParam(), requestDto.getTimestamp()),
            new BasicNameValuePair(RequestEnum.ACCESS_TYPE.getParam(), requestDto.getAccessType()),
            new BasicNameValuePair(RequestEnum.REDIRECT_URI.getParam(), requestDto.getRedirectUri()),
            new BasicNameValuePair(RequestEnum.CLIENT_SECRET.getParam(), requestDto.getClientSecret())
          ))
          .build();
  return Response.temporaryRedirect(esiaAuthUri).build();
}
For clarity, let's show how the EsiaRequestParams class might look like:
public class EsiaRequestParams {

  String clientId;
  String scope;
  String responseType;
  String state;
  String timestamp;
  String accessType;
  String redirectUri;
  String clientSecret;
  String code;
  String error;
  String grantType;
  String tokenType;

  public EsiaRequestParams(String apiUrl) throws Exception {
    this.clientId = CLIENT_ID;
    this.scope = Arrays.stream(ScopeEnum.values())
            .map(ScopeEnum::getName)
            .collect(Collectors.joining(" "));
    responseType = RESPONSE_TYPE;
    state = EsiaUtil.getState();
    timestamp = EsiaUtil.getUrlTimestamp();
    accessType = ACCESS_TYPE;
    redirectUri = apiUrl + RESOURCE_URL + "/" + AUTH_REQUEST_ESIA;
    clientSecret = EsiaUtil.generateClientSecret(String.join("", scope, timestamp, clientId, state));
    grantType = GRANT_TYPE;
    tokenType = TOKEN_TYPE;
  }
}
After that, you need to redirect the user to the ESIA authentication service. The user enters his username-password, confirms access to data for our system. Then ESIA sends a response to the online service, which contains an authorization code. This code will be needed for further inquiries to the ESIA.
Each request to the ESIA has a client_secret parameter, which is a detached electronic signature in the PKCS7 format (Public Key Cryptography Standard). In our case, a certificate is used for signing, which was received by the certification center before starting work on integration with the ESIA. How to work with a key store is well described in this series of articles .
As an example, let us show how the keystore provided by CryptoPro looks like:

Calling the private and public keys in this case will look like this:
KeyStore keyStore = KeyStore.getInstance("HDImageStore"); //
keyStore.load(null, null);
PrivateKey privateKey = (PrivateKey) keyStore.getKey(esiaKeyStoreParams.getName(), esiaKeyStoreParams.getValue().toCharArray()); //
X509Certificate certificate = (X509Certificate) keyStore.getCertificate(esiaKeyStoreParams.getName()); //  ,   –  .
Where JCP.HD_STORE_NAME is the storage name in CryptoPro, esiaKeyStoreParams.getName () is the container name and esiaKeyStoreParams.getValue (). ToCharArray () is the container password.
In our case, there is no need to load data into the storage using the load () method, since the keys will already be there when specifying the name of this storage.
It is important to remember here that obtaining a signature in the form
final Signature signature = Signature.getInstance(SIGN_ALGORITHM, PROVIDER_NAME);
signature.initSign(privateKey);
signature.update(data);
final byte[] sign = signature.sign();
it is not enough for us, since the ESIA requires a detached signature of the PKCS7 format. Therefore, a PKCS7 format signature should be generated.
An example of our method returning a detached signature looks like this:
public String generateClientSecret(String rawClientSecret) throws Exception {
    if (this.localCertificate == null || this.esiaCertificate == null) throw new RuntimeException("Signature creation is unavailable");
    return CMS.cmsSign(rawClientSecret.getBytes(), localPrivateKey, localCertificate, true);
  }
Here we check for our public key and the ESIA public key. Since the cmsSign () method may contain confidential information, we will not disclose it.
Here are just a few details:
- rawClientSecret.getBytes () - byte array of scope, timestamp, clientId and state;
- localPrivateKey - private key from the container;
- localCertificate - the public key from the container;
- true - boolean value of the signature parameter - checkout or not.
An example of creating a signature can be found in the CryptoPro java library, where the PKCS7 standard is called CMS. And also in the programmer's manual, which is included with the source code of the downloaded version of CryptoPro.
Getting a token
The next step is to obtain an access token (aka token) in exchange for an authorization code, which was received as a parameter upon successful user authorization on the State Services portal.
To receive any data in the Unified identification system, you need to get an access token. To do this, we form a request to the ESIA. The main request fields here are formed in the same way, the code looks like the following:
URI getTokenUri = new URIBuilder(ESIA_TOKEN_API_URL)
        .addParameters(Arrays.asList(
          new BasicNameValuePair(RequestEnum.CLIENT_ID.getParam(), requestDto.getClientId()),
          new BasicNameValuePair(RequestEnum.CODE.getParam(), code),
          new BasicNameValuePair(RequestEnum.GRANT_TYPE.getParam(), requestDto.getGrantType()),
          new BasicNameValuePair(RequestEnum.CLIENT_SECRET.getParam(), requestDto.getClientSecret()),
          new BasicNameValuePair(RequestEnum.STATE.getParam(), requestDto.getState()),
          new BasicNameValuePair(RequestEnum.REDIRECT_URI.getParam(), requestDto.getRedirectUri()),
          new BasicNameValuePair(RequestEnum.SCOPE.getParam(), requestDto.getScope()),
          new BasicNameValuePair(RequestEnum.TIMESTAMP.getParam(), requestDto.getTimestamp()),
          new BasicNameValuePair(RequestEnum.TOKEN_TYPE.getParam(), requestDto.getTokenType())
        ))
        .build();
HttpUriRequest getTokenPostRequest = RequestBuilder.post()
        .setUri(getTokenUri)
        .setHeader(HttpHeaders.CONTENT_TYPE, "application/x-www-form-urlencoded")
        .build();
Having received the answer, parse it and get the token:
try (CloseableHttpResponse response = httpClient.execute(getTokenPostRequest)) {
  HttpEntity tokenEntity = response.getEntity();
  String tokenEntityString = EntityUtils.toString(tokenEntity);
  tokenResponseDto = extractEsiaGetResponseTokenDto(tokenEntityString);
}
The token is a three-part string separated by periods: HEADER.PAYLOAD.SIGNATURE, where:
- HEADER is a header that has the properties of a token, including a signature algorithm;
- PAYLOAD is information about the token and the subject, which we request from the State Services;
- Signature is the signature of HEADER.PAYLOAD.
Token validation
In order to make sure that we received a response from the State Services, it is necessary to validate the token by specifying the path to the certificate (public key), which can be downloaded from the State Services website. By passing the received string (data) and signature (dataSignature) to the isEsiaSignatureValid () method, you can get the validation result as a boolean value.
public static boolean isEsiaSignatureValid(String data, String dataSignature) throws Exception {
  InputStream inputStream = EsiaUtil.class.getClassLoader().getResourceAsStream(CERTIFICATE); //   ,
  CertificateFactory certFactory = CertificateFactory.getInstance("X.509"); //         X.509
  X509Certificate certificate = (X509Certificate) certFactory.generateCertificate(inputStream);
  Signature signature = Signature.getInstance(certificate.getSigAlgName(), new JCP()); //    Signature       JCP
  signature.initVerify(certificate.getPublicKey()); //
  signature.update(data.getBytes()); //    ,
  return signature.verify(Base64.getUrlDecoder().decode(dataSignature));
}
In accordance with the guidelines, it is necessary to check the validity period of the token. If the validity period has expired, then you need to create a new link with additional parameters and make a request using the http client:
URI refreshTokenUri = new URIBuilder(ESIA_TOKEN_API_URL)
        .addParameters(Arrays.asList(
                new BasicNameValuePair(RequestEnum.CLIENT_ID.getParam(), requestDto.getClientId()),
                new BasicNameValuePair(RequestEnum.REFRESH_TOKEN.getParam(), tokenResponseDto.getRefreshToken()),
                new BasicNameValuePair(RequestEnum.CODE.getParam(), code),
                new BasicNameValuePair(RequestEnum.GRANT_TYPE.getParam(), EsiaConstants.REFRESH_GRANT_TYPE),
                new BasicNameValuePair(RequestEnum.STATE.getParam(), requestDto.getState()),
                new BasicNameValuePair(RequestEnum.SCOPE.getParam(), requestDto.getScope()),
                new BasicNameValuePair(RequestEnum.TIMESTAMP.getParam(), requestDto.getTimestamp()),
                new BasicNameValuePair(RequestEnum.TOKEN_TYPE.getParam(), requestDto.getTokenType()),
                new BasicNameValuePair(RequestEnum.CLIENT_SECRET.getParam(), requestDto.getClientSecret()),
                new BasicNameValuePair(RequestEnum.REDIRECT_URI.getParam(), requestDto.getRedirectUri())
        ))
        .build();
Retrieving user data
In our case, you need to get your full name, date of birth, passport details and contacts.
We use a functional interface that will help to receive user data:
Function<String, String> esiaPersonDataFetcher = (fetchingUri) -> {
  try {
    URI getDataUri = new URIBuilder(fetchingUri).build();
    HttpGet dataHttpGet = new HttpGet(getDataUri);
       dataHttpGet.addHeader("Authorization", requestDto.getTokenType() + " " + tokenResponseDto.getAccessToken());
    try (CloseableHttpResponse dataResponse = httpClient.execute(dataHttpGet)) {
      HttpEntity dataEntity = dataResponse.getEntity();
      return EntityUtils.toString(dataEntity);
    }
  } catch (Exception e) {
    throw new UndeclaredThrowableException(e);
  }
};
Getting user data:
String personDataEntityString = esiaPersonDataFetcher.apply(ESIA_REST_API_URL + "/prns/" + esiaAccountId);
Getting contacts is no longer as obvious as getting user data. First, you should get a list of links to contacts:
String contactsListEntityString = esiaPersonDataFetcher.apply(ESIA_REST_API_URL + "/prns/" + esiaAccountId + "/ctts");
EsiaListDto esiaListDto = objectMapper.readValue(contactsListEntityString, EsiaListDto.class);
Deserialize this list and get the esiaListDto object. The fields from the ESIA manual may differ, so it is worth checking empirically.
Next, you need to follow each link from the list to get each user contact. It will look like this:
for (String contactUrl : esiaListDto.getElementUrls()) {
  String contactEntityString = esiaPersonDataFetcher.apply(contactUrl);
  EsiaContactDto esiaContactDto = objectMapper.readValue(contactEntityString, EsiaContactDto.class);
}
The situation is the same with obtaining a list of documents. First, we get a list of links to documents:
String documentsListEntityString = esiaPersonDataFetcher.apply(ESIA_REST_API_URL + "/prns/" + esiaAccountId + "/docs");
Then deserialize it:
EsiaListDto esiaDocumentsListDto = objectMapper.readValue(documentsListEntityString, EsiaListDto.class);
      :
for (String documentUrl : esiaDocumentsListDto.getElementUrls()) {
  String documentEntityString = esiaPersonDataFetcher.apply(documentUrl);
  EsiaDocumentDto esiaDocumentDto = objectMapper.readValue(documentEntityString, EsiaDocumentDto.class);
}
Now what to do with all this data?
We can parse the data and get objects with the required fields. Here, each developer can design classes as he needs, in accordance with the terms of reference.
An example of getting an object with the required fields:
final ObjectMapper objectMapper = new ObjectMapper()
	.configure(DeserializationFeature.FAIL_ON_UNKNOWN_PROPERTIES, false);

String personDataEntityString = esiaPersonDataFetcher
	.apply(ESIA_REST_API_URL + "/prns/" + esiaAccountId);

EsiaPersonDto esiaPersonDto = objectMapper
	.readValue(personDataEntityString, EsiaPersonDto.class);
We fill the esiaPersonDto object with the necessary data, for example, contacts:
for (String contactUrl : esiaListDto.getElementUrls()) {
  String contactEntityString = esiaPersonDataFetcher.apply(contactUrl);
  EsiaContactDto esiaContactDto = objectMapper.readValue(contactEntityString, EsiaContactDto.class); //
  if (esiaContactDto.getType() == null) continue;
  switch (esiaContactDto.getType().toUpperCase()) {
    case EsiaContactDto.MBT: //     ,    mobilePhone
      esiaPersonDto.setMobilePhone(esiaContactDto.getValue());
      break;
    case EsiaContactDto.EML: //     ,    email
      esiaPersonDto.setEmail(esiaContactDto.getValue());
  }
}
The EsiaPersonDto class looks like this:
@Data
@FieldNameConstants(prefix = "")
public class EsiaPersonDto {

  private String firstName;
  private String lastName;
  private String middleName;
  private String birthDate;
  private String birthPlace;
  private Boolean trusted;  //    -  (“true”) /   (“false”)
  private String status;    //   - Registered () /Deleted ()
  //   ,      /prns/{oid}
  private List<String> stateFacts;
  private String citizenship;
  private Long updatedOn;
  private Boolean verifying;
  @JsonProperty("rIdDoc")
  private Integer documentId;
  private Boolean containsUpCfmCode;
  @JsonProperty("eTag")
  private String tag;
  // ----------------------------------------
  private String mobilePhone;
  private String email;

  @javax.validation.constraints.Pattern(regexp = "(\\d{2})\\s(\\d{2})")
  private String docSerial;

  @javax.validation.constraints.Pattern(regexp = "(\\d{6})")
  private String docNumber;

  private String docIssueDate;

  @javax.validation.constraints.Pattern(regexp = "([0-9]{3})\\-([0-9]{3})")
  private String docDepartmentCode;

  private String docDepartment;

  @javax.validation.constraints.Pattern(regexp = "\\d{14}")
  @JsonProperty("snils")
  private String pensionFundCertificateNumber;

  @javax.validation.constraints.Pattern(regexp = "\\d{12}")
  @JsonProperty("inn")
  private String taxPayerNumber;

  @JsonIgnore
  @javax.validation.constraints.Pattern(regexp = "\\d{2}")
  private String taxPayerCertificateSeries;

  @JsonIgnore
  @javax.validation.constraints.Pattern(regexp = "\\d{10}")
  private String taxPayerCertificateNumber;
}
The work on improving the service will continue, because the ESIA does not stand still.