There is a very cool harvester for joint project management, LDAP authorization, file synchronization with versioning and something like a corporate messenger with video conferencing, which were screwed up in the latest versions. Yes, I'm talking about Nextcloud. On the one hand, I am a supporter of the Unix-way and a clear division of applications into separate functions. On the other hand, this product is more than stable, it has been working for many years in several projects without any problems and additional whistles do not particularly interfere with its work. If you really want to, you can screw almost any game there. The community is lively and fully completes various plugins that are available as separate applications.
Today we will be deploying it. I will not give a complete step-by-step instruction, but I will try to mention the key points of the architecture that are worth paying attention to. In particular, let's take a look at load balancing, database replication and routine maintenance without service interruption.
We will deploy it in a fail-safe version for a small company of 150-1000 users, but it will also come in handy for home users.
What do companies need?
The main difference between the service on a cozy home server made of acorns and matches from the corporate segment is its responsibility to users. However, even in my home installation, I consider it good form to send messages to users with a warning about planned work or a potential accident. After all, it is on Saturday night that your friend may suddenly decide to work with the data that he hosts with you.
In the case of a company, even a small one, any simple important service means potential losses and problems. Especially if there are many processes tied to the service.
In particular, in my experience, Nextcloud is in demand for several features among small companies:
- Providing access to shared directories and synchronization.
- A killer feature with the provision of external access within the federation. You can integrate with a similar product from colleagues and another company.
- Providing external access via a direct link. It helps a lot if you, for example, work in the printing industry and need to exchange large amounts of heavy data with clients.
- Collabora document editor that runs on the server side and acts as a frontend for LibreOffice.
- Chats and video calls. A slightly controversial, not entirely stable feature, but it is there and works. In the latest version, it has already been stabilized.
We build architecture
Unfortunately, in the latest versions, Nextcloud Enterprise Implementation documentation is only available to paid subscriptions. However, as a reference, you can take older manuals that are still in the public domain.

Typical for home use and single installations.
An “all-in-one” option is not bad as long as you have few users and you can afford the downtime for routine maintenance. For example, during an update. Also, a monolithic scheme with placement on one node has problems with scaling. Therefore, we will try the second option.
Scalable deployment option recommended for higher workloads.
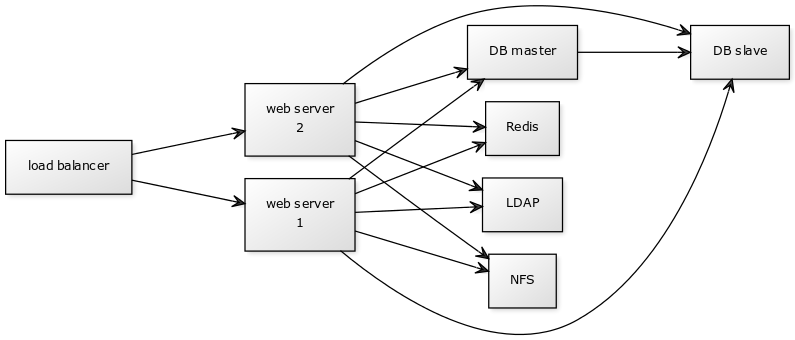
The main components of the system:
- 1 Balancer. You can use HAproxy or Nginx. I will consider the option with Nginx.
- 2-4 pieces Application server (web-server). The installation of Nextcloud itself with the main code in php.
- 2 DB. In the standard recommended configuration, this is MariaDB.
- NFS storage.
- Redis for caching database queries
Balancer
With this architecture, you will have fewer points of failure. The main point of failure is the load balancer. If it is unavailable, users will not be able to reach the service. Fortunately, its configuration of the same nginx is quite simple, as we will consider further, and it holds the load without any problems. Most failures on the balancer can be solved by restarting the daemon, the entire node, or by deploying from a backup. It will not be superfluous to have a configured cold reserve in another location with manual traffic switching to it in DNS.
Please note that the balancer is also an SSL / TLS termination point for your clients, and communication with the backend can go either over HTTP for trusted internal networks, or with additional HTTPS if traffic to the application server goes through general untrusted channels.
Database
A typical solution is MySQL / MariaDB in clustered execution in master-slave replication. At the same time, you have only one active database, and the second operates in the hot standby mode in case of an emergency failure of the main one or during scheduled work. Load balancing can also be considered, but it is technically more difficult. When using MariaDB Galera Cluster with the master-master replication option, you need to use an odd number of nodes, but at least three. Thus, the risk of split-brain situations is minimized, when the connectivity between nodes is cut.
Storage
Any solution that is best for you that the NFS protocol provides. For high loads, consider IBM Elastic Storage or Ceph. It is also possible to use S3-compatible object storage, but this is more likely an option for very large installations.
HDD or SSD
In principle, for medium-sized installations, using only the HDD is sufficient. The bottleneck here will be iops when reading from the database, which greatly affects the responsiveness of the system, but if you have Redis, which caches everything in RAM, this will not be a big problem. Also, part of the cache will be stored in memcached on application servers. However, I would recommend hosting your application servers on an SSD whenever possible. The web interface feels much more responsive. In this case, the same file synchronization on desktop clients will work in approximately the same way as when using HDD for these nodes.
The speed of synchronization and file upload will be determined by the performance of your NFS storage.
Configuring the balancer
As an example, I will give a simple in basic configuration and efficient nginx. Yes, various additional failover-buns are available only in the paid version, but even in the basic version it perfectly fulfills its task. Please note that round robin or random balancing is not suitable for us, since application servers store caches for specific clients.
Fortunately, this is solved using the ip_hash method . In this case, the user's sessions will be assigned to a specific backend, to which all requests from the user will be directed. This point is described in the documentation:
, IP- . IPv4- IPv6- . , . , . .
Unfortunately, when using this method, there can be problems with users who are behind a dynamic IP and keep changing it. For example, on clients with mobile Internet, which can be thrown along different routes when switching between cells. sticky cookie that solves this problem is only available in the paid version.
The nginx config file describes this as follows:
upstream backend {
    ip_hash;

    server backend1_nextcloud.example.com;
    server backend2_nextcloud.example.com;
    server backend3_nextcloud.example.com;
    server backend4_nextcloud.example.com;
}
In this case, the load will be as evenly distributed between the application servers as possible, although load imbalances may occur due to the client being bound to a specific session. For small to medium-sized installations, this can be neglected. If your backends are different in power, then you can set the weight of each of them. Then the balancer will try to distribute the load proportionally to the given weights:
upstream backend {
    ip_hash;

    server backend1_nextcloud.example.com weight=3;
    server backend2_nextcloud.example.com;
    server backend3_nextcloud.example.com;
}
In the given example, out of 5 received requests, 3 will go to backend1, 1 to backend2 and 1 to backend3.
If one of the application servers fails, nginx will try to redirect the request to the next server from the list of backends.
Configuring the database
Details of the Master-Slave configuration can be found in the main documentation .
Let's take a look at a few key points. First, we create a user for data replication:
create user 'replicant'@'%' identified by 'replicant_password';
grant replication slave on *.* to replicant;
flush privileges;
Then we edit the master config:
sudo nano /etc/mysql/mariadb.conf.d/50-server.cnf In the area of the "Logging and Replication" block, make the necessary edits:
[mysqld]
log-bin         = /var/log/mysql/master-bin
log-bin-index   = /var/log/mysql/master-bin.index
binlog_format   = mixed
server-id       = 01
replicate-do-db = nextcloud
bind-address = 192.168.0.6
On the Slave, we configure the config:
sudo nano /etc/mysql/mariadb.conf.d/50-server.cnf In the area of the "Logging and Replication" block, make the necessary edits:
    [mysqld]
    server-id       = 02
    relay-log-index = /var/log/mysql/slave-relay-bin.index
    relay-log       = /var/log/mysql/slave-relay-bin
    replicate-do-db = nextcloud
    read-only = 1
    bind-address    = 192.168.0.7
Restart both servers:
sudo systemctl restart mariadbNext, you will need to copy the database to Slave.
On the Master, we first perform table locking:
flush tables with read lock;And then we look at the status:
    MariaDB [(none)]> show master status;
    +-------------------+----------+--------------+------------------+
    | File              | Position | Binlog_Do_DB | Binlog_Ignore_DB |
    +-------------------+----------+--------------+------------------+
    | master-bin.000001 |      772 |              |                  |
    +-------------------+----------+--------------+------------------+
    1 row in set (0.000 sec)
Do not exit the database console, otherwise the locks will be removed!
We will need master_log_file and master_log_pos from here for the Slave configuration.
Dumping and removing locks:
sudo mysqldump -u root nextcloud > nextcloud.sql
    > unlock tables;
    > exit;
Then we import the dump to Slave and restart the daemon:
sudo mysqldump -u root nextcloud < nextcloud.sql
sudo systemctl restart mariadb
After that, set up replication in the console:
    MariaDB [(none)]> change master 'master01' to
    master_host='192.168.0.6',
    master_user='replicant',
    master_password='replicant_password',
    master_port=3306,
    master_log_file='master-bin.000001',
    master_log_pos=772,
    master_connect_retry=10,
    master_use_gtid=slave_pos;
We launch and check:
> start slave 'master01';
show slave 'master01' status\G;
There should be no errors in the answer and two points will indicate the success of the procedure:
Slave_IO_Running: Yes
Slave_SQL_Running: Yes
Deploy Application Nodes
There are several deployment options:
- snap
- docker-image
- manual update
Snap is available primarily for Ubuntu. It is quite good at delivering complex proprietary applications, but by default. But it has a feature that is rather annoying in an industrial environment - it automatically updates its packages several times a day. You will also have to saw through additional accesses to the outside if you have a rigidly delimited internal network. At the same time, mirroring its repositories inside is not entirely trivial.
Yes, there are subscription channels, and major releases, in theory, it should not switch, but think about it. I would recommend full control over the update process, especially since it is often accompanied by a change in the data structure in the database.
Docker-image is a good option, especially if your infrastructure is already running on Kubernetes. The same Redis node is likely to go to the cluster after the application servers.
If you don't have the infrastructure to do this, then manually updating and deploying from tar.gz is quite convenient and controllable.
Remember that you will need to install a web server on the application server to handle incoming requests. I would recommend a bundle from nginx + php-fpm7.4. With the latest versions of php-fmp, performance and responsiveness have improved significantly.
Configuring SSL / TLS
You should definitely count on TLS 1.3 if you are doing a new installation and there are no problems with nginx packages that depend on the freshness of system openssl. In particular, 0-RTT and other goodies allow at times to significantly speed up client reconnection due to caching. Security is also higher due to cutting out outdated protocols.
I will give the actual config for the nginx application server, which communicates with the balancer via TLS:
Nginx config
upstream php-handler {
 server unix:/var/run/php/php7.4-fpm.sock;
}

server {
    listen 80;
    server_name backend1_nextcloud.example.com;
    # enforce https
    root /var/www/nextcloud/;
    return 301 https://$server_name$request_uri;
}

server {
    listen 443 ssl http2;
    ssl_early_data on;
#    listen [::]:443 ssl http2;
    server_name backend1_nextcloud.example.com;

    # Path to the root of your installation
    root /var/www/nextcloud/;
    # Log path
    access_log /var/log/nginx/nextcloud.nginx-access.log;
    error_log /var/log/nginx/nextcloud.nginx-error.log;
    ### SSL CONFIGURATION ###
        ssl_certificate /etc/letsencrypt/live/backend1_nextcloud.example.com/fullchain.pem;
        ssl_certificate_key /etc/letsencrypt/live/backend1_nextcloud.example.com/privkey.pem;
        ssl_trusted_certificate /etc/letsencrypt/live/backend1_nextcloud.example.com/fullchain.pem;
        ssl_dhparam /etc/ssl/certs/dhparam.pem;

        ssl_protocols TLSv1.2 TLSv1.3;
        ssl_prefer_server_ciphers on;
        #ssl_ciphers "EECDH+AESGCM:EECDH+CHACHA20:EECDH+AES256:!AES128";
        ssl_ciphers ECDHE-ECDSA-AES256-GCM-SHA384:ECDHE-RSA-AES256-GCM-SHA384:ECDHE-ECDSA-CHACHA20-POLY1305:ECDHE-RSA-CHACHA20-POL>
        ssl_session_cache shared:SSL:50m;
        ssl_session_timeout 5m;

        ssl_stapling on;
        ssl_stapling_verify on;
        resolver 8.8.4.4 8.8.8.8;

        add_header Strict-Transport-Security 'max-age=63072000; includeSubDomains; preload' always;
###   SSL ###

    # Add headers to serve security related headers
    # Before enabling Strict-Transport-Security headers please read into this
    # topic first.
    # add_header Strict-Transport-Security "max-age=15768000;
    # includeSubDomains; preload;";
    #
    # WARNING: Only add the preload option once you read about
    # the consequences in https://hstspreload.org/. This option
    # will add the domain to a hardcoded list that is shipped
    # in all major browsers and getting removed from this list
    # could take several months.
    add_header Referrer-Policy "no-referrer" always;
    add_header X-Content-Type-Options "nosniff" always;
    add_header X-Download-Options "noopen" always;
    add_header X-Frame-Options "SAMEORIGIN" always;
    add_header X-Permitted-Cross-Domain-Policies "none" always;
    add_header X-Robots-Tag "none" always;
    add_header X-XSS-Protection "1; mode=block" always;

    # Remove X-Powered-By, which is an information leak
    fastcgi_hide_header X-Powered-By;

    location = /robots.txt {
        allow all;
        log_not_found off;
        access_log off;
    }

    # The following 2 rules are only needed for the user_webfinger app.
    # Uncomment it if you're planning to use this app.
    #rewrite ^/.well-known/host-meta /public.php?service=host-meta last;
    #rewrite ^/.well-known/host-meta.json /public.php?service=host-meta-json
    # last;

    location = /.well-known/carddav {
      return 301 $scheme://$host/remote.php/dav;
    }
    location = /.well-known/caldav {
      return 301 $scheme://$host/remote.php/dav;
    }

    # set max upload size
    client_max_body_size 512M;
    fastcgi_buffers 64 4K;

    # Enable gzip but do not remove ETag headers
    gzip on;
    gzip_vary on;
    gzip_comp_level 4;
    gzip_min_length 256;
    gzip_proxied expired no-cache no-store private no_last_modified no_etag auth;
    gzip_types application/atom+xml application/javascript application/json application/ld+json application/manifest+json application/rss+xml application/vnd.geo+json application/vnd.ms-fon>

    # Uncomment if your server is build with the ngx_pagespeed module
    # This module is currently not supported.
    #pagespeed off;

    location / {
        rewrite ^ /index.php;
    }

    location ~ ^\/(?:build|tests|config|lib|3rdparty|templates|data)\/ {
        deny all;
    }
location ~ ^\/(?:\.|autotest|occ|issue|indie|db_|console) {
        deny all;
    }

    location ~ ^\/(?:index|remote|public|cron|core\/ajax\/update|status|ocs\/v[12]|updater\/.+|oc[ms]-provider\/.+)\.php(?:$|\/) {
        fastcgi_split_path_info ^(.+?\.php)(\/.*|)$;
        set $path_info $fastcgi_path_info;
        try_files $fastcgi_script_name =404;
        include fastcgi_params;
        fastcgi_param SCRIPT_FILENAME $document_root$fastcgi_script_name;
        fastcgi_param PATH_INFO $path_info;
        fastcgi_param HTTPS on;
        # Avoid sending the security headers twice
        fastcgi_param modHeadersAvailable true;
        # Enable pretty urls
        fastcgi_param front_controller_active true;
        fastcgi_pass php-handler;
        fastcgi_intercept_errors on;
        fastcgi_request_buffering off;
    }

    location ~ ^\/(?:updater|oc[ms]-provider)(?:$|\/) {
        try_files $uri/ =404;
        index index.php;
    }

    # Adding the cache control header for js, css and map files
    # Make sure it is BELOW the PHP block
    location ~ \.(?:css|js|woff2?|svg|gif|map)$ {
        try_files $uri /index.php$request_uri;
        add_header Cache-Control "public, max-age=15778463";
        # Add headers to serve security related headers (It is intended to
        # have those duplicated to the ones above)
        # Before enabling Strict-Transport-Security headers please read into
        # this topic first.
        #add_header Strict-Transport-Security "max-age=15768000; includeSubDomains; preload;" always;
        #
        # WARNING: Only add the preload option once you read about
        # the consequences in https://hstspreload.org/. This option
        # will add the domain to a hardcoded list that is shipped
        # in all major browsers and getting removed from this list
        # could take several months.
        add_header Referrer-Policy "no-referrer" always;
        add_header X-Content-Type-Options "nosniff" always;
        add_header X-Download-Options "noopen" always;
        add_header X-Frame-Options "SAMEORIGIN" always;
        add_header X-Permitted-Cross-Domain-Policies "none" always;
        add_header X-Robots-Tag "none" always;
        add_header X-XSS-Protection "1; mode=block" always;

        # Optional: Don't log access to assets
        access_log off;
    }

    location ~ \.(?:png|html|ttf|ico|jpg|jpeg|bcmap)$ {
        try_files $uri /index.php$request_uri;
        # Optional: Don't log access to other assets
        access_log off;
    }
}
Routine maintenance
Remember, in an industrial environment, you need to provide a minimum and zero downtime for upgrades or even more backups. The key difficulty here is the dependence of the state of the metadata in the database and the files themselves, which are available through NFS or object storage.
When upgrading application servers to a new minor version, there are no special problems. But the cluster still needs to be transferred to mainenance mode to update the database structure.
Turn off the balancer at the time of the least load and proceed with the update.
After that, we carry out the manual update process on it from the downloaded tar.gz, while saving the config.php configuration file. Updating over the web on large installations is a very bad idea!
We update via the command line:
sudo -u www-data php /var/www/nextcloud/occ upgradeAfter that, turn on the balancer and send traffic to the updated server. To do this, we remove all non-updated application servers from balancing:
upstream backend {
    ip_hash;

    server backend1_nextcloud.example.com;
    server backend2_nextcloud.example.com down;
    server backend3_nextcloud.example.com down;
    server backend4_nextcloud.example.com down;
}
The rest of the nodes are gradually being updated and put into operation. In this case, there is no need to perform occ upgrade! You just need to replace the php files and save the configuration.
When backing up, you need to stop replication to Slave and perform a simultaneous dump of metadata from the database at the same time as creating a snapshot of files in the storage. You need to store them in pairs. Recovery should be similarly performed from a database dump and files for the same period. Otherwise, data loss is possible, since the file may be in the storage, but not have metadata in the database.