The era of flash drives has long since sunk into oblivion. Which, however, is not surprising: the irreplaceable tool for transferring files in your pocket has lost its relevance with the advent of cloud services - available wherever there is Internet, and from almost any device. However, this barrel of honey was not without a small fly in the ointment. Firstly, most vendors have free plans that impose strict limits on the amount of cloud storage and the number of devices on which you can install the sync app. Secondly, using public cloud services, you trust your files to a third-party company and cannot influence their security in any way. Thirdly, such repositories are not very convenient for teamwork, which is very relevant during the period of world coronavirus
Why, Holmes?
Like most ordinary users, I tried the most popular network storages in action in order to evaluate their advantages and disadvantages in practice. Dropbox is unspeakably beautiful in everything, except for the restrictions on the amount of free disk space, which I quickly crammed with working materials to the eyeballs, and the small number of devices available for installing the application at a free rate. I have a lot of devices, so in order to automatically synchronize files, I had to regularly disconnect and re-register them in the application, which is quite troublesome.
Yandex.Disk boasts a significant amount of disk space (especially if you store files in the cloud and save locally only what you need at the moment), but their client is just some kind of slow-moving, inconvenient and unwieldy monster. I also failed to make friends with the Google Drive client: both inconvenient and sorting of files there are some oddities - it seems that the software brings everything together, while even the manual sorting regularly gets lost. At the same time, I need a file sharing service all the time, on different devices and it is desirable that they do not have to install any third-party applications. Ideally, it would be to connect such a ball with a regular network drive and use it as needed on different machines, like a virtual flash drive.
Sure, you can buy 2 terabytes in the cloud from Dropbox for $ 9.99 a month, but there is no multiplayer option. At the current dollar rate, renting a virtual server with a 40 GB disk volume, but without restrictions on the number of connections, will cost about the same amount, and if you choose a simpler configuration with one core, it will be even cheaper. A certain part of this disk space will be occupied by the operating system, but at least 20 GB will remain for storing files, which is quite enough for my purposes.
At the same time, file storage on a VPS has a number of other undeniable advantages:
- You can publish websites directly from the public folder;
- you can organize access to it using SFTP;
- you can configure a torrent client to download and upload content;
- in the same container, you can mount an NFS or SMB server to use VPN.
In general, after thinking a little, I decided to set up File Storage on a virtual server from RuVDS - this provider mainly uses Windows Server in its infrastructure, which hints at the relative simplicity of organizing remote storage (ha-ha!). Moreover, Windows and macOS are installed on my devices (except, of course, mobile), so there should certainly not be any serious problems with connecting to a remote server, I thought (ha-ha, twice).
Materiel
Virtual Private Server (VPS) is most often bought for hosting sites, but unlike regular hosting, it allows you to run multiple applications in isolation in the same container. In general, a VPS can be used to organize personal file storage, because:
- VPS virtualization tools provide a sufficient level of security, and therefore such storage can be considered relatively reliable;
- As a rule, the provider independently organizes the backup of its own containers, or provides tools for automating this process, so you don't have to worry about backups;
- a virtual server is cheaper than a dedicated server with a similar level of security and is generally suitable for the chosen purpose.
To implement my idea, I chose a virtual server in the following configuration:
- Windows Server 2019
- 2 cores (Intel Xeon);
- 2 GB RAM;
- 40GB HDD.
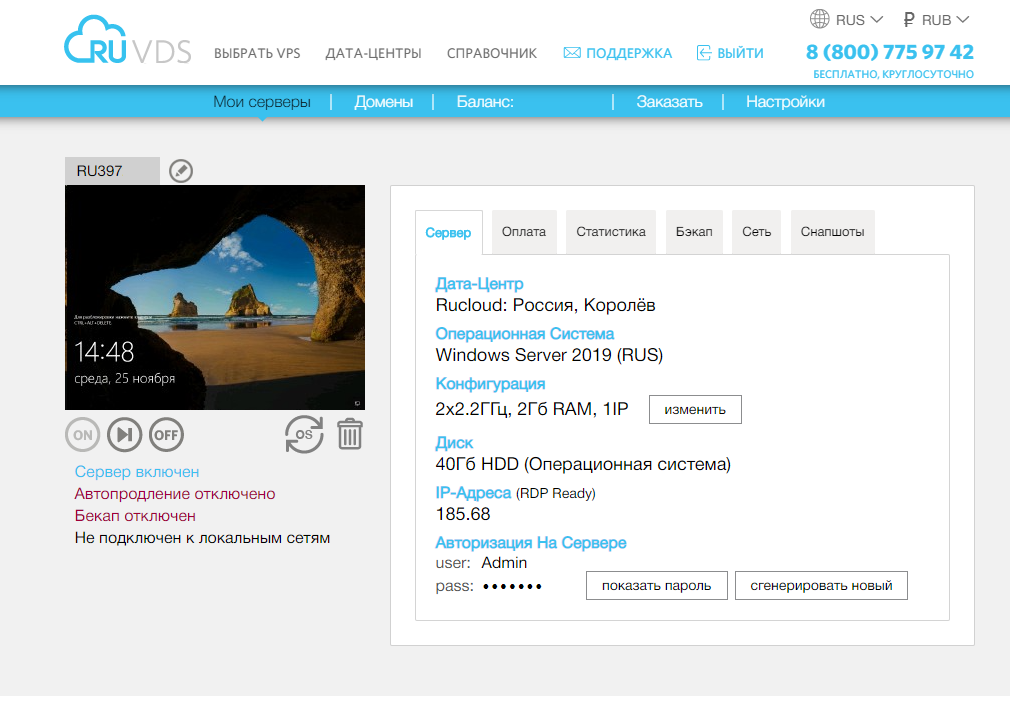
This is enough to use our VPS as a remote file storage. After creation, the server will immediately become available to us via RDP - you can connect to it either using the remote desktop client, or directly in the browser from the RuVDS Control Panel. The data necessary for connection will be additionally sent by e-mail, so that it will not be lost. Well, let's get down to the fun part - setting up the server.
Server Tuning
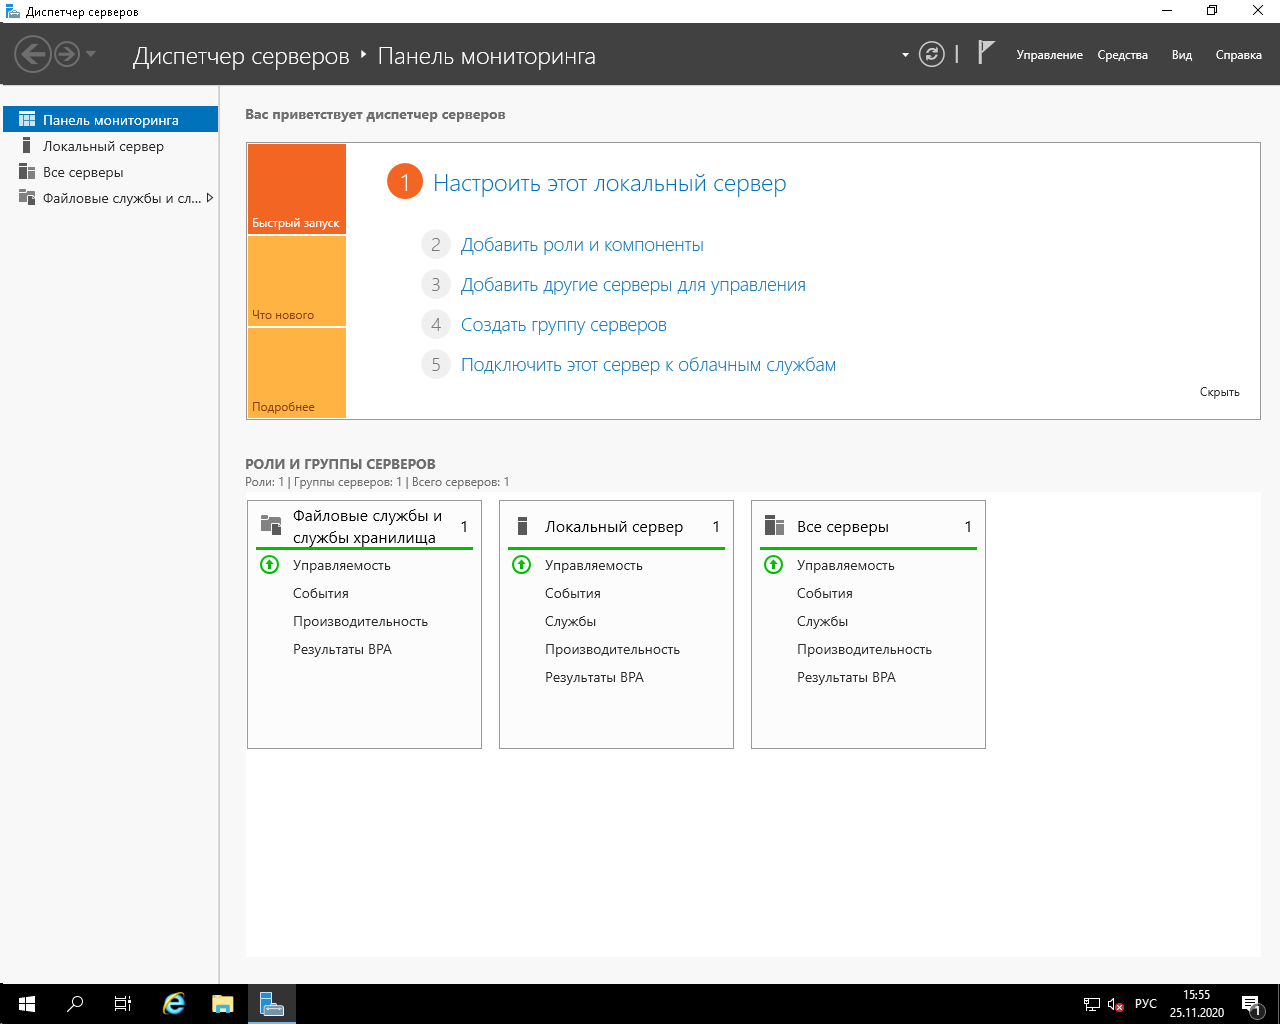
When you first log on to the server with an Administrator account, we will see the Server Manager window on the screen, in which you can configure the machine by clicking on the inscription "Add roles and features".
In the window of the Add Roles and Features Wizard, click "Next", then, having selected the "Install Roles and Features" option, click "Next" again. We select our server from the list (in fact, it will be presented there in a single copy), and by pressing the Next button we proceed to setting up the roles.

We are interested in the section "File and Storage Services". This role is installed on the server by default. Select the File and SCSI Services check box and expand the list below it. Here you should additionally set the following checkboxes:
- File server;
- Working folders;
- File Server Resource Manager (in the window that opens, click "Add Components").
Now, double-click Next and finish configuring the server roles by clicking the Install button.
Creating a new section
If we just create a shared folder on the C: drive , we won't be able to arrange write access for it. Windows reasonably considers this disk to be a bootable volume and does not allow writing to folders located on it over the network. Therefore, we will be able to see such a folder on a remote machine and even open it, but when we try to create or save a file in it, even with administrator rights, we will receive an error message "You need permission to perform this operation."

And if you try to grant additional full access rights for this folder, we will get an error when applying security settings for the boot disk.

I solved this problem by creating a separate logical volume, different from the one on which Windows is installed - there we can entertain ourselves as we please. For this:
- In the Server Manager window, open the Tools menu at the top and then Computer Management.
- In the window that opens, select the Disk Management snap-in in the left pane. You will see the only disk that contains the operating system.
- Right-click the drive and select Shrink Volume. With a total disk volume of 40 GB in the field "Size of compressed space, MB" I wrote a value of 25,000, considering that 15 GB of disk space is enough for Windows to work.
- Click the Compress button and wait for Windows to free up disk space.

After the unallocated free space appears in the Disk Manager, you need to do the following steps:
- Right-click in the unallocated area and select Create Simple Volume from the context menu;
- In the "New Simple Volume Wizard" click "Next", make sure that the size of the volume matches the size of the unallocated area, click "Next" again.
- Enter a drive letter (by default " D: ") and click "Next" again.
- Select NTFS as the file system, cluster size - "default", check the "Quick format" box. The rest of the parameters can be left unchanged. Click Next. Then click on the "Finish" button.

If we now open Explorer, we will see that a new D: drive has appeared in the system .
Create a ball
In Explorer on the remote server, create a new folder on the disk we just prepared and name it, for example, "Share". Let's open the Server Manager window again. In the left pane there is an inscription "File and Storage Services". Click on it with the mouse to go to the settings.

The window of the same name will open, in which the following snap-ins are demonstrated:
- Servers - contains a list of servers (in our case, one) and an event log;
- Volumes - data about logical volumes, shared resources, disk information;
- Disks - data on disk drives registered in the system;
- Storage pools - list of available storage pools, empty by default;
- Shares - information about all shared resources (balls) configured on the server;
- iSCSI - Information about iSCSI virtual disks.
- Working folders - information about synchronized Working folders configured on the server.
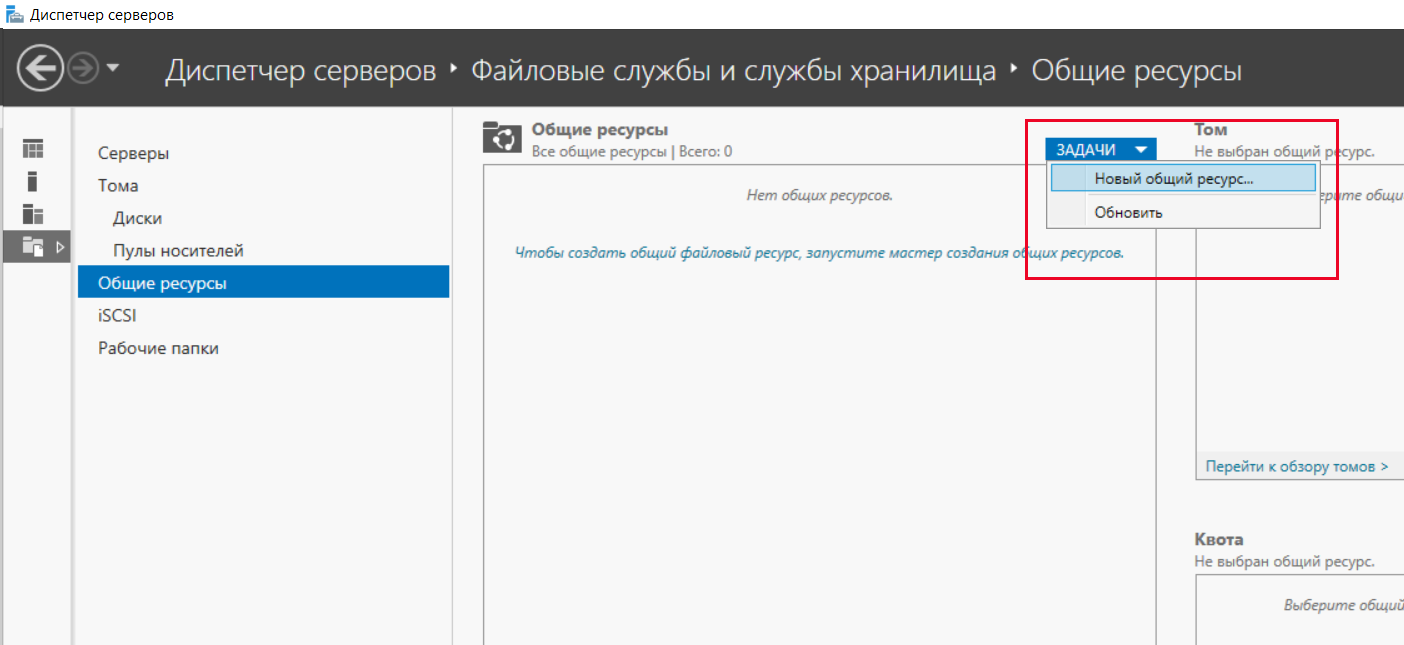
Let's go to the Shared Resources section, and in the Tasks menu located at the top, select the New Shared Resource item.
The "Create Shared Resources Wizard" starts. The first step is to select the appropriate public folder profile from the list. The SMB Share - Fast Profile option is fine because it allows you to share files on Windows computers and doesn't require any additional settings.

Click "Next". In the next window, we will be prompted to select a folder to create a share. Set the switch to the "Enter user path" position, click "Browse" and select the Share folder we created earlier. Click "Next" again.

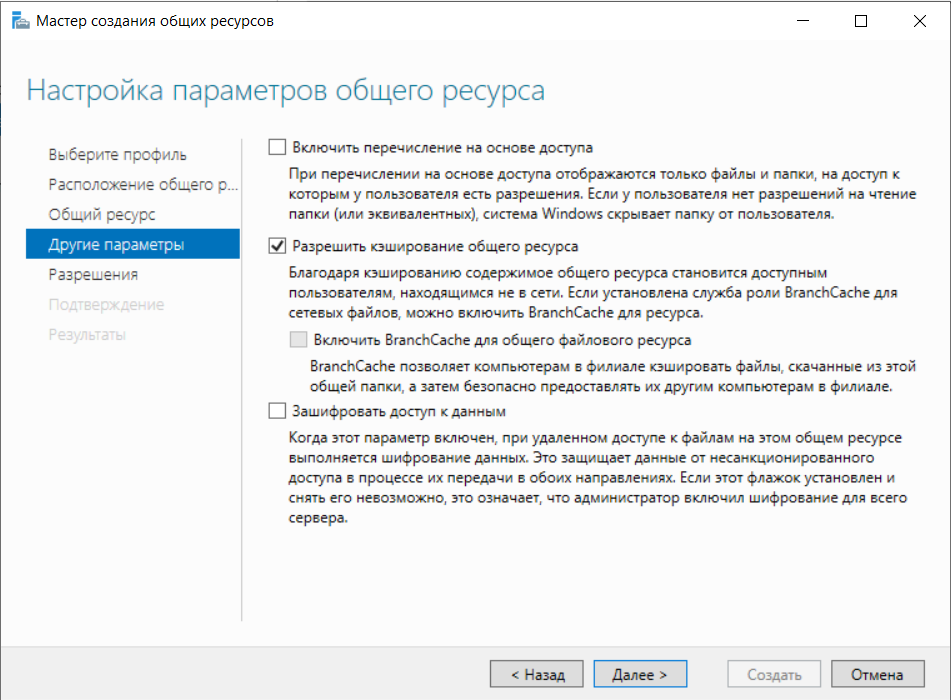
In the next window, enter an arbitrary name for the shared resource - it will be visible "outside" when accessing the folder, click "Next". In the next window we will be asked to specify additional settings for our balls. For security purposes, you can select the "Encrypt access to data" checkbox - in this case, when accessing a folder remotely, information transmitted in both directions will be encrypted. If the "Enable access-based enumeration" checkbox is selected, the user will only see the contents of the shared folder to which he has access according to the privileges of his account. If only you will use the folder, you do not need to select this check box. I recommend turning off share caching to avoid wasting server resources.
By clicking Next, the system will display the standard Windows Server list of permissions to access the folder, according to which only a user with Administrator rights has full read and write rights. Click in the Wizard window on the "Permissions setting" button, then "Add" -> "Select a subject", in the lower field enter "All" (without quotes), click "OK" and check the "Full access" box. Click "Apply", then "Ok".
It remains only to click the Next and Create buttons in the Shared Resources Wizard. The folder we selected appears in the Shares panel.

Trouble shooting
Now, it would seem, we can access this folder directly from Explorer. To do this, type in the address bar \\ ip-address-of-our-server , enter the Administrator's name and password, and see our shared folder with the name that we gave it at the setup stage. Can I use the ball? Khrenushki. Access denied. Windows wouldn't be Windows if it were that simple. The easiest way to get rid of this error is this.
- We reconnect to the server via RDP, right-click on the network connection icon in the tray and select "Open Network and Internet Settings" from the context menu.
- In the window that opens, scroll down the content and click on the inscription "Network and Sharing Center".
- In the panel on the left, click on the inscription "Change advanced sharing settings."
- Set the switch to the "Enable network discovery" position.
- Go to the "All networks" section just below, set the switch to "Enable sharing so that network users can read and write files in shared folders."
- Click "Save Changes".

If network discovery does not want to be turned on in any way, do the following: in the search bar, type "Services" or services.msc without quotes , and forcibly start the following services (if they are not already running):
- DNS Client
- SSDP Discovery
- Function Discovery Resource Publication
- UPnP Device Host
For each of these services, I highly recommend enabling automatic startup. Everything? Can we use the shared folder now? No!
We launch Explorer on the server, find our shared folder in it. Click on it with the right mouse button, select the "Properties" item in the context menu and open the "Security" tab. Select the user "All" by clicking the mouse and click on the "Change" button. Set the checkbox "Full access", click "Apply" and "OK".
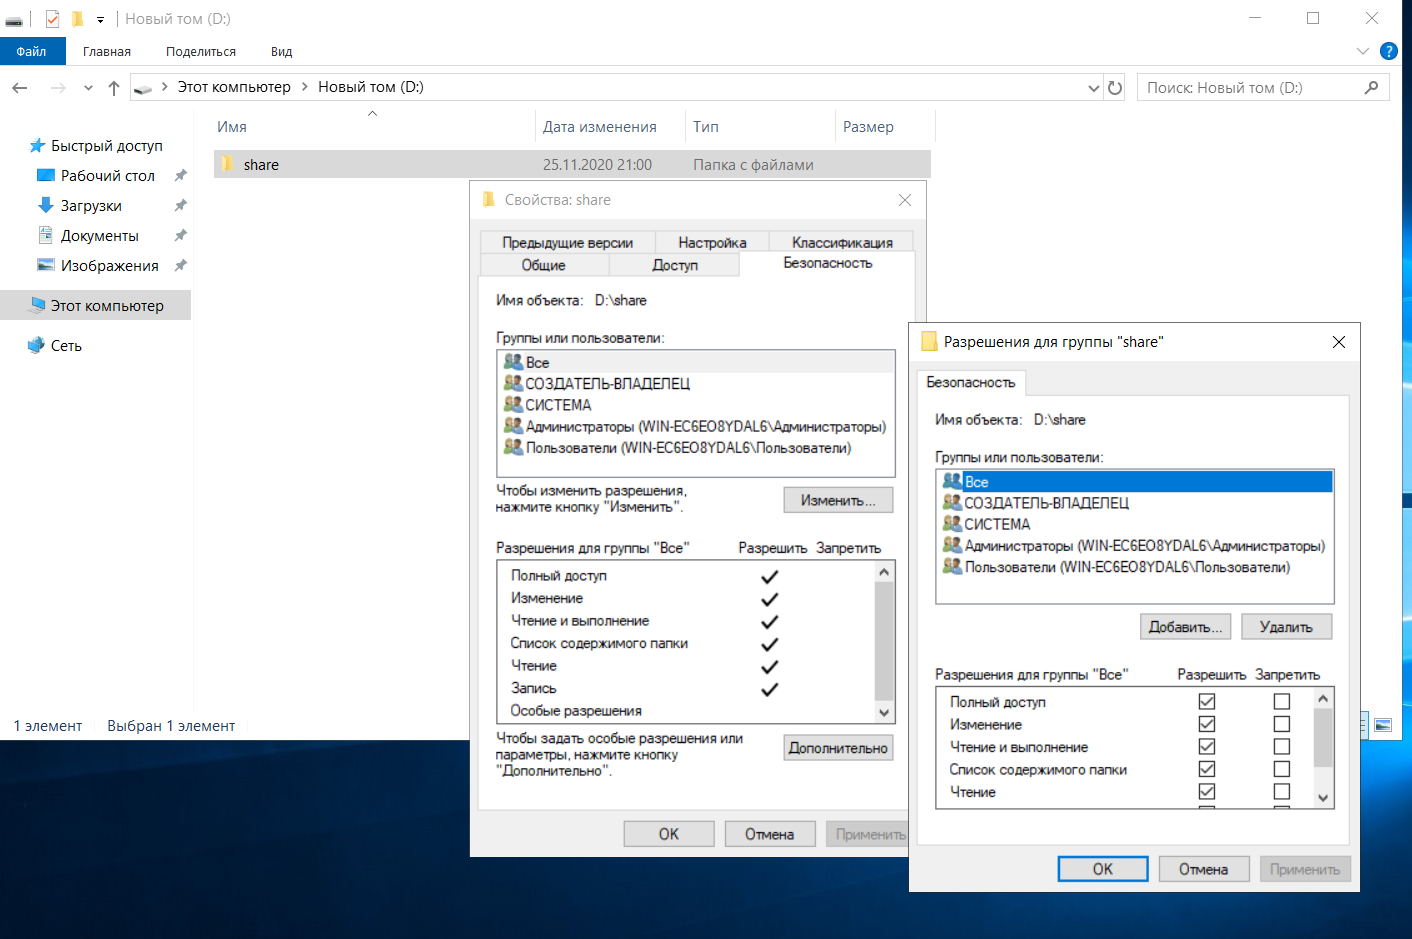
This is not the end of our torment! Open the "Access" tab, click on the "Advanced Settings" button, then - "Permissions". In the window that appears, you need to check the "Full access" box, then click "Apply" and "Ok".

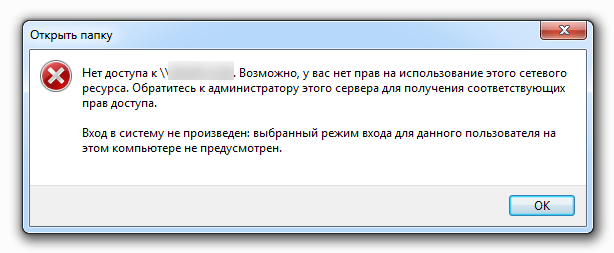
Is the quest over and we can use our ball? Whatever it is! After all, this is the Windows Server 2019 operating system in which security comes first. Therefore, when we try to access the server from Explorer on the local computer, we will most likely see the error "Login failed: the selected login mode for this user is not provided on this computer."
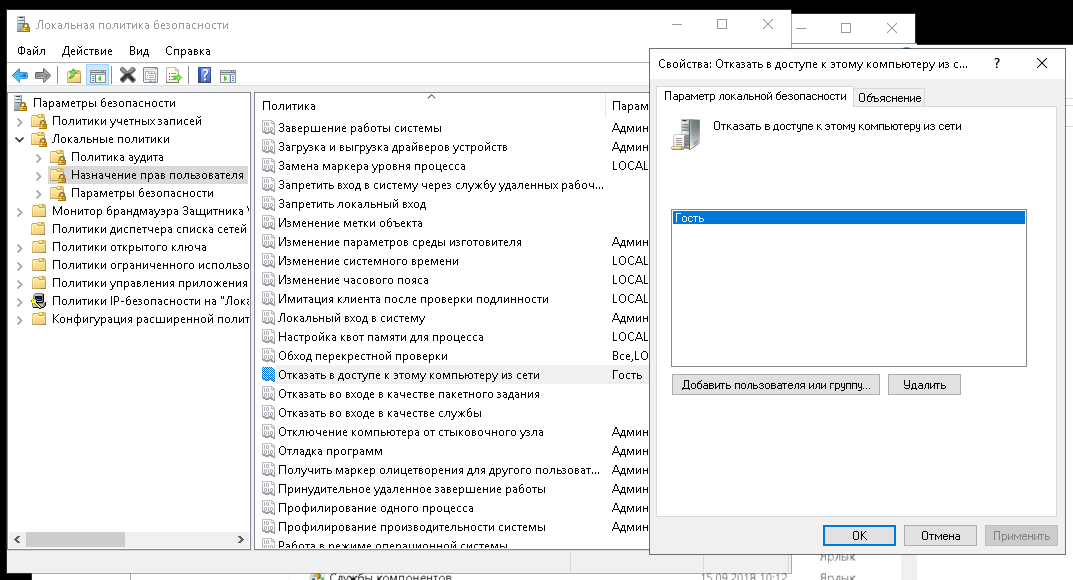
At this stage, some people despair and go to buy a paid Dropbox account for $ 9.99. But we are strong in spirit, love sex, and therefore we continue to experiment. Reopen Remote Desktop on the server, enter the word "Administration" (without quotes) into the search box and press Enter. In the "Administration" window, select "Local Security Policy" -> "Local Policies" -> "User Rights Assignment" -> "Deny access to this computer from the network - Guest". We double-click on this line with the mouse and remove the "Guest" from the list.
Everything! Hallelujah! Now, after all these dances with a tambourine, the shared access to the folder will finally be open, and we will be able to enjoy all the wonderful features of Windows Server 2019. At the very least, we will be able to save files in the ball. For greater convenience, you can connect a remote folder as a network drive. For this:
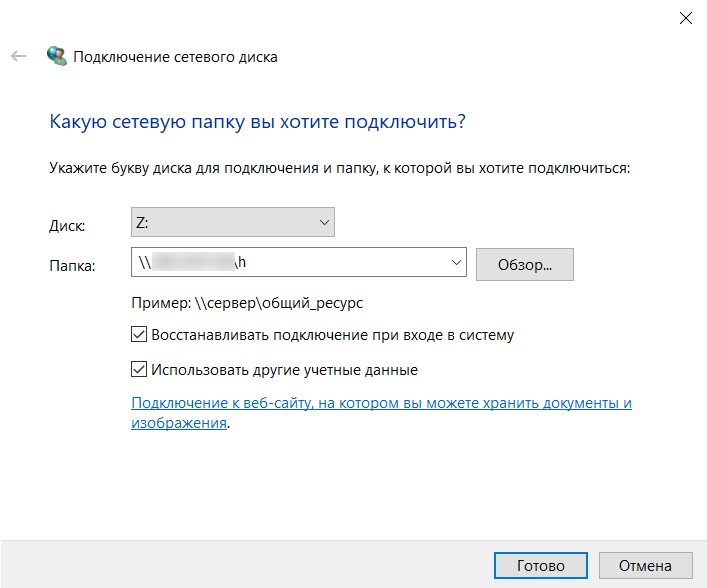
- On your work machine, open Explorer, right-click on the This PC icon and select Map Network Drive from the context menu.
- In the window that opens, select the letter of the network drive, in the "Folder" field, enter the IP address of the server and the network name of the shared folder, check the boxes "Reconnect at logon" and "use different credentials".
- Click on the "Finish" button.
The first time you connect to the disk, you will need to enter the server Administrator login and password. In the future, the accounting parameters will be pulled up automatically.
If you get the error "The shared resource is available on the network, but does not respond to connection attempts" when you try to connect, it is likely that the firewall on the server is to blame. It is quite easy to check this: you need to disable the firewall and try to go to the shared folder. If the attempt is successful, you need to configure connection rules in the firewall.
Quotas and Work Folders
If desired, you can configure quotas in the Server Manager, that is, prohibit users from creating files in the shared folder larger than the specified size. There is also an entertaining tool called "Working Folders". In fact, this is the same network ball, only with automatic synchronization, as in Dropbox or Yandex.Disk. Files in the "Working folder" are stored on the server and remain there even after the files are deleted on the user's device. You can read more about them here , but I will not describe the technology for setting up Work Folders, since it is generally similar to setting up a regular network share, which we examined in detail in this article.