OpenPNP quick start
Introduction
OpenPnP open source software written in java is used to automate the layout of electronic components on boards.
This guide will help you install OpenPnP, see the main interface components, and run a sample job in the OpenPnP simulator. And this, in turn, will allow you to quickly understand how OpenPnP works, and will give you the first knowledge to connect OpenPnP to the component installer.

Installation
Download
Visit openpnp.org/downloads to find out where to download the latest version of OpenPnP.
Install and run
If you are using one of the binary installers from the website, just run the installer and follow the instructions. Don't forget to install Java first. After installation, you can launch OpenPnP from the list of applications of the operating system, that is, from the Start menu, from the Applications folder, etc. l.
Quick tour
User interface
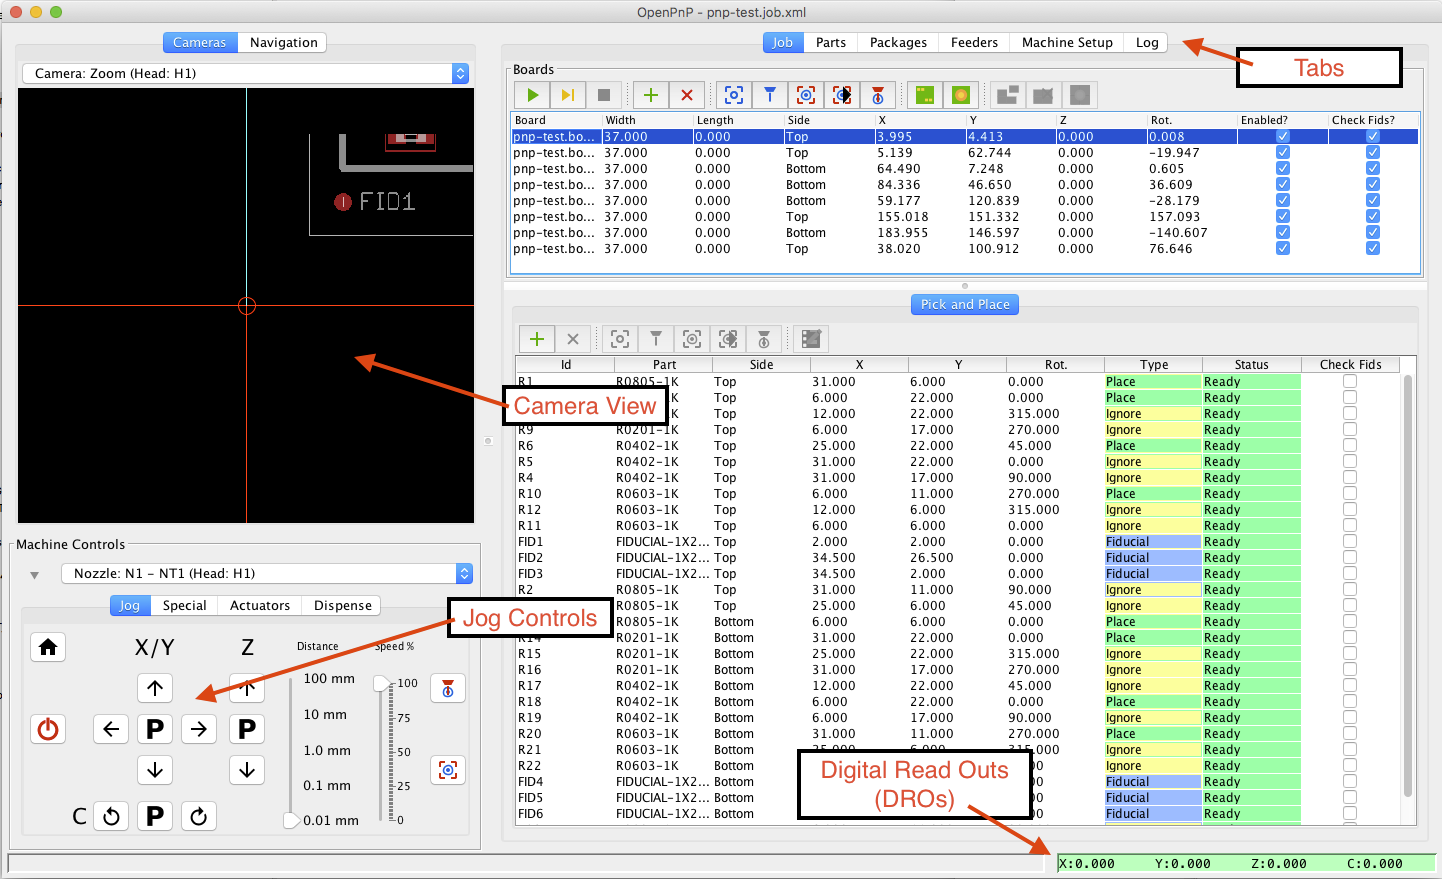
This image shows the main components of the user interface. We will refer to the names of these components below, so take a moment to get to know them.
Movement
OpenPnP is configured out of the box so you can use it right away; you don't even need to plug in your component installer (it works with a virtual machine)!
When you start OpenPnP for the first time, you will see a simulated selection and placement table in the camera's field of view. Try the following steps to understand how OpenPnP works:
- Press the green power button to start the virtual machine.
- Use the control buttons (arrows) to move the camera. You can change the distance the camera moves by changing the value of the Distance slider.
- Review each of the tabs at the top of the window to see how jobs, parts, packages, feeders, and component installer settings are configured. It's better not to change anything for now.
About demo
If you want to see OpenPnP in action, skip this section and come back to it later.
The demo configuration you see when you first start OpenPnP includes simulated cameras, feeders, nozzles, and everything else that makes up the OpenPnP "machine". Specifically, what you see in the camera's field of view is a small window visible in a much larger pick and place virtual machine. The complete "machine" looks like this: The

machine contains 8 boards with different orientations, 9 tape feeders labeled "Upper lane 1-4" and "Lower lane 1-4", and a red rectangle showing the location of the simulated lower view camera.
Your first job
Now that we've gotten a bit more familiar with the user interface, it's time to try the selection and placement challenge. Follow the instructions below:
- Select the Job tab at the top of the main OpenPnP window.
- From the File menu, select Open Job.
- Using the file dialog on your computer, find the samples directory, which is in. Windows is located in the Documents \ OpenPnP directory. On Mac and Unix, it is located in the same directory where you installed OpenPnP.
- In the samples directory, find the pnp-test directory and open the pnp-test.job.xml file inside it.
- You will see that the job is loaded and the boards and placements are now listed. You can view boards and placements to see what your previous work will do.
- Press the green power button to turn on the machine.
- Next, the green play button to start working, the camera will start moving.
OpenPnP will now simulate full selection and placement work. He will use computer vision to align boards using datum points, find parts in virtual feeders, and then place parts on virtual boards. You can follow what is happening by watching the camera.
The work is completed, we congratulate you! You have completed your first mission in OpenPnP!
What's next
It's time to start reading the user manual to better understand the more advanced features of OpenPnP and how to start integrating the software with your machine.
If you don't already have your own installer, visit openpnp.org/hardware for options to build yourself or buy a machine.
A developer guide is available for developers .
For help or just chat, join the discussion group or talk to us on Freenode IRC at #openpnp . If you don't have an IRC client, you can use this web client .
PS
This translation was made for the purpose of independent study of OpenPnP. I will try to fully convey the structure of the wiki from the program site
github.com/openpnp/openpnp/wiki/Quick-Start .