Greetings to all fans and experts of the Python programming language!
Today we will continue to deal with the topic of animations in a cross-platform framework for multitouch support - Kivy in conjunction with the Google Material Design component library - KivyMD . In the last article, we already analyzed an example of a test application in Python / Kivy / KivyMD, in this one we will go over the topic of animations in more detail. At the end of the article, I will provide a link to the project repository, where you can download and feel for yourself, a demo Kivy / KivyMD application. Like the previous one, this article will contain not a small number of GIF animations and videos, so pour some coffee and let's go!
Kivy runs on Linux, Windows, OS X, Android, iOS, and Raspberry Pi. You can run the same code on all supported platforms without making any additional changes to the codebase. Kivy supports a wide variety of input devices, including WM_Touch, WM_Pen, Mac OS X Trackpad and Magic Mouse, Mtdev, Linux Kernel HID, TUIO, and like Flutter, it does not use native controls. All of its widgets are customizable. This means that Kivy apps will look the same across all platforms. But due to the fact that Kivy widgets can be customized as you like, you can create your own widgets. For example, this is how the KivyMD library appeared . Before we continue, let's take a look at a small overview of Kivy's features:
Kivy Application Demos
These videos clearly demonstrate the interaction of the Kivy application with the user using gestures and animations. Let's create a simple application with animation of two labels:
from kivy.animation import Animation
from kivy.lang import Builder
from kivymd.app import MDApp
KV = """
<CommonLabel@MDLabel>
opacity: 0
adaptive_height: True
halign: "center"
y: -self.height
MDScreen:
on_touch_down: app.start_animation()
CommonLabel:
id: lbl_1
font_size: "32sp"
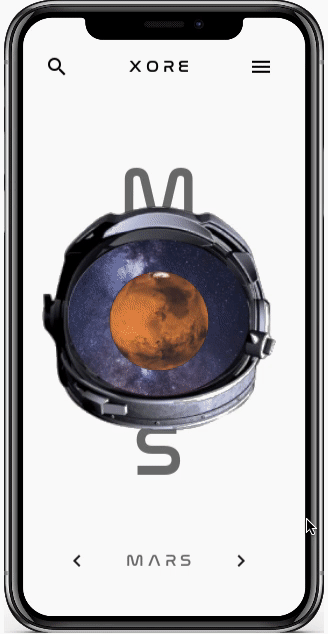
text: "M A R S"
CommonLabel:
id: lbl_2
font_size: "12sp"
text: "Lorem ipsum dolor sit amet, consectetur adipiscing elit"
"""
class TestAnimation(MDApp):
def build(self):
return Builder.load_string(KV)
def start_animation(self):
lbl_1 = self.root.ids.lbl_1
lbl_2 = self.root.ids.lbl_2
Animation(
opacity=1, y=lbl_1.height * 2, d=0.9, t="in_out_back"
).start(lbl_1)
Animation(
opacity=1, y=lbl_2.height + ids.lbl_1.height, d=1, t="in_out_back"
).start(lbl_2)
TestAnimation().run()
This is a ready-made application. We will only edit it slightly. The CommonLabel rule on the KV line is similar to creating a class in Python code. Compare:

The code in Kivy Language is always shorter and more readable. Therefore, in Python code, we will only have logic. We created two labels with common properties described in the CommonLabel rule : opacity , label texture size ( adaptive_height ), horizontal alignment ( halign ), Y- axis position ( y ) and gave these labels id-shniki ( lbl_1 , lbl_2 ) to be able to access and manipulate the properties of label objects from Python code. Next, we attached the start_animation method call to the on_touch_down event (triggered when touching the screen anywhere)in which we will animate our two labels.
Animation
Kivy uses the Animation class to animate objects . Using it is very simple: when you initialize the Animation class, you must pass property names with target values that will be reached at the end of the animation as arguments. For instance:
    def start_animation(self):
        #     KV
        lbl_1 = self.root.ids.lbl_1
        lbl_2 = self.root.ids.lbl_2
        #
        Animation(
            opacity=1,  #     1
            y=lbl_1.height * 2,  #      Y
            d=0.9,  #
            t="in_out_back"  #
        ).start(lbl_1)  #   start  ,
        #
        Animation(
            opacity=1, y=lbl_2.height + lbl_1.height, d=1, t="in_out_back"
        ).start(lbl_2)
In the animation below, I've demonstrated the result of the simplest animation we've created, with different types of animation:
- in_out_back
- out_elastic
- linear
 |
 |
 |
Let's complicate the task a little and try to animate the rotation of the labels on the plane. For this we will use matrix manipulations ( PushMatrix, PopMatrix, Rotate, Translate, Scale ). Add a canvas statement to the shared label :
<CommonLabel@MDLabel>
    angle: 180  #
    [...]

    canvas.before:
        PushMatrix
        Rotate:
            angle: self.angle
            origin: self.center
    canvas.after:
        PopMatrix
And in Python code, we will pass a new angle property for animation to the Animation class :
    def start_animation(self):
        lbl_1 = self.root.ids.lbl_1
        lbl_2 = self.root.ids.lbl_2

        Animation(angle=0, [...]).start(lbl_1)
        Animation(angle=0, [...]).start(lbl_2)
Result:

Let's add an animation of the scale of the labels:
<CommonLabel@MDLabel>
    scale: 5  #
    [...]

    canvas.before:
        PushMatrix
        [...]
        Scale:
            #
            x: self.scale
            y: self.scale
            z: self.scale
            origin: self.center
    canvas.after:
        PopMatrix
In Python code, we will pass a new scale property for animation to the Animation class :
    def start_animation(self):
        lbl_1 = self.root.ids.lbl_1
        lbl_2 = self.root.ids.lbl_2

        Animation(scale=1, [...]).start(lbl_1)
        Animation(scale=1, [...]).start(lbl_2)
Result:

The Animation class has a number of events to track the animation process: on_start, on_progress, on_complete . Consider the latter. on_complete is called when the animation process finishes. Let's bind this event to the complete_animation method that we will now create:
[...]


class TestAnimation(MDApp):
    [...]

    def complete_animation(self, animation, animated_instance):
        """
        :type animation: <kivy.animation.Animation object>
        :type animated_instance: <WeakProxy to <kivy.factory.CommonLabel object>>
        """

        #      .
        Animation(scale=1.4, d=1, t="in_out_back").start(animated_instance)
        Animation(color=(1, 0, 1, 1), d=1).start(animated_instance)
We bind the event:
    def start_animation(self):
        [...]

        animation = Animation(
            angle=0, scale=1, opacity=1, y=lbl_1.height * 2, d=0.9, t="in_out_back"
        )
        animation.bind(on_complete=self.complete_animation)
        animation.start(lbl_1)

        [....]
Result:
That's all for now. Asked:

Below I attach a preview of the Kivy / KivyMD project and a link to the repository where you can download the APK and touch:
→ The
APK repository can be found in the repository directory - StarTest / bin