In this article I will share my experience of implementing a system for testing in our cloud. I will describe the installation of NSX ALB in VMware vCenter and the main configuration steps for those who want to independently connect their local site for global balancing.
- deploying and configuring the controller ;
- preliminary network configuration ;
- creating a virtual service (VS) and connecting servers for balancing;
- setting up a global server balancing service .

Installing the controller
This step is required on the local site to connect it to the global balancing.
- The balancing services will live in VMware vCenter. We create three port groups there, which we will use as:
- management network for management and communication between the controller and the SE service virtual machines (internal addressing),
- network for SE, for internal needs NSX ALB (internal addressing),
- a network of external addresses for connecting clients to balanced services from the outside (external addressing).
- Download the Avi OVA image from the Avi website and deploy the controller as a virtual machine (VM).
- We start the VM and open the controller web interface using the configured IP address.
- We follow the steps of the wizard for initial configuration, as described in the vendor's documentation .
The system interface is now available at the same IP address. In the upper left corner, the NSX ALB main menu has appeared, consisting of 5 sections:

Presetting
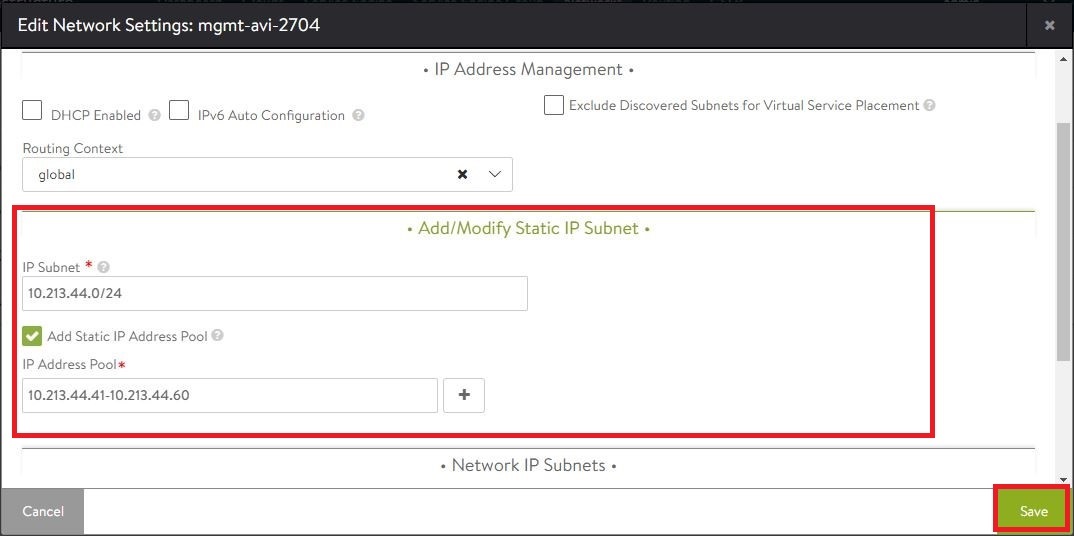
- Let's configure a static range of addresses for the management network. When the controller deploys SE service machines, they will receive addresses from this range.
In the main menu, go to the Clouds section. Let's select our vCenter and make changes to the settings:

- On the Network tab, in the IP Address Management for Management Network section, fill in the IP Subnet, Add Static IP Address Pool and Default Gateway fields:

- , SE VS. , SE , VS.
Infrastructure –> Networks, :

- vCenter. Network IP Subnets Discovered, .
, Add Subnet:

- Add/Modify Static IP Subnet IP Subnet, Add Static IP Address Pool IP Address Pool:
If more than one cloud is configured in the system, the Select Cloud drop-down list appears at the top in the Networks section. In this case, before searching for a network, select the desired cloud from the drop-down list:

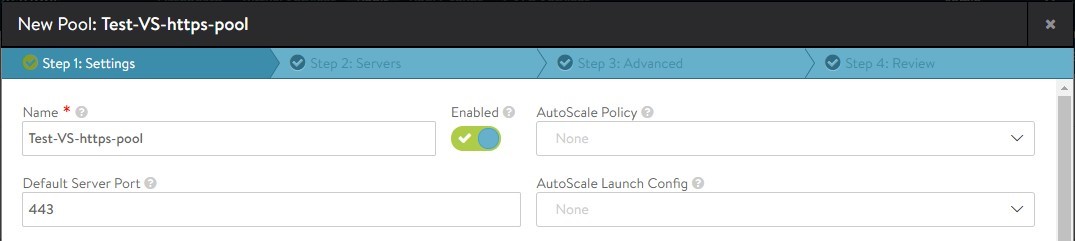
Creating a virtual services (VS)
- Let's go to the Applications -> Virtual Services section and click on CREATE VIRTUAL SERVICE:

Select the VS creation mode - Basic or Advanced.
- In Basic mode, servers for the balanced pool are added on the VS creation form itself, and the pool is automatically created for them.
- In Advanced, the pool must already be created in advance, or it must be created later manually in the Pools section and then added in the VS properties.
We'll look at creating VS in Basic mode. - In Basic mode, servers for the balanced pool are added on the VS creation form itself, and the pool is automatically created for them.
- FQDN or IPv4 Address. VIP – IP- VS, . , , , .

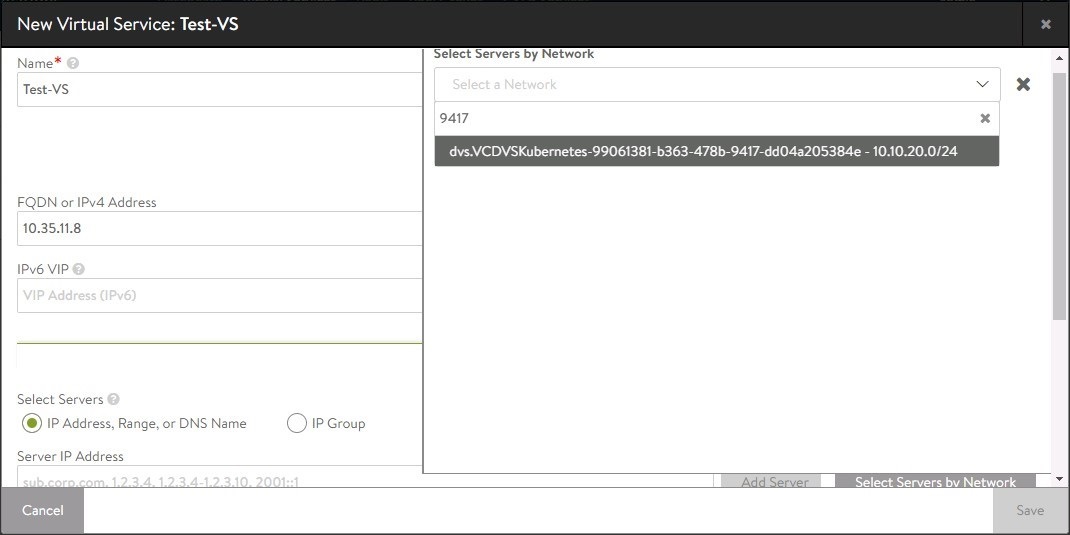
- Add Servers. , Server IP Address Add Server. Select Servers by Network:

. .
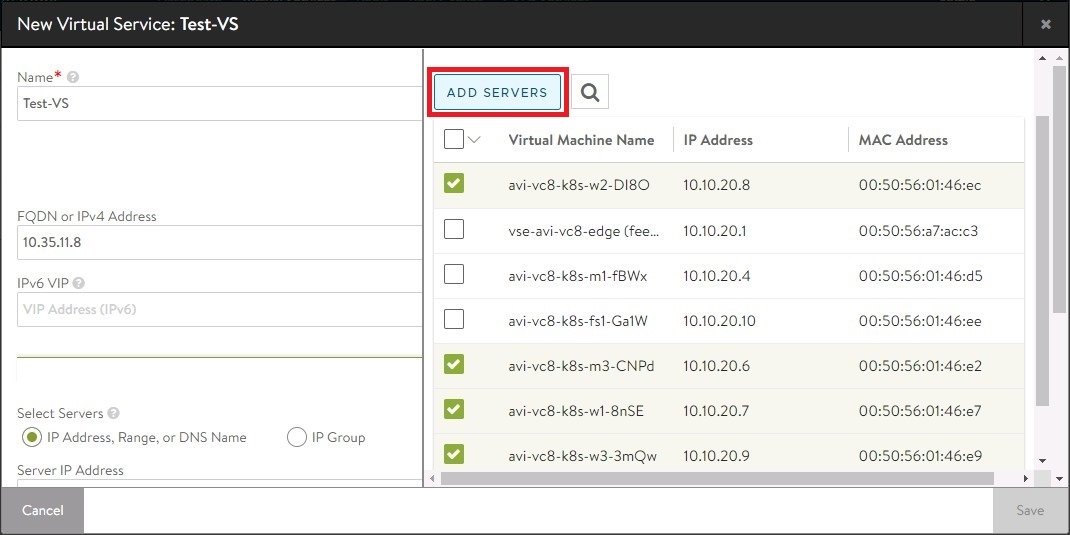
- . , IP- mac-. , . ADD SERVERS:
Servers. VS Save . [_VS]-pool, . - , SE VIP VS. VS, Advanced Virtual IP Placement Settings Add Placement Network:

, IPv4 Subnet :

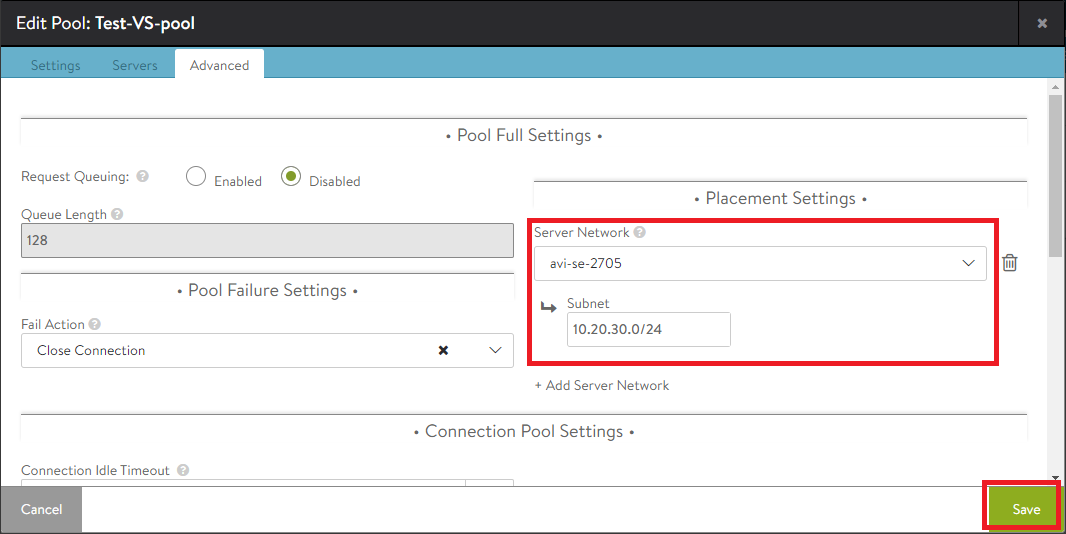
- , SE - VS. Test-VS-pool. Applications –> Pools, , Advanced Placement Settings Add Server Network:

, Subnet :
If there is more than one cluster in vCenter, you can specify the specific cluster and storage type (shared only) that will host SE. To do this, in the Infrastructure -> Service Engine Group section, open the used SE group for editing (for example, Default-Group). In it, on the Advanced tab in the Host & Data Store Scope section, switch to Cluster and select the desired one, and also select Shared in the datastore section:

If necessary, you can specify only specific hosts: click the Host button and select them from the list. The same with datastores: you can include specific ones by the Include button and select them from the list.
Bonus about NSX ALB capabilities: solving the problem due to the built-in packet analyzer
, NSX ALB HTTP- . , http https. VS , . . Http- https- . VS .
, Policies.
, Policies.
- , 443 :
- VS, Settings 443 Add Port :

- Policies HTTP Request . :

- http — Rule Name. Matching Rules Protocol Type HTTP. Action Content Switch http. :

- https. :

Configuring GSLB
To use the global balancing feature, the NSX ALB system must be deployed at 2 different sites. So, on the local site, we deployed a controller, created and configured VS. Now let's go through the steps to deploy DNS as VS at each site - in our example, on-premises and cloud-based.
DNS service configuration
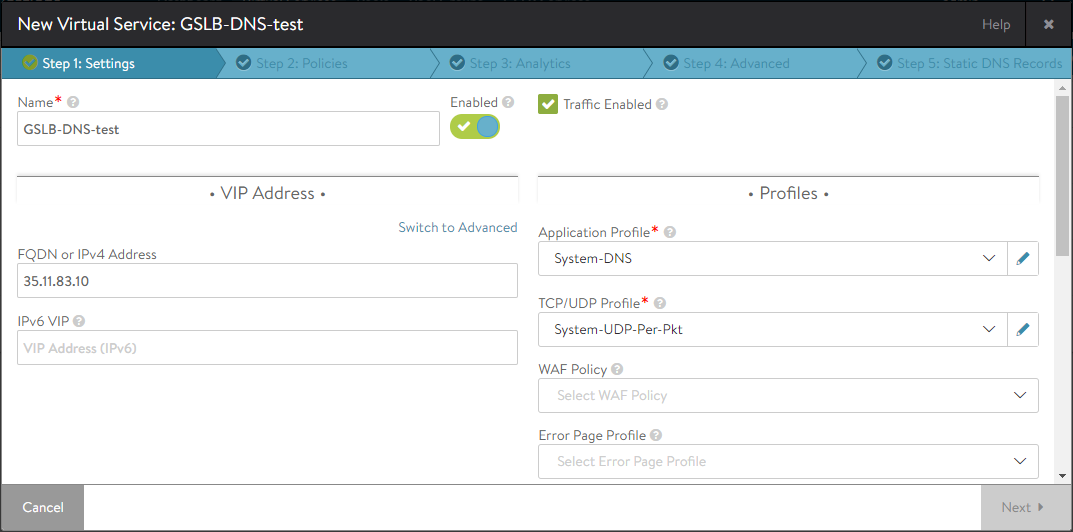
- In the Applications -> Virtual Services section, create a new VS by the CREATE VIRTUAL SERVICE button and select Advanced Setup.
Enter the name of the DNS service and fill in the DNS address in the VIP Address field. In the Application Profile drop-down list, select System-DNS, in the TCP / UDP Profile, select System-UDP-Per-Pkt:
- Service Port Switch to Advanced:

«Services» 53 TO 53. Add Port, 53 TO 53, Override TCP/UDP System-TCP-Proxy. Pool :

2 3 Next.
- DNS SE Group , DNS SE.
4 Other Settings Create SE Group:
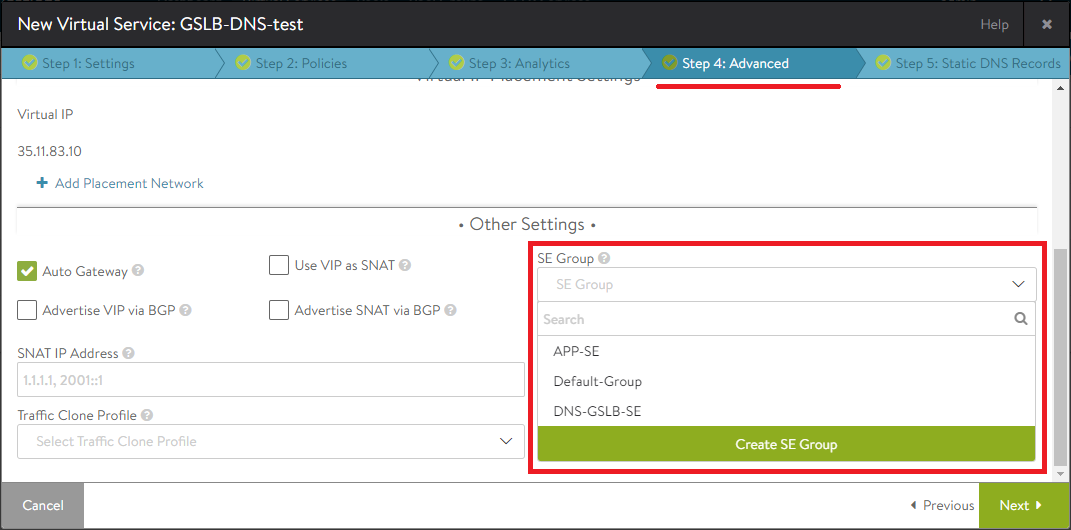
- Service Engine Group Name. Virtual Services per Service Engine , 1 . :

- GSLB NSX ALB. avi.dtln.cloud.
DNS- NSX ALB DNS. DNS .
. NS-, DNS- NSX ALB.
5 Static DNS Records Create DNS Record. FQDN , NS Record DNS:
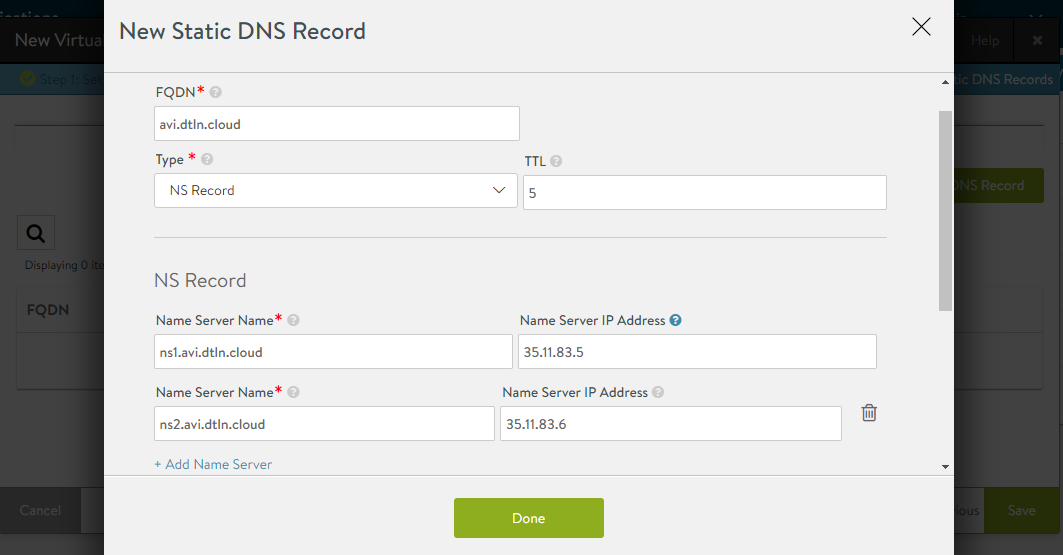
Done Save.
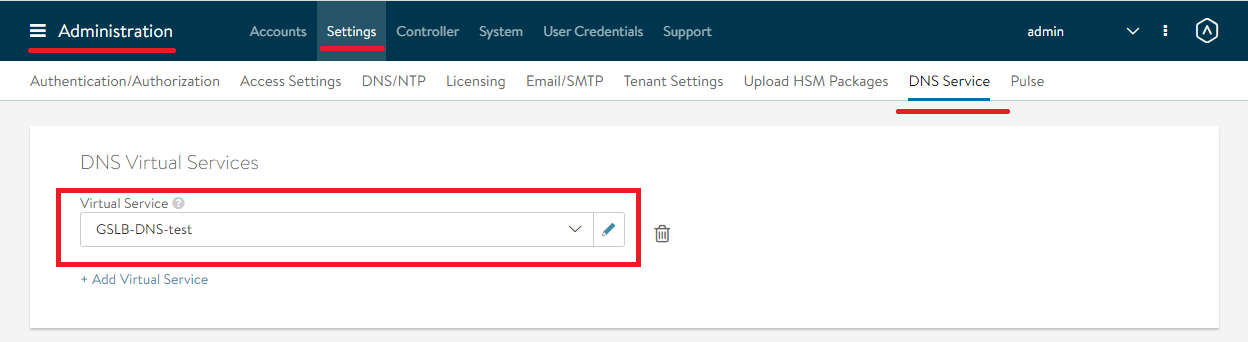
- DNS Administration –> Settings –> DNS Service:
Setting
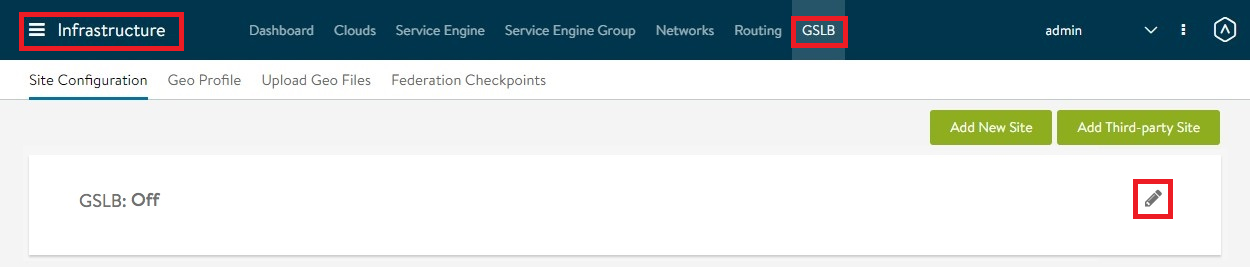
Up Sites To set up the global service itself, you first need to create GSLB sites. Let me remind you that sites in Avi terminology are all NSX ALB implementations with an independent controller (or their cluster) that we use within the GSLB.
- In the Infrastructure -> GSLB section, enable the global service function:
- A new GSLB site creation window will open. We enter the name of the site, the name and password of the administrator on this controller or cluster. We specify the address of a single controller or the addresses of all controllers for the cluster. If this site is the leading one, check the Active Member checkbox, save:

- On the main page of the Infrastructure -> GSLB section, click Add New Site:

The same window will open, in which we similarly add the second site and save.
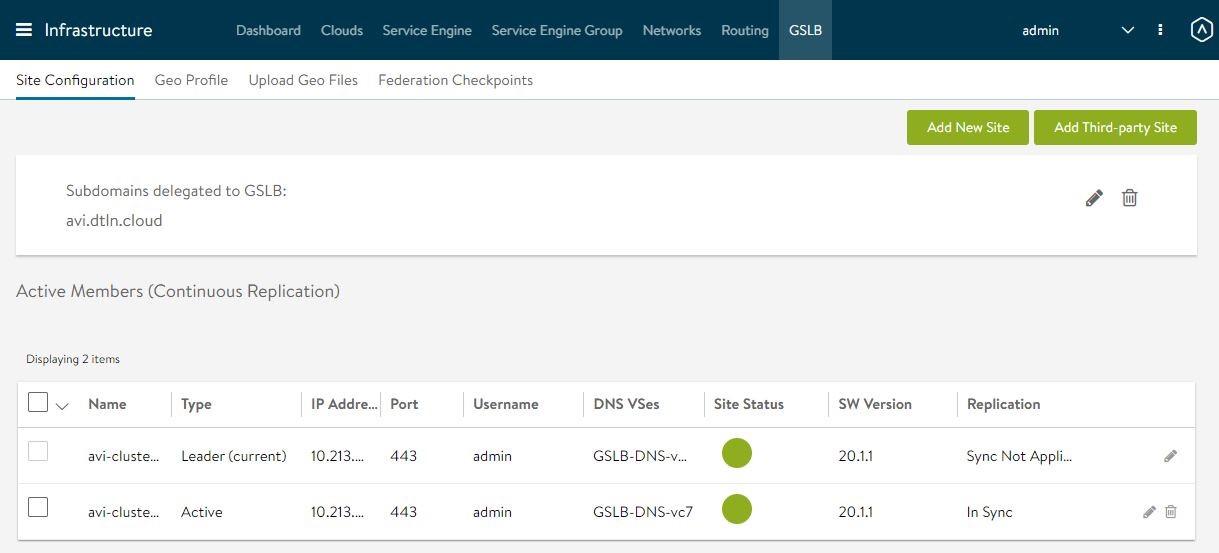
- Subdomains delegated to GSLB GSLB Subdomain DNS- :

- GSLB IP VS , FQDN . VIP . VS .
VIP – « SE».
Subdomains delegated to GSLB, Advanced Settings. Client Group IP Address Type Private, Add Group IP Address :

VIP GSLB.
- Open the settings of each configured site and click Save and Set DNS Virtual Services.
In the DNS Virtual Service field, select the created DNS service, and in the Subdomains field, the specified DNS zone. Let's save everything:

As a result, the section with websites will look like this:
Creating a global service
The Applications section now has a GSLB Services section - it appeared after GSLB was enabled in the Infrastructure section.
- In this section, click CREATE, in the drop-down list, select Basic Setup:

A note about tenantsVS admin, Global VS . VS Global VS, VS. , .
- , Application Name DNS- Subdomain:
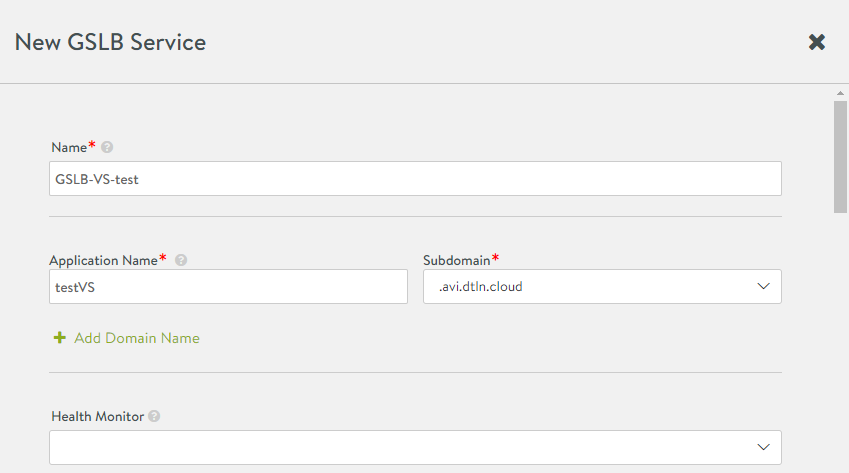
Application Name+Subdomain – FQDN , . testvs.avi.dtln.cloud.
- Pool Member . VS Basic Setup, . . – , VS GSLB-.
Site Cluster Controller . Virtual Service VS:

Public IP Address , VIP (. .5 GSLB).
- Add GSLB Pool Member. VS . .
In this setting GSLB completed. Now balancing is not limited to the framework of one site: you can add the required amount and balance between all at the same time. If self-tuning seems time-consuming, we are always ready to help.