Greetings to all fans and experts of the Python programming language!
In this article, I'll show you how to work with animations in the cross-platform Kivy framework in conjunction with the Google Material Design component library - KivyMD . We will look at the structure of a Kivy project, using material components to create a test mobile application with some animations. The article will not be small with a lot of GIF animations, so pour some coffee and let's go!
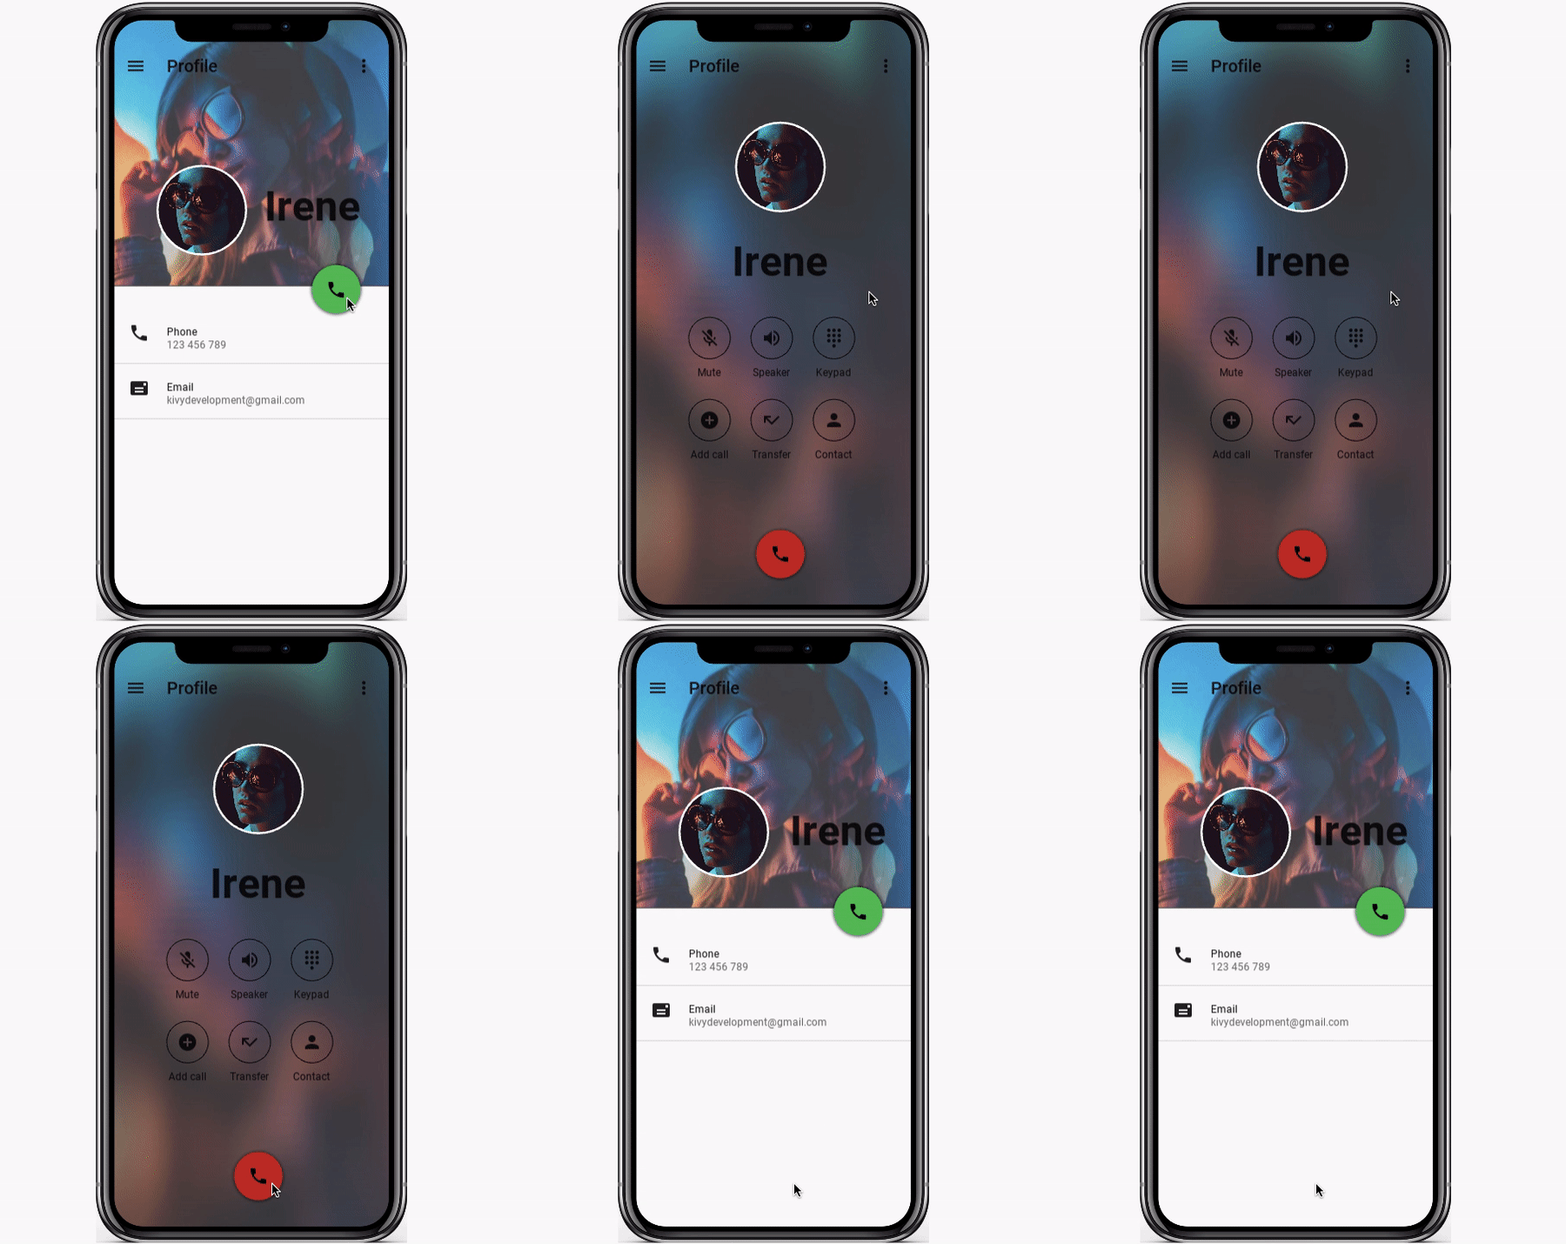
To pique the interest of readers, I want to immediately show the result of what we get in the end:
So, for work we need the Kivy framework:
pip install kivy
And the KivyMD library, which provides Material Design widgets for the Kivy framework:
pip install https://github.com/kivymd/KivyMD/archive/master.zip
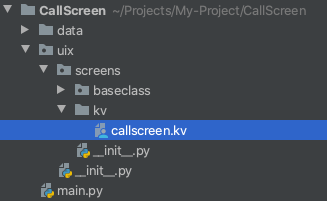
Everything is ready to go! Let's open PyCharm and create a new CallScreen project with the following directory structure:

The structure can be any. Neither the Kivy framework nor the KivyMD library require any required directories other than the standard requirement - there must be a file named main.py in the root of the project . This is the entry point to the application:

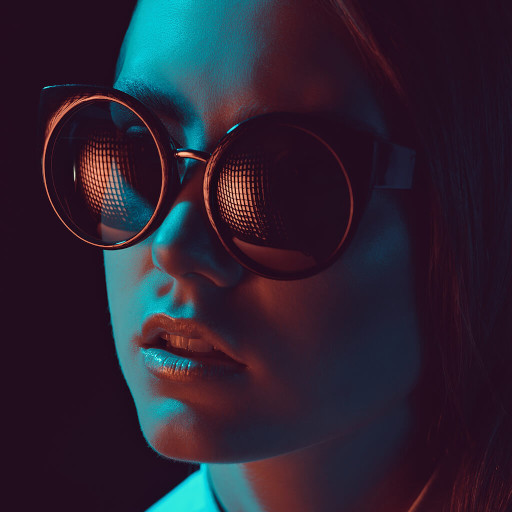
In the data / images directory, I have placed the graphic resources that the application requires:
 |
 |
In the uix / screens / baseclass directory , we will have a callscreen.py file with the Python class of the same name, in which we will implement the logic of the application screen operation:

And in the uix / screens / kv directory, we will create a callscreen.kv file (leave it blank for now) - with a description of the UI in a special DSL language Kivy Language :
When the project is created, we can open the callscreen.py file and implement the screen class of our test application.
callscreen.py:
import os

from kivy.lang import Builder

from kivymd.uix.screen import MDScreen

#    KV
with open(os.path.join(os.getcwd(), "uix", "screens", "kv", "callscreen.kv"), encoding="utf-8") as KV:
    Builder.load_string(KV.read())


class CallScreen(MDScreen):
    pass
The CallScreen class is inherited from the MDScreen widget of the KivyMD library (almost all components of this library have the MD - Material Design prefix ). MDScreen is an analogue of the Screen widget of the Kivy framework from the kivy.uix.screenmanager module , but with additional properties. Also MDScreen allows you to place widgets and controllers one above the other in itself as follows:
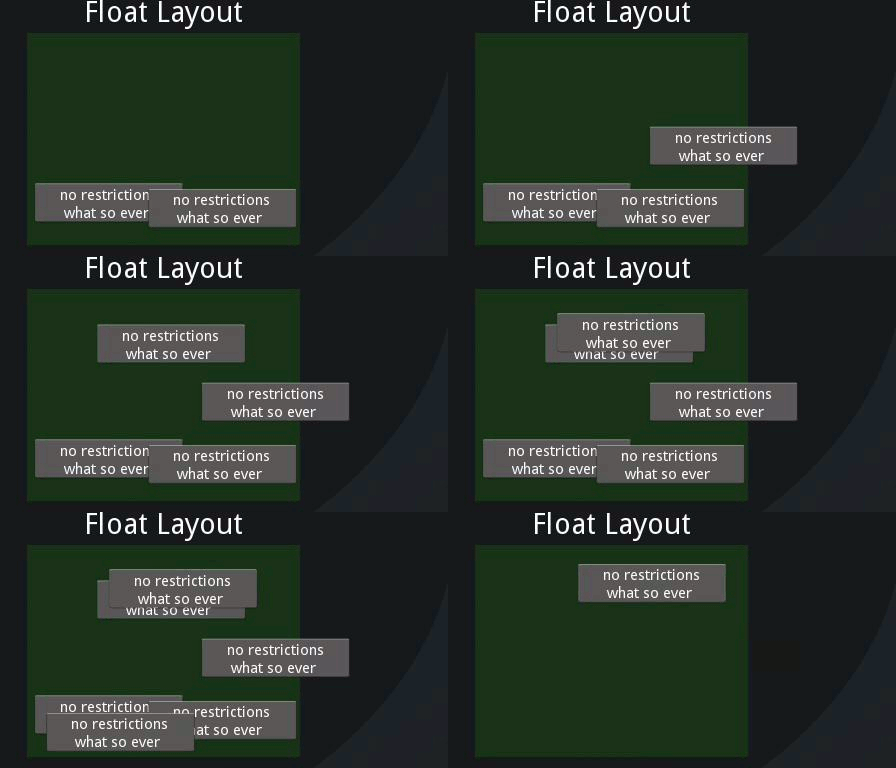
This is the positioning we will use when placing floating elements on the screen.
At the entry point to the application - the main.py file , create the TestCallScreen class , inherited from the MDApp class with a mandatory build method , which must return a widget or layout to display it on the screen. In our case, this will be the CallScreen screen class created earlier .
main.py:
from kivymd.app import MDApp

from uix.screens.baseclass.callscreen import CallScreen


class TestCallScreen(MDApp):
    def build(self):
        return CallScreen()


TestCallScreen().run()
This is a ready-made application that displays a blank screen. If we run the main.py file , we will see:
Now let's start marking up the UI screen in the callscreen.kv file . To do this, you need to create a rule of the same name with the base class, in which we will describe widgets and their properties. For example, if we have a Python class called CallScreen , then the rule in the KV file must have exactly the same name. Although you can create all interface elements right in the code, this is, to put it mildly, not correct. Compare:
MyRootWidget:

    BoxLayout:

        Button:

        Button:
And a Python analog:
root = MyRootWidget()
box = BoxLayout()
box.add_widget(Button())
box.add_widget(Button())
root.add_widget(box)
It is quite obvious that the widget tree is much more readable in Kv Language than in Python code. In addition, when the arguments for the widgets appear, your Python code will become just a mess and after a day you will not be able to figure it out. Therefore, no matter what they say, but if the framework allows you to describe UI elements through a declarative language, this is a plus. Well, in Kivy this is a double plus, because in Kv Language you can still execute Python instructions.
So let's start with the title image:
callscreen.kv:
<CallScreen>

    FitImage:
        id: title_image  # id
        size_hint_y: .45  #   (45%   )
        #  root     .
        #     <class 'uix.screens.baseclass.callscreen.CallScreen'>,
        #  self -    - <kivymd.utils.fitimage.FitImage object>.
        y: root.height - self.height  #    Y
        source: "data/images/avatar.jpg"  #
The FitImage widget is automatically stretched to fit the entire space allocated to it while maintaining the aspect ratio of the image:

We can run the main.py file and see the result:

For now, everything is simple and it's time to start animating the widgets. Let's add a button to the screen by pressing which the animation methods from the Python CallScreen class : callscreen.kv will be called
:
#:import get_color_from_hex kivy.utils.get_color_from_hex
#:import colors kivymd.color_definitions.colors


<CallScreen>

    FitImage:
        [...]

    MDFloatingActionButton:
        icon: "phone"
        x: root.width - self.width - dp(20)
        y: app.root.height * 45 / 100 + self.height / 2
        md_bg_color: get_color_from_hex(colors["Green"]["A700"])
        on_release:
            #     .
            root.animation_title_image(title_image); \
            root.open_call_box = True if not root.open_call_box else False
Module imports in Kv Language:
#:import get_color_from_hex kivy.utils.get_color_from_hex
#:import colors kivymd.color_definitions.colors
Will be similar to the following imports in Python code:
#  get_color_from_hex
#      rgba.
from kivy.utils import get_color_from_hex
#      :
#
# colors = {
#     "Red": {
#         "50": "FFEBEE",
#         "100": "FFCDD2",
#         ...,
#     },
#     "Pink": {
#         "50": "FCE4EC",
#         "100": "F8BBD0",
#         ...,
#     },
#     ...
# }
#
# https://kivymd.readthedocs.io/en/latest/themes/color-definitions/
from kivymd.color_definitions import colors
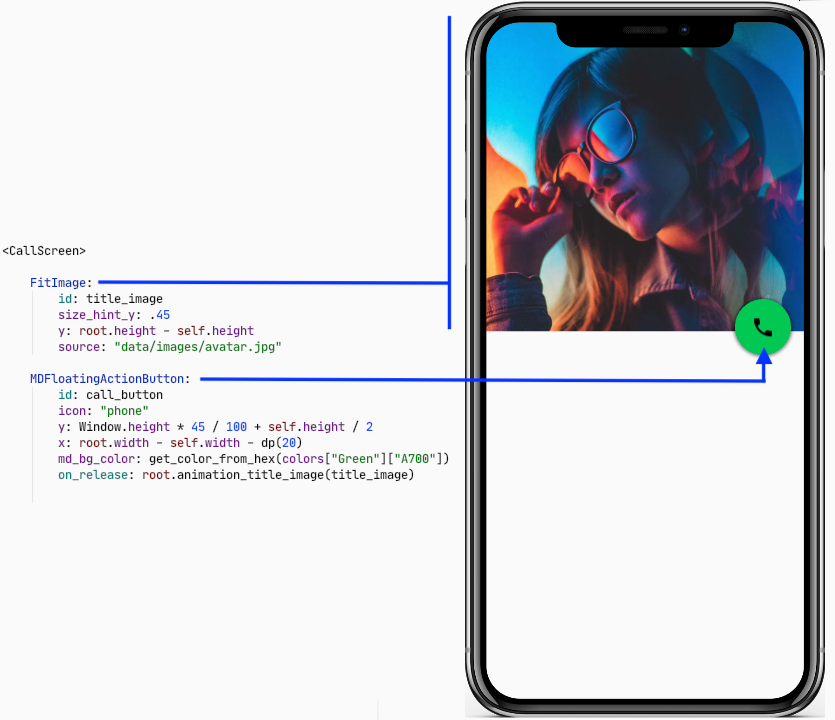
After launching and clicking on the green button, we get - AttributeError: 'CallScreen' object has no attribute 'animation_title_image' . Therefore, let us return to the base class CallScreen file callscreen.py and create in it a method animation_title_image , which will animate the title image.
callscreen.py:
#     .
from kivy.animation import Animation

[...]

class CallScreen(MDScreen):
    #        .
    open_call_box = False

    def animation_title_image(self, title_image):
        """
        :type title_image: <kivymd.utils.fitimage.FitImage object>
        """

        if not self.open_call_box:
            #       .
            Animation(size_hint_y=1, d=0.6, t="in_out_quad").start(title_image)
        else:
            #       .
            Animation(size_hint_y=0.45, d=0.6, t="in_out_quad").start(title_image)
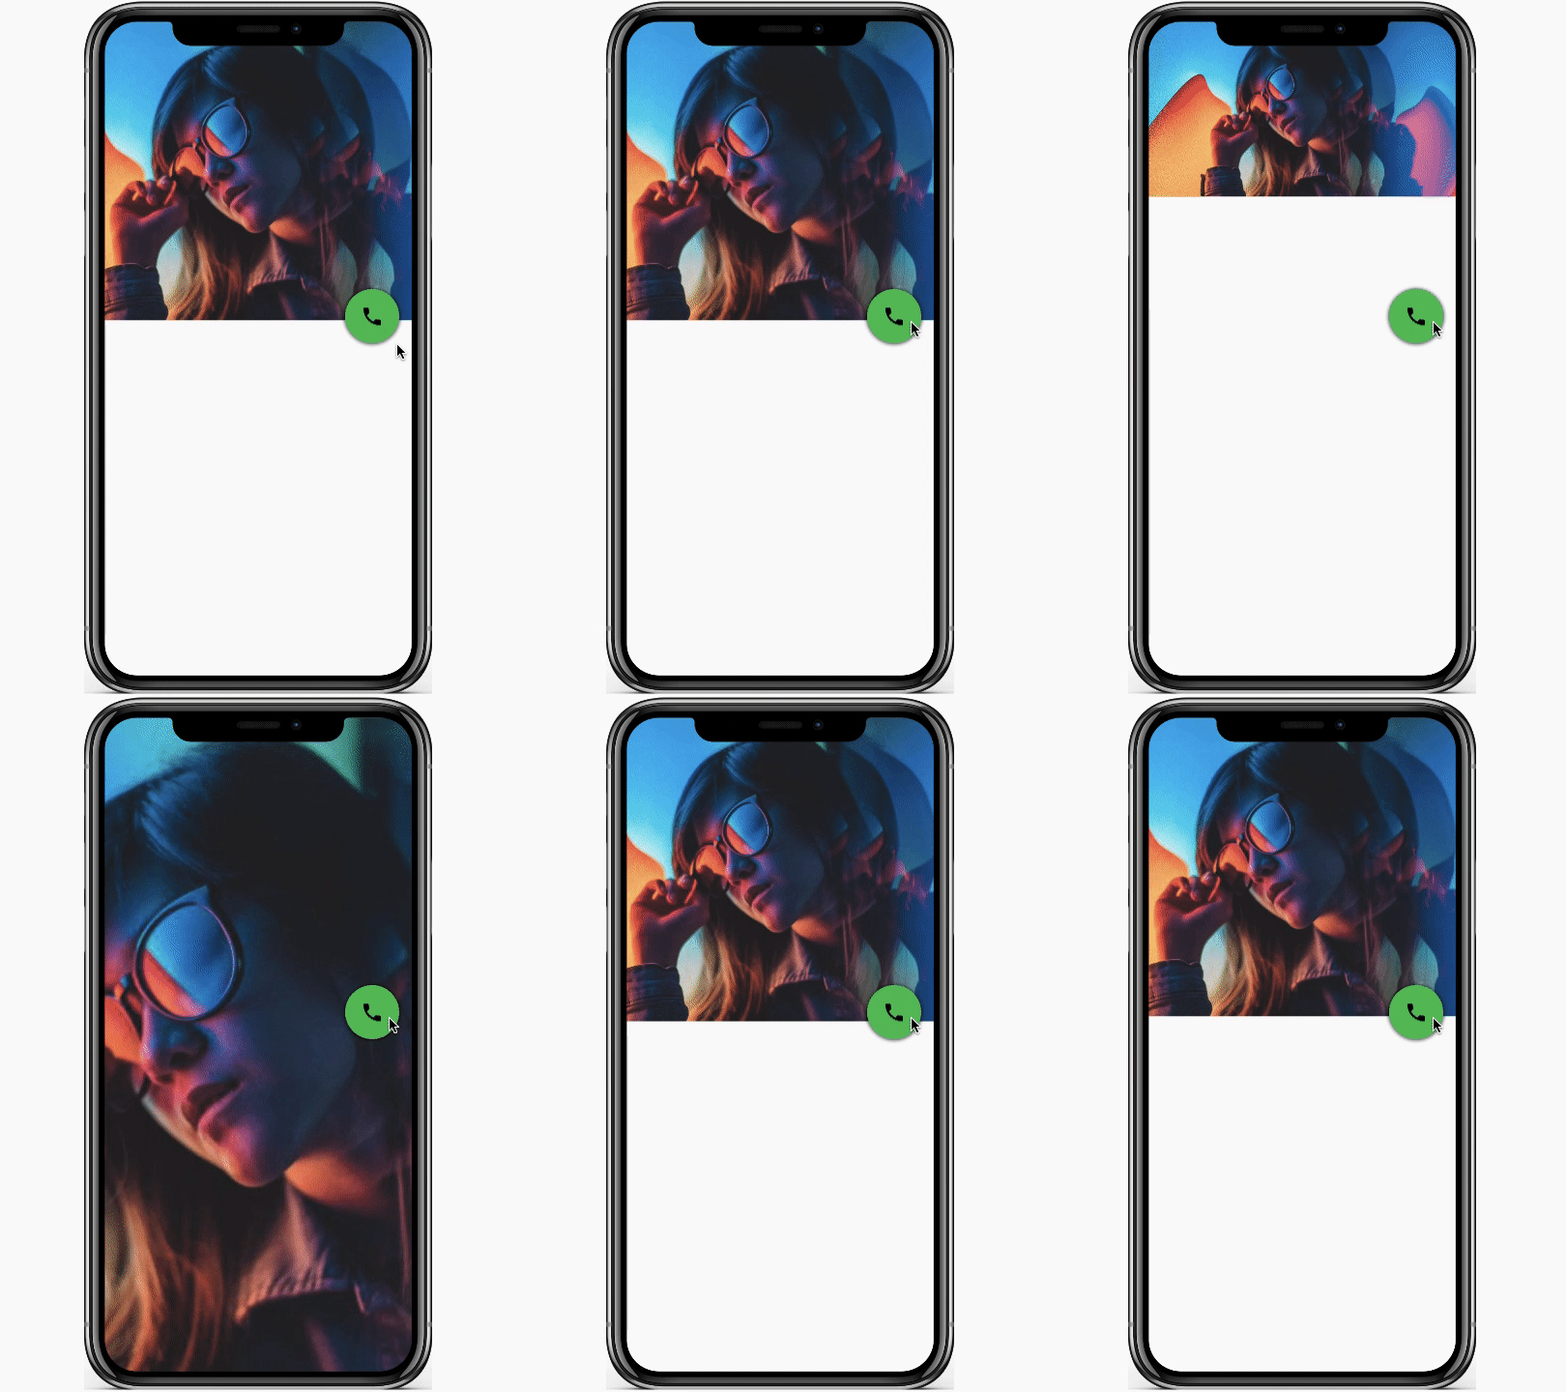
As you already understood, the Animation class , probably, like in other frameworks, simply animates a widget property. In our case, we will animate the size_hint_y property - the height hint, setting the animation execution interval in the d parameter - duration and the animation type in the t - type parameter . We can animate several properties of one widget at once, combine animations using operators + , + = ... The image below shows the result of our work. For comparison, for the right GIF, I used the in_elastic and out_elastic animation types :
 |
 |
Our next step is to add a blur effect to the title image. For these purposes, Kivy has an EffectWidget . We need to set the desired properties for the effect and place the title image widget in the EffectWidget.
callscreen.kv:
#:import effect kivy.uix.effectwidget.EffectWidget
#:import HorizontalBlurEffect kivy.uix.effectwidget.HorizontalBlurEffect
#:import VerticalBlurEffect kivy.uix.effectwidget.VerticalBlurEffect


<CallScreen>

    EffectWidget:
        effects:
            # blur_value   .
            (\
            HorizontalBlurEffect(size=root.blur_value), \
            VerticalBlurEffect(size=root.blur_value), \
            )

        FitImage:
            [...]

    MDFloatingActionButton:
        [...]
        on_release:
            #    blur .
            root.animation_blur_value(); \
            [...]
Now we need to add the blur_value attribute to the Python CallScreen base class and create an animation_blur_value method that animates the value of the blur effect.
callscreen.py:
from kivy.properties import NumericProperty
[...]


class CallScreen(MDScreen):
    #     EffectWidget.
    blur_value = NumericProperty(0)

    [...]

    def animation_blur_value(self):
        if not self.open_call_box:
            Animation(blur_value=15, d=0.6, t="in_out_quad").start(self)
        else:
            Animation(blur_value=0, d=0.6, t="in_out_quad").start(self)
Result:

Note that animation methods will execute asynchronously! Let's animate the green call button so that it doesn't bother our eyes.
callscreen.py:
from kivy.utils import get_color_from_hex
from kivy.core.window import Window

from kivymd.color_definitions import colors

[...]


class CallScreen(MDScreen):
    [...]

    def animation_call_button(self, call_button):
        if not self.open_call_box:
            Animation(
                x=self.center_x - call_button.width / 2,
                y=dp(40),
                md_bg_color=get_color_from_hex(colors["Red"]["A700"]),
                d=0.6,
                t="in_out_quad",
            ).start(call_button)
        else:
            Animation(
                y=Window.height * 45 / 100 + call_button.height / 2,
                x=self.width - call_button.width - dp(20),
                md_bg_color=get_color_from_hex(colors["Green"]["A700"]),
                d=0.6,
                t="in_out_quad",
            ).start(call_button)
callscreen.kv:
[...]

<CallScreen>

    EffectWidget:
        [...]

        FitImage:
            [...]

    MDFloatingActionButton:
        [...]
        on_release:
            #     .
            root.animation_call_button(self); \
            [...]
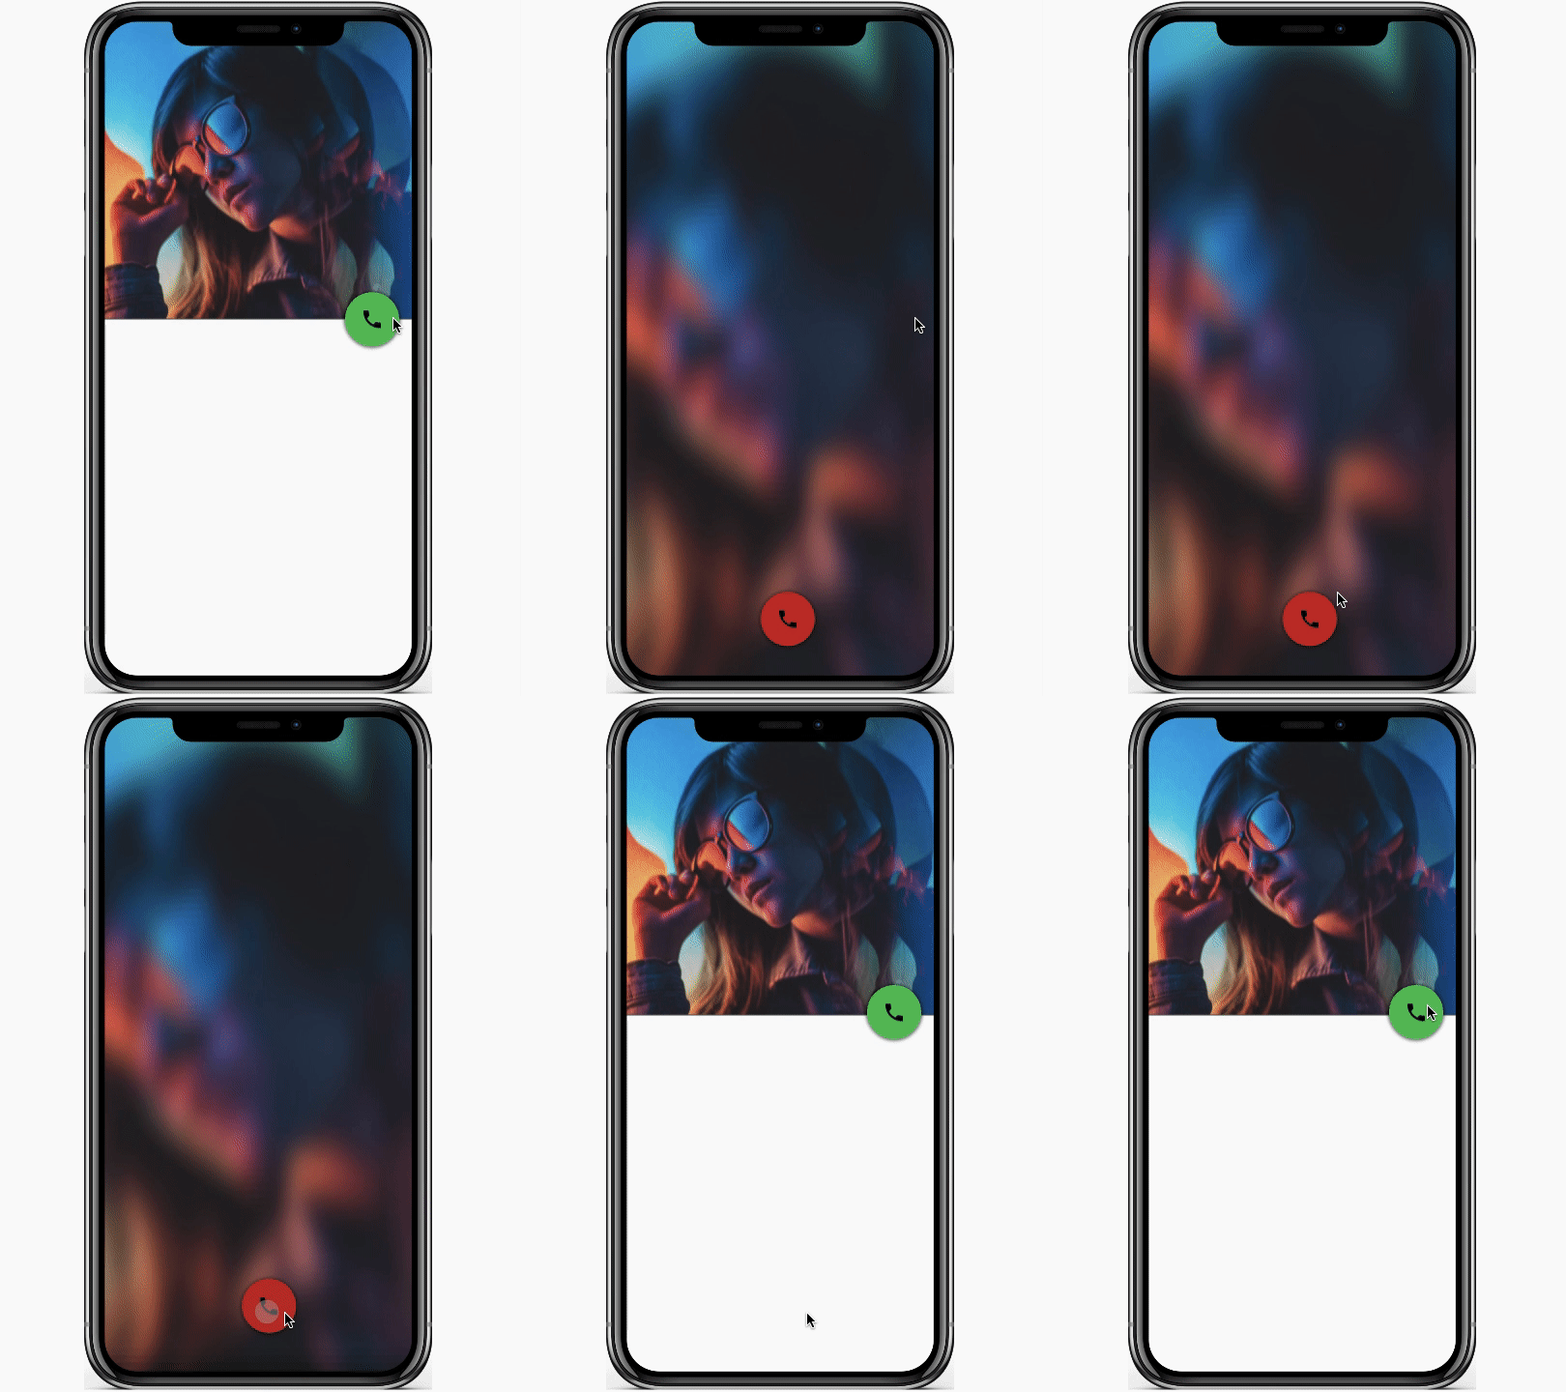
Let's add two items of type TwoLineAvatarListItem to the main screen.
callscreen.kv:
#:import STANDARD_INCREMENT kivymd.material_resources.STANDARD_INCREMENT
#:import IconLeftWidget kivymd.uix.list.IconLeftWidget

[...]


<ItemList@TwoLineAvatarListItem>
    icon: ""
    font_style: "Caption"
    secondary_font_style: "Caption"
    height: STANDARD_INCREMENT

    IconLeftWidget:
        icon: root.icon


<CallScreen>

    EffectWidget:
        [...]

        FitImage:
            [...]

    MDBoxLayout:
        id: list_box
        orientation: "vertical"
        adaptive_height: True
        y: root.height * 45 / 100 - self.height / 2

        ItemList:
            icon: "phone"
            text: "Phone"
            secondary_text: "123 456 789"

        ItemList:
            icon: "mail"
            text: "Email"
            secondary_text: "kivydevelopment@gmail.com"

    MDFloatingActionButton:
        [...]
        on_release:
            root.animation_list_box(list_box); \
            [...]
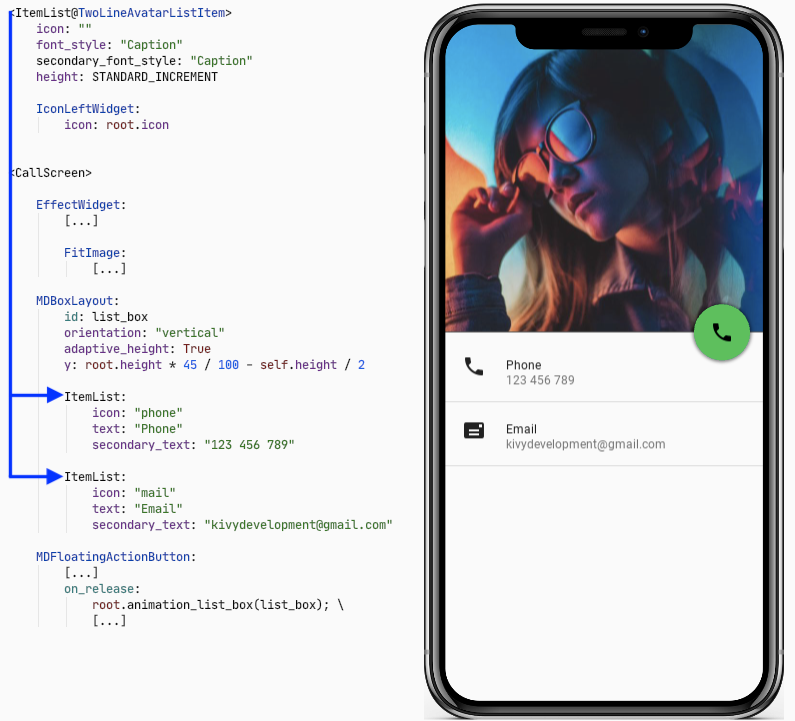
We've created two ItemList items and placed them in a vertical box. We can create a new method animation_list_box in the CallScreen class to animate this box.
callscreen.py:
[...]


class CallScreen(MDScreen):
    [...]

    def animation_list_box(self, list_box):
        if not self.open_call_box:
            Animation(
                y=-list_box.y,
                opacity=0,
                d=0.6,
                t="in_out_quad"
            ).start(list_box)
        else:
            Animation(
                y=self.height * 45 / 100 - list_box.height / 2,
                opacity=1,
                d=0.6,
                t="in_out_quad",
            ).start(list_box)

Let's add a toolbar to the screen.
callscreen.kv:
[...]

<CallScreen>

    EffectWidget:
        [...]

        FitImage:
            [...]

    MDToolbar:
        y: root.height - self.height - dp(20)
        md_bg_color: 0, 0, 0, 0
        opposite_colors: True
        title: "Profile"
        left_action_items:  [["menu", lambda x: x]]
        right_action_items: [["dots-vertical", lambda x: x]]

    MDBoxLayout:
        [...]

        ItemList:
            [...]

        ItemList:
            [...]

    MDFloatingActionButton:
        [...]

Avatar and username.
callscreen.kv:
[...]

<CallScreen>

    EffectWidget:
        [...]

        FitImage:
            [...]

    MDToolbar:
        [...]

    MDFloatLayout:
        id: round_avatar
        size_hint: None, None
        size: "105dp", "105dp"
        md_bg_color: 1, 1, 1, 1
        radius: [self.height / 2,]
        y: root.height * 45 / 100 + self.height
        x: root.center_x - (self.width + user_name.width + dp(20)) / 2

        FitImage:
            size_hint: None, None
            size: "100dp", "100dp"
            mipmap: True
            source: "data/images/round-avatar.jpg"
            radius: [self.height / 2,]
            pos_hint: {"center_x": .5, "center_y": .5}
            mipmap: True

    MDLabel:
        id: user_name
        text: "Irene"
        font_style: "H3"
        bold: True
        size_hint: None, None
        -text_size: None, None
        size: self.texture_size
        theme_text_color: "Custom"
        text_color: 1, 1, 1, 1
        y: round_avatar.y + self.height / 2
        x: round_avatar.x + round_avatar.width + dp(20)

    MDBoxLayout:
        [...]

        ItemList:
            [...]

        ItemList:
            [...]

    MDFloatingActionButton:
        root.animation_round_avatar(round_avatar, user_name); \
        root.animation_user_name(round_avatar, user_name); \
        [...]

Typical animation of the X and Y positions of an avatar and username.
callscreen.py:
[...]


class CallScreen(MDScreen):
    [...]

    def animation_round_avatar(self, round_avatar, user_name):
        if not self.open_call_box:
            Animation(
                x=self.center_x - round_avatar.width / 2,
                y=round_avatar.y + dp(50),
                d=0.6,
                t="in_out_quad",
            ).start(round_avatar)
        else:
            Animation(
                x=self.center_x - (round_avatar.width + user_name.width + dp(20)) / 2,
                y=self.height * 45 / 100 + round_avatar.height,
                d=0.6,
                t="in_out_quad",
            ).start(round_avatar)

    def animation_user_name(self, round_avatar, user_name):
        if not self.open_call_box:
            Animation(
                x=self.center_x - user_name.width / 2,
                y=user_name.y - STANDARD_INCREMENT,
                d=0.6,
                t="in_out_quad",
            ).start(self.ids.user_name)
        else:
            Animation(
                x=round_avatar.x + STANDARD_INCREMENT,
                y=round_avatar.center_y - user_name.height - dp(20),
                d=0.6,
                t="in_out_quad",
            ).start(user_name)

We just need to create a box with buttons:

At the time of this writing, I came across the fact that the required button was not found in the KivyMD library . I had to quickly make it myself. I simply added canvas instructions to the existing MDIconButton class , defining a circle around the button, and placing it in a vertical box along with the label. callscreen.kv:
<CallBoxButton@MDBoxLayout>
    orientation: "vertical"
    adaptive_size: True
    spacing: "8dp"
    icon: ""
    text: ""

    MDIconButton:
        icon: root.icon
        theme_text_color: "Custom"
        text_color: 1, 1, 1, 1

        canvas:
            Color:
                rgba: 1, 1, 1, 1
            Line:
                width: 1
                circle:
                    (\
                    self.center_x, \
                    self.center_y, \
                    min(self.width, self.height) / 2, \
                    0, \
                    360, \
                    )

    MDLabel:
        text: root.text
        size_hint_y: None
        height: self.texture_size[1]
        font_style: "Caption"
        halign: "center"
        theme_text_color: "Custom"
        text_color: 1, 1, 1, 1

[...]

Next, we create a box for the custom buttons.
callscreen.kv:
<CallBox@MDGridLayout>
    cols: 3
    rows: 2
    adaptive_size: True
    spacing: "24dp"

    CallBoxButton:
        icon: "microphone-off"
        text: "Mute"
    CallBoxButton:
        icon: "volume-high"
        text: "Speaker"
    CallBoxButton:
        icon: "dialpad"
        text: "Keypad"

    CallBoxButton:
        icon: "plus-circle"
        text: "Add call"
    CallBoxButton:
        icon: "call-missed"
        text: "Transfer"
    CallBoxButton:
        icon: "account"
        text: "Contact"

[...]
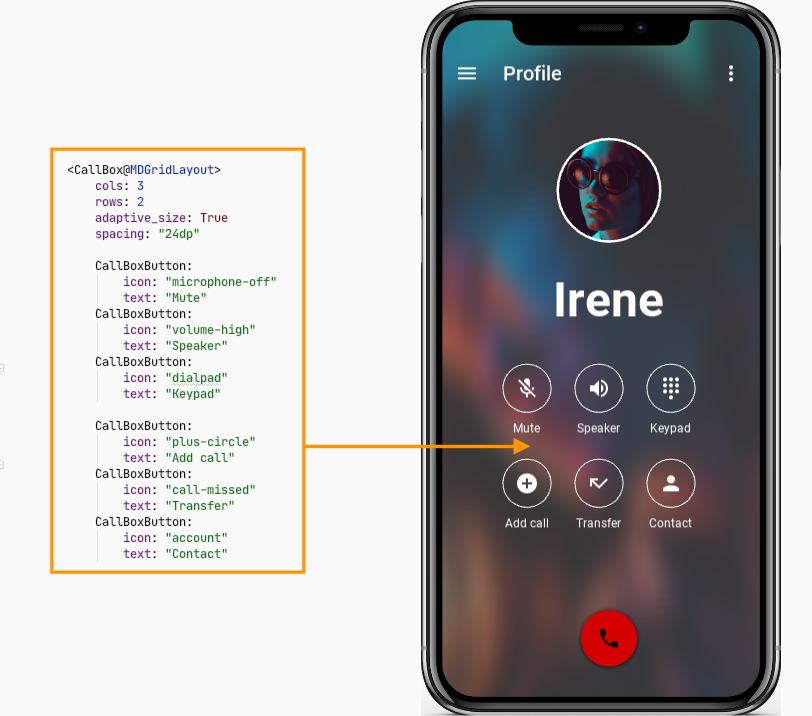
Now we place the created CallBox in the CallScreen rule and set its position along the Y axis beyond the bottom border of the screen.
callscreen.kv:
[...]

<CallScreen>

    EffectWidget:
        [...]

        FitImage:
            [...]

    MDToolbar:
        [...]

    MDFloatLayout:
        [...]

        FitImage:
            [...]

    MDLabel:
        [...]

    MDBoxLayout:
        [...]

        ItemList:
            [...]

        ItemList:
            [...]

    MDFloatingActionButton:
        root.animation_call_box(call_box, user_name); \
        [...]

    CallBox:
        id: call_box
        pos_hint: {"center_x": .5}
        y: -self.height
        opacity: 0
It remains only to animate the position of the created box with buttons.
callscreen.py:
from kivy.metrics import dp
[...]


class CallScreen(MDScreen):
    [...]

    def animation_call_box(self, call_box, user_name):
        if not self.open_call_box:
            Animation(
                y=user_name.y - call_box.height - dp(100),
                opacity=1,
                d=0.6,
                t="in_out_quad",
            ).start(call_box)
        else:
            Animation(
                y=-call_box.height,
                opacity=0,
                d=0.6,
                t="in_out_quad",
            ).start(call_box)
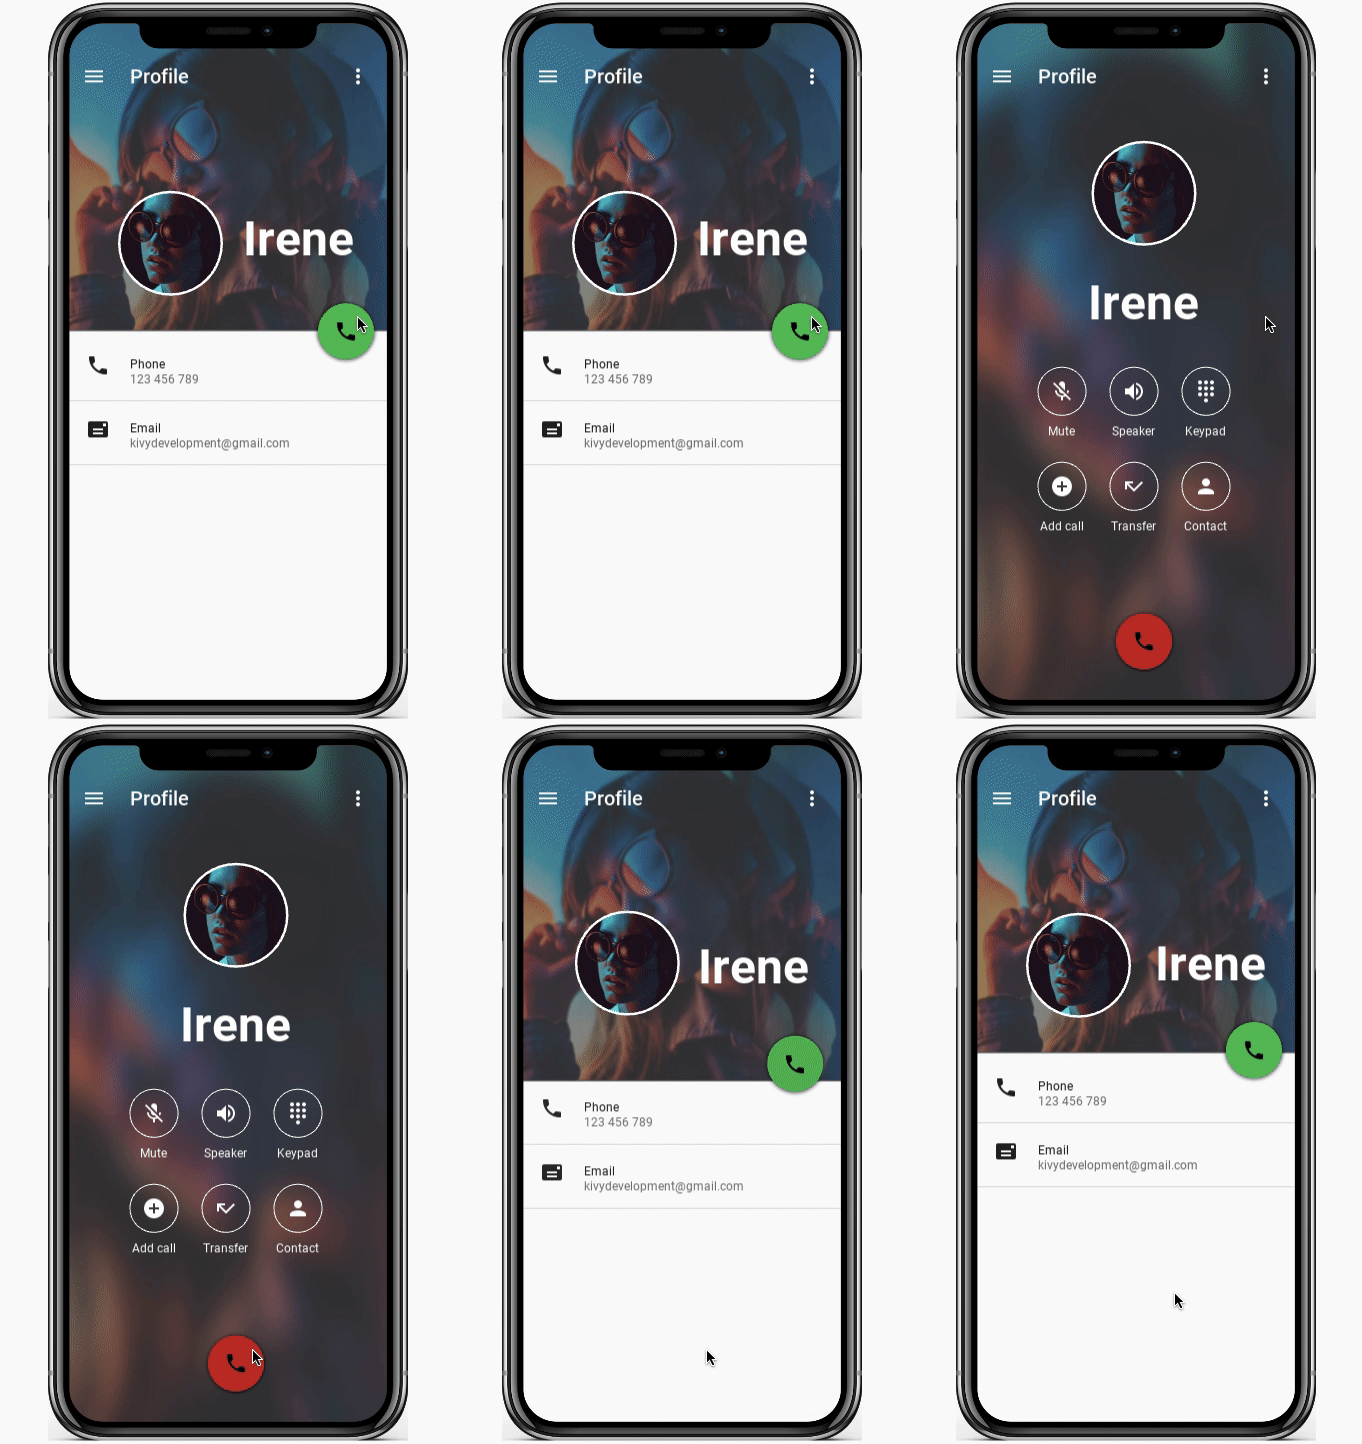
Final GIF with a test on a mobile device:

That's all, I hope it was useful!