On one large project, we encountered a low build speed - from three minutes or more. Typically, in such cases, studios practice modularization of projects so as not to work with huge monoliths. At Surf, we decided to experiment and modularize the project using the Swift Package Manager, Apple's dependency manager.
We will talk about the results in another article, but now we will answer the main questions: why is all this needed, why we chose SPM and how we took the first steps.

Why SPM
The answer is simple - it's native and new. It doesn't create xcworkspace overheads like Cocoapods, for example. In addition, SPM is an open-source project that is actively developing. Apple and the community are fixing bugs, fixing vulnerabilities, updating to follow Swift.
Does this make building the project faster
In theory, the assembly will speed up due to the very fact of dividing the application into modules - frameworks. This means that each module will only be built when changes have been made to it. But it will be possible to assert for sure only at the end of the experiment.
Note: The effectiveness of modularization directly depends on the correct division of the project into modules.
How to make efficient partitioning
The partitioning method depends on the chosen architecture, the type of application, its size and plans for further development. Therefore, I will talk about three rules that we try to adhere to when splitting.
Share generic functionality. Each module is responsible for a category, for example:
- CommonAssets - a set of your Assets and a public interface for accessing them. It is usually generated using SwiftGen.
- CommonExtensions - a set of extensions, for example Foundation, UIKit, additional dependencies.
Separate application flows. Consider a tree structure, where MainFlow is the main flow of the application. Let's say we have a news application.
- NewFlow - screens of news and overview of specific news.
- FavoritesFlow — .
- SettingsFlow — , , . .
reusable :
- CommonUIComponents — , UI-. .
- UI . , , , . .
Let's say we have a specific flow and we want to add new functions to it. If the component will be reused or it is theoretically possible in the future, it is better to move it into a separate module or an analogue of CommonUIComponents. In other cases, you can leave the component local.
This approach solves the problem of missing components. This happens in large projects, and if the component is not documented, then its support and debugging will subsequently become unprofitable.
Create a project using SPM
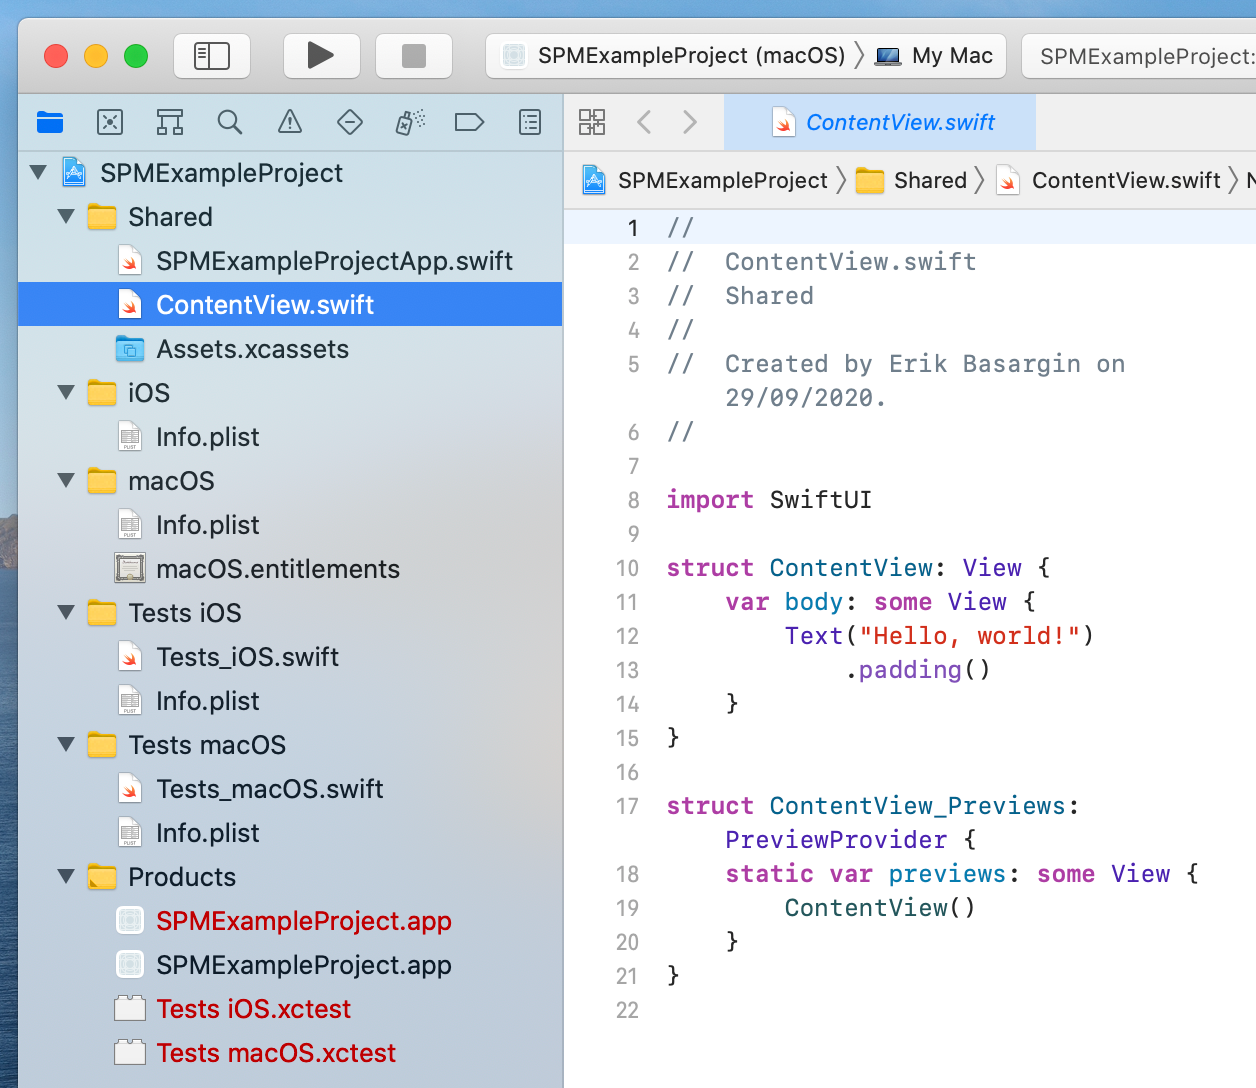
Consider creating a trivial test project. I am using the Multiplatform App project on SwiftUI. The platform and interface are irrelevant here.
Note: To quickly create a Multiplatform App, you need XCode 12.2 beta. Let's create a
project and see the following:

Now let's create the first Common module:
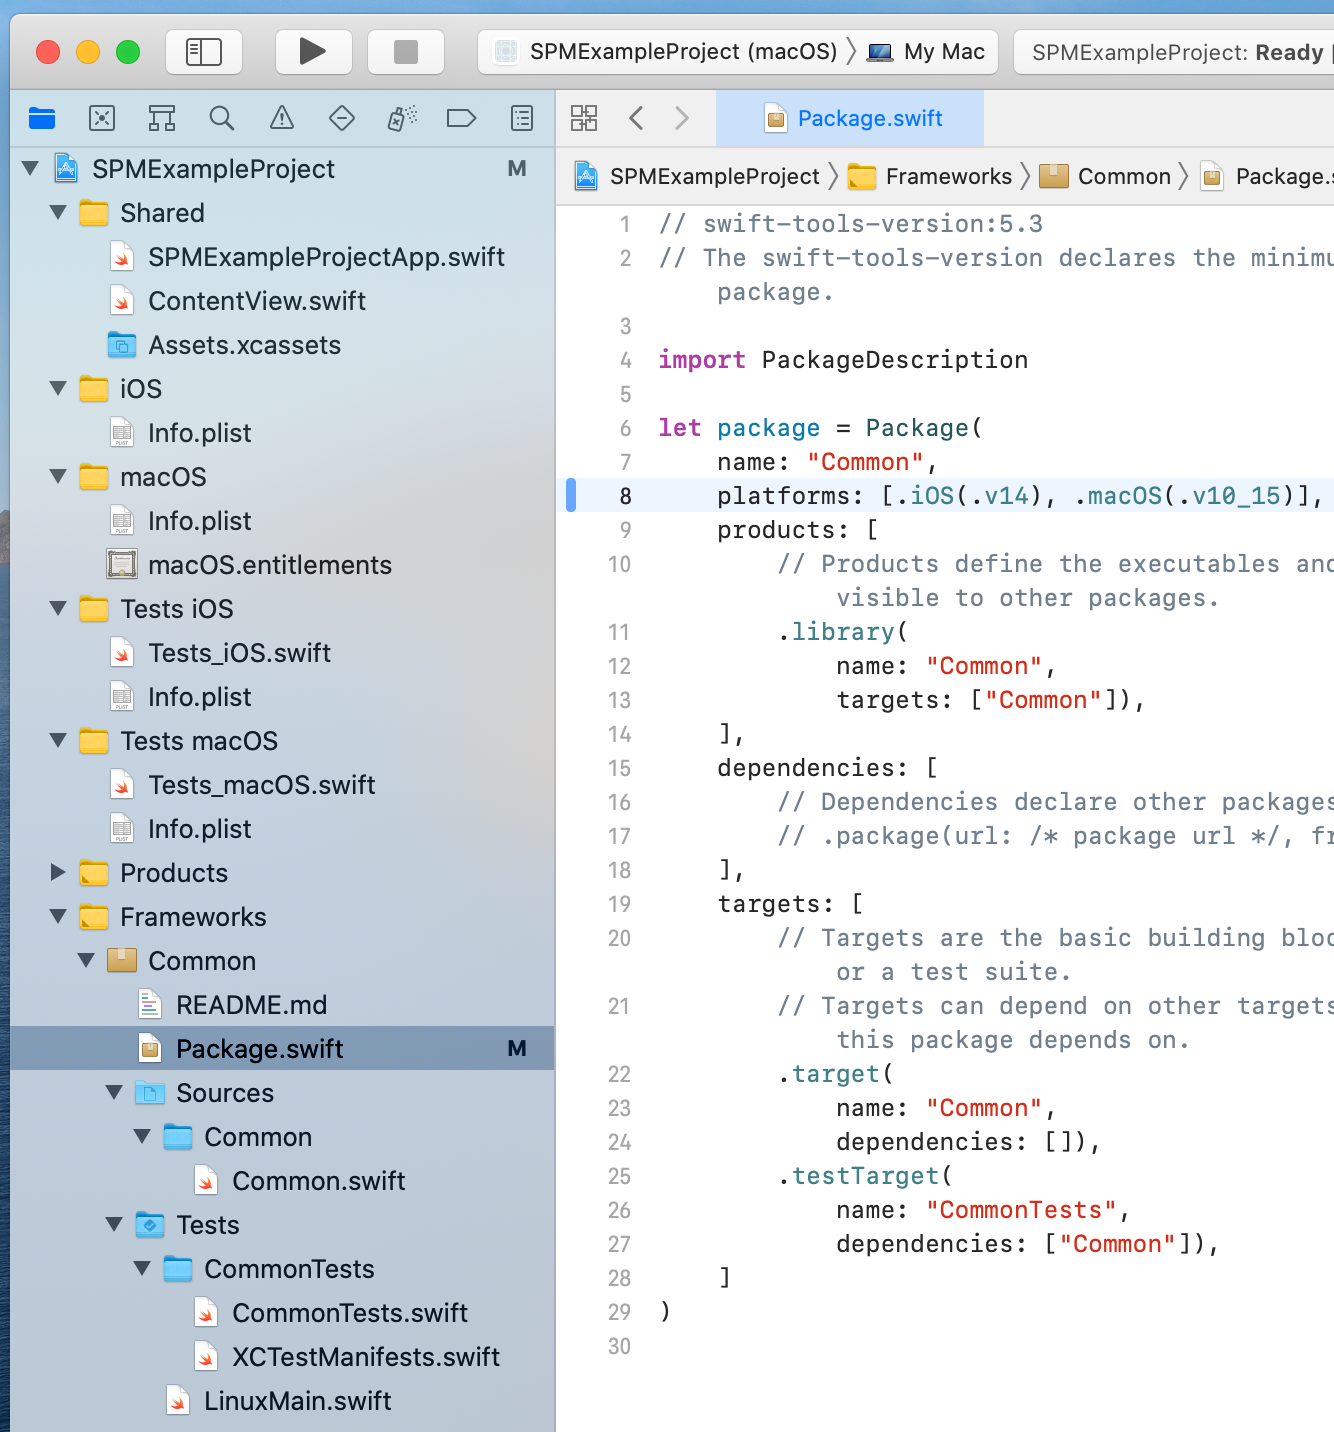
- add the Frameworks folder without creating a directory;
- create an SPM package Common.

- Add the supported platforms to the Package.swift file. We have it
platforms: [.iOS(.v14), .macOS(.v10_15)]

- Now we add our module to each target. We have this SPMExampleProject for iOS and SPMExampleProject for macOS.

Note: It is enough to connect only root modules to the targets. They are not added as submodules.
The connection is complete. Now all you have to do is configure a module with a public interface - and voila, the first module is ready.
How to add a dependency for a local SPM package
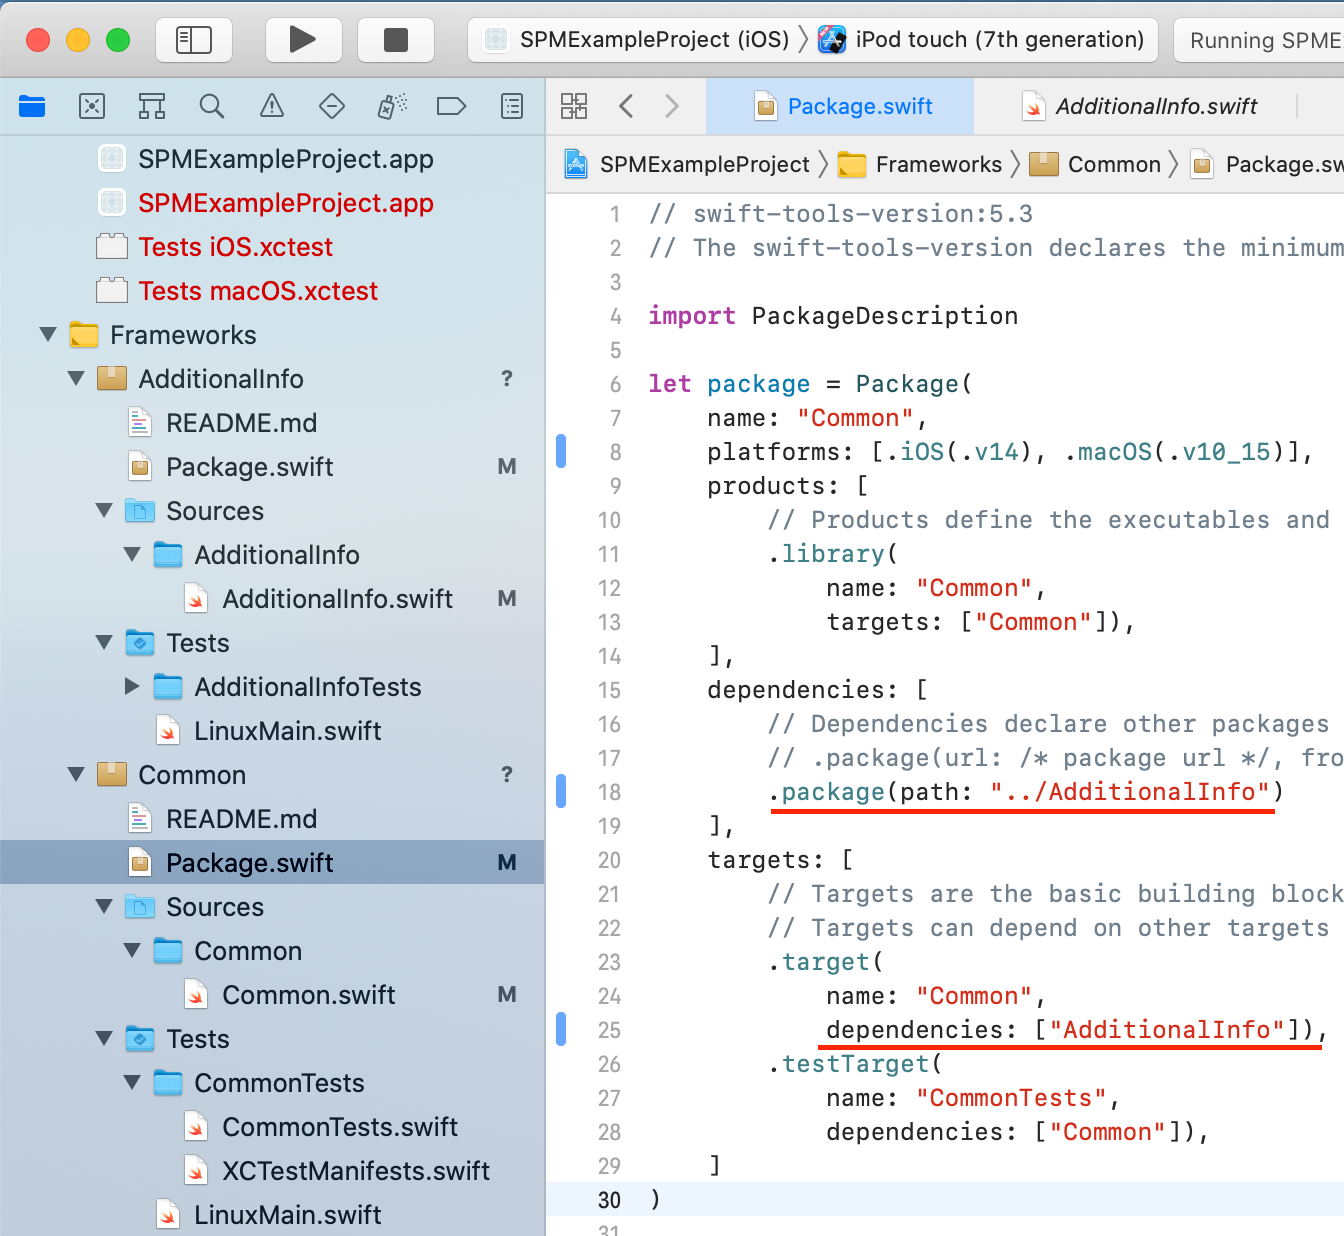
Let's add the AdditionalInfo package - as Common, but without adding it to the targets. Now let's change the Package.swift of the Common package.

You don't need to add anything else. Can be used.
An example close to reality
Let's connect SwiftGen to our test project and add the Palette module - it will be responsible for accessing the color palette approved by the designer.
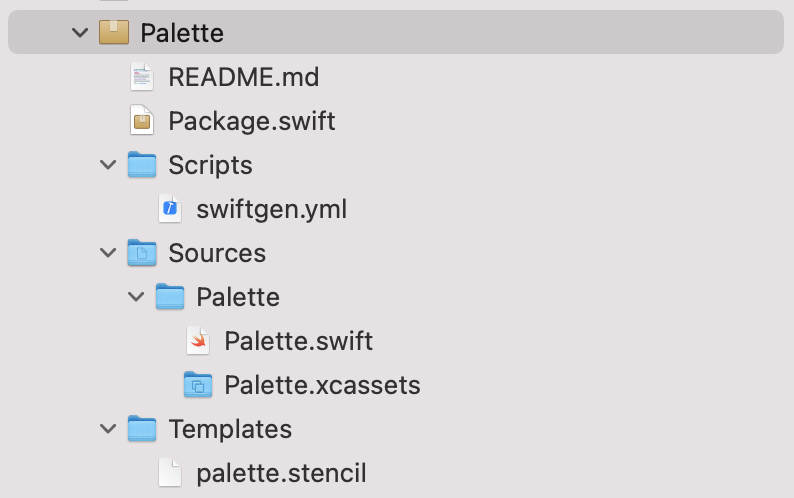
- Create a new root module following the instructions above.
- Add the Scripts and Templates root directories to it.
- Add the Palette.xcassets file to the module root and write down any color sets.
- Add an empty Palette.swift file to Sources / Palette.
- Add the palette.stencil template to the Templates folder .
- Now you need to register the configuration file for SwiftGen. To do this, add the swiftgen.yml file to the Scripts folder and write the following in it:
xcassets:
  inputs:
    - ${SRCROOT}/Palette/Sources/Palette/Palette.xcassets
  outputs:
    - templatePath: ${SRCROOT}/Palette/Templates/palette.stencil
      params:
        bundle: .module
        publicAccess: true
      output: ${SRCROOT}/Palette/Sources/Palette/Palette.swift
The final appearance of the Palette
module We have configured the Palette module. Now we need to configure the launch of SwiftGen so that the palette is generated at the start of the build. To do this, go to the configuration of each target and create a new Build Phase - let's call it Palette generator. Don't forget to move this Build Phase to the highest position possible.
Now we write the call for SwiftGen:
cd ${SRCROOT}/Palette
/usr/bin/xcrun --sdk macosx swift run -c release swiftgen config run --config ./Scripts/swiftgen.yml
Note:
/usr/bin/xcrun --sdk macosxis a very important prefix. Without it, the build will generate an error: "unable to load standard library for target 'x86_64-apple-macosx10.15".

Sample call for SwiftGen
Done - colors can be accessed like this:
Palette.myGreen(Color type in SwiftUI) and PaletteCore.myGreen(UIColor / NSColor).
Underwater rocks
I will list what we have encountered.
- .
- SwiftLint & SwiftGen SPM. yml.
- Cocoapods. — , SPM . SPM Cocoapods - : «MergeSwiftModule failed with a nonzero exit code». , .
- SPM .
-L$(BUILD_DIR).
SPM — Bundler?
In this matter, I propose to dream and discuss in the comments. The topic needs to be studied well, but it looks very interesting. By the way, there is already an interesting rather close article on the pros and cons of SPM.
SPM allows you to call swift run by adding Package.swift to your project root. What does it give us? For example, you can call fastlane or swiftlint. Call example:
swift run swiftlint --autocorrect.