Good day, friends!
ES6 modules using the "import / export" syntax are quite powerful tools and a worthy competitor to the components of popular frameworks.
Let me demonstrate this by drawing various shapes on canvas.
Inspired by this section of the JavaScript Guide from MDN.
Here's what functionality will be implemented in our small application:
- automatic creation of a canvas of specified dimensions and its rendering on the page
- the ability to draw squares, circles and triangles of a given size and color on the canvas
- dividing the code into modules containing logical parts of the application
In the process of creating the application, we will pay special attention to the default and named export / import, as well as static and dynamic imports. Most of the application will be written using class syntax.
It is desirable that you have at least a basic understanding of working with classes and the canvas.
The project code is here .
A demo of the application can be viewed here .
Let's start with support.
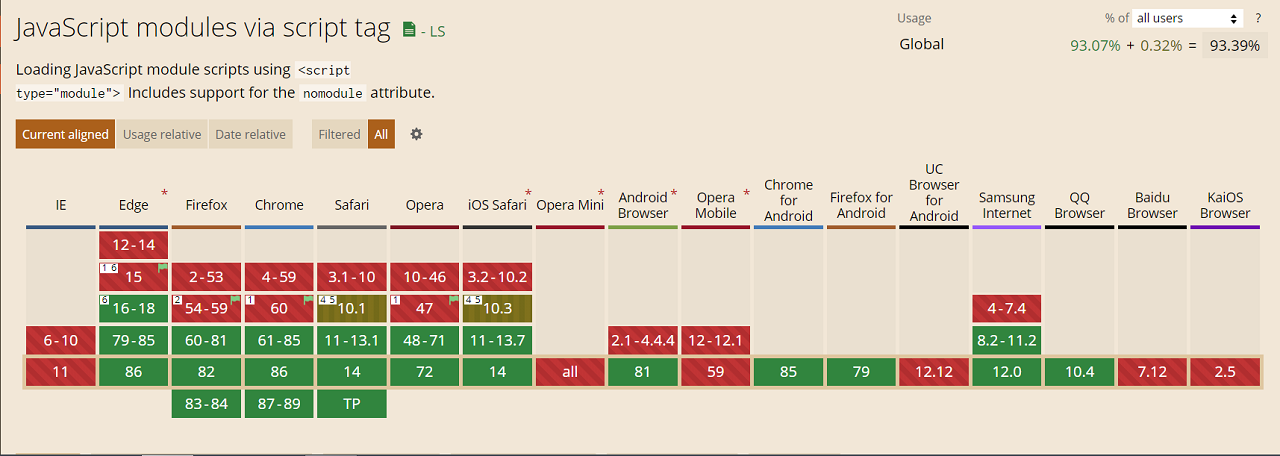

Overall pretty good. On average, about 93%.
The project structure will be as follows (you can create all files at once or create them as needed):
modules
  helpers
    convert.js
  shapes
    circle.js
    square.js
    triangle.js
  canvas.js
index.html
main.js
main.css
The markup looks like this:
<div>
  <section>
    <h3>Circle</h3>
    <label>
      X:
      <input type="number" value="75" data-prop="x" />
    </label>
    <label>
      Y:
      <input type="number" value="75" data-prop="y" />
    </label>
    <label>
      Radius:
      <input type="number" value="50" data-prop="radius" />
    </label>
    <label>
      Color:
      <input type="color" value="#ff0000" data-prop="color" />
    </label>
    <button data-btn="circle" class="draw_btn">Draw</button>
  </section>

  <section>
    <h3>Square</h3>
    <label>
      X:
      <input type="number" value="275" data-prop="x" />
    </label>
    <label>
      Y:
      <input type="number" value="175" data-prop="y" />
    </label>
    <label>
      Length:
      <input type="number" value="100" data-prop="length" />
    </label>
    <label>
      Color:
      <input type="color" value="#00ff00" data-prop="color" />
    </label>
    <button data-btn="square" class="draw_btn">Draw</button>
  </section>

  <section>
    <h3>Triangle</h3>
    <label>
      X:
      <input type="number" value="150" data-prop="x" />
    </label>
    <label>
      Y:
      <input type="number" value="100" data-prop="y" />
    </label>
    <label>
      Length:
      <input type="number" value="125" data-prop="length" />
    </label>
    <label>
      Color:
      <input type="color" value="#0000ff" data-prop="color" />
    </label>
    <button data-btn="triangle" class="draw_btn">Draw</button>
  </section>
</div>
<button>Clear Canvas</button>

<script src="main.js" type="module"></script>
What should you pay attention to here?
For each shape, a separate section is created with fields for entering the necessary data and a button for starting the process of drawing the shape on the canvas. For the example of a section for a circle, such data are: start coordinates, radius and color. We set the input fields to initial values to enable quick testing of the application's health. The "data-prop" attributes are designed to get the values of the fields for input in the script. The "data-btn" attributes are intended to determine which button was pressed. The last button is used to clear the canvas.
Pay attention to how the script is connected. The "type" attribute with the value "module" is required. The "defer" attribute is not required in this case, since the loading of modules is deferred (ie after the page is fully loaded) by default. Also note that we only include the "main.js" file in the page. Other files are used inside "main.js" as modules.
One of the main features of modules is that each module has its own scope (context), including "main.js". On the one hand, this is good because it avoids pollution of the global namespace and, therefore, prevents conflicts between variables and functions of the same name. On the other hand, if different modules need to access the same DOM elements, for example, you have to either create a separate script with global variables and connect it to the page before the main module, or explicitly create global variables (window.variable = value), or create the same variables within each module, or exchange variables between modules (which we, in fact, will do).
There is also a fourth approach: access DOM elements by ID directly. Did you know about this possibility? For example, if we have an element with the identifier "main" in our markup, we can refer to it simply as main (main.innerHTML = "<p> Some Awesome Content <p />") without first defining (searching) the element with using "document.getElementById ()" or similar methods. However, this approach is non-standard and is not recommended for use, since it is not known whether it will be supported in the future, although I personally find this opportunity very convenient.
Another feature of static modules is that they can only be imported once. Re-import will be ignored.
Finally, the third feature of modules is that the module code cannot be changed after import. In other words, variables and functions declared in a module can only be changed in this module, where they are imported, this cannot be done. This is somewhat reminiscent of the Module design pattern, implemented using an object containing private variables and functions, or using a class with private fields and methods.
Moving on. Let's add some minimal styles:
body {
  max-width: 768px;
  margin: 0 auto;
  color: #222;
  text-align: center;
}
canvas {
  display: block;
  margin: 1rem auto;
  border: 1px dashed #222;
  border-radius: 4px;
}
div {
  display: grid;
  grid-template-columns: repeat(3, 1fr);
}
section {
  padding: 1rem;
}
label {
  display: block;
}
input {
  margin: 0.25rem 0;
}
input:not([type="color"]) {
  width: 50px;
}
button {
  margin: 0.25rem auto;
  cursor: pointer;
}
ul {
  list-style: none;
}
li {
  margin: 0.5rem auto;
  width: 320px;
  border-bottom: 1px dotted #222;
}
p {
  margin: 0.25rem 0;
}
Nothing special here. You can add beauty to your liking.
Let's move on to the modules.
The "canvas.js" file contains the class code for creating and rendering a canvas, as well as a list for messages displayed when creating a particular shape (these messages represent information about the area and perimeter of the (conventionally) shape):
// export default
//           ,  IIFE (   ,    )
//   , ..  class ClassName...,  export default ClassName
export default class Canvas {
  //     :  ,
  constructor(parent, width, height) {
    this.parent = parent;
    this.width = width;
    this.height = height;
    //
    this.ctx = null;
    //
    this.listEl = null;
    //        ,
    this.clearCanvas = this.clearCanvas.bind(this);
  }

  //
  createCanvas() {
    //
    //  ,
    //
    if (this.ctx !== null) {
      console.log("Canvas already created!");
      return;
    } else {
      //   "canvas"
      const canvasEl = document.createElement("canvas");

      //
      //
      canvasEl.setAttribute("width", this.width);
      canvasEl.setAttribute("height", this.height);

      //
      this.parent.append(canvasEl);

      //
      this.ctx = canvasEl.getContext("2d");
    }

    //
    return this;
  }

  //
  //
  createReportList() {
    if (this.listEl !== null) {
      console.log("Report list already created!");
      return;
    } else {
      const listEl = document.createElement("ul");
      this.parent.append(listEl);

      this.listEl = listEl;
    }

    return this;
  }

  //
  clearCanvas() {
    this.ctx.clearRect(0, 0, this.width, this.height);
    this.listEl.innerHTML = "";
  }
}
The convert.js file contains a function for converting degrees to radians:
//
export const convert = (degrees) => (degrees * Math.PI) / 180;
Each file in the shapes directory is a module for a specific shape. In general, the code of these modules is identical, with the exception of drawing methods, as well as formulas for calculating the area and perimeter of a shape. Consider a module containing the code for drawing a circle (circle.js):
//
//
//       -      "Module"
import { convert } from "../helpers/convert.js";

//
//
export class Circle {
  //     ""
  //
  //    ,    ""  ctx  listEl
  constructor({ ctx, listEl, radius, x, y, color }) {
    this.ctx = ctx;
    this.listEl = listEl;
    this.radius = radius;
    this.x = x;
    this.y = y;
    this.color = color;
    //
    this.name = "Circle";
    //
    this.listItemEl = document.createElement("li");
  }

  //
  draw() {
    //
    this.ctx.fillStyle = this.color;
    //
    this.ctx.beginPath();
    //  arc  6 :
    //     "x",     "y", ,  ,
    // (      "0, 2 * Math.PI")
    //   ,    :
    this.ctx.arc(this.x, this.y, this.radius, convert(0), convert(360));
    //
    this.ctx.fill();
  }

  //
  report() {
    //
    this.listItemEl.innerHTML = `<p>${this.name} area is ${Math.round(Math.PI * (this.radius * this.radius))}px squared.</p>`;
    //
    this.listItemEl.innerHTML += `<p>${this.name} circumference is ${Math.round(2 * Math.PI * this.radius)}px.</p>`;

    this.listEl.append(this.listItemEl);
  }
}
Finally, in the "main.js" file, a static default import of the "Canvas" class module is carried out, an instance of this class is created and button presses are handled, which consists in dynamically importing the corresponding figure class module and calling its methods:
//
//
import Canvas from "./modules/canvas.js";

//   ,
//     :
//   ,
const { ctx, listEl, clearCanvas } = new Canvas(document.body, 400, 300).createCanvas().createReportList();

//    ""
//    ,
//      "async"
document.addEventListener("click", async (e) => {
  //
  if (e.target.tagName !== "BUTTON") return;

  //
  if (e.target.className === "draw_btn") {
    //
    //  ,
    //
    const { btn: btnName } = e.target.dataset;

    //
    //      -
    const shapeName = `${btnName[0].toUpperCase()}${btnName.slice(1)}`;

    //
    const shapeParams = {};

    //
    const inputsEl = e.target.parentElement.querySelectorAll("input");

    //
    inputsEl.forEach((input) => {
      //
      //
      const { prop } = input.dataset;
      //
      //  ,   ,
      const value = !isNaN(input.value) ? input.valueAsNumber : input.value;
      //
      shapeParams[prop] = value;
    });
    //
    shapeParams.ctx = ctx;
    shapeParams.listEl = listEl;

    console.log(shapeParams);

    //
    //   "Module"
    const ShapeModule = await import(`./modules/shapes/${btnName}.js`);
    //      -
    //
    //             "Module" (  )
    const shape = new ShapeModule[shapeName](shapeParams);

    //
    shape.draw();
    //
    shape.report();
  } else {
    //
    //     "Canvas"
    clearCanvas();
  }
});
You can play with the code here .
As you can see, ES6 modules provide some pretty interesting features related to the division of code into relatively self-contained blocks containing logical parts of the application that can be loaded immediately or on demand. In tandem with template literals, they are a good alternative to components of popular frameworks. I mean, first of all, rendering pages on the client side. Moreover, this approach allows you to re-render only those DOM elements that have undergone changes, which, in turn, allows you to do without the virtual DOM. But more on that in one of the following articles.
Hope you found something interesting for yourself. Thank you for attention.