
Before starting diagnostics, the first step is to assess the state of the drive. Since this is Seagate, we need to see the terminal log from the moment the power is applied, SMART and evaluate the ability to read heads in zones of different densities. As a rule, such a short test will reveal many faults.
We connect, supply power. In the terminal, the drive briefly reports that the start procedure was successful, and by the DRD and DSC registers it demonstrates its readiness to accept commands.
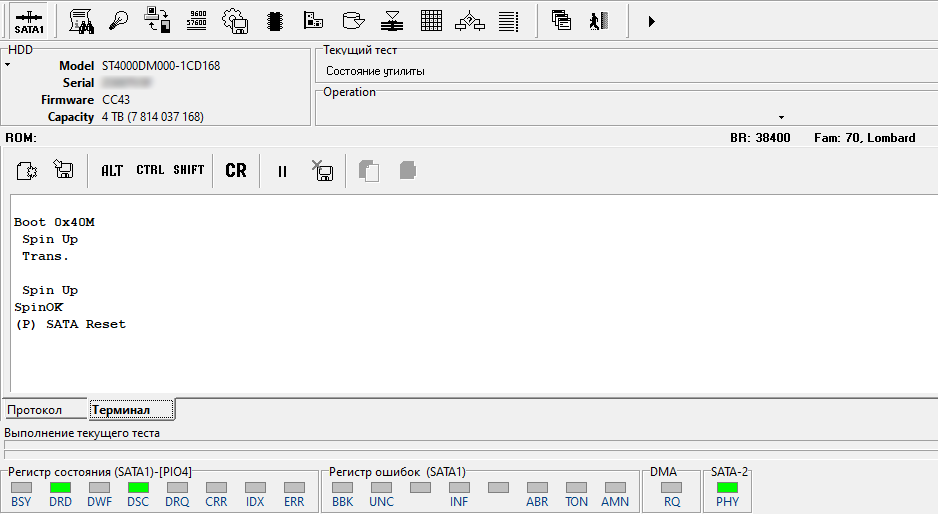
Figure: 2 Terminal start log of Seagate ST4000DM000 HDD
Next, you need to check the SMART readings ( what is SMART and what to look for in it I have already described in my note).
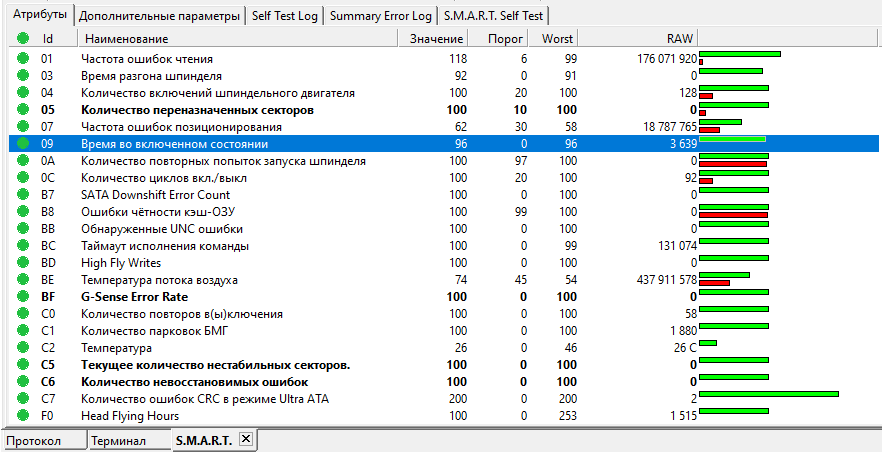
Figure: 3 SMART readings
The first thing we look at is the operating time (attribute 0x09), since if it turns out that it is close to zero, then it makes no sense to pay attention to the SMART readings , since there will be a high probability that the statistics were someone reset by technological commands, and the current readings do not show all the events recorded during the drive's operation. In our case, the operating time is 3,696 hours, which indicates that most likely there was no interference in the SMART readings .
Next, pay attention to the readings of the attributes 0x05, 0xC5 (197), 0xC6 (196) in the RAW column. Zero values indicate that during the operation of the drive, no serious problems with reading from the surface were recorded and no remap was performed.
Reading the attribute 0xC7 (199) hints at possible problems with data transfer in high speed modes. Taking into account the fact that the number of errors is small, for now we will not make premature conclusions.
Since this is not a Tiled Recorder (SMR), then the ability to read all heads in zones of different density is easy to assess. To do this, it is enough to know the number of heads, the approximate size of the minibands and their alternation order in building the logical space of the drive. We will use Data Extractor for demonstration. Let's build a map of the minispaces.

Figure: 4 Map of minispaces in logical space Seagate ST4000DM000
The list shows the order of using minispaces to build a logical space:
0, 1, 2, 3, 4, 5, 6, 7, 7, 6, 5, 4, 3, 2, 1, 0 and then cyclic repetition. Based on the size of one mini-zone for a given drive, it is obvious that it is enough to read several sections of logical space (usually the beginning, middle, and end of the logical range) about 500,000 sectors long to make sure that the drive does not freeze and the scan speed does not drop sharply. one of the surfaces.
It was reading from the surface that was used, and not verification, in order to check at the same time whether errors would occur during data transfer. In this case, no reading errors were found. This set of actions allows you to consider the drive as conditionally healthy and start analyzing the structures of file systems.
Initially, we will assess whether any partitions currently exist on the disk and what file systems are used there.
I would like to draw your attention to the fact that on disks where the number of sectors is more than 4,294,967,296 sectors, you must use GPTto use the full capacity, since the classic partition table uses 32-bit values that are not wide enough. In our case, ST4000DM000 is a 4TB drive, in which the logical range consists of 7,814,037,168 512-byte sectors.
Let's start by looking at the content in LBA 0.

Figure: 5 Partition table describing the presence of GPT .
Here we find a classic partition table, with a description of one volume. At offset 0x1C2, the partition type 0xEE is indicated with an offset of 0x00000001 sector from the beginning of the disk and a size of 0x3A3817D5.
The purpose of this entry is to indicate that all the contents of the disk available for the classic partition table are occupied so that various old disk utilities that have no idea about GPT cannot create the partition. But in the case of disks where the number of sectors is greater than 4,294,967,296, the protected area must be 0xFFFFFFF, not 0x3A3817D5.
Please note that the value 0x3A3817D5 (976 754 645) is approximately 8 times less than 7 814 037 168 - the total number of sectors on the disk. This allows us to make the assumption that most likely the disk was used as a device with a sector size of 4096 bytes, and not 512 bytes. Let's check the assumption and try to search for the regular expression 0x45 0x46 0x49 0x20 0x50 0x41 0x52 0x54 (EFI PART). If it is in sector 1, then the assumption is incorrect, if it is in sector 8, then the assumption will be confirmed.

Figure: 6 GPT Header Let's
also check if any volumes are described in this GPT , for which we go to sector 16
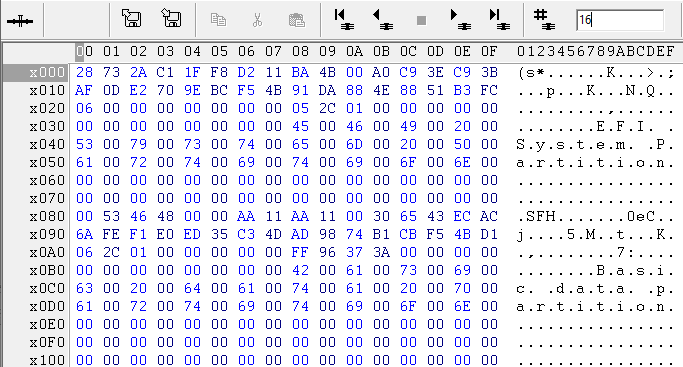
Figure: 7 Sections described in GPT
Two entries are found here.
The first record is a 76,800 (614,400) sector volume using the FAT32 file system. This volume is reserved for EFI needs.
The second record is a volume of 976 644 858 (7 813 158 864) sectors using the HFS + file system.
Since the version with the fact that the disk was used as a device with a sector size of 4096 bytes is confirmed, the next step will be to continue the analysis using Data Extractor.
After creating the task, change the sector size parameter from 512 to 4096 and get the following picture.
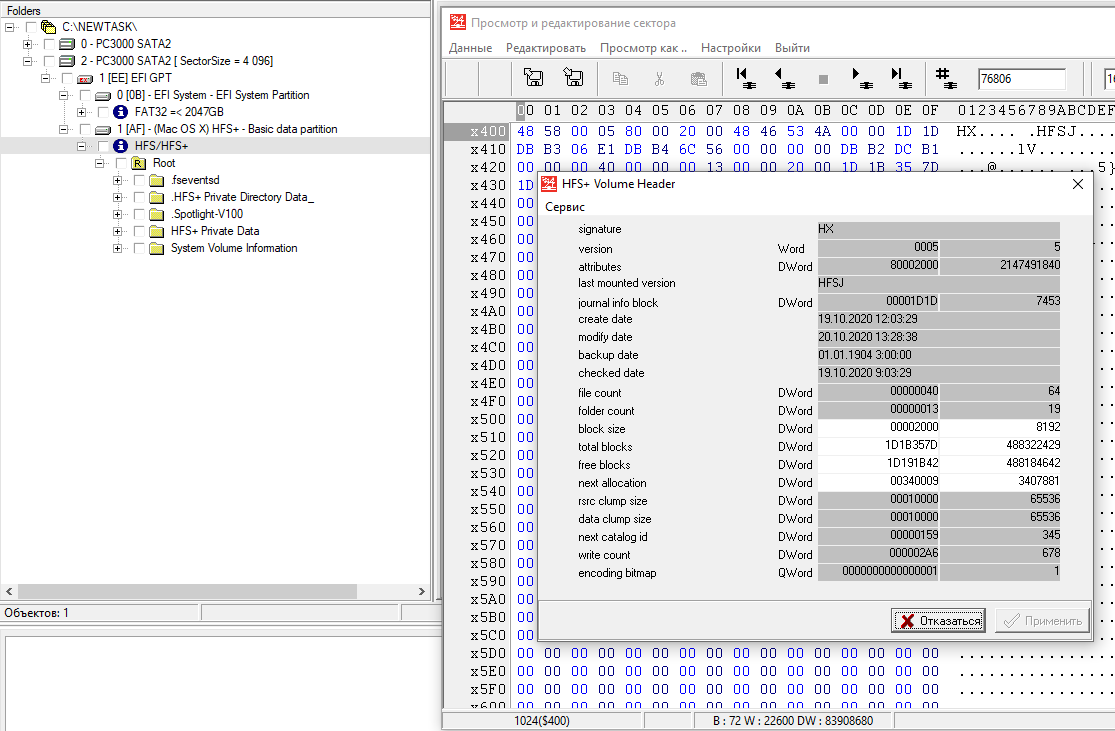
Figure: 8 Parameters HFS +
We see two volumes on the disk with correct file systems. The first volume, based on the role and size, does not interest us. But the second volume is already of interest.
From the timestamps, we can conclude that this volume was created on October 19, 2020, which is a relatively close date to the time the disc arrived at us.
Scanning the CatalogFile + Journal (HFS + structures) shows that the disk is 99.9% empty and there are no signs of user data described by this file system.
Now it is necessary to check the assumption that, perhaps, on this disk there were other volumes and file systems, and not only those that are presented now. To do this, we will use the search tool for various regular expressions that are specific to various structures of file systems and files.

Figure: 9 Regular expression search result.
Analysis of an area of about 2 GB, which lasts less than 2 minutes, shows us that in addition to the existing FAT32 and HFS +, there are signs of the existence of a volume with the ExFAT file system. The first thing we're interested in is viewing the volume's ExFAT Root Directory.
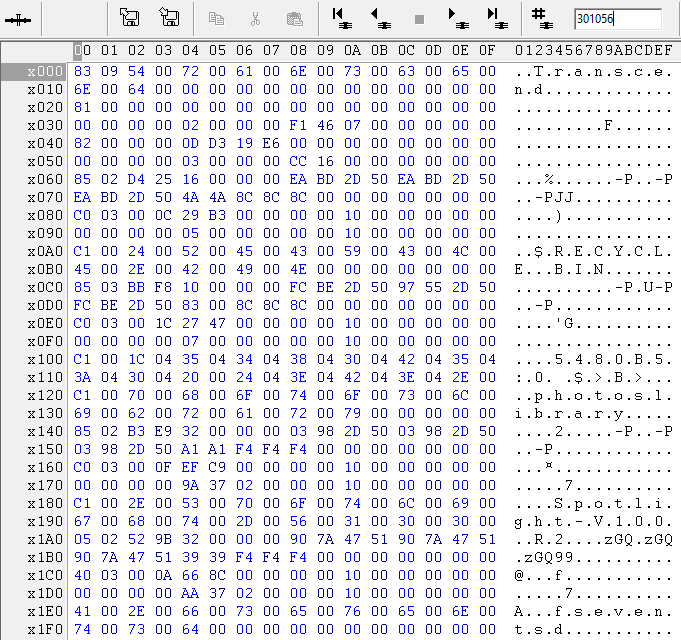
Figure: 10 ExFAT Root Directory The
"Transcend" volume label is striking. The oddity is that external drives from this manufacturer are widespread in the 2.5-inch form factor, not 3.5. And it is quite unlikely that the user himself ever decided to put a similar volume label.
Let's write down the names of the directories that are described in the root directory and ask the client questions about whether they are the required information.
So, after a little more than 10 minutes have passed, we proceed to continue the conversation with the client, during which it turns out that he is not the owner of the information and cannot shed light on what data was contained on the disk, and that he needs to make a call to the manager to clarify the task ...
In the course of the dialogue, it can be assumed that the client is the courier of an intermediary organization in the data recovery services market. Further negotiations confirm this version, since after the client announces the information, a pause follows to his manager. Apparently the manager is also not aware of what exactly should be on the disk. But after about 15 minutes, the client receives a call informing that this is exactly the data that needs to be extracted, and that their volume should be about 2TB. We are also informed that we have been provided for analysis with a sector-by-sector copy of the original media made using WinHex.
Finally, the task becomes clear and that we are on the right track. You can take the drive again from the customer and proceed to continue the diagnostic activities. Of course, if we had all this information from the very beginning, the express diagnostics procedure would be much shorter.
To reconstruct ExFAT, we need to know what the size of the cluster was for this file system, and determine the position of the zero cluster (reference point). Next, look for the remains of the file allocation table and the bitmap of the occupied space (Bitmap).
A separate unflattering word needs to be said about the ExFAT developers. For the sake of the performance of the file system, it was decided that the table only contains information about fragmented chains. Inline data does not appear in the table in any way. Creating this file system on a non-empty disk does not clear the file location table and may contain garbage data. Unfortunately, this ideology does not in the best way affect the complexity of data recovery.
When analyzing the first 2GB, parts of the ExFAT directories were found. Having estimated the size of these structures and further filling with zeros before the beginning of other data, it is easy to establish the cluster size. After browsing several directories, we see pronounced intervals of 256 (2048) sectors. This allows us to assume that the cluster size was 1,048,576 (0x100000) bytes or 1 MB.
To determine the starting point, let's look at the positions of nearby directories. Referring back to Figure 10. In particular, we are interested in the $ RECYCLE.BIN directory, since it is located almost at the very beginning. Its cluster number is indicated at offset 0x94 and is a double word (DW), in which the value 0x00000005 is written, that is, the directory is located in cluster 5. Also, pay attention to the directory "Xxxxxxxxxx Xxxx.photoslibrary", which, according to the value indicated in offset 0xF4 , located in cluster 7. These directories are good because there is a high probability that a predictable set of directories or files is expected there.
Further, from the root directory with a step of 0x100000 bytes or 256 (2048) sectors, scroll forward through the address space.

Figure: 11 ExFAT directory, possibly $ RECYCLE.BIN The
content is similar to an empty trash folder, where nothing is described except for the "desktop.ini" file. The file location at offset 0x34 indicates cluster 6 and size 0x81 (129) bytes. Let's move 1 more cluster forward
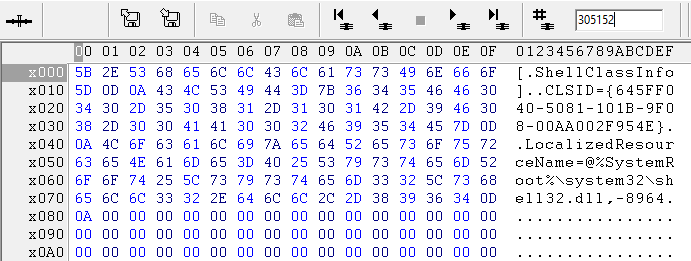
Figure: 12 Contents of the desktop.ini file The
content is very similar to what is usually seen in the files "desktop.ini" and is 0x81 (129) bytes in size. There is reason to believe that in Figure 11, the $ RECYCLE.BIN folder, and in Figure 11. 12 file described in it. If the assumption is correct, then in the next cluster we should see a directory, and its contents should probably look like a typical photoslibrary folder for MacOS on Apple Macintosh.
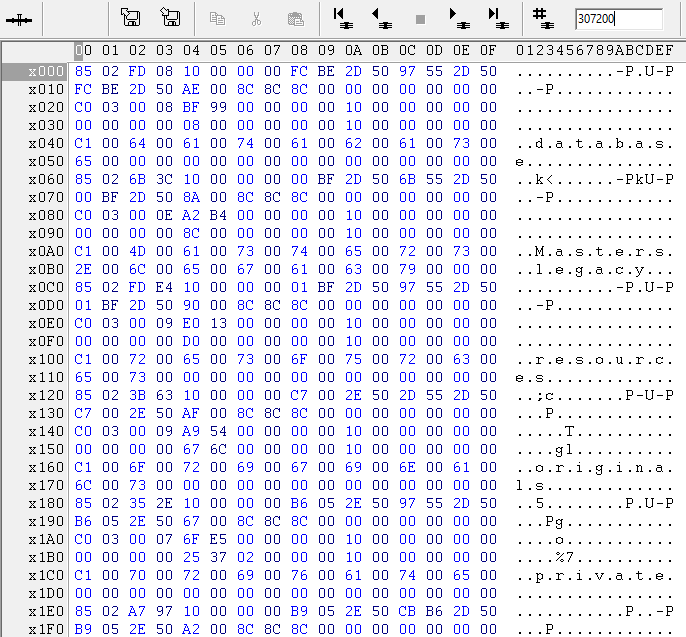
Figure: 13 Directory ExFAT, possibly Xxxxxxxxxxxxxxx.photoslibrary
As you can see, the assumption turned out to be correct, and we saw the names of the expected directories. The number of matches in this area can be considered sufficient and calculate the zero point and position of the root directory of the once-existing volume.
The root directory is in cluster 4. Since it precedes the $ RECYCLE.BIN directory whose cluster number is 5.
The zero point relative to $ RECYCLE.BIN must be at a distance of minus 5 clusters. Position $ RECYCLE.BIN 37 888 (303 104) sector. 5 clusters are 1280 (10 240) sectors. By performing a simple subtraction, we get the desired position: 37,888 (303104) - 1,280 (10240) = 36,608 (292864) or the offset from the beginning of the logical space in bytes is 292,864 * 512 = 149,946,368 (0x8F00000).
Further, having the starting point of reference, the cluster size and the position of the root directory, we will try to confirm the correctness of our assumption with a significantly larger number of checks.
Using Data Extractor tools it is not so quick to do this for the ExFAT partition, so we mount the disk in the OS (with write-disabled).

Figure: 14 Menu for mounting disks in the OS in the PC3000 Win 7 Disk utility We
use the free Image Explorer from the software center, where, by opening the disk, we can quickly write the parameters of the virtual file system and evaluate the correctness of the assumptions.

fig. 15 Expanded ExFAT directory tree
As you can see in the screenshot, the directories and files are in their places, which allows us to conclude that the file system parameters are defined correctly.
At this point, the diagnostic activities can be stopped and then the following list of works can be agreed with the client:
1. Search for regular expressions within the entire logical space to establish the possible location of various types of data.
2. At least reconstruction of one ExFAT section.
3. Analysis of intersections with new overwritten data.
4.Building an inverted map in relation to the existing data on the reconstructed file system within the intersection with Bitmap and searching for user data in these areas, followed by sorting the found.
In the case of intermediary companies, as usual, the call starts, and only after the consent of the final owner (who hardly suspects that his data will be restored in our laboratory) is the consent given to carry out the work.
Any work, even with serviceable disks, still begins with creating a sector-by-sector copy to another drive. This measure is necessary so that the client's drive remains unchanged and no OS initiatives lead to irrevocable data corruption. For a 4TB disk, copying through the PC3000Express ports will take about 10-12 hours.
After creating a copy, we start searching for various regular expressions in order to have an idea of the distribution of data in a logical space, and also to see if there are signs of other partitions and file systems on this disk.
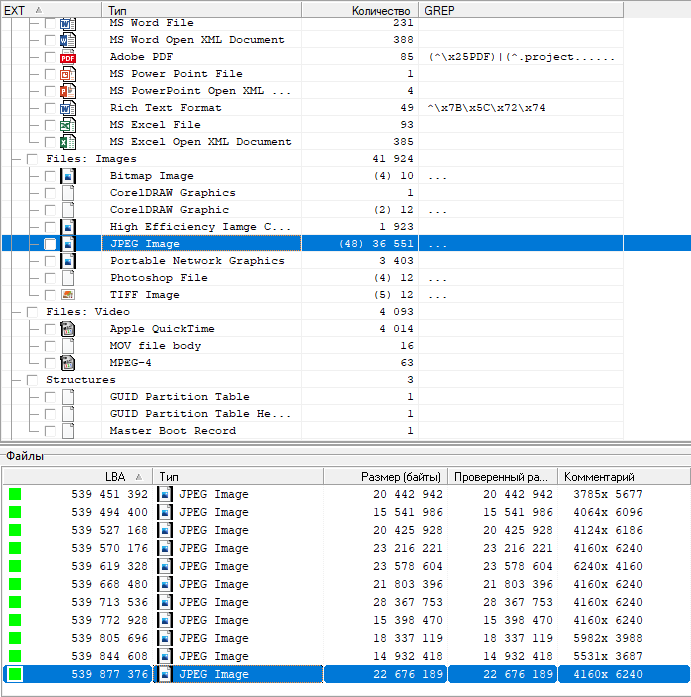
Figure: 16 Regular expression search results within the entire drive
The scan results show that the user data on the disk is definitely much less than the 2TB declared by the client. The last regex is located at sector 539 877 376 and until the end of the disk there is no longer anything similar to user data, except for the end marker of the newly created HFS +, although the disk is not all zeros until the very end. It is likely that the drive contained an encrypted volume before the ExFAT partition was created on the disk. Nothing else explains the presence of only “noisy” data.
In such a case, it is important to match the regex search result to a bitmap.
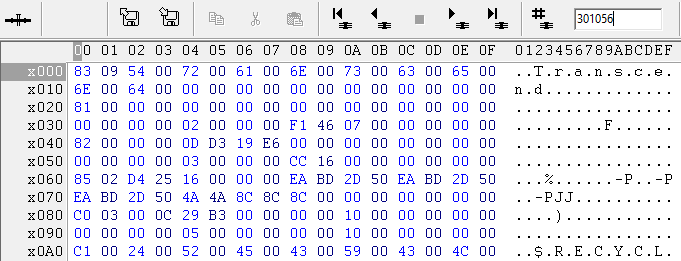
Figure: 17 Fragment of the sector of the root directory of ExFAT
At offset 0x34, the cluster number is indicated 2 - this is the position of the bitmap on the ExFAT section. The offset 0x38 indicates the size of the structure 0x0746F1 (476,913 bytes or 3,815,304 bits). When analyzing this structure, it was found that the raised bits in the card are only for the first 270GB, and then, according to the card, the section is empty. That is, the bitmap matches the regular expression search results, but both are at odds with the client's words.
Of course, if such a serious inconsistency is found, the work is suspended and you have to contact the intermediary client again and try to get answers to the questions:
1. Did they really create a full sector-by-sector copy that they gave us for analysis?
2.Is the owner really sure that this disk contained 2TB of data?
3. And if you are sure, do you agree to continue the work on data recovery knowing that data over 270GB cannot be received on this disk?
We got the answer to the first question through remote access to the original disk. And in the disk editor, having scrolled through it with some large step, they compared it with the copy that we have. It turned out that the copy was complete.
The answer to the second question was that the owner of the information believed that he saw for sure that the disk was full of 2TB, but was no longer very sure of this.
But with all the client's confidence that there was more data, still consent is given to continue the work.
Before reconstructing the filesystem, it is advisable to get an idea of how many fragmented directories there are. To do this, take the results of a rough analysis and view the size of the directories found. If there are directories with the size of records equal to the size of the cluster, then most likely fragmentation occurs, if the size of the records is less than the size of the cluster, then we can assume that the task is noticeably simplified and no manual splicing of directory fragments is required.

Figure: 18 List of found ExFAT directories
In this case, no additional complications were found, the maximum size of entries in the directory was 629,984 bytes, which is noticeably less than the cluster size.
It is also necessary to mark all areas occupied by the newly created file structures. To do this, we will build maps of the location of all structures and files on FAT32 and HFS + partitions.

Figure: 19 Map of structures and data on the HFS + volume
Let's fill in these places on the copy with a pattern that will be easy to distinguish from any user data, and also in the copy task for these areas we will change the legend from successfully read to read with errors. This will be necessary for further detection of files corrupted by overwrites.
For further more convenient use of the Data Extractor analytical tools, it is necessary to describe the section in the partition table and create a boot sector for the ExFAT partition.

Figure: 20 Table of partitions with a registered ExFAT volume
At offset 0x1D2, enter the volume type 0x07. This type is used for both NTFS and ExFAT.
At offset 0x1D6, the pointer to the beginning of the ExFAT volume. Let it be 32 sectors (0x20).
At offset 0x1DA, write the maximum allowable volume size for the classic partition table (although this value is less than the actual volume size, but in this case it is acceptable, since we do not plan to mount this damaged volume in any OS, and we need a non-zero value only for normal operation of Data Extractor tools).

Figure: 21 ExFAT boot sector
Since Data Extractor is very sensitive to the contents of the ExFAT boot sector, filling in only important fields is often insufficient (which is not very logical), and it is so easy to display the section in the internal explorer, as it was in the diagnostics in Image Explorer, not work out. Therefore, in the case of the ExFAT boot sector, it is better to take a standard template and enter the correct values into it.
For our convenience, we will write the boot sector in the form it would be if the drive were used as a device with a 512 byte sector. This will provide us with the correct operation of all the tools of the complex without unnecessary map rebuilding.
Fill in the fields:
Bytes Per Block- the number of bytes in the sector. ExFAT specifies the power to which 2 must be raised to get the size.
Block per Cluster - the number of sectors in the cluster. It also indicates the degree to which you need to raise 2 to get the quantity.
Total Clusters The number of clusters available on the volume. We enter the value 3 815 304. It is obtained by multiplying the size of the bitmap by 8.
Total Blocks - the number of sectors. The value is obtained by multiplying Total Clusters by the cluster size (which in turn is obtained by multiplying Bytes per Block by Blocks per Cluster)
FAT offset- offset from the boot sector to the file allocation table. Let's create an empty structure and put it from sector 64. Add a standard title to it.
Block Per FAT - the number of sectors occupied by the FAT table. Its size is easy to calculate based on the number of clusters. Block Per FAT = Total Clusters / (Bytes per Block / 4) with further rounding up to the nearest integer. 3815 304 / (512/4) = 29 807, 0625 = 29 808.
(No matter how hard some sources try to call ExFAT a 64-bit file system, the file allocation table is 32-bit, but, unlike FAT32, for 32 bits are used for addressing, not 28.)
Number of FATs - number of table copies. Unfortunately, when creating partitions, it is usually 1.
Cluster Heap Offset- indicates the offset to the bitmap in sectors.
Root Dir Cluster - the cluster number of the root directory.
After the section has become available in the Data Extractor explorer, we will build a map of the occupied space using a bitmap.

Figure: 22 Map of occupied space by ExFAT structures and user data according to bitmap.
We will also build a file location map based on existing file records, sort by the order in which the files are located on disk, and compare with the bitmap data.
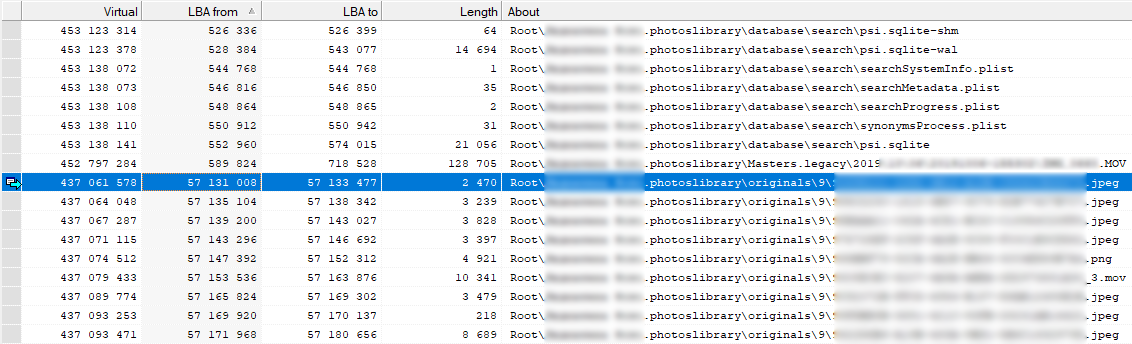
Figure: 23 Fragment of the map of the location of files available on the ExFAT volume Based
on the results of building the map of the location of files, we observe a rather extensive "hole" in the logical range from 718 528 to 57 131 008. It is obvious on the bitmap that this area is occupied by user data. Also, when searching for regular expressions across the entire disk, data signs were found in this area.
In this case, the fact of damage to this file system and the need for further analytical actions are confirmed.
Invert the file location map to get a list of chains of space that is not described by existing file records. We delete all chains, the size of which is less than the size of the cluster, since these will be free cluster fragments that are not completely occupied by the user data written to them. We map to a bitmap and leave only overlapping strings from these ranges.
The remaining result is subject to further analysis - searching for ExFAT directories. Let's create a directory in which we will form entries - pointers to the found directories, as well as enter the entries from the found fragments of directories. Found directories should be checked for the contents of entries that intersect with available directories, establish their relationships, and also check the correspondence of the file headers pointed to by the entries in these directories and filter out irrelevant directories. The loss of directories could be caused both by errors in the file system during disk exploitation, or by partial overlap of new data written to the disk.
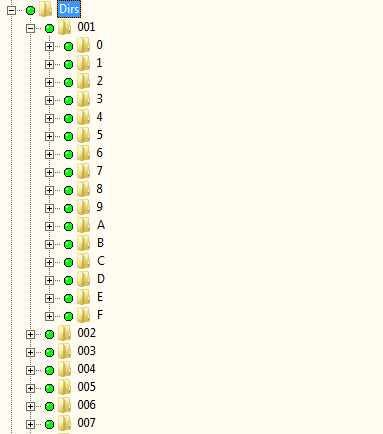
Figure: 24 Directory with pointers to found structures that have no parent object.
Further, having supplemented the file location map with objects found in the lost directories, we will proceed to repeating the procedures with the construction of an inverted map taking into account the intersection with the bitmap. In the chains obtained in this way, it is necessary to search for regular expressions for various types of user files.
This is the final stage of analytical work, the result of which will be the remains of user data, for which there are no elements of the file system describing their location. Please note that these measures helped us not to include in the final result various garbage from data that could have been deleted earlier by the user himself.
Upon completion of these operations, you can start copying the found data, taking into account the presence in the map of the location of the file sectors "read with an error" and thus weed out files that are uniquely overwritten with new data. We created the "read with error" marks after building the FAT32 and HFS + feature maps.
This completes the work. The maximum possible result of non-fragmented files was obtained while maintaining the original directory hierarchy, and almost all possible lost files were found without including in this result various garbage data typical for automatic recovery programs.
Previous post: Self-diagnostics of hard drives and data recovery