Prerequisites
A number of articles ( https://habr.com/ru/post/345320/ , habr.com/ru/post/80893 , habr.com/ru/post/246975 ) suggested that Excel can be used as a translator into AVR assembly code.
Let's compare Excel with the main features of a “regular” code editor. The list of the most popular features is as follows:
| Code editor feature | How to implement in Excel | As implemented in Atmel Studio |
|---|---|---|
| Syntax highlighting | Conditional formatting of cells based on content | Command highlighting |
| Autocompletion | Custom VBA functions;
Named ranges; Cell as a mini-console with a macro for the Change event; |
No |
| Indentation | Manually jump to an adjacent column | Manually |
| Checking the correct placement of brackets | Has built-in control | Assembly only |
| Contextual code help | No | There is a list of label names |
| Collapsing a block of code | Column and row grouping function | No |
| Static analyzer | Shows errors in links on the go | No |
Looks acceptable. Some things get "for free", something needs to be improved.
But the main difference between a spreadsheet processor and a textual one is that the user can place a block of information in an arbitrary place in the space, and not just under each other. We use this feature to turn flat code into an almost complete flowchart.
Initial agreements
Let's take the general approach and terminology from here: habr.com/ru/post/345320
The whole algorithm is divided into branches. The branch plays the role of an independent program unit.
Each branch has a name, which is the entry point to it. It must be unique and meaningful. All branch names are placed on the top line, which we will call - "name string".
A branch ends with one or more branches to other branches. Transitions from one branch to another are placed on the very bottom line. Let's call it the "transition line".
We also accept the rule that from within one branch it is impossible to go inside another.
General scheme of the algorithm

For branches and loops within a branch, labels are also used. That is, there are a lot of labels in the program. Each time coming up with a new unique name is a routine. This is where basic Excel functionality comes in. Each cell already has a unique name consisting of a column name and a row number.
In VBA, let's create a label function with an argument of type Range . A label in AVR assembler must have a colon at the end. Those. our label function receives as input a reference to the cell in which it is placed and calculates its address in the A1 format. Then it adds the text "_M:" to it. The "_M" fragment is not accidental, we will use this further - in the formatting of cells.
Transition visualization
In true visual environments, transitions are indicated by arrows. It is convenient and intuitive.
In a spreadsheet processor, instead of arrows, you can tint the cells that form the path to the label from the jump command. This is done in the examples.
If you manage to fit all the branch code into one screen, then you don't have to draw routes. All transition commands and labels will be in front of your eyes.
For block diagrams, there are standards for the designation of individual elements. For example, a rectangle is a computation; diamond - condition, etc. When working with a spreadsheet processor, we have access to color, style and border control.
Excel has a handy conditional formatting feature. It can be used in different ways, but we will introduce only three simple rules:
- A non-empty cell in the name bar and in the transition bar is colored yellow;
- A non-empty cell in the body of the branch is colored orange;
- Cells with "local" labels and jump commands are colored blue. This is a nonblank cell that contains the "_M" characters mentioned above.
The gif below shows how the work with labels and transitions looks after all the settings.
Working with labels and jump commands
The procedure for forming the final listing
The Listing Collector traverses the final program from top to bottom and right to left. One cell at a time.
How the final listing is formed

The assembly algorithm skips empty cells and cells that contain the ";" character, i.e. comments.
Debugging of the algorithm and final assembly of the project takes place in the studio. There is no code feedback in studio with Excel cells. Therefore, to catch errors in the final listing, opposite each command, we indicate a cell link. From this link, we find the problematic command in the diagram in Excel.
The basic algorithmic solution is branching like:
If <> then
    <>
Else
    <>
End if
For it, there are conditional jump instructions in the AVR assembler (breq, brne, sbic and others). These commands tell the program where to go when the condition is met.
Now let's imagine how the program of such a branching should look, taking into account the principles outlined above:
Simple branching

The brne command and its peers have a limitation. The jump distance is 64 words in each direction. Therefore, a long macro inserted into the "None" branch may call out of range.
To get around this limitation, processing "No" should be done in a separate branch, which will be to the right of the branch mark from brne . Or use a subroutine in which the macro is called.
Select Case
If you have to choose from a large number of options, the Select Case is used in Java:
Select Case <>
    Case <1>
    Case <2>
    Case <3>
    Case else
End select
Index jumps are available in assembly language for AVR. Let's show the implementation option.
Select Case

Here you can see that the prohibition of jumping from the body of a branch to another branch is violated. This is intentional, otherwise the program will take up too much horizontal space.
For the same reason, the interrupt vector should be executed in one column.
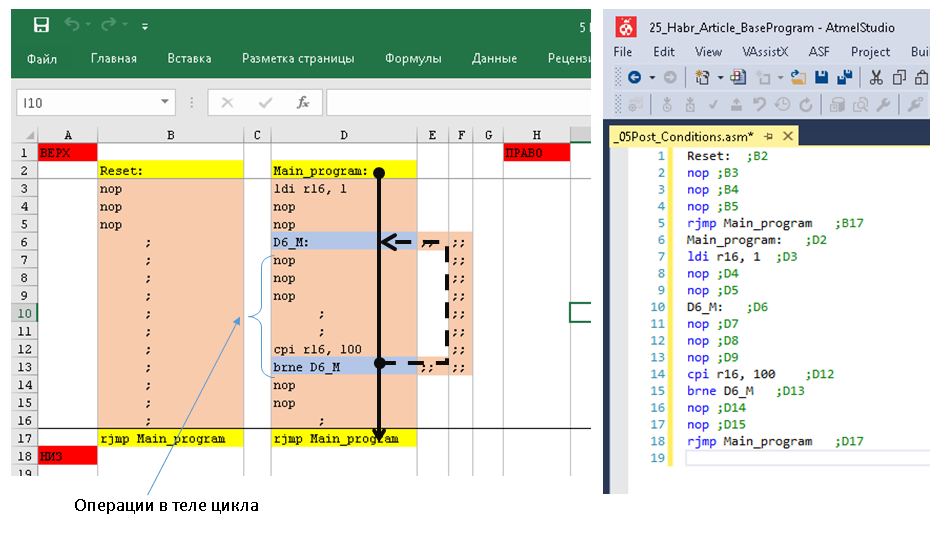
Loop with postcondition
A loop, when at least one repetition is needed, in JLU notation looks like this:
Do
    <>
Loop while <>
An example of how it looks in Excel and the resulting code in the studio:
Loop with postcondition
Loop with precondition
An example in Java:
Do while <>
	<>
Loop
An example of how it looks in Excel and the resulting code in the studio:
Loop with precondition

Loop with nested loop
Processing arrays or working with numbers involves the use of nested loops. General view of JAVU:
Do
    Do
        <>
    Loop while < 2- >
    <>
Loop while < 1- >
You can implement a nested loop in two ways: either within a single branch, or using multiple branches. Let's show both options.
Nested loops within one branch

Nested loops with implementation via branches

Loop with conditional exit
There are situations when you need to exit the cycle before it ends. For example, a logical zero on the 0th leg of port D may indicate some kind of malfunction. The program should exit the main loop and trigger an alarm.
In JLU, the break command is used , and the general algorithm is as follows:
Do
    <>
    If < > then break
Loop while <>
Let's show again how the algorithm would look like without branches and with branches.
Interrupting a loop within one branch

Interrupting a loop implemented through branches

Calling subroutines
Subroutines are called by the call , icall , rcall commands . There is an important feature here. The subroutine must be called strictly from the body of the branch. If the call is placed in a branch line, the return from the subroutine is almost guaranteed to occur in the wrong place.
Mandatory requirements for the subroutine:
- the subroutine itself must begin with a label name;
- the last command of the subroutine must be ret and placed in the jump line.
The internal structure of the subprogram can be any - apply all the same automatic label label to implement the logic.
Running light example
Here is the code of a running light test program. The example includes loops, branches and subroutine calls.
The end result looks like this:
Running light scheme

Listing the entire program in Excel with a scratch fit on one screen:
Running light. Excel code

Running light. Final listing

Outcome
What did not like
- The described method is unlikely to be suitable for working on a large project with the participation of an entire team. Version control, diffs, etc. you still have to decide on the side.
- In debug mode, it is very inconvenient without two monitors. The debugging itself is carried out in the studio, and the flowchart in Excel. These are different windows, switching is required.
- The program swells quickly in the horizontal direction. At the same time, in Excel scrolling to the side is rough and inconvenient.
- - – . 12801024 5 45 . 20% ( 45 ). – . .
- « » . .
- Excel . Atmel Studio .
- .
- . – . , .
- Excel . - , - – VBA.
- . « » , . 4-5 . « – – – » , « » , « » « ». 4-5 .
- Additional checks for errors. It is easy to organize a macro to check if there are any "dangling" blocks that do not end with transitions. Also, using a macro, we can find and remove unused labels that distract attention during debugging.
- You can enter your own rules for coloring cells.
- If a spreadsheet processor was built into the studio as a code editor, then it would be very convenient to debug directly on such a block diagram.