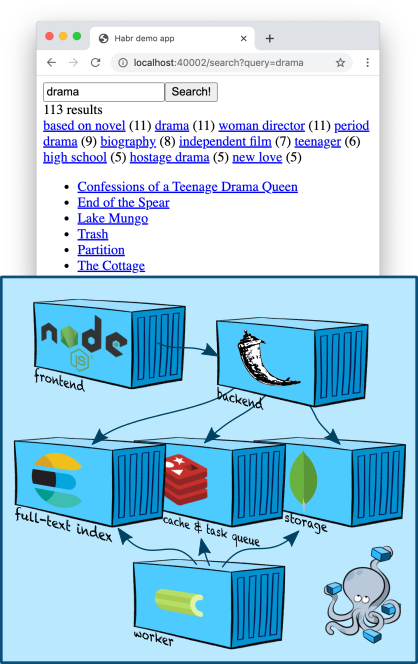
In this article I will touch upon a slightly more complex and interesting topic (at least to me, the developer of the search team): full-text search. We will add an Elasticsearch node to our container region, learn how to build an index and search through content, taking descriptions of five thousand films from TMDB 5000 Movie Dataset as test data... We will also learn how to make search filters and dig quite a bit towards ranking.
Infrastructure: Elasticsearch
Elasticsearch is a popular document store that can build full-text indexes and, as a rule, is used specifically as a search engine. Elasticsearch adds to the Apache Lucene engine , on which it is based, sharding, replication, a convenient JSON API and a million more details that have made it one of the most popular full-text search solutions.
Let's add one Elasticsearch node to ours
docker-compose.yml:
services:
  ...
  elasticsearch:
    image: "elasticsearch:7.5.1"
    environment:
      - discovery.type=single-node
    ports:
      - "9200:9200"
  ...
The environment variable
discovery.type=single-nodetells Elasticsearch to prepare to work alone, rather than looking for other nodes and merging with them into a cluster (this is the default behavior).
Note that we are publishing port 9200 outward, even though our application is navigating inside the network created by docker-compose. This is purely for debugging: this way we can access Elasticsearch directly from the terminal (until we come up with a smarter way - more on that below).
Add Elasticsearch client in our wiring is not difficult - the good, Elastic provides a minimalistic Python-client .
Indexing
In the last article, we put our main entities - "cards" into a MongoDB collection. We can quickly retrieve their contents from a collection by identifier, because MongoDB built a direct index for us - it uses B-trees for this .
Now we are faced with the inverse task - by the content (or its fragments) to get the identifiers of the cards. Therefore, we need a reverse index . This is where Elasticsearch comes in handy!
The general scheme for building an index usually looks like this.
- Create a new empty index with a unique name, configure it as needed.
- We go through all our entities in the database and put them in a new index.
- We switch production so that all queries start going to the new index.
- Removing the old index. Here at will - you may well want to store the last few indices, so that, for example, it would be more convenient to debug some problems.
Let's create the skeleton of the indexer and then go into more detail with each step.
import datetime

from elasticsearch import Elasticsearch, NotFoundError

from backend.storage.card import Card, CardDAO


class Indexer(object):

    def __init__(self, elasticsearch_client: Elasticsearch, card_dao: CardDAO, cards_index_alias: str):
        self.elasticsearch_client = elasticsearch_client
        self.card_dao = card_dao
        self.cards_index_alias = cards_index_alias

    def build_new_cards_index(self) -> str:
        #   .
        #      .
        index_name = "cards-" + datetime.datetime.now().strftime("%Y-%m-%d-%H-%M-%S")

        #   .
        #        .
        self.create_empty_cards_index(index_name)

        #         .
        #
        #       .
        for card in self.card_dao.get_all():
            self.put_card_into_index(card, index_name)
        return index_name

    def create_empty_cards_index(self, index_name):
        ...

    def put_card_into_index(self, card: Card, index_name: str):
        ...

    def switch_current_cards_index(self, new_index_name: str):
        ...
Indexing: creating an index
An index in Elasticsearch is created by a simple PUT request in
/-or, in the case of using a Python client (in our case), by calling
elasticsearch_client.indices.create(index_name, {
    ...
})
The request body can contain three fields.
- Description of aliases (
"aliases": ...). The alias system allows you to keep the knowledge of which index is currently up-to-date on the Elasticsearch side; we'll talk about it below. - Settings (
"settings": ...). When we're big guys with real production, we'll be able to configure replication, sharding, and other SRE joys here. - Data schema (
"mappings": ...). Here we can specify what type of fields in the documents that we will index, for which of these fields we need inverse indices, for which aggregations should be supported, and so on.
Now we are only interested in the scheme, and we have it very simple:
{
    "mappings": {
        "properties": {
            "name": {
                "type": "text",
                "analyzer": "english"
            },
            "text": {
                "type": "text",
                "analyzer": "english"
            },
            "tags": {
                "type": "keyword",
                "fields": {
                    "text": {
                        "type": "text",
                        "analyzer": "english"
                    }
                }
            }
        }
    }
}
We have marked the field
name, and textas the text in English. A parser is an entity in Elasticsearch that processes text before storing it into an index. In the case of the englishanalyzer, the text will be split into tokens along word boundaries ( details ), after which individual tokens will be lemmatized according to the rules of the English language (for example, the word treeswill be simplified to tree), too general lemmas (like the) will be deleted and the remaining lemmas will be put in the reverse index.
The field is a
tagslittle more complicated. A typekeywordassumes that the values of this field are some string constants that do not need to be processed by the analyzer; the inverse index will be built based on their "raw" values - without tokenization and lemmatization. But Elasticsearch will create special data structures so that aggregations can be read by the values of this field (for example, so that, simultaneously with the search, you can find out which tags were found in documents that satisfy the search query, and in what quantity). This is great for fields that are essentially enum; we will use this feature to make some cool search filters.
But so that the text of the tags can be searched by text search too, we add a subfield to it
"text", configured by analogy with nameandtextabove - in essence, this means that Elasticsearch will create another "virtual" field under the name in all documents it receives tags.text, into which it will copy the content tags, but index it according to different rules.
Indexing: filling the index
To index a document, it is enough to make a PUT request to
/-/_create/id-or, when using a Python client, just call the required method. Our implementation will look like this:
    def put_card_into_index(self, card: Card, index_name: str):
        self.elasticsearch_client.create(index_name, card.id, {
            "name": card.name,
            "text": card.markdown,
            "tags": card.tags,
        })
Pay attention to the field
tags. Although we described it as containing a keyword, we are not sending a single string, but a list of strings. Elasticsearch supports this; our document will be located at any of the values.
Indexing: switching the index
To implement a search, we need to know the name of the most recent fully built index. The alias mechanism allows us to keep this information on the Elasticsearch side.
An alias is a pointer to zero or more indices. The Elasticsearch API allows you to use an alias name instead of an index name when searching (POST
/-/_searchinstead of POST /-/_search); in this case, Elasticsearch will search all indexes pointed to by the alias.
We will create an alias called
cards, which will always point to the current index. Accordingly, switching to the actual index after completion of construction will look like this:
    def switch_current_cards_index(self, new_index_name: str):
        try:
            #      ,   .
            remove_actions = [
                {
                    "remove": {
                        "index": index_name,
                        "alias": self.cards_index_alias,
                    }
                }
                for index_name in self.elasticsearch_client.indices.get_alias(name=self.cards_index_alias)
            ]
        except NotFoundError:
            # ,  -    .
            # ,    .
            remove_actions = []

        #
        #     .
        self.elasticsearch_client.indices.update_aliases({
            "actions": remove_actions + [{
                "add": {
                    "index": new_index_name,
                    "alias": self.cards_index_alias,
                }
            }]
        })
I won't go into more detail on the alias API; all the details can be found in the documentation .
Here it is necessary to make a remark that in a real highly loaded service such a switch can be quite painful and it may make sense to do a preliminary warm-up - load the new index with some kind of pool of saved user queries.
All the code that implements indexing can be found in this commit .
Indexing: adding content
For the demonstration in this article, I am using data from the TMDB 5000 Movie Dataset . To avoid copyright problems, I only provide the code for the utility that imports them from a CSV file, which I suggest you download yourself from the Kaggle website. After downloading, just run the command
docker-compose exec -T backend python -m tools.add_movies < ~/Downloads/tmdb-movie-metadata/tmdb_5000_movies.csv
to create five thousand movie cards and a team
docker-compose exec backend python -m tools.build_index
to build an index. Please note that the last command does not actually build the index, but only puts the task in the task queue, after which it will be executed on the worker - I discussed this approach in more detail in the last article .
docker-compose logs workershow you how the worker tried!
Before we get down to the actual search, we want to see with our own eyes if anything has been written to Elasticsearch, and if so, how it looks!
The most direct and fastest way to do this is to use the Elasticsearch HTTP API. First, let's check where the alias points to:
$ curl -s localhost:9200/_cat/aliases
cards                cards-2020-09-20-16-14-18 - - - -
Great, the index exists! Let's look at it closely:
$ curl -s localhost:9200/cards-2020-09-20-16-14-18 | jq
{
  "cards-2020-09-20-16-14-18": {
    "aliases": {
      "cards": {}
    },
    "mappings": {
      ...
    },
    "settings": {
      "index": {
        "creation_date": "1600618458522",
        "number_of_shards": "1",
        "number_of_replicas": "1",
        "uuid": "iLX7A8WZQuCkRSOd7mjgMg",
        "version": {
          "created": "7050199"
        },
        "provided_name": "cards-2020-09-20-16-14-18"
      }
    }
  }
}
And finally, let's look at its contents:
$ curl -s localhost:9200/cards-2020-09-20-16-14-18/_search | jq
{
  "took": 2,
  "timed_out": false,
  "_shards": {
    "total": 1,
    "successful": 1,
    "skipped": 0,
    "failed": 0
  },
  "hits": {
    "total": {
      "value": 4704,
      "relation": "eq"
    },
    "max_score": 1,
    "hits": [
      ...
    ]
  }
}
In total, our index is 4704 documents, and in the field
hits(which I skipped because it is too large) you can even see the contents of some of them. Success!
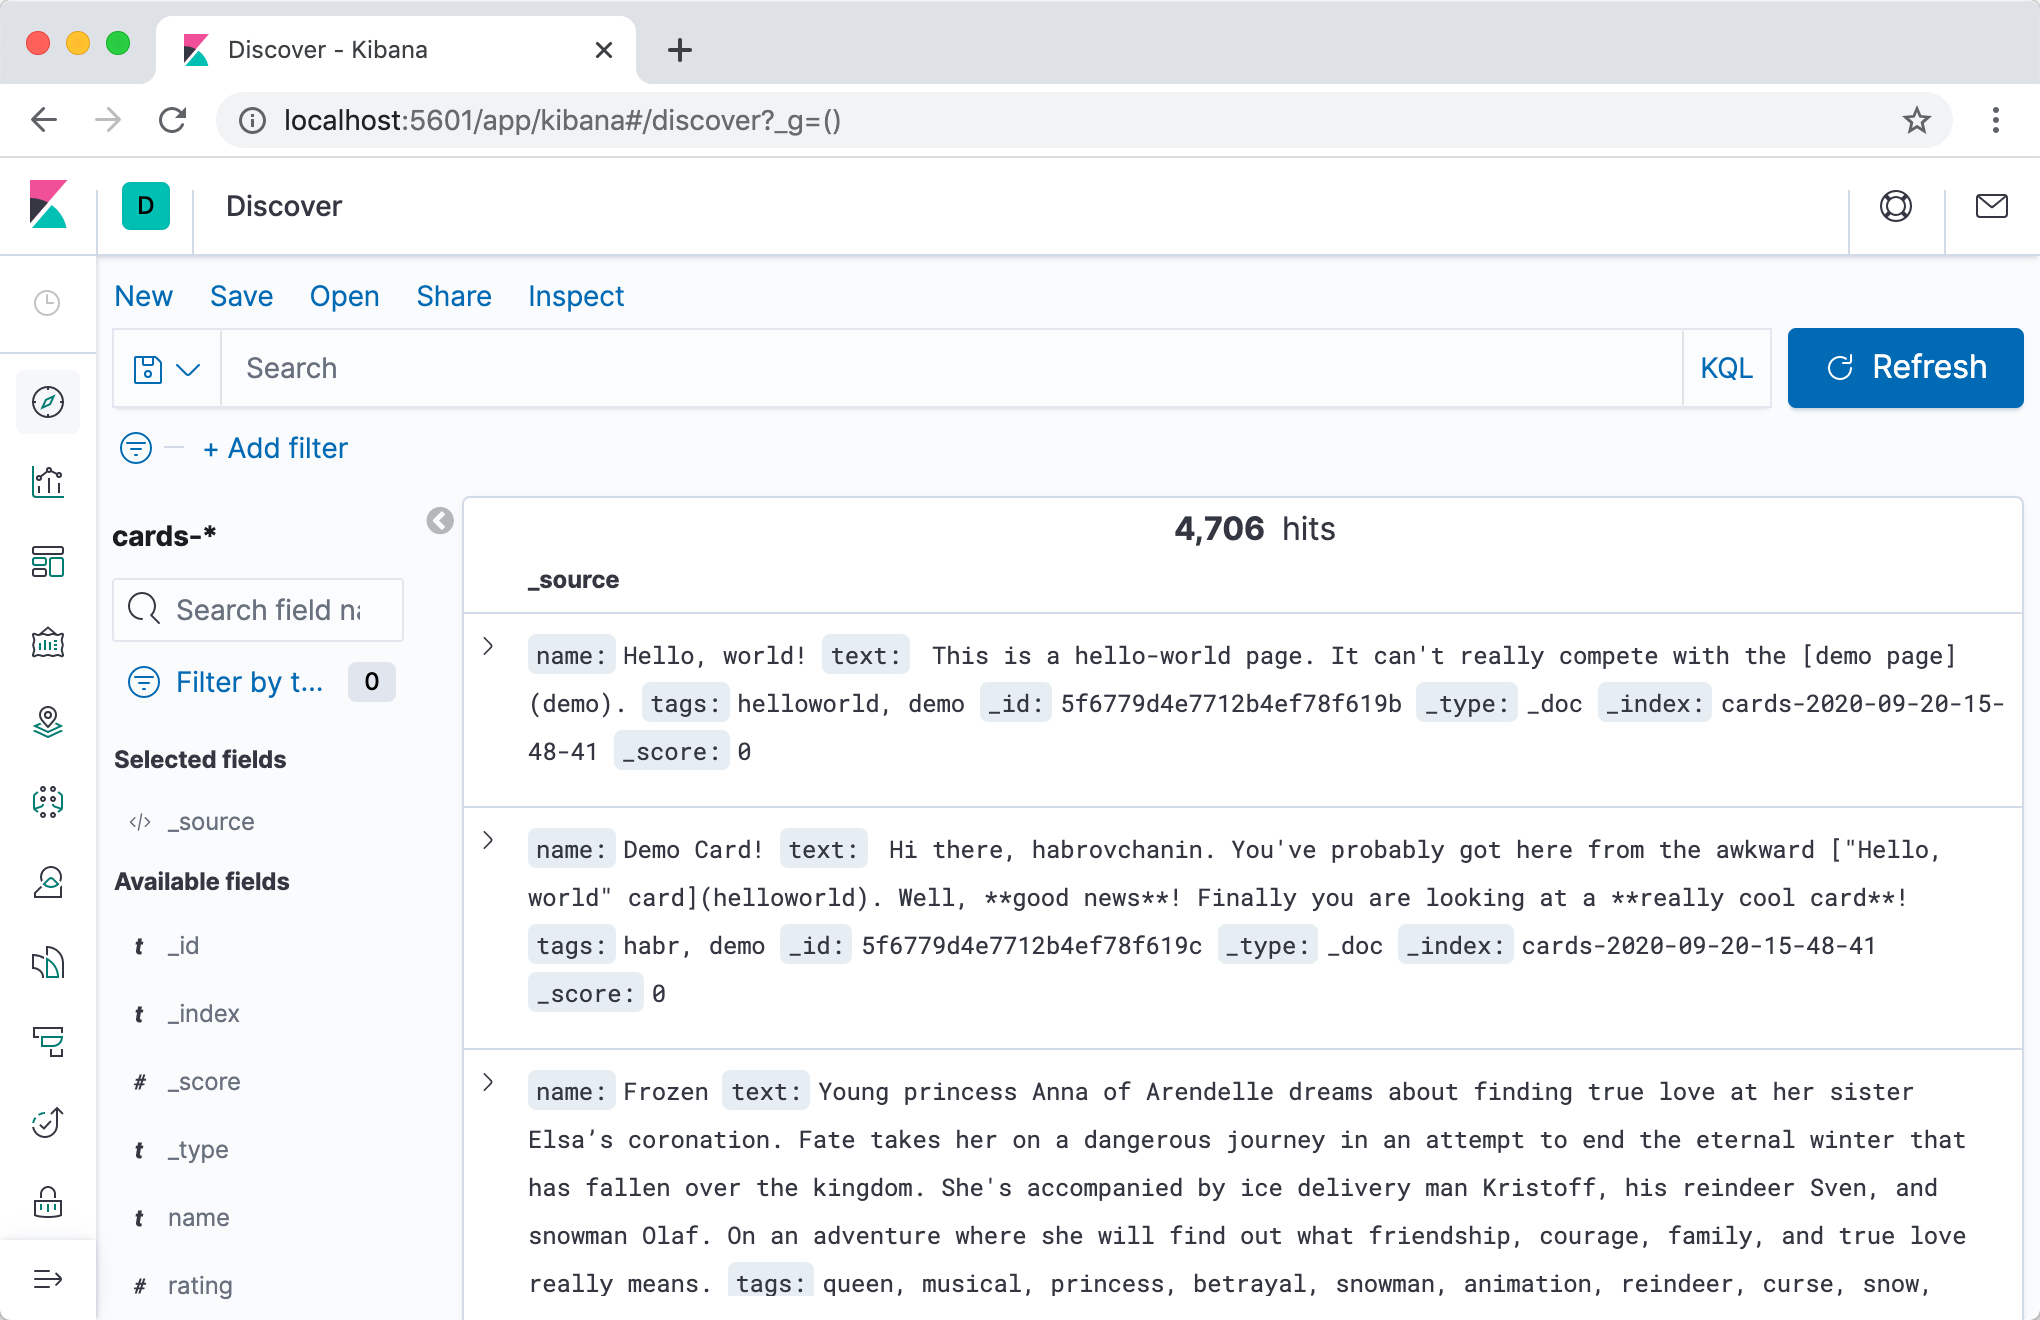
A more convenient way to browse the contents of the index and generally all sorts of pampering with Elasticsearch would be to use Kibana . Let's add the container to
docker-compose.yml:
services:
  ...
  kibana:
    image: "kibana:7.5.1"
    ports:
      - "5601:5601"
    depends_on:
      - elasticsearch
  ...
After a second time,
docker-compose upwe can go to Kibana at the address localhost:5601(attention, the server may not start quickly) and, after a short setup, view the contents of our indexes in a nice web interface.
I highly recommend the Dev Tools tab - during development, you will often need to make certain requests in Elasticsearch, and in interactive mode with auto-completion and auto-formatting it is much more convenient.
Search
After all the incredibly boring preparations, it's time for us to add search functionality to our web application!
Let's divide this non-trivial task into three stages and discuss each separately.
- Add a component
Searcherresponsible for the search logic to the backend . It will form a query to Elasticsearch and convert the results into more digestible for our backend. - Add an endpoint to the API (handle / route / what do you call it in your company?) That
/cards/searchperforms the search. It will call the component's methodSearcher, process the resulting results, and return it to the client. - Let's implement the search interface on the frontend. It will contact
/cards/searchwhen the user has decided what he wants to search for, and display the results (and, possibly, some additional controls).
Search: we implement
It is not so difficult to write a search manager as to design one. Let's describe the search result and the manager interface and discuss why it is this and not different.
# backend/backend/search/searcher.py

import abc
from dataclasses import dataclass
from typing import Iterable, Optional


@dataclass
class CardSearchResult:
    total_count: int
    card_ids: Iterable[str]
    next_card_offset: Optional[int]


class Searcher(metaclass=abc.ABCMeta):

    @abc.abstractmethod
    def search_cards(self, query: str = "",
                     count: int = 20, offset: int = 0) -> CardSearchResult:
        pass
Some things are obvious. For example, pagination. We're an ambitious young
Some are less obvious. For example, a list of IDs, not cards as a result. Elasticsearch stores our entire documents by default and returns them in search results. This behavior can be turned off to save on the size of the search index, but for us this is clearly a premature optimization. So why not return the cards right away? Answer: This would violate the single-responsibility principle. Perhaps someday we will wind up complex logic in the card manager that translates cards into other languages, depending on the user's settings. Exactly at this moment, the data on the card page and the data in the search results will be dispersed, because we will forget to add the same logic to the search manager. And so on and so forth.
The implementation of this interface is so simple that I was too lazy to write this section :-(
# backend/backend/search/searcher_impl.py

from typing import Any

from elasticsearch import Elasticsearch

from backend.search.searcher import CardSearchResult, Searcher


ElasticsearchQuery = Any  #


class ElasticsearchSearcher(Searcher):

    def __init__(self, elasticsearch_client: Elasticsearch, cards_index_name: str):
        self.elasticsearch_client = elasticsearch_client
        self.cards_index_name = cards_index_name

    def search_cards(self, query: str = "", count: int = 20, offset: int = 0) -> CardSearchResult:
        result = self.elasticsearch_client.search(index=self.cards_index_name, body={
            "size": count,
            "from": offset,
            "query": self._make_text_query(query) if query else self._match_all_query
        })
        total_count = result["hits"]["total"]["value"]
        return CardSearchResult(
            total_count=total_count,
            card_ids=[hit["_id"] for hit in result["hits"]["hits"]],
            next_card_offset=offset + count if offset + count < total_count else None,
        )

    def _make_text_query(self, query: str) -> ElasticsearchQuery:
        return {
            # Multi-match query
            #    (   match
            # query,     ).
            "multi_match": {
                "query": query,
                #   ^ – .
                #    ,     .
                "fields": ["name^3", "tags.text", "text"],
            }
        }

    _match_all_query: ElasticsearchQuery = {"match_all": {}}
In fact, we just go to the Elasticsearch API and carefully extract the IDs of the found cards from the result.
The endpoint implementation is also pretty trivial:
# backend/backend/server.py

...

    def search_cards(self):
        request = flask.request.json
        search_result = self.wiring.searcher.search_cards(**request)
        cards = self.wiring.card_dao.get_by_ids(search_result.card_ids)
        return flask.jsonify({
            "totalCount": search_result.total_count,
            "cards": [
                {
                    "id": card.id,
                    "slug": card.slug,
                    "name": card.name,
                    #     ,
                    #     ,
                    #  .
                } for card in cards
            ],
            "nextCardOffset": search_result.next_card_offset,
        })

...
The implementation of the frontend using this endpoint, although voluminous, is generally quite straightforward and in this article I do not want to dwell on it. The entire code can be viewed in this commit .

So far so good, let's move on.
 Search: adding filters
Searching in text is cool, but if you've ever searched on serious resources, you've probably seen all sorts of goodies like filters.
Our descriptions of films from the TMDB 5000 database have tags in addition to titles and descriptions, so let's implement filters by tags for training. Our goal is on the screenshot: when you click on a tag, only films with this tag should remain in the search results (their number is indicated in brackets next to it).

To implement filters, we need to solve two problems.
- Learn to understand on request which set of filters is available. We do not want to display all possible filter values on every screen, because there are a lot of them and most of them will lead to an empty result; you need to understand what tags the documents found by request have, and ideally leave the N most popular.
- To learn, in fact, to apply a filter - to leave in the search results only documents with tags, the filter by which the user has chosen.
The second in Elasticsearch is simply implemented through the query API (see terms query ), the first is through a slightly less trivial aggregation mechanism .
So, we need to know what tags are found in the found cards, and be able to filter cards with the necessary tags. First, let's update the search manager design:
# backend/backend/search/searcher.py

import abc
from dataclasses import dataclass
from typing import Iterable, Optional


@dataclass
class TagStats:
    tag: str
    cards_count: int


@dataclass
class CardSearchResult:
    total_count: int
    card_ids: Iterable[str]
    next_card_offset: Optional[int]
    tag_stats: Iterable[TagStats]


class Searcher(metaclass=abc.ABCMeta):

    @abc.abstractmethod
    def search_cards(self, query: str = "",
                     count: int = 20, offset: int = 0,
                     tags: Optional[Iterable[str]] = None) -> CardSearchResult:
        pass
Now let's move on to the implementation. The first thing we need to do is to start an aggregation by the field
tags:
--- a/backend/backend/search/searcher_impl.py
+++ b/backend/backend/search/searcher_impl.py
@@ -10,6 +10,8 @@ ElasticsearchQuery = Any

 class ElasticsearchSearcher(Searcher):

+    TAGS_AGGREGATION_NAME = "tags_aggregation"
+
     def __init__(self, elasticsearch_client: Elasticsearch, cards_index_name: str):
         self.elasticsearch_client = elasticsearch_client
         self.cards_index_name = cards_index_name
@@ -18,7 +20,12 @@ class ElasticsearchSearcher(Searcher):
         result = self.elasticsearch_client.search(index=self.cards_index_name, body={
             "size": count,
             "from": offset,
             "query": self._make_text_query(query) if query else self._match_all_query,
+            "aggregations": {
+                self.TAGS_AGGREGATION_NAME: {
+                    "terms": {"field": "tags"}
+                }
+            }
         })
Now, in the search result from Elasticsearch, a field will come
aggregationsfrom which, using a key, TAGS_AGGREGATION_NAMEwe can get buckets containing information about what values are in the field tagsfor the found documents and how often they occur. Let's extract this data and return it as designed above:
--- a/backend/backend/search/searcher_impl.py
+++ b/backend/backend/search/searcher_impl.py
@@ -28,10 +28,15 @@ class ElasticsearchSearcher(Searcher):
         total_count = result["hits"]["total"]["value"]
+        tag_stats = [
+            TagStats(tag=bucket["key"], cards_count=bucket["doc_count"])
+            for bucket in result["aggregations"][self.TAGS_AGGREGATION_NAME]["buckets"]
+        ]
         return CardSearchResult(
             total_count=total_count,
             card_ids=[hit["_id"] for hit in result["hits"]["hits"]],
             next_card_offset=offset + count if offset + count < total_count else None,
+            tag_stats=tag_stats,
         )
Adding a filter application is the easiest part:
--- a/backend/backend/search/searcher_impl.py
+++ b/backend/backend/search/searcher_impl.py
@@ -16,11 +16,17 @@ class ElasticsearchSearcher(Searcher):
         self.elasticsearch_client = elasticsearch_client
         self.cards_index_name = cards_index_name

-    def search_cards(self, query: str = "", count: int = 20, offset: int = 0) -> CardSearchResult:
+    def search_cards(self, query: str = "", count: int = 20, offset: int = 0,
+                     tags: Optional[Iterable[str]] = None) -> CardSearchResult:
         result = self.elasticsearch_client.search(index=self.cards_index_name, body={
             "size": count,
             "from": offset,
-            "query": self._make_text_query(query) if query else self._match_all_query,
+            "query": {
+                "bool": {
+                    "must": self._make_text_queries(query),
+                    "filter": self._make_filter_queries(tags),
+                }
+            },
             "aggregations": {
Subqueries included in the must-clause are required, but they will also be taken into account when calculating the speed of documents and, accordingly, ranking; if we ever add any more conditions to the texts, it is better to add them here. The subqueries in the filter clause only filter without affecting the speed and ranking.
It remains to implement
_make_filter_queries():
    def _make_filter_queries(self, tags: Optional[Iterable[str]] = None) -> List[ElasticsearchQuery]:
        return [] if tags is None else [{
            "term": {
                "tags": {
                    "value": tag
                }
            }
        } for tag in tags]
Again, I will not dwell on the front-end part; all the code is in this commit .
Ranging
So, our search looks for cards, filters them according to a given list of tags and displays them in some order. But which one? The order is very important for a practical search, but all we did during our litigation in terms of order was hinted to Elasticsearch that finding words in the heading of the card is more profitable than in the description or tags by specifying the priority
^3in the multi-match query.
Despite the fact that by default Elasticsearch ranks documents with a rather tricky TF-IDF based formula, for our imaginary ambitious startup, this is hardly enough. If our documents are goods, we need to be able to account for their sales; if it is user-generated content, be able to take into account its freshness, and so on. But we cannot simply sort by the number of sales / date of addition, because then we will not take into account the relevance to the search query.
Ranking is a large and confusing realm of technology that cannot be covered in one section at the end of this article. So here I am switching to large strokes; I will try to tell you in the most general terms how industrial grade ranking can be arranged in search, and I will reveal some technical details of how it can be implemented with Elasticsearch.
The task of ranking is very complex, so it is not surprising that one of the main modern methods of solving it is machine learning. Applying machine learning technologies to ranking is collectively called learning to rank .
A typical process looks like this.
We decide what we want to rank . We put the entities of interest to us in the index, learn how to get some reasonable top (for example, some simple sorting and cutting off) of these entities for a given search query, and now we want to learn how to rank it in a more intelligent way.
Determining how we want to rank... We decide on what characteristic we want to rank our results in accordance with the business goals of our service. For example, if our entities are products we sell, we may want to sort them in descending order of likelihood of purchase; if memes - by likelihood of like or share, and so on. We, of course, do not know how to calculate these probabilities - at best we can estimate, and even then only for old entities for which we have enough statistics - but we will try to teach the model to predict them based on indirect signs.
Extracting signs... We come up with a set of features for our entities that could help us assess the relevance of entities to search queries. In addition to the same TF-IDF, which already knows how to calculate Elasticsearch for us, a typical example is CTR (click-through rate): we take the logs of our service for the entire time, for each pair of entity + search query we count how many times the entity appeared in the search results for this request and how many times it has been clicked, we divide one by the other, et voilà - the simplest estimate of the conditional click probability is ready. We can also come up with user-specific traits and user-entity paired traits to personalize rankings. Having come up with signs, we write a code that calculates them, puts them in some kind of storage and knows how to give them in real time for a given search query, user and a set of entities.
Putting together a training dataset . There are many options, but all of them, as a rule, are formed from the logs of "good" (for example, a click and then a purchase) and "bad" (for example, a click and return to issue) events in our service. When we have collected a dataset, whether it is a list of statements “the assessment of the relevance of product X to query Q is approximately equal to P”, a list of pairs “product X is more relevant to product Y to query Q” or a set of lists “for query Q, products P 1 , P 2 , ... correctly rank as -that ", we tighten the corresponding signs to all the lines appearing in it.
We train the model . Here are all the ML classics: train / test, hyperparameters, retraining,
We embed the model . It remains for us, one way or another, to screw the calculation of the model on the fly for the entire top, so that the already ranked results reach the user. There are many options; for illustrative purposes, I will (again) focus on a simple Elasticsearch plugin Learning to Rank .
Ranking: Elasticsearch Learning to Rank Plugin
Elasticsearch Learning to Rank is a plugin that adds to Elasticsearch the ability to compute an ML model in the SERP and immediately rank the results according to the calculated rates. It will also help us get features identical to those used in real time, while reusing the capabilities of Elasticsearch (TF-IDF and the like).
First, we need to connect the plugin in our container with Elasticsearch. We need a simple Dockerfile
# elasticsearch/Dockerfile

FROM elasticsearch:7.5.1
RUN ./bin/elasticsearch-plugin install --batch http://es-learn-to-rank.labs.o19s.com/ltr-1.1.2-es7.5.1.zip
and related changes to
docker-compose.yml:
--- a/docker-compose.yml
+++ b/docker-compose.yml
@@ -5,7 +5,8 @@ services:
   elasticsearch:
-    image: "elasticsearch:7.5.1"
+    build:
+      context: elasticsearch
     environment:
       - discovery.type=single-node
We also need plugin support in the Python client. With amazement I found that support for Python does not go complete with plug-in, so especially for this article I have it washed down . Add
elasticsearch_ltrto requirements.txtand upgrade the client in wiring:
--- a/backend/backend/wiring.py
+++ b/backend/backend/wiring.py
@@ -1,5 +1,6 @@
 import os

+from elasticsearch_ltr import LTRClient
 from celery import Celery
 from elasticsearch import Elasticsearch
 from pymongo import MongoClient
@@ -39,5 +40,6 @@ class Wiring(object):
         self.task_manager = TaskManager(self.celery_app)

         self.elasticsearch_client = Elasticsearch(hosts=self.settings.ELASTICSEARCH_HOSTS)
+        LTRClient.infect_client(self.elasticsearch_client)
         self.indexer = Indexer(self.elasticsearch_client, self.card_dao, self.settings.CARDS_INDEX_ALIAS)
         self.searcher: Searcher = ElasticsearchSearcher(self.elasticsearch_client, self.settings.CARDS_INDEX_ALIAS)
Ranking: sawing signs
Each request in Elasticsearch returns not only a list of IDs of documents that were found, but also some of them soon (how would you translate the word score into Russian?). So, if this is a match or multi-match query that we are using, then fast is the result of calculating that very tricky formula involving TF-IDF; if bool query is a combination of nested query rates; if function score query- the result of calculating a given function (for example, the value of some numeric field in a document), and so on. The ELTR plugin provides us with the ability to use the speed of any query as a sign, allowing us to easily combine data on how well the document matches the request (via multi-match query) and some pre-calculated statistics that we put into the document in advance (via the function score query) ...
Since we have a TMDB 5000 database in our hands, which contains descriptions of films and, among other things, their ratings, let's take the rating as an exemplary pre-calculated feature.
In this commitI added some basic infrastructure for storing features to the backend of our web application and supported loading the rating from the movie file. In order not to force you to read another bunch of code, I will describe the most basic.
- We will store the features in a separate collection and get them by a separate manager. Dumping all data into one entity is a bad practice.
- We will contact this manager at the indexing stage and put all the available features in the indexed documents.
- To know the index schema, we need to know the list of all existing features before starting to build the index. We will hardcode this list for now.
- Since we are not going to filter documents by feature values, but are only going to extract them from already found documents for calculating the model, we will turn off the construction of inverse indices by new fields with an option
index: falsein the schema and save a little space due to this.
Ranking: collecting the dataset
Since, firstly, we do not have production, and secondly, the margins of this article are too small to talk about telemetry, Kafka, NiFi, Hadoop, Spark and building ETL processes, I will just generate random views and clicks for our cards and some kind of search queries. After that, you will need to calculate the characteristics for the resulting card-request pairs.
It's time to dig deeper into the ELTR plugin API. To calculate features, we will need to create a feature store entity (as far as I understand, this is actually just an index in Elasticsearch in which the plugin stores all its data), then create a feature set - a list of features with a description of how to calculate each of them. After that, it will be enough for us to go to Elasticsearch with a special request to get a vector of feature values for each found entity as a result.
Let's start by creating a feature set:
# backend/backend/search/ranking.py

from typing import Iterable, List, Mapping

from elasticsearch import Elasticsearch
from elasticsearch_ltr import LTRClient

from backend.search.features import CardFeaturesManager


class SearchRankingManager:

    DEFAULT_FEATURE_SET_NAME = "card_features"

    def __init__(self, elasticsearch_client: Elasticsearch,
                 card_features_manager: CardFeaturesManager,
                 cards_index_name: str):
        self.elasticsearch_client = elasticsearch_client
        self.card_features_manager = card_features_manager
        self.cards_index_name = cards_index_name

    def initialize_ranking(self, feature_set_name=DEFAULT_FEATURE_SET_NAME):
        ltr: LTRClient = self.elasticsearch_client.ltr
        try:
            #  feature store   ,
            #        ¯\_(ツ)_/¯
            ltr.create_feature_store()
        except Exception as exc:
            if "resource_already_exists_exception" not in str(exc):
                raise
        #  feature set    !
        ltr.create_feature_set(feature_set_name, {
            "featureset": {
                "features": [
                    #
                    #      ,
                    #     ,
                    #     .
                    self._make_feature("name_tf_idf", ["query"], {
                        "match": {
                            # ELTR
                            # ,  .
                            #  , ,
                            # ,
                            #  match query.
                            "name": "{{query}}"
                        }
                    }),
                    #  ,    .
                    self._make_feature("combined_tf_idf", ["query"], {
                        "multi_match": {
                            "query": "{{query}}",
                            "fields": ["name^3", "tags.text", "text"]
                        }
                    }),
                    *(
                        #
                        #    function score.
                        #   -
                        #   ,  0.
                        # (
                        #   !)
                        self._make_feature(feature_name, [], {
                            "function_score": {
                                "field_value_factor": {
                                    "field": feature_name,
                                    "missing": 0

                                }
                            }
                        })
                        for feature_name in sorted(self.card_features_manager.get_all_feature_names_set())
                    )
                ]
            }
        })


    @staticmethod
    def _make_feature(name, params, query):
        return {
            "name": name,
            "params": params,
            "template_language": "mustache",
            "template": query,
        }
Now - a function that calculates features for a given query and cards:
    def compute_cards_features(self, query: str, card_ids: Iterable[str],
                                feature_set_name=DEFAULT_FEATURE_SET_NAME) -> Mapping[str, List[float]]:
        card_ids = list(card_ids)
        result = self.elasticsearch_client.search({
            "query": {
                "bool": {
                    #    ,
                    #       —  ,
                    #     .
                    #      ID.
                    "filter": [
                        {
                            "terms": {
                                "_id": card_ids
                            }
                        },
                        #  —    ,
                        #   SLTR.
                        #
                        # feature set.
                        # (  ,
                        # filter,     .)
                        {
                            "sltr": {
                                "_name": "logged_featureset",
                                "featureset": feature_set_name,
                                "params": {
                                    #   .
                                    # ,  ,
                                    #
                                    #  {{query}}.
                                    "query": query
                                }
                            }
                        }
                    ]
                }
            },
            #
            #        .
            "ext": {
                "ltr_log": {
                    "log_specs": {
                        "name": "log_entry1",
                        "named_query": "logged_featureset"
                    }
                }
            },
            "size": len(card_ids),
        })
        #      (
        # )  .
        # ( ,
        # ,       Kibana.)
        return {
            hit["_id"]: [feature.get("value", float("nan")) for feature in hit["fields"]["_ltrlog"][0]["log_entry1"]]
            for hit in result["hits"]["hits"]
        }
A simple script that accepts CSV with requests and ID cards as input and outputs CSV with the following features:
# backend/tools/compute_movie_features.py

import csv
import itertools
import sys

import tqdm

from backend.wiring import Wiring

if __name__ == "__main__":
    wiring = Wiring()

    reader = iter(csv.reader(sys.stdin))
    header = next(reader)

    feature_names = wiring.search_ranking_manager.get_feature_names()
    writer = csv.writer(sys.stdout)
    writer.writerow(["query", "card_id"] + feature_names)

    query_index = header.index("query")
    card_id_index = header.index("card_id")

    chunks = itertools.groupby(reader, lambda row: row[query_index])
    for query, rows in tqdm.tqdm(chunks):
        card_ids = [row[card_id_index] for row in rows]
        features = wiring.search_ranking_manager.compute_cards_features(query, card_ids)
        for card_id in card_ids:
            writer.writerow((query, card_id, *features[card_id]))
Finally, you can run it all!
#  feature set
docker-compose exec backend python -m tools.initialize_search_ranking

#
docker-compose exec -T backend \
    python -m tools.generate_movie_events \
    < ~/Downloads/tmdb-movie-metadata/tmdb_5000_movies.csv \
    > ~/Downloads/habr-app-demo-dataset-events.csv

#
docker-compose exec -T backend \
    python -m tools.compute_features \
    < ~/Downloads/habr-app-demo-dataset-events.csv \
    > ~/Downloads/habr-app-demo-dataset-features.csv
Now we have two files - with events and signs - and we can start training.
Ranking: train and implement the model
Let's skip the details of loading datasets (you can see the full script in this commit ) and get straight to the point.
# backend/tools/train_model.py

...

if __name__ == "__main__":
    args = parser.parse_args()

    feature_names, features = read_features(args.features)
    events = read_events(args.events)

    #    train  test   4  1.
    all_queries = set(events.keys())
    train_queries = random.sample(all_queries, int(0.8 * len(all_queries)))
    test_queries = all_queries - set(train_queries)

    # DMatrix —   ,  xgboost.
    #
    #  .      1,   ,
    #  0,    ( .  ).
    train_dmatrix = make_dmatrix(train_queries, events, feature_names, features)
    test_dmatrix = make_dmatrix(test_queries, events, feature_names, features)

    #  !
    #
    #  ML,
    #     XGBoost.
    param = {
        "max_depth": 2,
        "eta": 0.3,
        "objective": "binary:logistic",
        "eval_metric": "auc",
    }
    num_round = 10
    booster = xgboost.train(param, train_dmatrix, num_round, evals=((train_dmatrix, "train"), (test_dmatrix, "test")))

    #     .
    booster.dump_model(args.output, dump_format="json")

    #    ,   :
    #         ROC-.
    xgboost.plot_importance(booster)

    plt.figure()
    build_roc(test_dmatrix.get_label(), booster.predict(test_dmatrix))

    plt.show()
Launch
python backend/tools/train_search_ranking_model.py \
    --events ~/Downloads/habr-app-demo-dataset-events.csv \
    --features ~/Downloads/habr-app-demo-dataset-features.csv \
     -o ~/Downloads/habr-app-demo-model.xgb
Please note that since we exported all the necessary data with the previous scripts, this script no longer needs to be run inside docker - it needs to be run on your machine, having previously installed
xgboostand sklearn. Similarly, in real production, the previous scripts would need to be run somewhere where there is access to the production environment, but this one is not.
If everything is done correctly, the model will successfully train and we will see two beautiful pictures. The first is a graph of the significance of the features:

Although the events were generated randomly,
combined_tf_idfturned out to be much more significant than others - because I made a trick and artificially lowered the probability of a click for cards that are lower in the search results, ranked in our old way. The fact that the model noticed this is a good sign and a sign that we did not make any completely stupid mistakes in the learning process.
The second graph is the ROC curve : The

blue line is above the red line, which means our model predicts labels a little better than a coin toss. (Mom's friend's ML engineer curve should almost touch the top left corner.)
The matter is quite small - we add a script for filling the model , fill it in and add a small new item to the search query - rescoring:
--- a/backend/backend/search/searcher_impl.py
+++ b/backend/backend/search/searcher_impl.py
@@ -27,6 +30,19 @@ class ElasticsearchSearcher(Searcher):
                     "filter": list(self._make_filter_queries(tags, ids)),
                 }
             },
+            "rescore": {
+                "window_size": 1000,
+                "query": {
+                    "rescore_query": {
+                        "sltr": {
+                            "params": {
+                                "query": query
+                            },
+                            "model": self.ranking_manager.get_current_model_name()
+                        }
+                    }
+                }
+            },
             "aggregations": {
                 self.TAGS_AGGREGATION_NAME: {
                     "terms": {"field": "tags"}
Now, after Elasticsearch performs the search we want and ranks the results with its (fairly fast) algorithm, we will take the top 1000 results and re-rank using our (relatively slow) machine-learned formula. Success!
Conclusion
We took our minimalistic web application and went from no search feature per se to a scalable solution with many advanced features. This was not so easy to do. But it's not that difficult either! The final application lies in the repository on Github in a branch with a modest name
feature/searchand requires Docker and Python 3 with machine learning libraries to run.
I used Elasticsearch to show how this works in general, what problems are encountered and how they can be solved, but this is certainly not the only tool to choose from. Solr , PostgreSQL full-text indexes, and other engines also deserve your attention when choosing what to build your
And, of course, this solution does not pretend to be complete and ready for production, but is only an illustration of how everything can be done. You can improve it almost endlessly!
- Incremental indexing. When modifying our cards through
CardManagerit would be good to immediately update them in the index. In orderCardManagernot to know that we also have a search in the service, and to do without cyclic dependencies, we will have to screw dependency inversion in one form or another. - For indexing in our particular case, MongoDB bundles with Elasticsearch, you can use ready-made solutions like mongo-connector .
- , — Elasticsearch .
- , , .
- , , . -, -, - … !
- ( , ), ( ). , .
- , , .
- Orchestrating a cluster of nodes with sharding and replication is a whole separate pleasure.
But to keep the article readable in size, I will stop there and leave you alone with these challenges. Thanks for attention!