kotlinx.android.synthetic is no longer a recommended practice. Removing in favor of explicit findViewById
Of course, this was very convenient, especially if you have a project entirely in Kotlin. However, the world is changing and now we need to look for alternatives. In this article, we'll take a quick look at what the Kotlin Android Extension plugin is, what the problems were with it, and what we, Android developers, should do now. In part, the material in this article was used . So let's go.
Kotlin Android Extensions at a glance
Kotlin Android Extensions is a Kotlin plugin that allows you to restore views from Activities, Fragments, and Views without writing standard boilerplate code like findViewById.
The plugin generates additional code that allows you to access the view as XML, just as if you were dealing with the properties named id that you used when defining the structure.
It also creates a local view cache. On first use of the property, the plugin will execute the standard findViewById. Subsequently, the view will be restored from the cache, so access to it will be faster.
If it's all so convenient, then why deprecated it?
Kotlin Android Extensions issues
- . , view — , id.
- Kotlin ()
- Null Safety. , view — , .
- . : UI Kit, UI-, . issues . findViewById :(
- , , — , , . — Kotlin Android Extensions .
- KotterKnife (, ).
- FindViewById() — , .
- AndroidAnnotations ( 2015)
- View Binding Google — !
View Binding Google
So the winner on this list is Google's ViewBinding (not to be confused with DataBinding). Let's take a quick look at what it is.
View Binding is a tool that makes it easier to write code to interact with a view. When you enable the View Binding in a specific module, it generates binding classes for each layout file in the module. The object of the generated binding class contains links to all views from the markup file, for which android: id is specified.
The main advantages of View Binding are Null safety and Type safety.
Getting Started with View Binding
Getting started with ViewBinding is easy enough. You need to add an option to build.gradle:
android {
    ...
    buildFeatures {
        viewBinding true
    }
}
After that, you can already use it. Each generated binding class contains a link to the root view of the markup (root) and links to all views that have id. The name of the generated class is formed as "the name of the markup file" translated into camel case + "Binding". For example, for the markup file result_profile.xml:
<LinearLayout ... >
    <TextView android:id="@+id/name" />
    <ImageView android:cropToPadding="true" />
    <Button android:id="@+id/button"
        android:background="@drawable/rounded_button" />
</LinearLayout>
A ResultProfileBinding class will be generated containing 2 fields: TextView name and Button button.
Use in Activity
For example, you have this layout:
<?xml version="1.0" encoding="utf-8"?>
<androidx.constraintlayout.widget.ConstraintLayout xmlns:android="http://schemas.android.com/apk/res/android"
    xmlns:app="http://schemas.android.com/apk/res-auto"
    xmlns:tools="http://schemas.android.com/tools"
    android:layout_width="match_parent"
    android:layout_height="match_parent"
    tools:context=".MainActivity">

    <TextView
        android:id="@+id/textView"
        android:layout_width="wrap_content"
        android:layout_height="wrap_content"
        android:text="Hello World!"
        app:layout_constraintBottom_toBottomOf="parent"
        app:layout_constraintLeft_toLeftOf="parent"
        app:layout_constraintRight_toRightOf="parent"
        app:layout_constraintTop_toTopOf="parent" />

</androidx.constraintlayout.widget.ConstraintLayout>
The result of the ViewBinding:
public final class ActivityMainBinding implements ViewBinding {
  @NonNull
  private final ConstraintLayout rootView;

  @NonNull
  public final TextView textView;
You can use viewBinding like this:
private lateinit var binding: ResultProfileBinding

override fun onCreate(savedInstanceState: Bundle?) {
    super.onCreate(savedInstanceState)
    binding = ResultProfileBinding.inflate(layoutInflater)
    val view = binding.root
    setContentView(view)
}
And now, after we got the links to the view:
binding.name.text = viewModel.name
binding.button.setOnClickListener { viewModel.userClicked() }
If you are using ViewBinding in a fragment and keep the link to the binding in the fragment (and not just in the onCreateView () method), then do not forget to clear the links in the onDestroyView () method.
Example:
private var _binding: ResultProfileBinding? = null
// This property is only valid between onCreateView and
// onDestroyView.
private val binding get() = _binding!!

override fun onCreateView(
    inflater: LayoutInflater,
    container: ViewGroup?,
    savedInstanceState: Bundle?
): View? {
    _binding = ResultProfileBinding.inflate(inflater, container, false)
    val view = binding.root
    return view
}

override fun onDestroyView() {
    super.onDestroyView()
    _binding = null
}
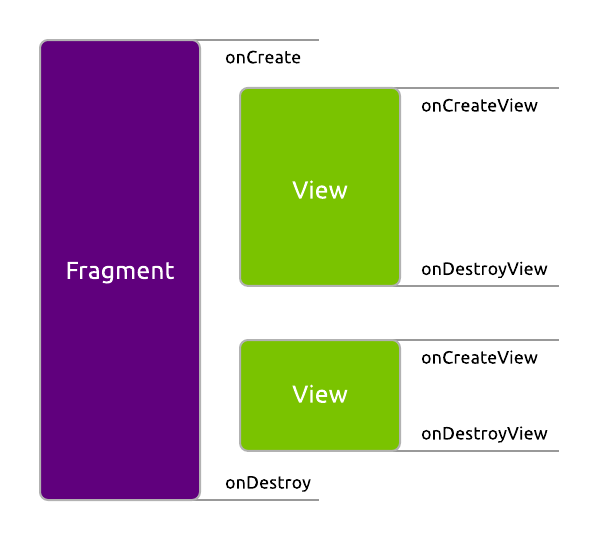
This must be done because of the fragment and view lifecycle:
In general, switching to ViewBinding is not difficult enough, although it's a pity that the Kotlin Android Extensions is deprecated. Do not forget to join us in Telegram , and useful materials for Android developers and modern tutorials are published on the AndroidSchool.ru platform .
Useful links:
- ViewBinding Documentation
- Fragment and view lifecycle article
- An article on using the ViewBinding