Introducing Cumulus Linux. Hardware installation and initial setup
Introductory to the beginning of work were as follows:
- Equipment purchased
- Racks rented
- Lines to old data centers laid
The first piece of hardware that needed to be delivered was 4 x Mellanox SN2410 with Cumulus Linux pre-installed on them. At first, there was still no understanding of how everything would look like (it will develop only at the stage of VXLAN / EVPN implementation), therefore, we decided to raise them as simple L3 switches with CLAG (Analogue of MLAG from Cumulus). Previously, neither I nor my colleagues had much experience with Cumulus, so everything was to some extent new, then just about that.
No license - no ports
By default, when you turn on the device, only 2 ports are available to you - console and eth0 (aka Management port). To unblock 25G / 100G ports you need to add a license. And it immediately becomes clear that Linux in the name of the software is not for nothing, since after installing the license, you need to restart the switchd daemon through “systemctl restart switchd.service” (in fact, the lack of a license just prevents this daemon from starting).
The next thing that will immediately make you remember that this is still Linux, will be updating the device using apt-get upgrade, as in a regular Ubuntu, but it is not always possible to update this way. When switching between releases, for example, from 3.1.1 to 4.1.1, you need to install a new image, which entails resetting the configs to default. But it saves that DHCP is enabled on the Management interface in the default configuration, which allows you to return control.
License installation
cumulus@Switch1:~$ sudo cl-license -i
balagan@telecom.ru|123456789qwerty
^+d
cumulus@Switch1:~$ sudo systemctl restart switchd.service
P.S. eth0(mgmt) :
cumulus@Switch1:~$ net show configuration commands | grep eth
net add interface eth0 ip address dhcp
net add interface eth0 vrf mgmt
balagan@telecom.ru|123456789qwerty
^+d
cumulus@Switch1:~$ sudo systemctl restart switchd.service
P.S. eth0(mgmt) :
cumulus@Switch1:~$ net show configuration commands | grep eth
net add interface eth0 ip address dhcp
net add interface eth0 vrf mgmt
Commit system
As a person who has worked a lot with Juniper, for me things like rollbacks, commit confirm, etc. were not new, but managed to step on a couple of rakes.
The first thing I ran into was the rollback numbering of cumulus, due to the habit of rollback 1 == the last working configuration. I am driving this command with great confidence to roll back the latest changes. But what was my surprise when the piece of hardware just disappeared in control, and for some time I did not understand what happened. Then, after reading the doc from cumulus, it became clear what had happened: by driving in the “net rollback 1” command instead of rolling back to the last configuration, I rolled back to the FIRST device configuration. (And again, DHCP saved from the fiasco in the default configuration)
commit history
cumulus@Switch1:mgmt:~$ net show commit history
# Date Description
— — — 2 2020-06-30 13:08:02 nclu «net commit» (user cumulus)
208 2020-10-17 00:42:11 nclu «net commit» (user cumulus)
210 2020-10-17 01:13:45 nclu «net commit» (user cumulus)
212 2020-10-17 01:16:35 nclu «net commit» (user cumulus)
214 2020-10-17 01:17:24 nclu «net commit» (user cumulus)
216 2020-10-17 01:24:44 nclu «net commit» (user cumulus)
218 2020-10-17 12:12:05 nclu «net commit» (user cumulus)
cumulus@Switch1:mgmt:~$
The second thing I had to face was the commit confirm algorithm: unlike the usual “commit confirm 10”, where within 10 minutes you need to write “commit” again, Cumulus had its own vision of this feature. Your “commit confirm” is simply pressing Enter after entering a command, which can play a cruel joke on you if connectivity is not lost immediately after commit.
net commit confirm 10
cumulus@Switch1:mgmt:~$ net commit confirm 10
— /etc/network/interfaces 2020-10-17 12:12:08.603955710 +0300
+++ /run/nclu/ifupdown2/interfaces.tmp 2020-10-29 19:02:33.296628366 +0300
@@ -204,20 +204,21 @@
auto swp49
iface swp49
+ alias Test
link-autoneg on
net add/del commands since the last «net commit»
================================================
User Timestamp Command
— — — cumulus 2020-10-29 19:02:01.649905 net add interface swp49 alias Test
Press ENTER to confirm connectivity.
First topology
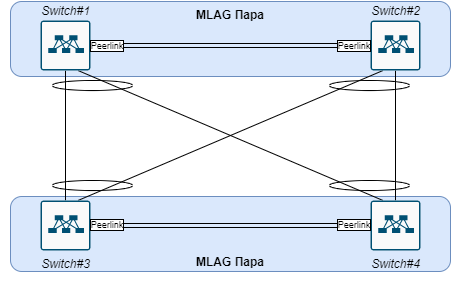
The next step was to work out the logic of the switches between themselves, at this stage the hardware was only installed and tested, there was no talk of any target schemes yet. But one of the conditions was that servers connected to different MLAG pairs must be in the same L2 domain. I didn't want to make one of the pairs simple L2, and therefore it was decided to raise L3 connectivity over SVI, OSPF was chosen for routing, since it has already been used in older data centers, making it easier to connect the infrastructure in the next step.

This diagram shows the physics diagram + the division of devices into pairs, all links in the diagram work in Trunk mode.

As mentioned, all L3 connectivity is done through SVI, therefore, only 2 devices out of 4 have an IP address in each Vlan, which allows you to make a kind of L3 p2p bundle.
Basic commands for those interested
Bond (Port-channel) + CLAG (MLAG)
# vrf mgmt best-practice
net add interface peerlink.4094 clag backup-ip ... vrf mgmt
# ( linklocal IP )
net add interface peerlink.4094 clag peer-ip linklocal
# 44:38:39:ff:00:00-44:38:39:ff:ff:ff
net add interface peerlink.4094 clag sys-mac .X.X.X.X
#C Bond#
net add bond bond-to-sc bond slaves swp1,swp2
# LACP
net add bond bond-to-sc bond mode 802.3ad
# VLAN Bond
net add bond bond-to-sc bridge vids 42-43
# ID
net add bond bond-to-sc clag id 12
P.S. /etc/network/interfaces
cumulus@Switch1:mgmt:~$ net show clag
The peer is alive
Our Priority, ID, and Role: 32768 1c:34:da:a5:6a:10 secondary
Peer Priority, ID, and Role: 100 b8:59:9f:70:0e:50 primary
Peer Interface and IP: peerlink.4094 fe80::ba59:9fff:fe70:e50 (linklocal)
VxLAN Anycast IP: 10.223.250.9
Backup IP: 10.1.254.91 vrf mgmt (active)
System MAC: 44:39:39:aa:40:97
Trunk / Access port mode
# Vlan
net add vlan 21 ip address 100.64.232.9/30
# ID
net add vlan 21 vlan-id 21
# L2 Bridge
net add vlan 21 vlan-raw-device bridge
P.S. VLAN Bridge
#Trunk ( bridge vlan)
net add bridge bridge ports swp49
#Trunk ( VLAN)
net add interface swp51-52 bridge vids 510-511
#Access
net add interface swp1 bridge access 21
P.S. /etc/network/interfaces
OSPF + Static
#Static route mgmt
net add routing route 0.0.0.0/0 10.1.255.1 vrf mgmt
#OSPF Network
net add ospf network 0.0.0.0 area 0.0.0.0
#OSPF
net add interface lo ospf area 0.0.0.0
P.S. Cumulus Loopback
#OSPF
net add ospf redistribute connected
P.S. vtysh(c Cisco like ), .. Cumulus FRR
net add routing route 0.0.0.0/0 10.1.255.1 vrf mgmt
#OSPF Network
net add ospf network 0.0.0.0 area 0.0.0.0
#OSPF
net add interface lo ospf area 0.0.0.0
P.S. Cumulus Loopback
#OSPF
net add ospf redistribute connected
P.S. vtysh(c Cisco like ), .. Cumulus FRR
Conclusion
I hope someone will find this article interesting. I would like to see feedback: what to add, and what is completely unnecessary. In the next article, we will already move on to the most interesting - to the design of the target network and VXLAN / EVPN configuration. And in the future, an article on VXLAN / EVPN automation using Python is possible.