Hello, Habr!
In modern reality, due to the increasing role of containerization in development processes, the issue of ensuring the security of various stages and entities associated with containers is not in the last place. Carrying out manual checks is time consuming, so it would be nice to take at least the initial steps to automate this process.
In this article, I will share ready-made scripts for implementing several Docker security utilities and instructions on how to deploy a small demo stand to test this process. You can use the resources to experiment with how to organize the security testing process for images and Dockerfile instructions. It is clear that the development and implementation infrastructure is different for everyone, so below I will give several possible options.
Security check utilities
There are many different helper applications and scripts that test various aspects of the Docker infrastructure. Some of them have already been described in the previous article ( https://habr.com/ru/company/swordfish_security/blog/518758/#docker-security ), and in this material I would like to focus on three of them that cover the main part of the security requirements for Docker images that are built during development. In addition, I will also show an example of how these three utilities can be connected into one pipeline for performing security checks.
Hadolint
https://github.com/hadolint/hadolint
A fairly simple console utility that helps, as a first approximation, to assess the correctness and security of Dockerfile instructions (for example, using only authorized image registries or using sudo).

Dockle
https://github.com/goodwithtech/dockle
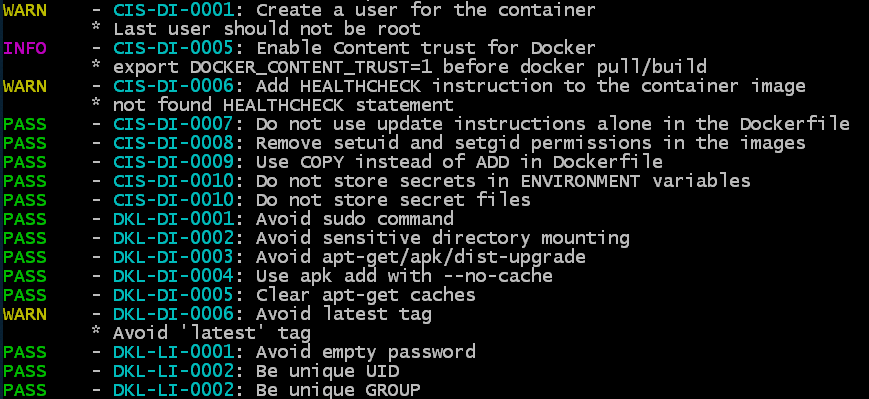
Console utility that works with an image (or with a saved tar-archive of an image) that checks the correctness and security of a specific image as such, analyzing its layers and configuration - which users are created, which instructions used which volumes are mounted, the presence of an empty password, etc. While the number of checks is not very large and is based on several of its own checks and recommendations of the CIS (Center for Internet Security) Benchmark for Docker.
Trivy
https://github.com/aquasecurity/trivy
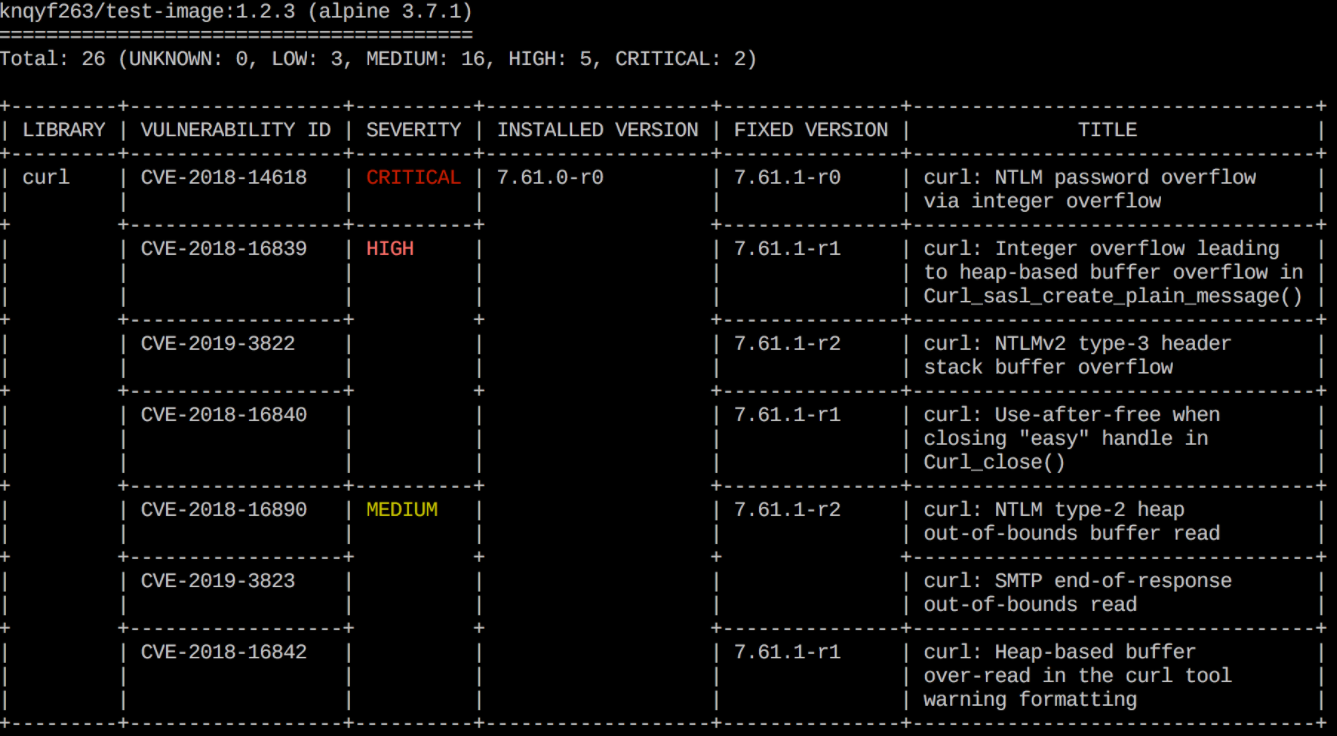
This utility aims to find two types of vulnerabilities - OS build problems (supported by Alpine, RedHat (EL), CentOS, Debian GNU, Ubuntu) and dependency problems (Gemfile.lock, Pipfile. lock, composer.lock, package-lock.json, yarn.lock, Cargo.lock). Trivy can scan both the image in the repository and the local image, as well as scan based on the transferred .tar file with the Docker image.
Implementation options for utilities
In order to try the described applications in isolated conditions, I will provide instructions for installing all the utilities in a simplified process.
The main idea is to demonstrate how you can implement automatic content validation of Dockerfile and Docker images that are created during development.
The check itself consists of the following steps:
- Checking the correctness and safety of Dockerfile instructions - using the Hadolint linter
- Checking the correctness and security of target and intermediate images - using the Dockle utility
- Checking for well-known vulnerabilities (CVEs) in the base image and a number of dependencies - using the Trivy utility
Further in the article, I will give three options for implementing these steps:
First, by configuring the CI / CD pipeline using the example of GitLab (with a description of the process of raising a test instance).
The second is using a shell script.
The third is with building a Docker image for scanning Docker images.
You can choose the option that suits you best, transfer it to your infrastructure and adapt it to your needs.
All necessary files and additional instructions are also in the repository: https://github.com/Swordfish-Security/docker_cicd
Integration into GitLab CI / CD
In the first option, we will look at how you can implement security checks using the example of the GitLab repository system. Here we will go through the steps and analyze how to set up a test environment with GitLab from scratch, create a scanning process and run utilities to check a test Dockerfile and a random image - the JuiceShop application.
Installing GitLab
1. Install Docker:
sudo apt-get update && sudo apt-get install docker.io2. Add the current user to the docker group so that you can work with docker not via sudo:
sudo addgroup <username> docker3. Find your IP:
ip addr4. Install and run GitLab in a container, replacing the IP address in hostname with your own:
docker run --detach \
--hostname 192.168.1.112 \
--publish 443:443 --publish 80:80 \
--name gitlab \
--restart always \
--volume /srv/gitlab/config:/etc/gitlab \
--volume /srv/gitlab/logs:/var/log/gitlab \
--volume /srv/gitlab/data:/var/opt/gitlab \
gitlab/gitlab-ce:latest
We are waiting for GitLab to complete all the necessary installation procedures (you can follow the process through the output of the log file: docker logs -f gitlab).
5. Open your local IP in the browser and see a page with a proposal to change the password for the root user:
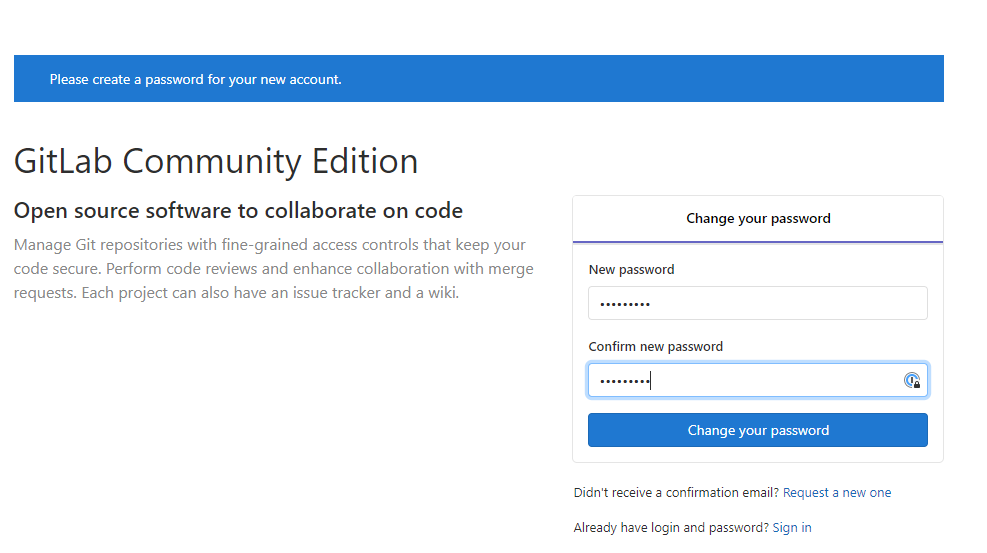
Set a new password and go to GitLab.
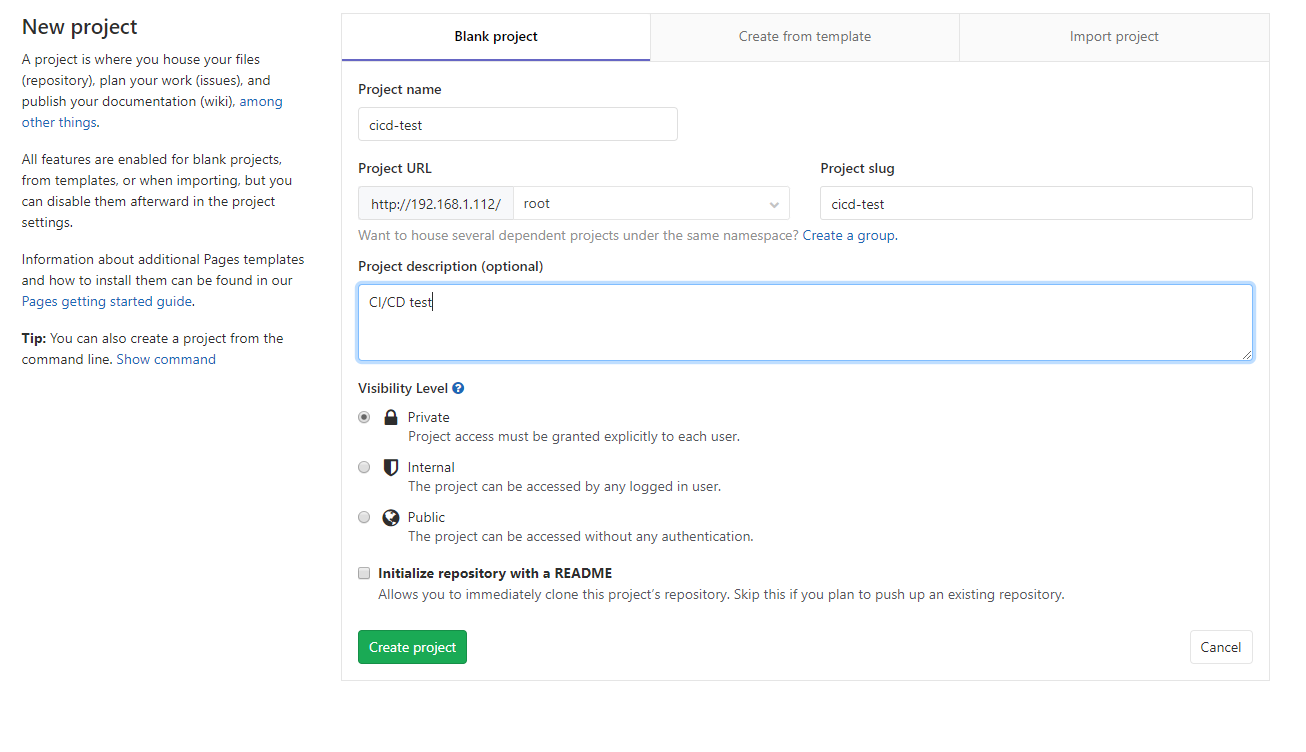
6. Create a new project, for example cicd-test and initialize it with the start file README.md :
7. Now we need to install the GitLab Runner: an agent that will launch all the necessary operations upon request.
Download the latest version (in this case, for Linux 64-bit):
sudo curl -L --output /usr/local/bin/gitlab-runner https://gitlab-runner-downloads.s3.amazonaws.com/latest/binaries/gitlab-runner-linux-amd648. Make it executable:
sudo chmod +x /usr/local/bin/gitlab-runner9. Add the OS user for the Runner and start the service:
sudo useradd --comment 'GitLab Runner' --create-home gitlab-runner --shell /bin/bash
sudo gitlab-runner install --user=gitlab-runner --working-directory=/home/gitlab-runner
sudo gitlab-runner start
It should look something like this:
local@osboxes:~$ sudo gitlab-runner install --user=gitlab-runner --working-directory=/home/gitlab-runner
Runtime platform arch=amd64 os=linux pid=8438 revision=0e5417a3 version=12.0.1
local@osboxes:~$ sudo gitlab-runner start
Runtime platform arch=amd64 os=linux pid=8518 revision=0e5417a3 version=12.0.1
10. Now we register the Runner so that it can interact with our GitLab instance.
To do this, open the Settings-CI / CD page (http: // OUR_ IP_ADDRESS / root / cicd-test / - / settings / ci_cd) and on the Runners tab find the URL and Registration token:
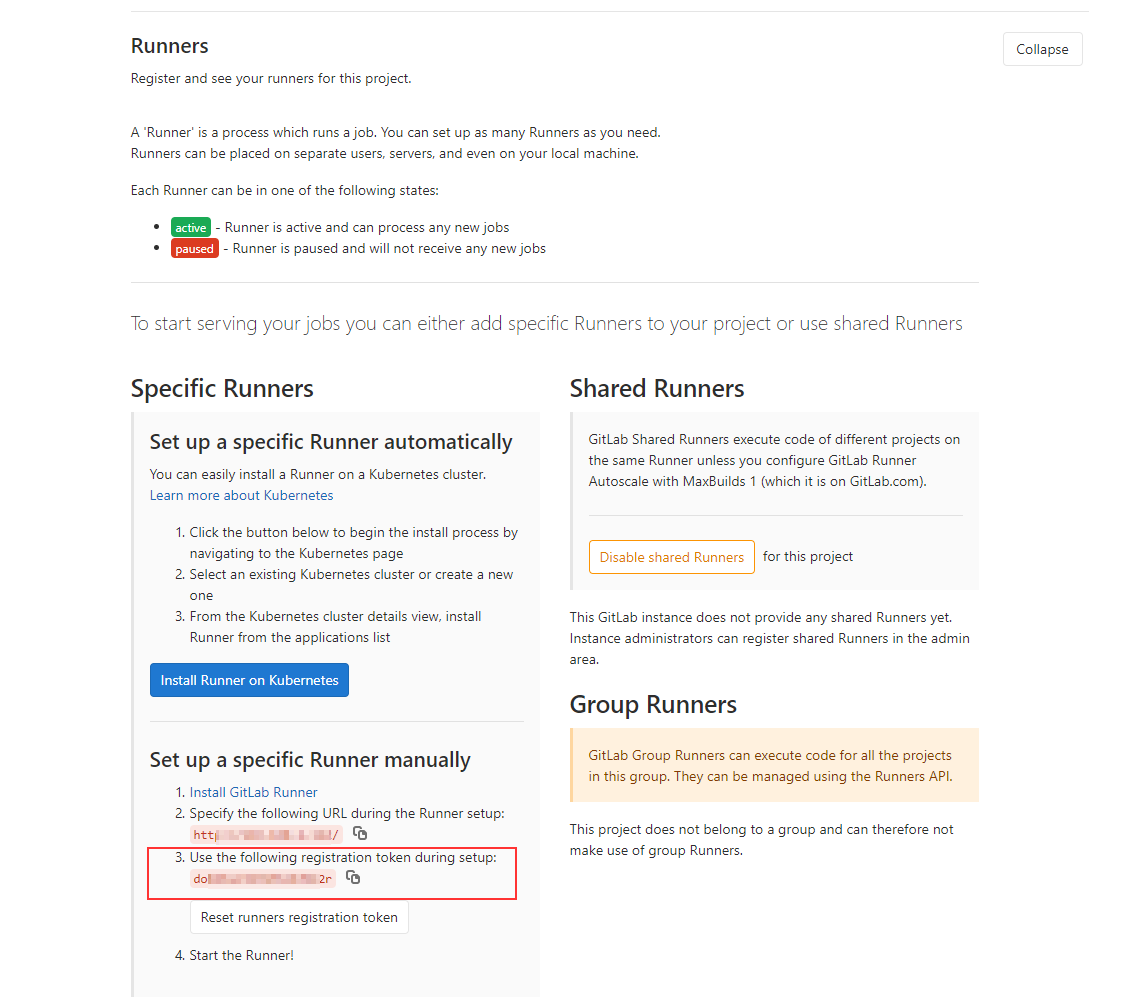
11. Register the Runner by substituting the URL and Registration token:
sudo gitlab-runner register \
--non-interactive \
--url "http://<URL>/" \
--registration-token "<Registration Token>" \
--executor "docker" \
--docker-privileged \
--docker-image alpine:latest \
--description "docker-runner" \
--tag-list "docker,privileged" \
--run-untagged="true" \
--locked="false" \
--access-level="not_protected"
As a result, we get a ready-made working GitLab, in which we need to add instructions for starting our utilities. In this demo case, we do not have steps for building the application and its containerization, but in a real environment they will precede the scanning steps and generate images and Dockerfile for analysis.
Configuration of the pipeline
1. Add to the repository the files mydockerfile.df (this is some test Dockerfile that we will check) and the GitLab CI / CD process configuration file .gitlab-cicd.yml , which lists the instructions for scanners (note the dot in the file name ).
The YAML configuration file contains instructions for running three utilities (Hadolint, Dockle, and Trivy) that will parse the selected Dockerfile and the image specified in the DOCKERFILE variable. All necessary files can be taken from the repository: https://github.com/Swordfish-Security/docker_cicd/
Excerpt from mydockerfile.df (this is an abstract file with a set of arbitrary instructions just to demonstrate how the utility works). Direct link to file: mydockerfile.df
Content of mydockerfile.df
FROM amd64/node:10.16.0-alpine@sha256:f59303fb3248e5d992586c76cc83e1d3700f641cbcd7c0067bc7ad5bb2e5b489 AS tsbuild
COPY package.json .
COPY yarn.lock .
RUN yarn install
COPY lib lib
COPY tsconfig.json tsconfig.json
COPY tsconfig.app.json tsconfig.app.json
RUN yarn build
FROM amd64/ubuntu:18.04@sha256:eb70667a801686f914408558660da753cde27192cd036148e58258819b927395
LABEL maintainer="Rhys Arkins <rhys@arkins.net>"
LABEL name="renovate"
...
COPY php.ini /usr/local/etc/php/php.ini
RUN cp -a /tmp/piik/* /var/www/html/
RUN rm -rf /tmp/piwik
RUN chown -R www-data /var/www/html
ADD piwik-cli-setup /piwik-cli-setup
ADD reset.php /var/www/html/
## ENTRYPOINT ##
ADD entrypoint.sh /entrypoint.sh
ENTRYPOINT ["/entrypoint.sh"]
USER root
The configuration YAML looks like this (the file itself can be taken from the direct link here: .gitlab-ci.yml ):
.Gitlab-ci.yml content
variables:
    DOCKER_HOST: "tcp://docker:2375/"
    DOCKERFILE: "mydockerfile.df" # name of the Dockerfile to analyse
    DOCKERIMAGE: "bkimminich/juice-shop" # name of the Docker image to analyse
    # DOCKERIMAGE: "knqyf263/cve-2018-11235" # test Docker image with several CRITICAL CVE
    SHOWSTOPPER_PRIORITY: "CRITICAL" # what level of criticality will fail Trivy job
    TRIVYCACHE: "$CI_PROJECT_DIR/.cache" # where to cache Trivy database of vulnerabilities for faster reuse
    ARTIFACT_FOLDER: "$CI_PROJECT_DIR"

services:
    - docker:dind # to be able to build docker images inside the Runner

stages:
    - scan
    - report
    - publish

HadoLint:
    # Basic lint analysis of Dockerfile instructions
    stage: scan
    image: docker:git

    after_script:
    - cat $ARTIFACT_FOLDER/hadolint_results.json

    script:
    - export VERSION=$(wget -q -O - https://api.github.com/repos/hadolint/hadolint/releases/latest | grep '"tag_name":' | sed -E 's/.*"v([^"]+)".*/\1/')
    - wget https://github.com/hadolint/hadolint/releases/download/v${VERSION}/hadolint-Linux-x86_64 && chmod +x hadolint-Linux-x86_64

    # NB: hadolint will always exit with 0 exit code
    - ./hadolint-Linux-x86_64 -f json $DOCKERFILE > $ARTIFACT_FOLDER/hadolint_results.json || exit 0

    artifacts:
        when: always # return artifacts even after job failure
        paths:
        - $ARTIFACT_FOLDER/hadolint_results.json

Dockle:
    # Analysing best practices about docker image (users permissions, instructions followed when image was built, etc.)
    stage: scan
    image: docker:git

    after_script:
    - cat $ARTIFACT_FOLDER/dockle_results.json

    script:
    - export VERSION=$(wget -q -O - https://api.github.com/repos/goodwithtech/dockle/releases/latest | grep '"tag_name":' | sed -E 's/.*"v([^"]+)".*/\1/')
    - wget https://github.com/goodwithtech/dockle/releases/download/v${VERSION}/dockle_${VERSION}_Linux-64bit.tar.gz && tar zxf dockle_${VERSION}_Linux-64bit.tar.gz
    - ./dockle --exit-code 1 -f json --output $ARTIFACT_FOLDER/dockle_results.json $DOCKERIMAGE

    artifacts:
        when: always # return artifacts even after job failure
        paths:
        - $ARTIFACT_FOLDER/dockle_results.json

Trivy:
    # Analysing docker image and package dependencies against several CVE bases
    stage: scan
    image: docker:git

    script:
    # getting the latest Trivy
    - apk add rpm
    - export VERSION=$(wget -q -O - https://api.github.com/repos/knqyf263/trivy/releases/latest | grep '"tag_name":' | sed -E 's/.*"v([^"]+)".*/\1/')
    - wget https://github.com/knqyf263/trivy/releases/download/v${VERSION}/trivy_${VERSION}_Linux-64bit.tar.gz && tar zxf trivy_${VERSION}_Linux-64bit.tar.gz

    # displaying all vulnerabilities w/o failing the build
    - ./trivy -d --cache-dir $TRIVYCACHE -f json -o $ARTIFACT_FOLDER/trivy_results.json --exit-code 0 $DOCKERIMAGE

    # write vulnerabilities info to stdout in human readable format (reading pure json is not fun, eh?). You can remove this if you don't need this.
    - ./trivy -d --cache-dir $TRIVYCACHE --exit-code 0 $DOCKERIMAGE

    # failing the build if the SHOWSTOPPER priority is found
    - ./trivy -d --cache-dir $TRIVYCACHE --exit-code 1 --severity $SHOWSTOPPER_PRIORITY --quiet $DOCKERIMAGE

    artifacts:
        when: always # return artifacts even after job failure
        paths:
        - $ARTIFACT_FOLDER/trivy_results.json

    cache:
        paths:
        - .cache

Report:
    # combining tools outputs into one HTML
    stage: report
    when: always
    image: python:3.5

    script:
    - mkdir json
    - cp $ARTIFACT_FOLDER/*.json ./json/
    - pip install json2html
    - wget https://raw.githubusercontent.com/shad0wrunner/docker_cicd/master/convert_json_results.py
    - python ./convert_json_results.py

    artifacts:
        paths:
        - results.html
If necessary, you can also scan the saved images as a .tar archive (however, you will need to change the input parameters for the utilities in the YAML file)
NB: Trivy rpm git. RedHat-based .
2. After adding the files to the repository, according to the instructions in our config file, GitLab will automatically start the build and scan process. On the CI / CD → Pipelines tab, you can see the progress of instructions.
As a result, we have four tasks. Three of them deal directly with scanning and the last (Report) collects a simple report from scattered files with scan results.
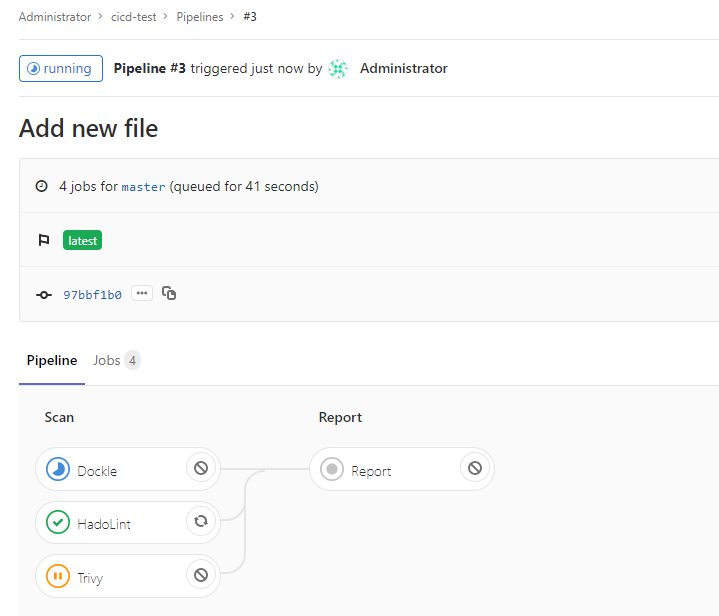
By default, Trivy stops executing if CRITICAL vulnerabilities are found in the image or dependencies. At the same time, Hadolint always returns Success the execution code, since as a result of its execution, there are always comments, which leads to the stop of the build.
Depending on your specific requirements, you can configure the exit code so that these utilities also stop the build process when they detect problems of a certain severity. In our case, the build will stop only if Trivy detects a critical vulnerability that we specified in the SHOWSTOPPER variable in .gitlab-ci.yml .
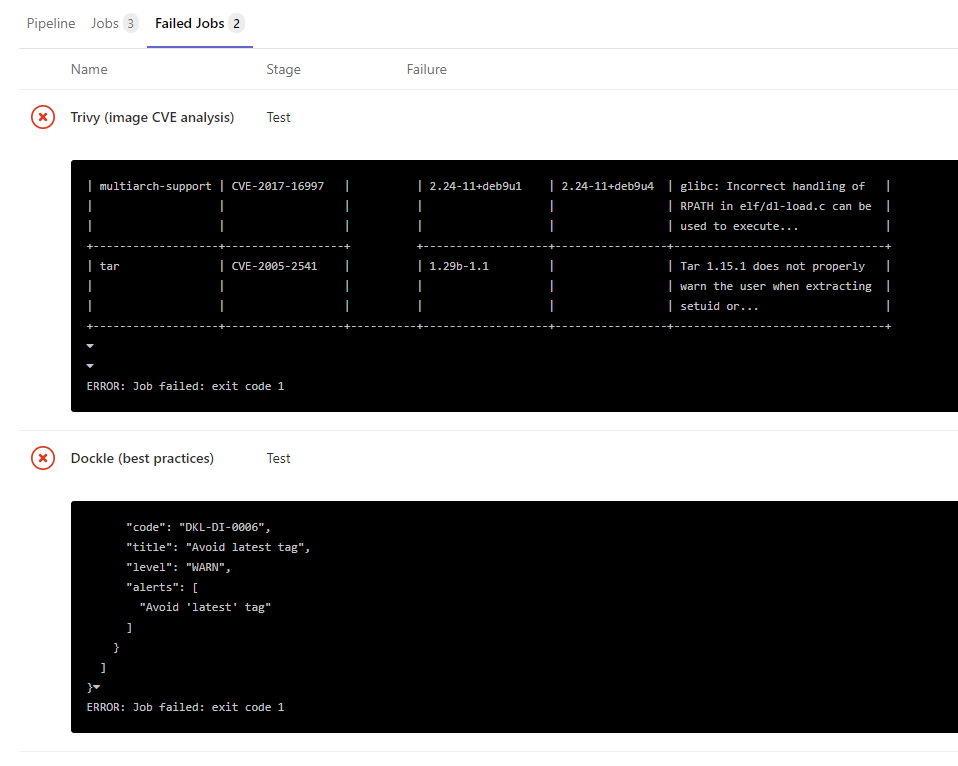
The result of the operation of each utility can be viewed in the log of each scanning task, directly in the json files in the artifacts section, or in a simple HTML report (more about it below):

3. To present the utility reports in a slightly more human-readable form, a small Python script is used for converting three json files into one HTML file with a table of defects.
This script is launched by a separate Report task, and its final artifact is an HTML file with a report. The script source is also in the repository and you can adapt it to your needs, colors, etc.

Shell script
The second option is suitable for cases when you need to check Docker images outside the CI / CD system, or you need to have all the instructions in a form that can be executed directly on the host. This option is covered by a ready-made shell script that can be run on a clean virtual (or even real) machine. The script follows the same instructions as the above gitlab-runner.
For the script to work successfully, Docker must be installed on the system and the current user must be in the docker group.
The script itself can be taken here: docker_sec_check.sh
At the beginning of the file, variables are used to set which image should be scanned and what critical defects will cause exit from the Trivy utility with the specified error code.
During the script execution, all utilities will be downloaded to the docker_tools directory , the results of their work - to the docker_tools / json directory , and the HTML with the report will be in the results.html file .
Sample script output
~/docker_cicd$ ./docker_sec_check.sh

[+] Setting environment variables
[+] Installing required packages
[+] Preparing necessary directories
[+] Fetching sample Dockerfile
2020-10-20 10:40:00 (45.3 MB/s) - ‘Dockerfile’ saved [8071/8071]
[+] Pulling image to scan
latest: Pulling from bkimminich/juice-shop
[+] Running Hadolint
...
Dockerfile:205 DL3015 Avoid additional packages by specifying `--no-install-recommends`
Dockerfile:248 DL3002 Last USER should not be root
...
[+] Running Dockle
...
WARN    - DKL-DI-0006: Avoid latest tag
        * Avoid 'latest' tag
INFO    - CIS-DI-0005: Enable Content trust for Docker
        * export DOCKER_CONTENT_TRUST=1 before docker pull/build
...
[+] Running Trivy
juice-shop/frontend/package-lock.json
=====================================
Total: 3 (UNKNOWN: 0, LOW: 1, MEDIUM: 0, HIGH: 2, CRITICAL: 0)

+---------------------+------------------+----------+---------+-------------------------+
|       LIBRARY       | VULNERABILITY ID | SEVERITY | VERSION |             TITLE       |
+---------------------+------------------+----------+---------+-------------------------+
| object-path         | CVE-2020-15256   | HIGH     | 0.11.4  | Prototype pollution in  |
|                     |                  |          |         | object-path             |
+---------------------+------------------+          +---------+-------------------------+
| tree-kill           | CVE-2019-15599   |          | 1.2.2   | Code Injection          |
+---------------------+------------------+----------+---------+-------------------------+
| webpack-subresource | CVE-2020-15262   | LOW      | 1.4.1   | Unprotected dynamically |
|                     |                  |          |         | loaded chunks           |
+---------------------+------------------+----------+---------+-------------------------+

juice-shop/package-lock.json
============================
Total: 20 (UNKNOWN: 0, LOW: 1, MEDIUM: 6, HIGH: 8, CRITICAL: 5)

...

juice-shop/package-lock.json
============================
Total: 5 (CRITICAL: 5)

...
[+] Removing left-overs
[+] Making the output look pretty
[+] Converting JSON results
[+] Writing results HTML
[+] Clean exit ============================================================
[+] Everything is done. Find the resulting HTML report in results.html
Docker image with all utilities
As a third alternative, I've compiled two simple Dockerfiles to create an image with security utilities. One Dockerfile will help to build a set for scanning an image from the repository, the second (Dockerfile_tar) - build a set for scanning a tar file with an image.
1. We take the corresponding Docker file and scripts from the repository https://github.com/Swordfish-Security/docker_cicd/tree/master/Dockerfile .
2. Run it for assembly:
docker build -t dscan:image -f docker_security.df .
3. After the end of the assembly, create a container from the image. At the same time, we pass the DOCKERIMAGE environment variable with the name of the image we are interested in and mount the Dockerfile that we want to analyze from our machine to the file / Dockerfile (note that an absolute path to this file is required):
docker run --rm -v $(pwd)/results:/results -v $(pwd)/docker_security.df:/Dockerfile -e DOCKERIMAGE="bkimminich/juice-shop" dscan:image
[+] Setting environment variables
[+] Running Hadolint
/Dockerfile:3 DL3006 Always tag the version of an image explicitly
[+] Running Dockle
WARN    - DKL-DI-0006: Avoid latest tag
        * Avoid 'latest' tag
INFO    - CIS-DI-0005: Enable Content trust for Docker
        * export DOCKER_CONTENT_TRUST=1 before docker pull/build
INFO    - CIS-DI-0006: Add HEALTHCHECK instruction to the container image
        * not found HEALTHCHECK statement
INFO    - DKL-LI-0003: Only put necessary files
        * unnecessary file : juice-shop/node_modules/sqlite3/Dockerfile
        * unnecessary file : juice-shop/node_modules/sqlite3/tools/docker/architecture/linux-arm64/Dockerfile
        * unnecessary file : juice-shop/node_modules/sqlite3/tools/docker/architecture/linux-arm/Dockerfile
[+] Running Trivy
...
juice-shop/package-lock.json
============================
Total: 20 (UNKNOWN: 0, LOW: 1, MEDIUM: 6, HIGH: 8, CRITICAL: 5)
...
[+] Making the output look pretty
[+] Starting the main module ============================================================
[+] Converting JSON results
[+] Writing results HTML
[+] Clean exit ============================================================
[+] Everything is done. Find the resulting HTML report in results.html
results
We have covered just one basic set of tools for scanning Docker artifacts, which, in my opinion, quite effectively covers a decent part of the image security requirements. There are many more free and paid tools that can perform the same checks, draw beautiful reports or work purely in console mode, cover container management systems, etc. An overview of these tools and how to integrate them may appear a little later.
The positive side of the set of tools, which is described in the article, is that they are all built on open source code and you can experiment with them and other similar tools to find what exactly suits your requirements and infrastructure features. Of course, all vulnerabilities that will be found should be studied for applicability in specific conditions, but this is a topic for a future large article.
I hope this tutorial, scripts and utilities will help you and become a starting point for creating a more secure infrastructure in the field of containerization.