Background to Linux Security Modules and SELinux
Security Enhanced Linux is a set of rules and an access mechanism based on mandatory and role-based access models to protect Linux systems from potential threats and fix the flaws of Discretionary Access Control (DAC), the traditional Unix security system. The project originated in the bowels of the US National Security Agency, mainly contractors Secure Computing Corporation and MITER, as well as a number of research laboratories, were directly involved in the development.
Linux Security Modules
Linus Torvalds has made a number of comments about new NSA developments so that they can be included in the upstream Linux kernel. He described a general environment, with a set of interceptors for managing operations with objects and a set of some protective fields in the kernel data structures for storing the corresponding attributes. This environment can then be used by loadable kernel modules to implement any desired security model. LSM was fully incorporated into the Linux v2.6 kernel in 2003.
The LSM framework includes guard fields in data structures and calls to intercept functions at critical points in the kernel code to manage them and perform access control. It also adds functionality for registering security modules. The / sys / kernel / security / lsm interface contains a list of active modules on the system. LSM hooks are stored in lists, which are called in the order specified in CONFIG_LSM. Detailed hook documentation is included in the include / linux / lsm_hooks.h header file.
The LSM subsystem allowed complete SELinux integration of the same stable Linux kernel v2.6. Almost immediately SELinux became the de facto standard for secure Linux environments and became part of the most popular distributions: RedHat Enterprise Linux, Fedora, Debian, Ubuntu.
SELinux Glossary
- — SELinux , Unix/Linux user id, , . Linux SELinux. SELinux , , — .
- — SELinux , . . . , . — , . : sysadm_t , user_t, . init init_t, named named_t.
- — , SELinux. , . . Role Based Access Control (RBAC), SELinux.
- — Type Enforcement, , . , , , , , , . .
- — , . : , , ., , , — .
- SELinux — SELinux . SELinux , — — . , . .
LSM SELinux
Despite the name LSMs are not generally Linux loadable modules. However, just like SELinux, it is directly integrated into the kernel. Any change to the LSM source code requires a new kernel compilation. The corresponding option must be enabled in the kernel settings, otherwise the LSM code will not be activated after boot. Even so, it can be enabled with the OS bootloader option.

LSM check stack
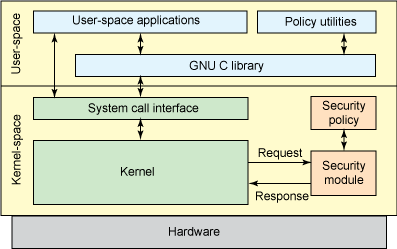
LSM is equipped with hooks in core core functions that might be relevant for checks. One of the main features of LSMs is that they are stacked. Thus, the standard checks are still performed, and each LSM layer only adds additional controls and controls. This means that the ban cannot be rolled back. This is shown in the figure, if the result of routine DAC checks is a failure, then it will not even reach the LSM hooks.
SELinux has adopted the Flask security architecture of the Fluke research operating system, in particular the principle of least privilege. The essence of this concept, as their name implies, is to grant a user or process only those rights that are necessary to carry out the intended actions. This principle is implemented using forced typing of access, thus SELinux admission control is based on the domain => type model.
Due to the forced typing of access, SELinux has much more significant access control capabilities than the traditional DAC model used in the Unix / Linux OS. For example, you can restrict the network port number that will happen to the ftp server, allow writing and changing files in a specific folder, but not deleting them.
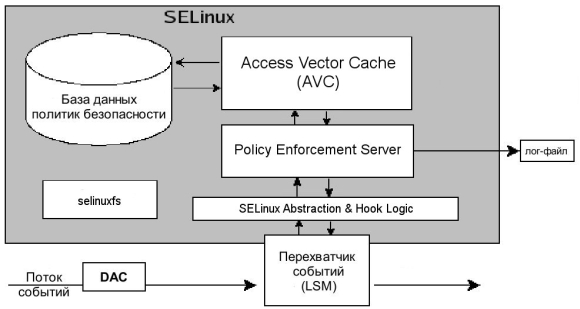
The main components of SELinux are:
- Policy Enforcement Server - The main mechanism for organizing access control.
- Database of system security policies.
- Interaction with the LSM event interceptor.
- Selinuxfs - Pseudo-FS, same as / proc and mounted in / sys / fs / selinux. Dynamically populated by the Linux kernel at runtime and contains files containing SELinux status information.
- Access Vector Cache - Performance Helper.
How SELinux works
All of this works as follows.
- A certain subject, in SELinux terms, performs a permitted action on an object after a DAC check, as shown in the top picture. This request to perform the operation goes to the LSM event interceptor.
- From there, the request, along with the subject and object security context, is passed to the SELinux Abstraction and Hook Logic module, which is responsible for interacting with the LSM.
- The Policy Enforcement Server is the instance for deciding on the subject's access to the object, and data from SELinux AnHL comes to it.
- To make a decision about access or denial, the Policy Enforcement Server consults the caching subsystem of the most used Access Vector Cache (AVC) rules.
- If a solution for the corresponding rule is not found in the cache, then the request is passed on to the security policy database.
- The search result from the DB and AVC is returned to the Policy Enforcement Server.
- If the found policy is consistent with the requested action, then the operation is allowed. Otherwise, the operation is prohibited.
Managing SELinux Settings
SELinux operates in one of three modes:
- Enforcing - Strict adherence to security policies.
- Permissive - violation of restrictions is allowed, the corresponding mark is made in the log.
- Disabled - Security policies are not in effect.
You can see what mode SELinux is in with the following command.
[admin@server ~]$ getenforce
Permissive
Changing the mode before rebooting, for example, set it to enforcing, or 1. The permissive parameter corresponds to the numeric code 0.
[admin@server ~]$ setenfoce enforcing
[admin@server ~]$ setenfoce 1 #
You can also change the mode by editing the file:
[admin@server ~]$ cat /etc/selinux/config# This file controls the state of SELinux on the system.
# SELINUX= can take one of these three values:
# enforcing - SELinux security policy is enforced.
# permissive - SELinux prints warnings instead of enforcing.
# disabled - No SELinux policy is loaded.
SELINUX=enforcing
# SELINUXTYPE= can take one of three values:
# targeted - Targeted processes are protected,
# minimum - Modification of targeted policy. Only selected processes are protected.
# mls - Multi Level Security protection.
SELINUXTYPE = targete
The difference with setenfoce is that when the operating system boots, the SELinux mode will be set in accordance with the value of the SELINUX parameter of the configuration file. In addition, changes to enforcing <=> disabled take effect only through editing the / etc / selinux / config file and after a reboot.
View a short status report:
[admin@server ~]$ sestatusSELinux status: enabled
SELinuxfs mount: /sys/fs/selinux
SELinux root directory: /etc/selinux
Loaded policy name: targeted
Current mode: permissive
Mode from config file: enforcing
Policy MLS status: enabled
Policy deny_unknown status: allowed
Max kernel policy version: 31
Some of the native utilities use the -Z parameter to view SELinux attributes.
[admin@server ~]$ ls -lZ /var/log/httpd/
-rw-r--r--. root root system_u:object_r:httpd_log_t:s0 access_log
-rw-r--r--. root root system_u:object_r:httpd_log_t:s0 access_log-20200920
-rw-r--r--. root root system_u:object_r:httpd_log_t:s0 access_log-20200927
-rw-r--r--. root root system_u:object_r:httpd_log_t:s0 access_log-20201004
-rw-r--r--. root root system_u:object_r:httpd_log_t:s0 access_log-20201011
[admin@server ~]$ ps -u apache -Z
LABEL                             PID TTY          TIME CMD
system_u:system_r:httpd_t:s0     2914 ?        00:00:04 httpd
system_u:system_r:httpd_t:s0     2915 ?        00:00:00 httpd
system_u:system_r:httpd_t:s0     2916 ?        00:00:00 httpd
system_u:system_r:httpd_t:s0     2917 ?        00:00:00 httpd
...
system_u:system_r:httpd_t:s0     2918 ?        00:00:00 httpd
Compared to the usual ls -l output, there are several additional fields in the following format:
<user>:<role>:<type>:<level>
The last field denotes something like a secrecy stamp and consists of a combination of two elements:
- s0 - significance, also written as lowlevel-highlevel interval
- c0, c1… c1023 - category.
Change of access configuration
Use semodule to load SELinux modules, add and remove them.
[admin@server ~]$ semodule -l |wc -l #
408
[admin@server ~]$ semodule -e abrt #enable -
[admin@server ~]$ semodule -d accountsd #disable -
[admin@server ~]$ semodule -r avahi #remove -
The first command, semanage login, binds the SELinux user to the operating system user, the second lists it. Finally, the last command with the -r switch removes the mapping from SELinux users to OS accounts. An explanation of the syntax for MLS / MCS Range values is found in the previous section.
[admin@server ~]$ semanage login -a -s user_u karol
[admin@server ~]$ semanage login -l
Login Name SELinux User MLS/MCS Range Service
__default__ unconfined_u s0-s0:c0.c1023 *
root unconfined_u s0-s0:c0.c1023 *
system_u system_u s0-s0:c0.c1023 *
[admin@server ~]$ semanage login -d karol
The semanage user command is used to manage the mappings between SELinux users and roles.
[admin@server ~]$ semanage user -l
                Labeling   MLS/       MLS/
SELinux User    Prefix     MCS Level  MCS Range             SELinux Roles
guest_u         user       s0         s0                    guest_r
staff_u         staff      s0         s0-s0:c0.c1023        staff_r sysadm_r
...
user_u          user       s0         s0                    user_r
xguest_u        user       s0         s0                    xguest_r
[admin@server ~]$ semanage user -a -R 'staff_r user_r'
[admin@server ~]$ semanage user -d test_u
Command parameters:
- -a add a custom role mapping entry;
- -l list of correspondence between users and roles;
- -d remove user-defined role mapping entry;
- -R list of roles assigned to the user;
Files, ports and booleans
Each SELinux module provides a set of rules for marking files, but you can also add your own rules for if necessary. For example, we want the web server to have access rights to the / srv / www folder.
[admin@server ~]$ semanage fcontext -a -t httpd_sys_content_t "/srv/www(/.*)?
[admin@server ~]$ restorecon -R /srv/www/
The first command registers the new marking rules, and the second resets, or rather sets, file types in accordance with the current rules.
Likewise, TCP / UDP ports are marked in such a way that only the corresponding services can listen on them. For example, in order for the web server to listen on port 8080, you need to run the command.
[admin@server ~]$ semanage port -m -t http_port_t -p tcp 8080A significant number of SELinux modules have parameters that can take boolean values. The entire list of such parameters can be seen with getsebool -a. Boolean values can be changed with setsebool.
[admin@server ~]$ getsebool httpd_enable_cgi
httpd_enable_cgi --> on
[admin@server ~]$ setsebool -P httpd_enable_cgi off
[admin@server ~]$ getsebool httpd_enable_cgi
httpd_enable_homedirs --> off
Workshop, Access the Pgadmin-web interface
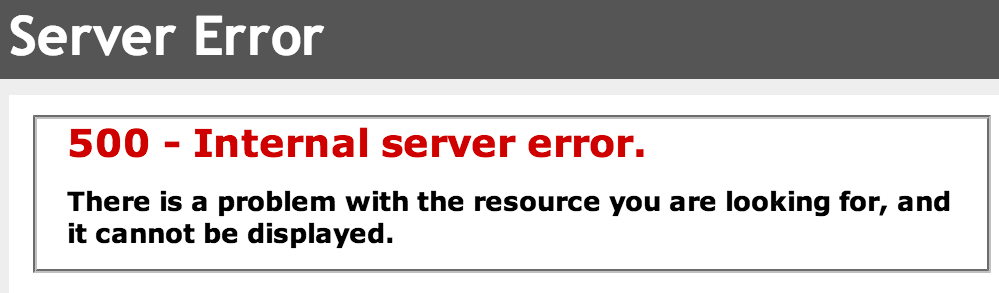
Consider an example from practice, we installed on RHEL 7.6 pgadmin4-web for PostgreSQL database administration. We went through a small quest with setting pg_hba.conf, postgresql.conf and config_local.py, set the rights to folders, installed missing Python modules from pip. Everything is ready, run it and get 500 Internal Server error .
Starting with the typical suspects, checking / var / log / httpd / error_log. There are some interesting entries there. At this point, most Linux administrators will be tempted to run setencorce 0, and that's it. Frankly, the first time I did it. This, of course, is also a solution, but far from the best.
[timestamp] [core:notice] [pid 23689] SELinux policy enabled; httpd running as context system_u:system_r:httpd_t:s0
...
[timestamp] [wsgi:error] [pid 23690] [Errno 13] Permission denied: '/var/lib/pgadmin'
[timestamp] [wsgi:error] [pid 23690]
[timestamp] [wsgi:error] [pid 23690] HINT : You may need to manually set the permissions on
[timestamp] [wsgi:error] [pid 23690] /var/lib/pgadmin to allow apache to write to it.
Despite the bulkiness of the constructs, SELinux can be user friendly. It is enough to install the setroubleshoot package and view the system log. Note that the auditd service must be restarted in this way, and not using systemctl, despite the presence of systemd in the OS. The system log will indicate not only the fact of blocking, but also the reason and the way to overcome the ban . We execute these commands: We check access to the pgadmin4-web web page, everything works.
[admin@server ~]$ yum install setroubleshoot
[admin@server ~]$ journalctl -b -0
[admin@server ~]$ service restart auditd
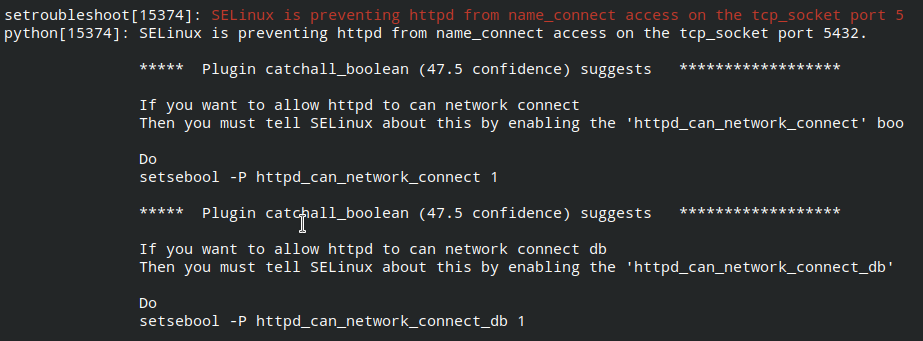
[admin@server ~]$ setsebool -P httpd_can_network_connect 1
[admin@server ~]$ setsebool -P httpd_can_network_connect_db 1