
In the previous article, we looked at a simple installation of an IP PBX (IP PBX) Asterisk 16 from a regular repository on a RuVDS virtual server with Ubuntu 20.04 . In such a configuration, you should not expose the VoIP service to the public: you need to make additional settings, including those related to information security.
Defining the threat model
To begin with, let's figure out what risks a company that has placed a virtual PBX on the Internet will face. All their diversity comes down to a short list:
- confidential data leaks and content corruption (session hijacking);
- unauthorized access to corporate information systems due to vulnerabilities in Asterisk and other software on the server, in particular, due to incorrect configuration;
- virtual PBX disruption due to denial of service attacks;
- reselling traffic after hacking a PBX (the most common type of attack).
Some of the vulnerabilities are directly related to the Asterisk software. IP PBX developers regularly release patches, and system administrators can only install updates in a timely manner. This method does not guarantee complete security, so it is also worth limiting clients' access to the IP telephony server. Let's see what needs to be done to organize secure telephony.
Configuring a firewall
The easiest way to protect yourself is to restrict client connections to a firewall. Since VDS has real IP, there is no need to solve problems with traffic passing through NAT. It remains to allow incoming connections from subscribers, and block all others using Netfilter . On virtual servers RuVDS with Ubuntu, it is configured using the preinstalled UFW (Uncomplicated Firewall) utility . If you don't have the ufw package installed, it's easy to fix:
sudo apt-get install ufwFirst, let's check the status:
sudo ufw status verboseBy default, UFW is disabled (Status: inactive), but you should not rush to enable it: if you do not change the settings, all incoming packets will begin to be hacked at the root and you will lose access to the server via SSH. At a minimum, you should allow incoming connections on port 22, while you can use the pre-installed OpenSSH application profile (view profiles: sudo ufw app list):
#    SSH
#   IP,
sudo ufw allow OpenSSH
#    IP (  )
sudo ufw allow from XXX.XXX.XXX.XXX to any port 22
#       IP ()    Asterisk
sudo ufw allow from XXX.XXX.XXX.XXX
#
sudo ufw enable
To view the filtering policy, use the command:
sudo ufw status verbose
To delete rules, you need to see their numbers:
sudo ufw status numbered
sudo ufw delete N
There are other tools for configuring Netfiler (the same iptables), but you should not combine different utilities - this is fraught with problems. You won't be able to do without filtering traffic, because your Asterisk will not stand for an hour when open to all winds, as such funny pictures will appear in the console:

Since remote users are at home (in theory), as a rule, they have a real dedicated IP, and we don't need anything else. Otherwise, you should take care of creating a secure virtual private network: it will also come in handy for accessing other corporate resources that should not be exposed to the public. More sophisticated defenses (fail2ban, etc.) are not directly related to Asterisk. We'll look at them in general context in other posts as well.
Getting rid of unnecessary modules
This part of the configuration is not directly related to security, but is generally necessary. In addition, the fewer opportunities your PBX provides to clients, the more difficult it is to hack it - the absence of unnecessary functionality will to a certain extent complicate the life of potential attackers.
The minimum PBX functionality looks like this:
- SIP support;
- Support for the G711 alaw only codec (if you wish, you can add all available codecs);
- Call recording;
- Support for WAV format (if desired, you can add support for all available formats);
- Optional : support for storing call detail on the database server.
To manage the Asterisk service interactively, use the built-in text console:
sudo asterisk -rvvModule files * .so are stored in the / usr / lib / asterisk / modules / directory . Upload and download can be in the console without having to restart the server (the module name is specified without an extension, for example, chan_sip instead chan_sip.so ): the Asterisk Module settings found in the configuration file /etc/asterisk/modules.conf . By default, all available modules are loaded automatically at server startup, but this can be easily changed using the autoload = yes | no parameter . Let's edit the configuration file, after making a backup copy of the distribution file:
module load NAME
module unload NAME
sudo mv /etc/asterisk/modules.conf /etc/asterisk/modules.conf.b
sudo nano /etc/asterisk/modules.conf
There are two approaches to configuration. In the first case, we enable autoloading of all existing modules, and disable unnecessary ones through modules.conf (section [modules] ): Note, here we specify the file name with the extension. The second option is to disable autoloading of all and specify only the necessary modules in the [modules] section of the modules.conf file , for example, like this: After editing, change the access rights:
[modules]
autoload=yes
noload => module_name.so
[modules]
autoload = no
load => chan_sip.so
load => codec_alaw.so
load => format_wav.so
load => app_dial.so
load => res_musiconhold.so
sudo chown asterisk:asterisk /etc/asterisk/modules.conf
sudo chmod 640 /etc/asterisk/modules.conf
We look at the list of loaded modules in the Asterisk console:
module show
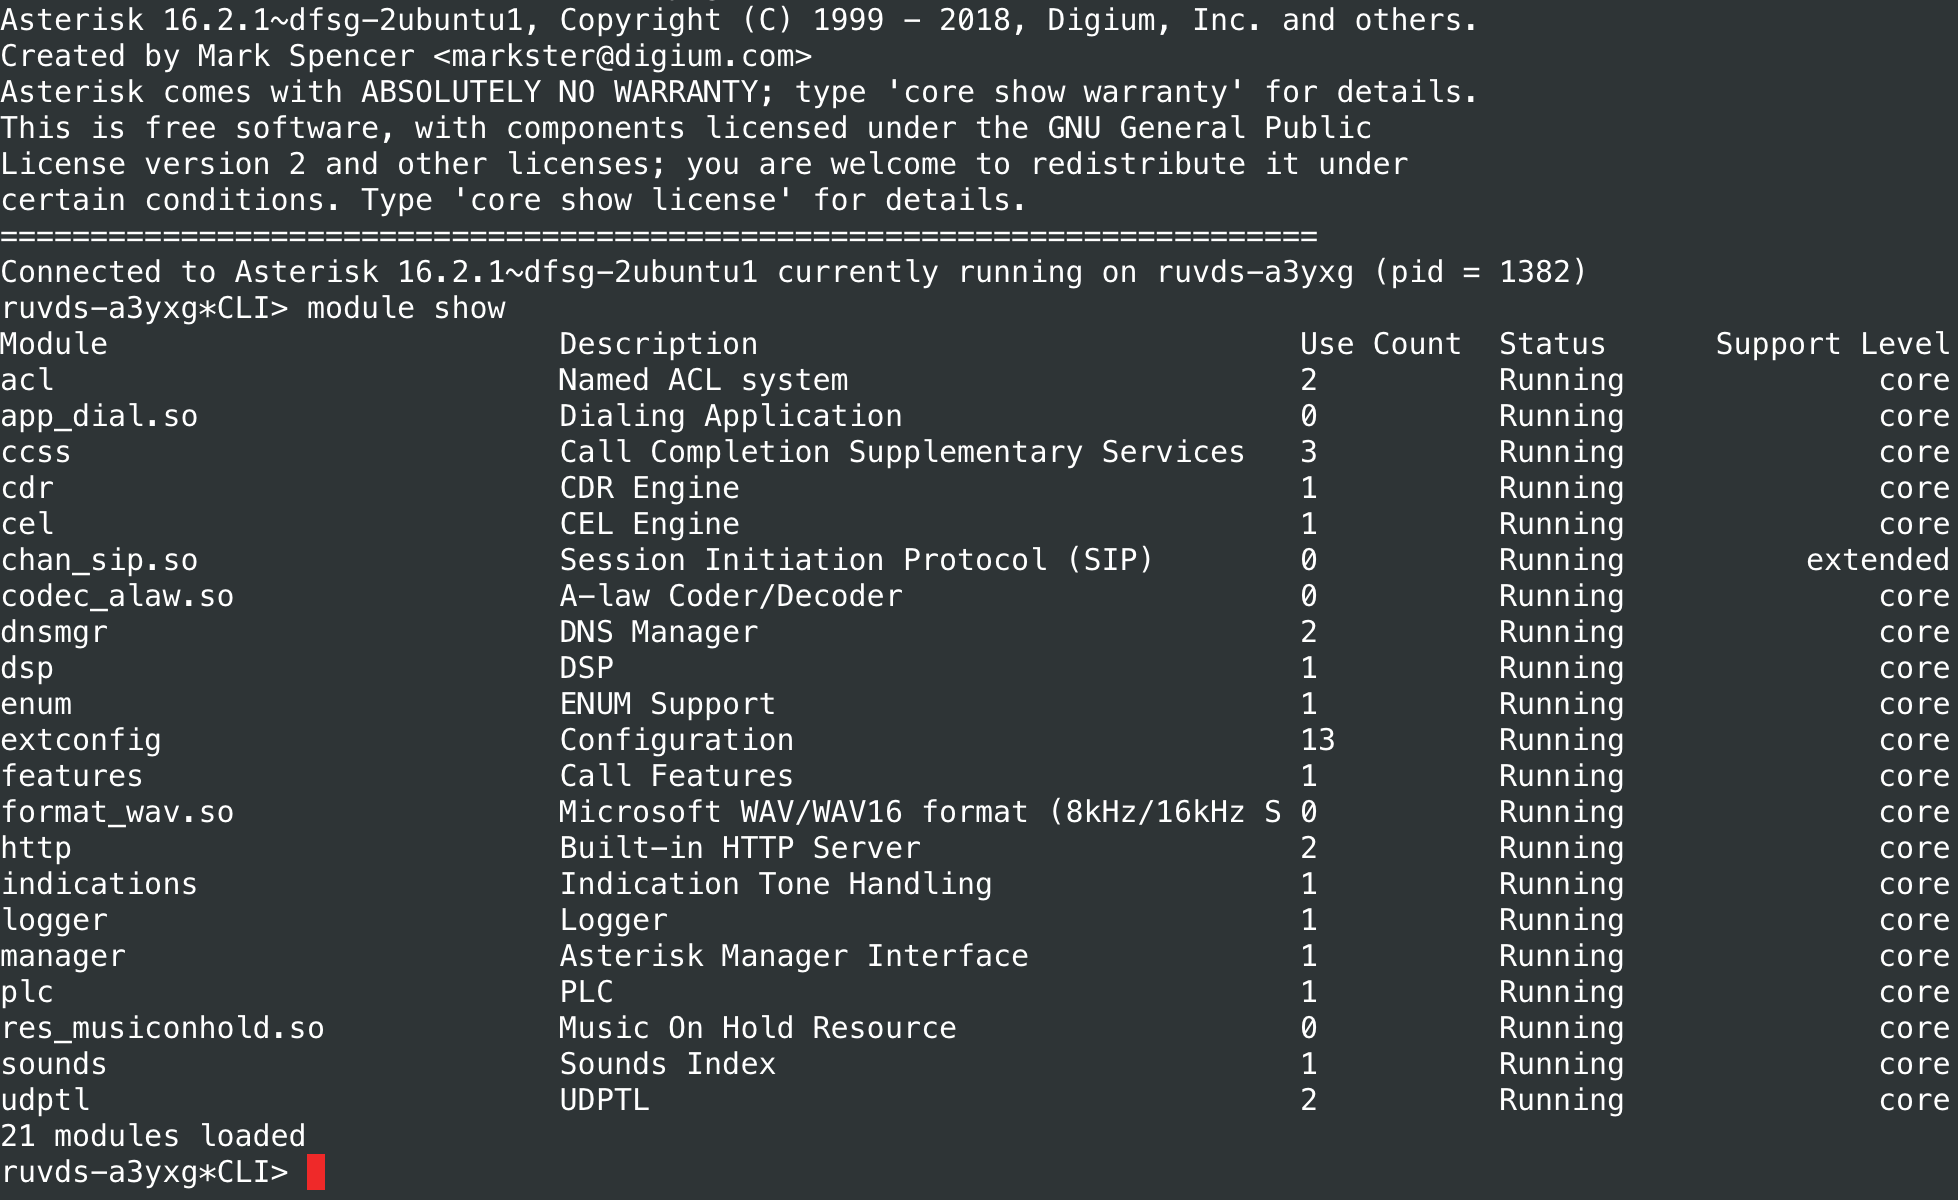
We add other modules to taste. This is how the modules.conf file will look for configuring an IP PBX with a sufficiently developed functionality:
Content of modules.conf
[modules]
autoload=no ; /usr/lib/asterisk/modules/
; VoIP (SIP)
load => chan_sip.so
load => res_sorcery_config.so
load => res_pjproject.so ; res_rtp_asterisk.so
load => res_rtp_asterisk.so
load => app_dial.so ; res_musiconhold.so
load => app_echo.so
load => bridge_simple.so ;
load => app_bridgewait.so
load => app_transfer.so ;
load => app_verbose.so ;
load => app_voicemail.so ; res_adsi.so
load => app_playback.so ;
load => app_stack.so
load => app_confbridge.so ;
load => app_directory.so
load => res_adsi.so
load => app_system.so ;
load => app_queue.so ;
;
load => func_devstate.so
load => app_chanisavail.so ; ChanIsAvail
load => func_cut.so ; cut
;
load => res_musiconhold.so
load => pbx_config.so
;
load => codec_a_mu.so
load => codec_adpcm.so
load => codec_alaw.so
load => codec_ulaw.so
load => codec_gsm.so
load => codec_lpc10.so
load => codec_g726.so
load => codec_g722.so
;
load => format_gsm.so ; Raw GSM data
load => format_h263.so ; Raw h263 data
load => format_pcm.so ; Raw uLaw 8khz Audio support (PCM)
load => format_wav_gsm.so ; Microsoft WAV format (Proprietary GSM)
load => format_wav.so ; Microsoft WAV format (8000hz Signed Linear)
load => format_mp3.so ; mp3-format
; Dahdi ( VDS )
;load => chan_dahdi.so
;
load => res_parking.so
; res_monitor.so,
load => func_periodic_hook.so
load => func_strings.so ; STRFTIME
; CALLERID, res_monitor.so
load => func_callerid.so
load => func_volume.so
;
load => res_monitor.so
load => app_mixmonitor.so ; app_mixmonitor.so app_dial.so
load => func_channel.so
; MySQL ( )
;load => cdr_mysql.so
;load => res_config_mysql.so ; MySQL RealTime Configuration Driver
; MySQL ODBC ( )
;load => res_odbc.so
;load => res_config_odbc.so
;load => cdr_odbc.so ;
; SNMP ( )
;load => res_snmp.so
; /var/spool/asterisk/outgoing/ ( )
;load => pbx_spool.so
; ( )
;load => app_exec.so ; exec execif
;load => app_while.so ; dialplan
;load => res_sorcery_astdb.so
;load => res_sorcery_realtime.so
;load => app_read.so
;load => app_stack.so
;load => cdr_csv.so ; /var/log/asterisk/cdr-csv/Master.csv
;load => func_cdr.so
;load => func_logic.so
;load => func_timeout.so
;load => func_shell.so
;load => pbx_ael.so
;load => res_ael_share.so
;load => res_agi.so
;load => res_speech.so ; res_agi.so
Note: You can comment out a line using a semicolon.
After modifying the modules.conf file, you must reload modules from the Asterisk console:
module reload
If you need to restart Asterisk, use the following command instead of the built-in console:
sudo systemctl restart asteriskAll called modules must be installed, otherwise Asterisk will fail when trying to load them. For example, to support the MP3 format, you have to install the asterisk-mp3 package , but to work with the MySQL server directly, you need asterisk-mysql :
sudo apt-get install asterisk-mp3
sudo apt-get install asterisk-mysql
Finding packages available in the repository is easy using the command:
apt-cache search asteriskIn fact, there are many more modules for Asterisk, we have not listed all of them. If you, for example, install a PBX on a physical server and want to connect analog lines to it through a telephony interface board, you will need the asterisk-dahdi package .
Configuring VoIP
Now let's change the sip.conf file so that we can work with Asterisk:
sudo nano /etc/asterisk/sip.confAdd the following lines to the [general] section , if you haven't already: The first parameter protects Asterisk from brute-force attacks. If you do not enable it, the server will inform attackers when the subscriber does not exist. Having found a valid number, a hacker can proceed to brute force passwords. If alwaysauthreject = yes , authentication errors for existing and non-existent subscribers look the same and it is more difficult to guess the password. The parameter allowguest = no disables the so-called. guest calls to PBX users. You can also change the port that Asterisk listens to to a non-standard port using the bindport directive (similarly, the address that listens to the VoIP service is configured using bindaddr ).
alwaysauthreject=yes
allowguest=no
In the sip.conf file we have registered subscribers (peers - from English peers) PBX. If the user works from fixed IP, it is worth limiting his connectivity. It is also necessary to create strong passwords, introduce a limit on the number of calls and, of course, register connections to external VoIP providers (the so-called trunks - from the English trunk):
deny=0.0.0.0/0.0.0.0 ;prohibiting connections from all nodes
permit=xxx.xxx.xxx.xxx/24 ;allow connections from a specific subnet
secret=_ ;subscriber passwords must be resistant to brute force
call-limit=2 ; limiting the number of simultaneous calls
As a result, the sip.conf file will look something like this:
Sip.conf content
[general]
context=default
allowoverlap=no
udpbindaddr=0.0.0.0
tcpenable=no
tcpbindaddr=0.0.0.0
transport=udp
srvlookup=yes
alwaysauthreject=yes
allowguest=no
; SIPNET c chan_sip
; register
[sipnet]
remotesecret=
defaultuser=
host=sipnet.ru
type=peer
context=sipnet-trunk; dialplan ( extensions.conf)
insecure=invite
callbackextension=s
fromuser=
fromdomain=sipnet.ru
disallow=all
allow=alaw,ulaw
nat=no
directmedia=no
dtmfmode=rfc2833
[office](!)
; , .
; .
type=friend
host=dynamic ; , IP
nat=no ; NAT
deny=0.0.0.0/0.0.0.0 ;
call-limit=2
qualify=yes ; 2
dtmfmode=rfc2833 ; dtmf , rfc2833
; ,
disallow=all
allow=ulaw
allow=alaw
allow=g729
allow=g723
allow=g726
allow=h261
allow=h263
allow=h264
allow=h263p
; () office
[1001](office)
permit=XXX.XXX.XXX.XXX/Netmask
secret=_
callerid= <1001>
context=homeoffice ; dialplan ( extensions.conf)
[1002](office)
permit=YYY.YYY.YYY.YYY
secret=_
callerid= <1002>
context=homeoffice
In this case, the subscriber 1001 can connect from any address of a specific subnet, and 1002 - only from a fixed IP. We also gave subscribers a number, password, name and context, which will be used in the call routing plan (dialplan). Instructions for configuring trunks are best taken on the sites of service providers: in our case, this is SIPNET . The parameters are similar to those of other peers - extensions. Note also that the context specified in the configuration file (we will talk about this entity below) must exist in dialplan.
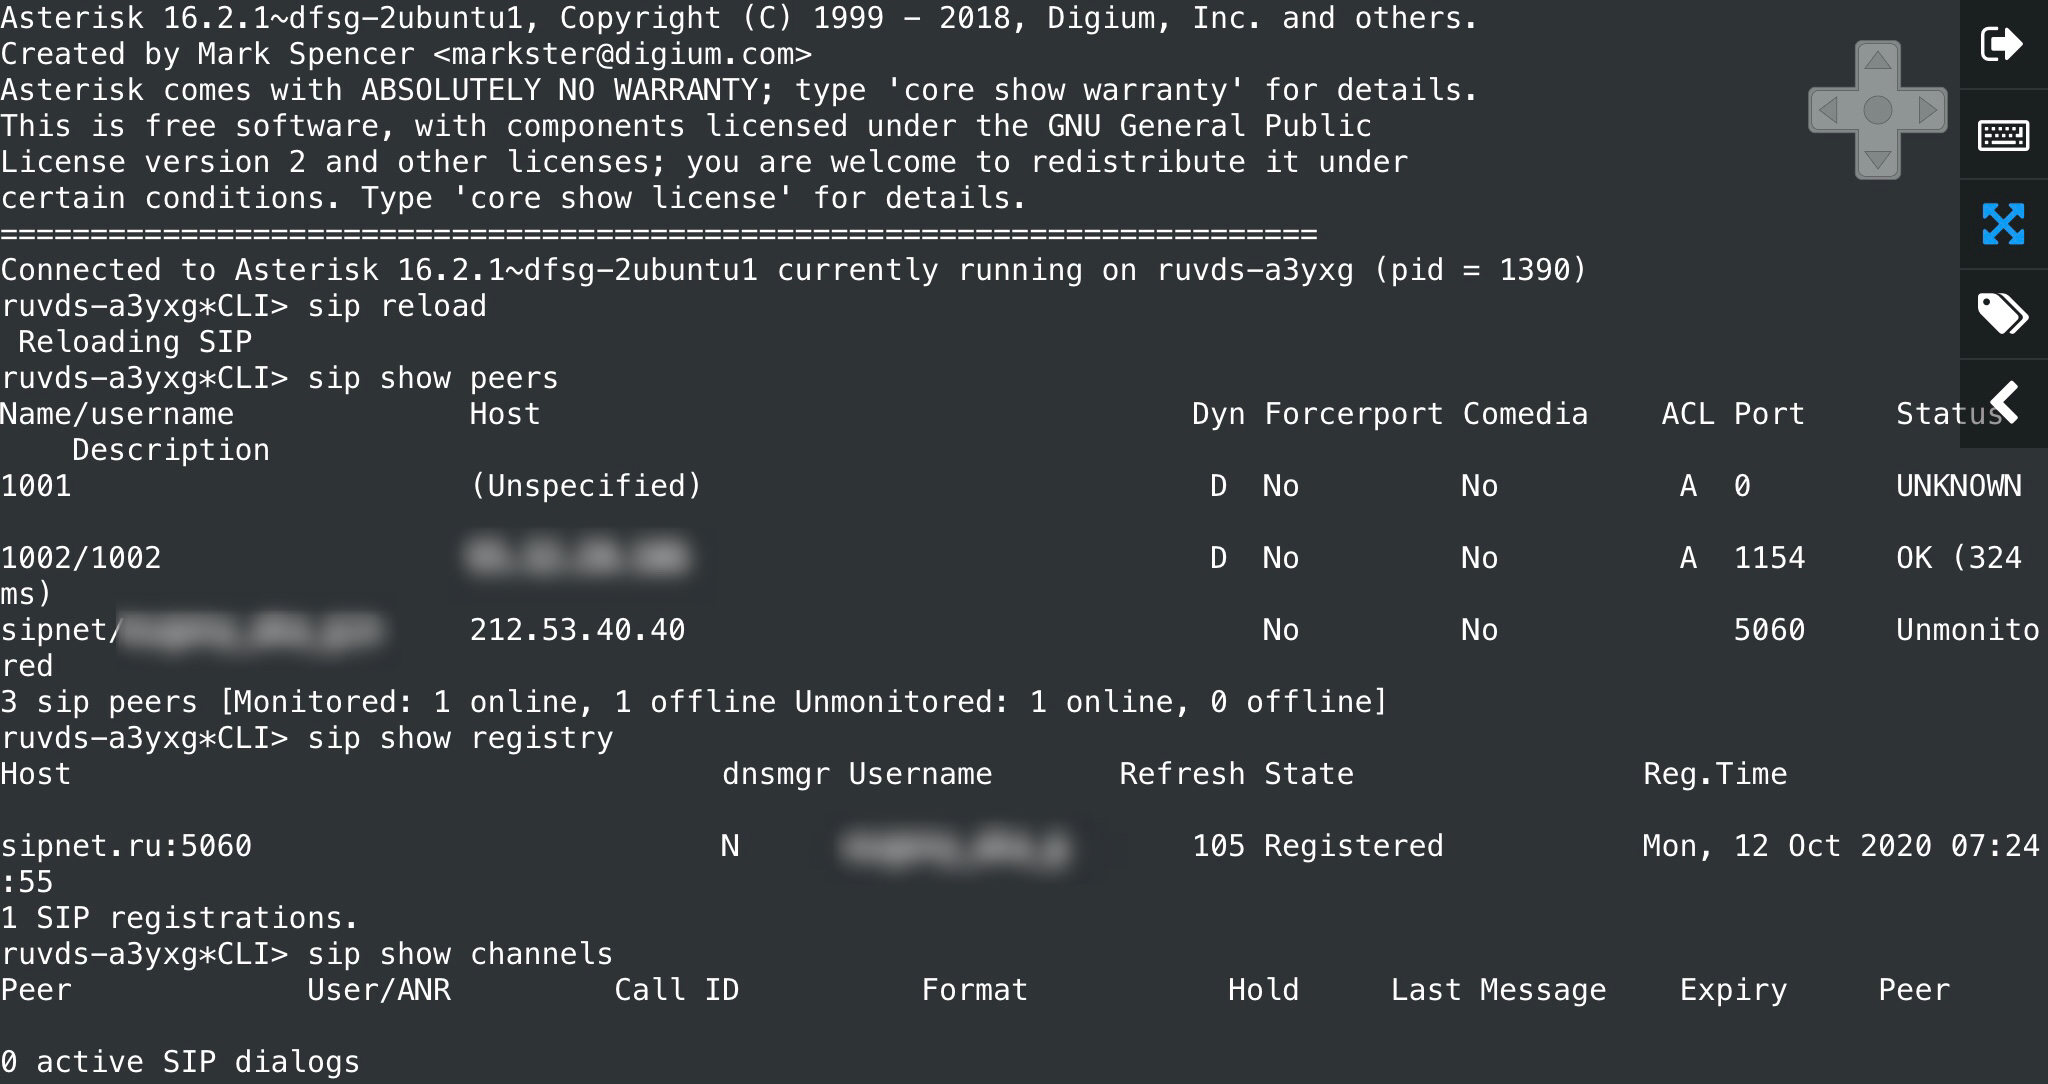
After making changes to the sip.conf configuration file, you need to restart the SIP module via the Asterisk console:
sip reload
Other built-in console commands for working with the SIP module:
sip show peers- displaying the status of all trunks / peers;
sip show registry- display of all registrations;
sip show channels- display of active channels;
sip show settings- viewing the global settings of the SIP module.
Dialplan and all-all-all
Call routing plan or dialplan is often referred to as the heart of Asterisk. It is stored in the /etc/asterisk/extensions.conf file and is essentially a script that makes the PBX respond to external events. Calling plan scripts can be written in different languages, but we will consider the built-in one, which appeared in the first versions of the popular IP PBX. After configuring and starting Asterisk, there will be some content in the extensions.conf file . Replace it with our own: The script syntax is pretty straightforward, we'll go into more detail in the next article. Note only that Asterisk's Calling Plan is based on four central concepts:
[general]
static=yes
writeprotect=no
priorityjumping=no
autofallthrough=yes
clearglobalvars=no
;
[default]
exten => _X.,1,NoOp()
same => n,Busy()
same => n,HangUp()
; homeoffice
[homeoffice]
;
exten => _1XXX,1,Dial(SIP/${EXTEN})
; SIPNET
exten => _.7XXXXXXXXXX,1,Dial(SIP/${EXTEN}@sipnet)
; sipnet-trunk, SIPNET
[sipnet-trunk]
;
- Contexts - named parts of the code communicating with each other (names are enclosed in square brackets): sets of instructions;
- (extensions) — , exten;
- — , ( ) ( n — next). exten same;
- (applications) — . , Dial — , .
Extensions sort calls by a mask using a set of patterns, starting with an underscore - it makes our PBX understand that we are talking about a pattern:
exten => _1XXX,1,Dial(SIP/${EXTEN})
Next, the priority is indicated and the call to the application with passing arguments to it is quite simple.
Restart dialplan using Asterisk console:
dialplan reload
To see the current dialplan, use the command:
dialplan show
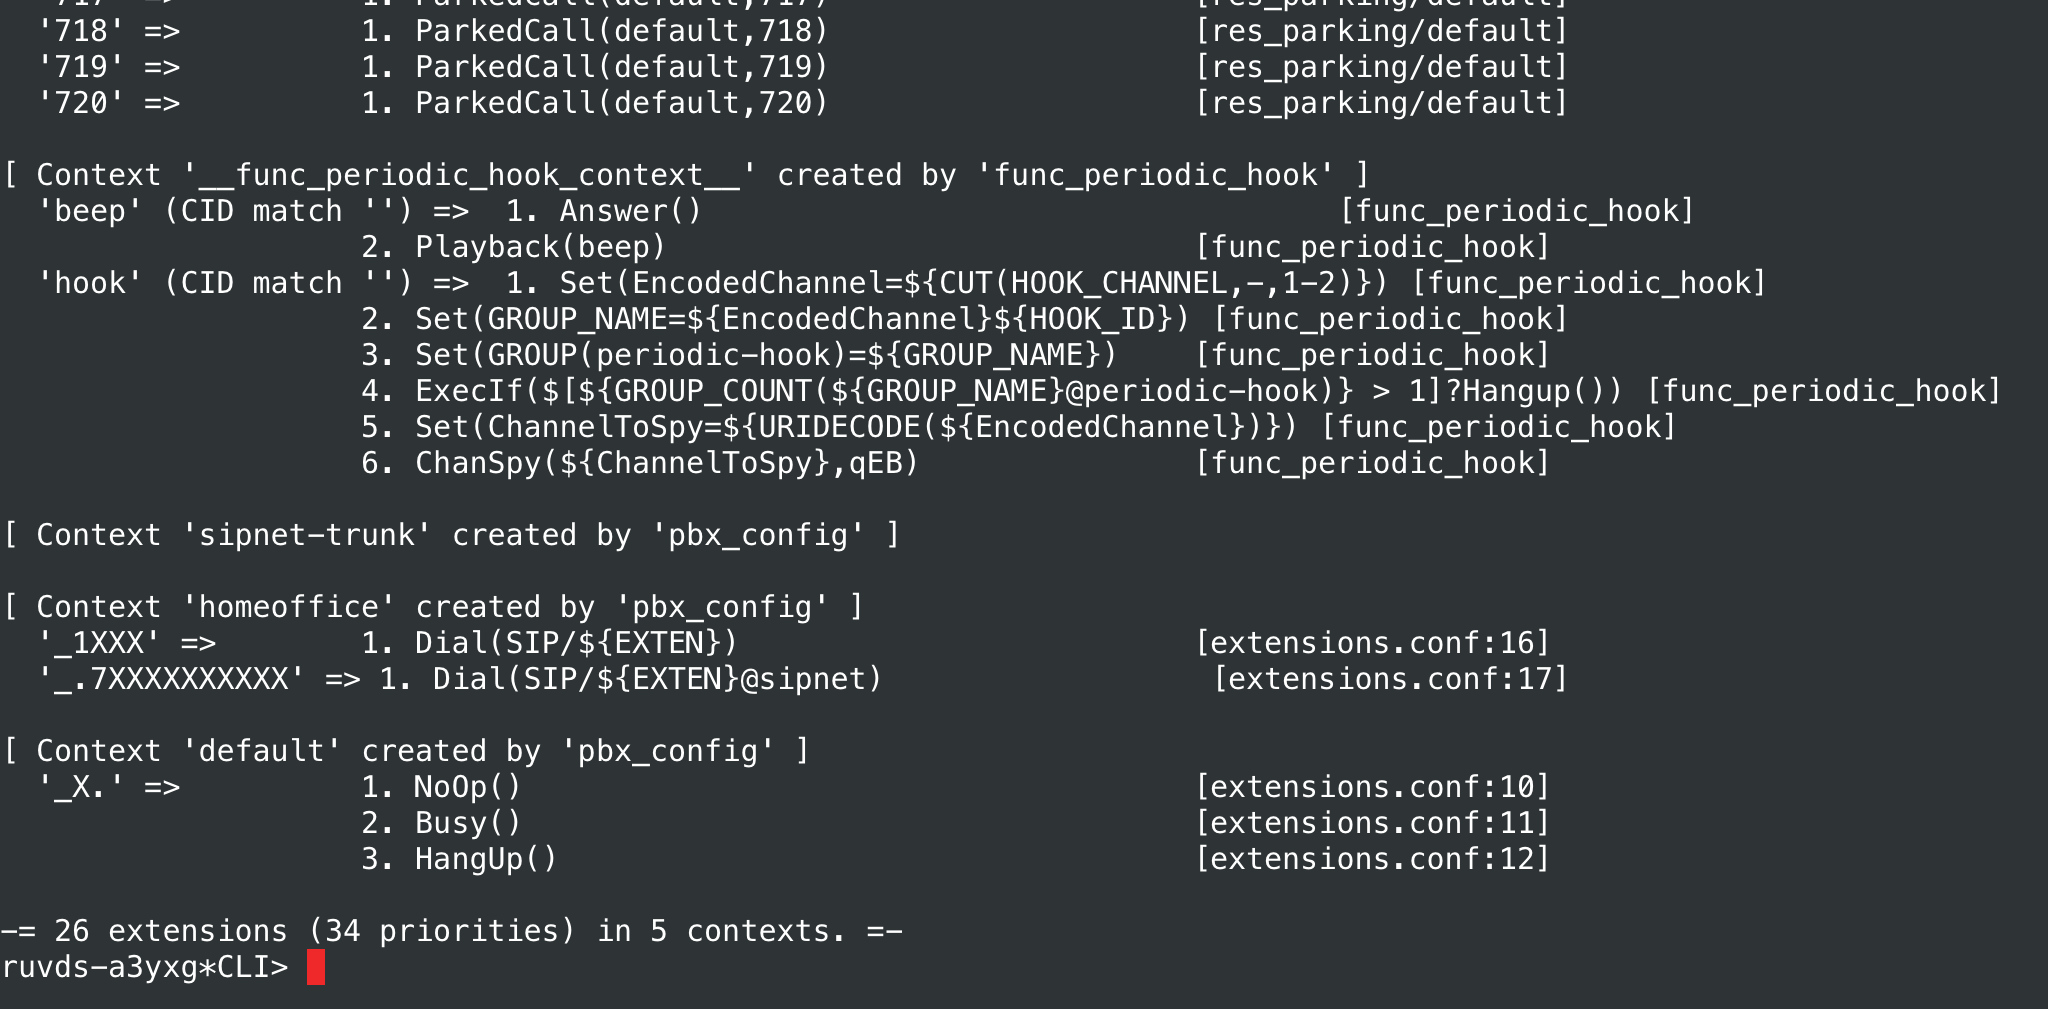
Note that, for example, modules you have loaded can make changes to dialplan.
Now the PBX allows internal subscribers to communicate with each other, as well as to make external calls within Russia via SIPNET. This is not much, but enough for the second lesson. In the current configuration, the deprecated chan_sip module has been used , which will eventually be discontinued in Asterisk. In the next article we will look at migrating to the PjSIP libraryto work with the VoIP protocol stack, as well as extend dialplan for receiving incoming calls, organizing conferences and solving other call routing tasks. Attentive readers might have noticed that some of the loaded modules were not used in the examples: we will need them to learn how to record calls, create queues and do other interesting tricks.

Read our blog)