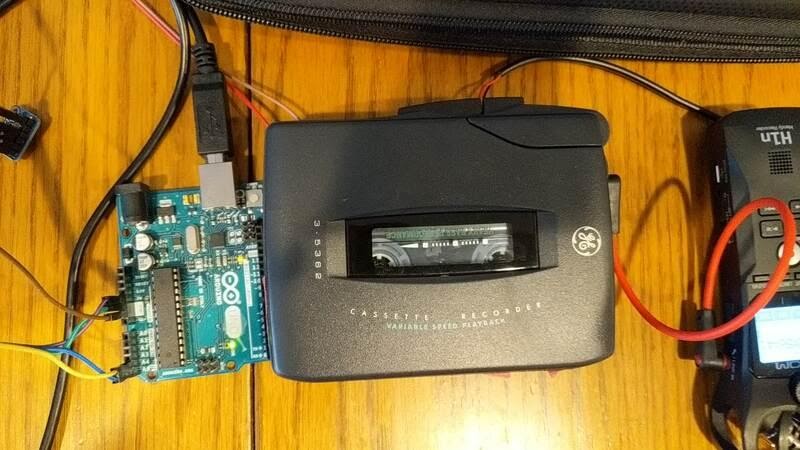
Cassette Synthesizer
I like unusual musical projects. For example, I have released an album based on recordings made by NASA during the Apollo 12 mission. And recently I used my own heart to control the tempo of the music. You can find the results of my musical experiments here .
I recently made a MIDI-controlled synthesizer out of an old cassette player reminiscent of Sony's Walkman. To do this, I needed an Arduino board and some code. What happened can be called a "cassette synthesizer".
A cassette synthesizer works by playing a monotonous sound (one note) previously recorded on a cassette tape. The pitch can be controlled, it depends on the speed of the tape. The Onde Magnétique project led me to the idea of creating a cassette synthesizer , and the creators of this project were inspired by the idea of Mellotron .
Here's a video showing me playing a cassette synthesizer using a MIDI keyboard.
The good thing about this synthesizer is that it produces a very "analog" sound when changing notes. Namely, the pitch often smoothly changes when passing from note to note, the sound, as a result, turns out to be very interesting (that is, the portamento effect is often encountered in music played on this synthesizer). In addition, absolutely any sound can be recorded on tape, so my synthesizer turned out to be quite versatile.
Creating a cassette synthesizer
In fact, creating such a synthesizer is very simple. I came across a good video on how to modify a cassette player so that the playback speed of the cassette can be controlled using a voltage regulator. I have modified my existing player in a similar way. I also created, based on a browser, a simple MIDI controller designed to get the desired notes by modifying the voltage.
The instructions below focus on the hardware of the synthesizer, represented by the player and the Arduino, and the software, which is played by the MIDI controller.
Materials
- GE 3-5362A Cassette Player ($ 15, a lot on eBay)
- Arduino ($ 23).
- DAC MCP4725 ($ 11).
- 3,5 ($8).
- ( , $5).
- , ($25, ).
GE 3-5362A
Note that you do not need to use the GE 3-5362A player. Any player that supports variable playback speed will do. If you are going to make a cassette synthesizer based on another player, you just need to figure out its internal structure and where to solder the corresponding wires.
Let's start by opening the body of the player. To do this, you need to unscrew the four screws located on the back of the device. You don't need to make much effort here - just unscrew the screws and carefully open the case. Note that the back and front of the unit are connected by wires that supply power to the player's electronics. Do not cut these wires.
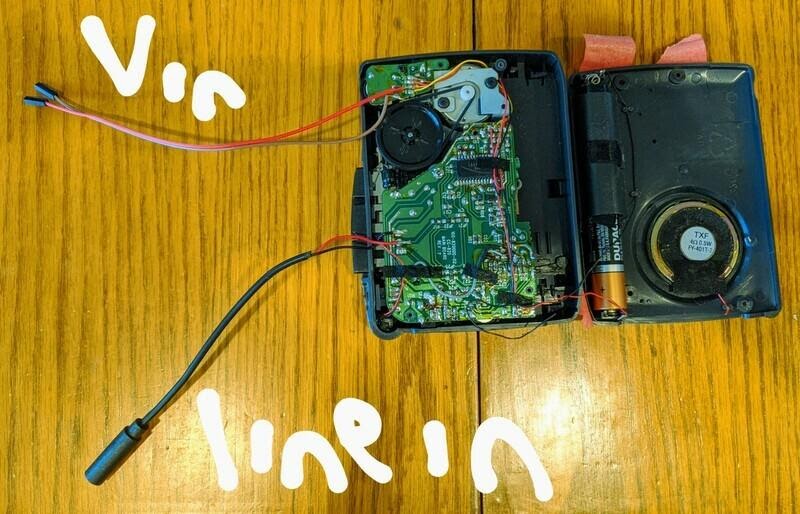
Disassembled player that has already been modified
In order to turn the player into a cassette synthesizer, we need to solder two new components to it. The first is a wire connected to
Vin, with which we can control the speed of the tape playing using a voltage regulator. The second is an audio splitter connected toLine in, which will allow us to record sounds on a cassette (this is useful for those who do not have a tape recorder).
If you don't know how to solder, don't worry. It's simple. Watch this video. From it you will learn how to solder wires to contact pads.
Connecting to Vin and organizing tape speed control
Find the wheel labeled Variable Speed Playback on the device. This is where we will solder a couple of wires. I prefer to use the red wire for the plus and the brown or green wire for the minus. Therefore, we solder the red wire to the VS + pad, and the other color wire to the pad located immediately below B +.
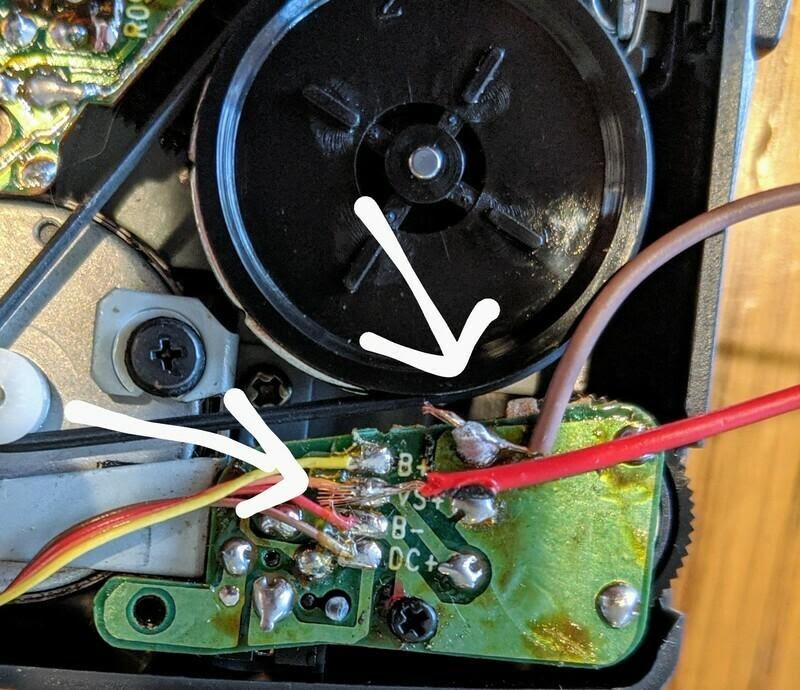
Wires soldered to the VS + pad and to the pad located near B +
Note that I use cables with female connectors on one end in situations like this. It is very convenient to connect something to them.
Connection to Line in for organizing sound recording on a cassette
Now you need to find the MIC- and MIC + pads, to which the red and black wires from the microphone are soldered. You can simply unsolder these wires and solder the audio cable wires to these pads. Red to MIC +, black to MIC-.
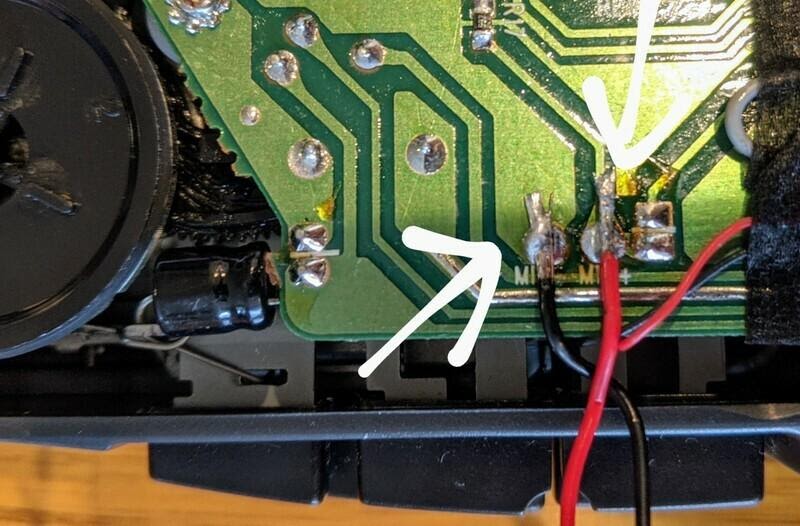
Wires soldered to MIC- and MIC +
Recording monotonous sound on a cassette
Now you can insert the cassette into the player and record sound on it by connecting to
Line in! You can record the sound of any note. As a rule, you can start experiments with the note "C". The recording should be long enough - 30 minutes or so (here, by the way, a tape with a tape loop would come in handy). Please note that only one tone needs to be recorded on the cassette, since it is the pitch of this tone that we will change by controlling the playback speed of the recording.
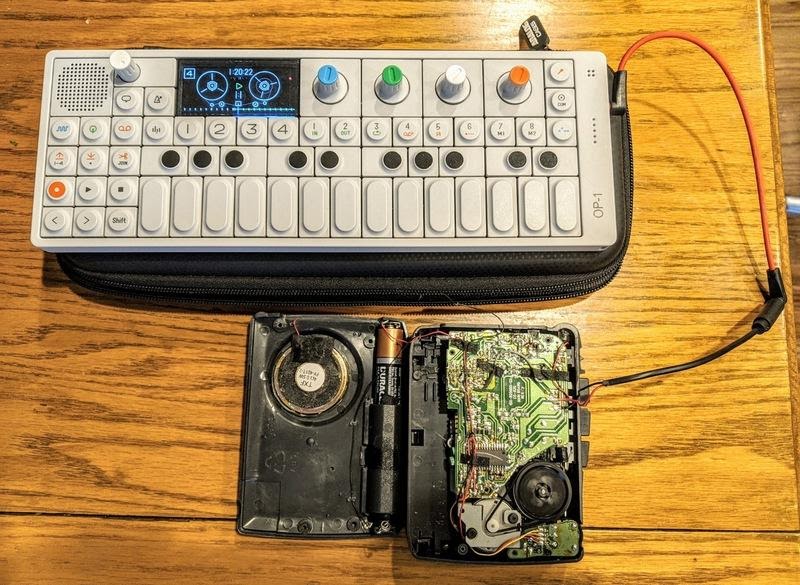
Recording sound to a cassette with the OP-1
Preparing the Arduino for use as a MIDI interface
Arduino acts as an intermediary between the MIDI interface and the digital-to-analog converter, which is responsible for changing the voltage. The MIDI keyboard is connected to the computer. Keyboard signals are received by a program running in Chrome. It addresses the server, which sends data about the voltage change to the Arduino, and the Arduino transmits the corresponding signals to the digital-to-analog converter, which controls the playback speed of the tape on the player.
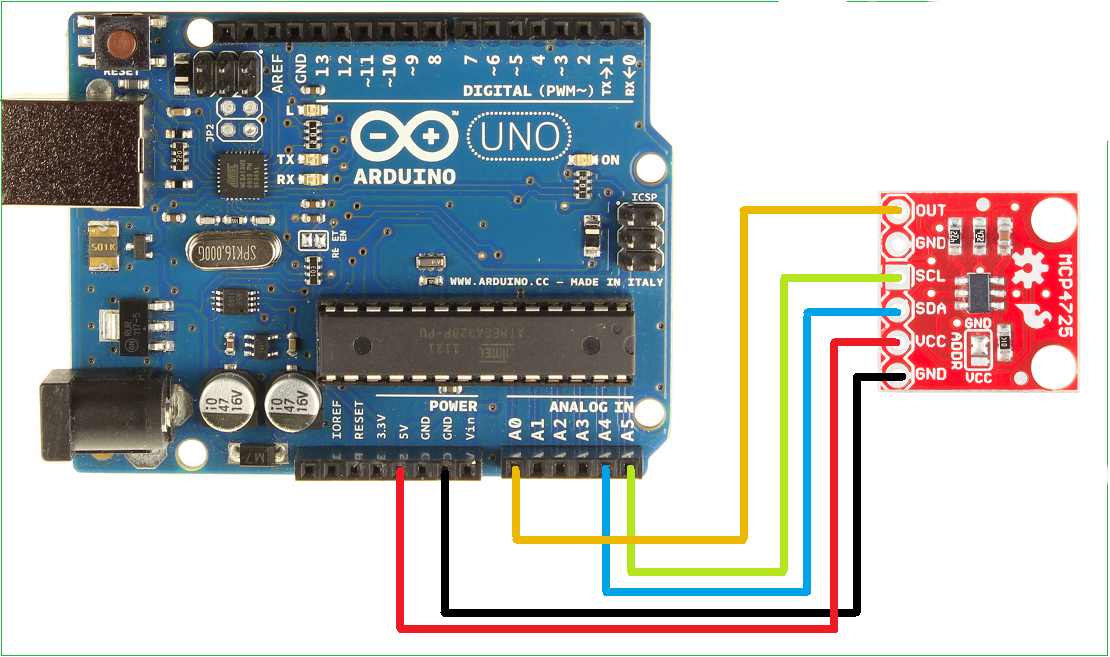
Connecting the MCP4725 D / A Converter to the Arduino
First, you need to connect the MCP4725 to the Arduino using the above diagram. The MCP4725 is a digital-to-analog converter that can be controlled from the Arduino. The OUT terminal of the converter must be connected to the red wire that we previously soldered to the player. The other wire must be connected to the GND pin on the Arduino.
The code that communicates between the computer and the Arduino communicates with the device, sending it information about how to change the voltage. For example, if the Arduino receives a command
dac.setVoltage(newVolts, 1), the MCP4725 will output a voltagenewVolts. Here is the code:
#include <Wire.h>
#include <Adafruit_MCP4725.h>

Adafruit_MCP4725 dac;
String sdata = ""; //   .
bool started = false;
void setup(void) {
  Serial.begin(9600);

  //  Adafruit MCP4725A1  -  0x62 ( )  0x63 ( ADDR   VCC)
  //  MCP4725A0  -  0x60  0x61
  //  MCP4725A2  -  0x64  0x65
  dac.begin(0x62);
  pinMode(2, OUTPUT);
  pinMode(3, OUTPUT);

  Serial.println("Begin");
}

void loop(void) {
  if (started == false) {
    started = true;
    dac.setVoltage(0, 1);
    digitalWrite(2, LOW);
    digitalWrite(3, LOW);
  }
  byte ch;
  if (Serial.available()) {
    ch = Serial.read();
    sdata += (char)ch;
    if (ch == '\n') {
      sdata.trim();
      if (sdata.indexOf("voltage") > -1) {
        sdata.remove(0, 7);
        float newVal = sdata.toFloat();
        //
        float newVoltage = round(910.0 * newVal);
        if (newVoltage > 4095) {
          newVoltage = 4095;
        }
        uint16_t newVolts = uint16_t(newVoltage);
        dac.setVoltage(newVolts, 1);
        Serial.print("volts: ");
        Serial.println(newVolts);
      } else {
        Serial.println("?");
      }
      sdata = "";
    }
  }
}
Server used to send commands to Arduino
To control the Arduino, you can use a simple server that sends commands to the board that change the voltage. The relevant code can be found here . For the server to work, you need Golang . Here's how to get your server up and running:
$ git clone https://github.com/schollz/tape-synth
$ cd tape-synth
$ go build
$ ./tape-synth -com ARDUINOCOM
If you are using Linux, then you need to use the command to organize work with the USB port
sudo. ARDUINOCOMIs a COM port for an Arduino board connected to a computer via USB. This is common on Windows COM4.
The page is used to manage the server
index.html. In order to open it in Chrome, you need to go to the address localhost:8080. Next, you can connect a MIDI keyboard and send Arduino commands (Chrome is the most popular browser that supports MIDI ).
Building the system and playing the synthesizer
In order to play the cassette synthesizer, you need to start the server, connect a MIDI keyboard and go to Chrome at
localhost:8080. Now you can turn on the player and start playing! The note being played on the keyboard must be played by the player.
Synthesizer setup
We are dealing with a mechanical system that changes the pitch by changing the speed of the tape. Therefore, our synthesizer needs tuning. To do this, you need to open
index.htmland edit the properties of the object voltageMap. Each note must be assigned a voltage (between 0 and 3) corresponding to its pitch.
var voltageMap = {
    "C": 0,
    "C#": 0.7,
    "D": 0.9,
    "D#": 1.2,
    "E": 1.4,
    "F": 1.62,
    "F#": 1.85,
    "G": 2.25,
    "G#": 2.6,
    "A": 3.0,
    "A#": 0,
    "B": 0,
}
Outcome
If I have explained something incomprehensibly (I suspect that it is) - ask me questions on Twitter or Instagram .
Are you planning to build your own cassette synthesizer?

