In this tutorial, we will look at the built-in drag-and-drop mechanism on the page.
For the sake of fairness, it should be noted that this mechanism can be implemented using mouse events, as Ilya Kantor shows in his textbook , however, we will use native tools based on the specification .
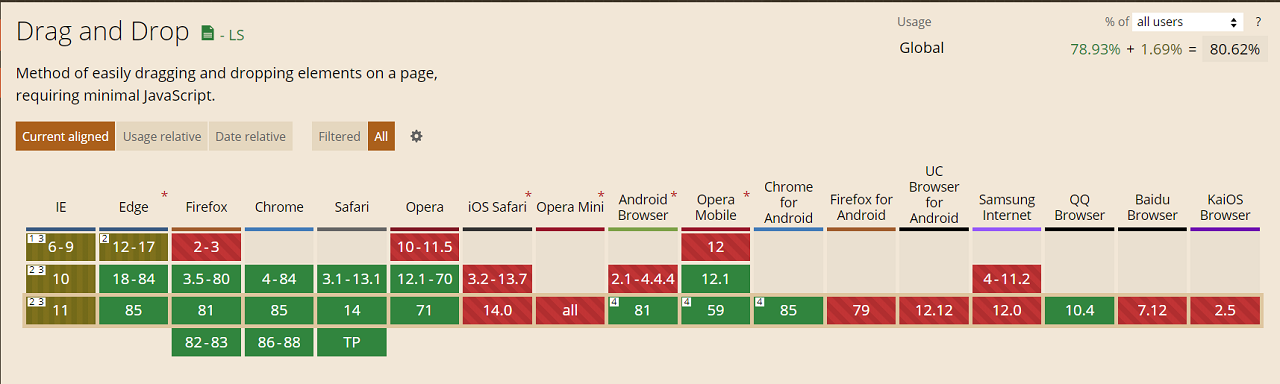
Technology support:
Preview:
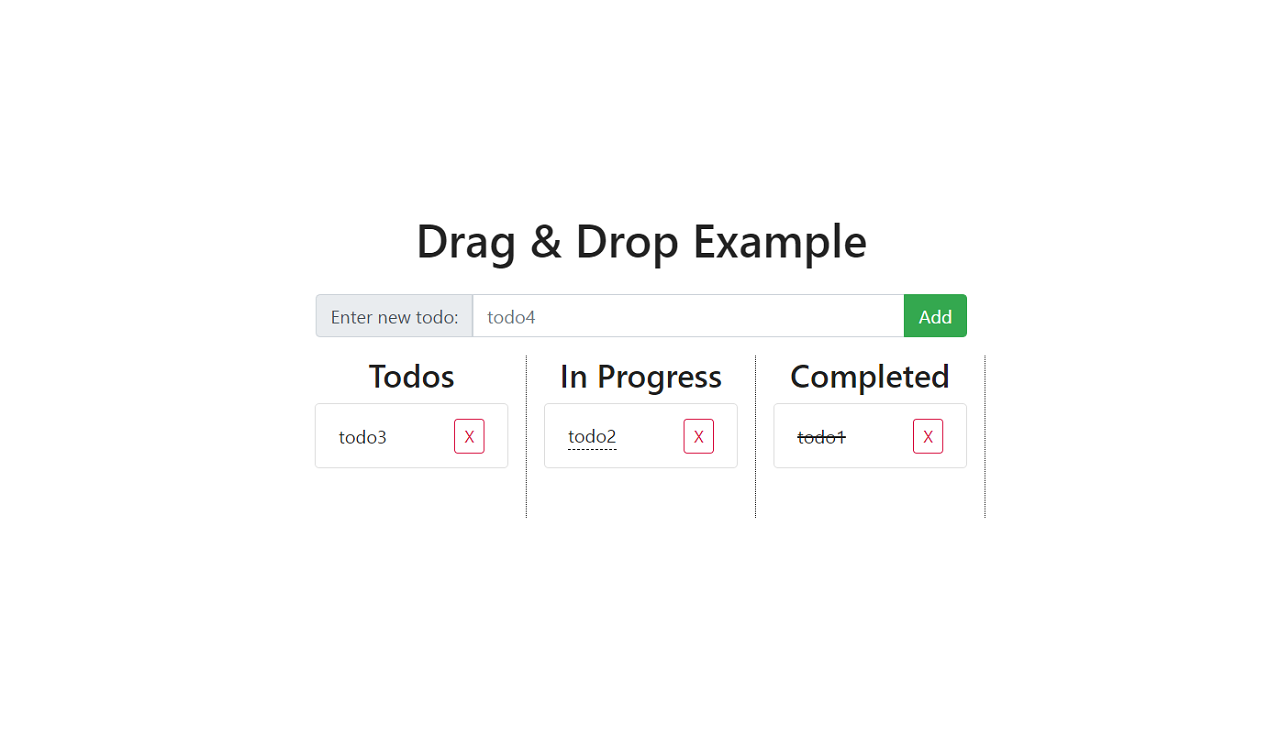
Our task is as follows: to implement a list of tasks, consisting of three columns: all tasks, tasks in the process of execution, completed tasks. Of course, the application must provide the ability to add and remove tasks. In addition, the possibility of arbitrary arrangement of tasks should be provided. This is one of the more interesting parts of the tutorial - keeping track of the item underneath the dragged item and determining where the dragged item should be positioned above or below the tracked item. Bootstrap
will be used for styling . If you are interested, please follow me.
Markup:
<head>
    <!-- Bootstrap CSS -->
    <link
      rel="stylesheet"
      href="https://stackpath.bootstrapcdn.com/bootstrap/4.5.2/css/bootstrap.min.css"
      integrity="sha384-JcKb8q3iqJ61gNV9KGb8thSsNjpSL0n8PARn9HuZOnIxN0hoP+VmmDGMN5t9UJ0Z"
      crossorigin="anonymous"
    />
    <!-- custom CSS -->
    <link rel="stylesheet" href="style.css" />
  </head>
  <body class="container">
    <h1>Drag & Drop Example</h1>
    <main class="row">
      <div class="input-group">
        <div class="input-group-prepend">
          <span class="input-group-text">Enter new todo: </span>
        </div>
        <input
          type="text"
          class="form-control"
          placeholder="todo4"
          data-name="todo-input"
        />
        <div class="input-group-append">
          <button class="btn btn-success" data-name="add-btn">Add</button>
        </div>
      </div>

      <div class="col-4">
        <h3>Todos</h3>
        <ul class="list-group" data-name="todos-list">
          <li class="list-group-item" data-id="1" draggable="true">
            <p>todo1</p>
            <button
              class="btn btn-outline-danger btn-sm"
              data-name="remove-btn"
            >
              X
            </button>
          </li>
          <li class="list-group-item" data-id="2" draggable="true">
            <p>todo2</p>
            <button
              class="btn btn-outline-danger btn-sm"
              data-name="remove-btn"
            >
              X
            </button>
          </li>
          <li class="list-group-item" data-id="3" draggable="true">
            <p>todo3</p>
            <button
              class="btn btn-outline-danger btn-sm"
              data-name="remove-btn"
            >
              X
            </button>
          </li>
        </ul>
      </div>

      <div class="col-4">
        <h3>In Progress</h3>
        <ul class="list-group" data-name="in-progress-list"></ul>
      </div>

      <div class="col-4">
        <h3>Completed</h3>
        <ul class="list-group" data-name="completed-list"></ul>
      </div>
    </main>

    <!-- custom JS -->
    <script src="script.js"></script>
</body>
Here we have a container with a field for entering the text of a task and a button for adding it to the list (input-group), as well as three container-columns (list-group) for all tasks (todos-list), tasks in progress (in -progress-list) and completed tasks (completed-list). As for the "data" attributes, they are intended to separate styling and control: classes - for styling, data - for management.
Styles:
body {
  min-height: 100vh;
  display: flex;
  flex-direction: column;
  justify-content: center;
  align-items: center;
  color: #222;
}

main {
  max-width: 600px;
}

.input-group {
  margin: 1rem;
}

.list-group {
  min-height: 100px;
  height: 100%;
}

.list-group-item {
  display: flex;
  justify-content: space-between;
  align-items: center;
}

div + div {
  border-right: 1px dotted #222;
}

h3 {
  text-align: center;
}

p {
  margin: 0;
}

.completed p {
  text-decoration: line-through;
}

.in-progress p {
  border-bottom: 1px dashed #222;
}

.drop {
  background: linear-gradient(#eee, transparent);
  border-radius: 4px;
}
The "in-progress" and "completed" classes serve as indicators that the task is in the corresponding column. The “drop” class is designed to visualize the task hitting the drop zone.
Before moving on to the script, note that we will not be using all drag events, but most of the main ones.
We define the main container in which the search for elements will be carried out and to which event processing will be delegated:
const main = document.querySelector("main");
We implement adding and removing tasks through processing a click:
main.addEventListener("click", (e) => {
  //
  if (e.target.tagName === "BUTTON") {
    //      "data-name"
    const { name } = e.target.dataset;
    //
    if (name === "add-btn") {
      //
      const todoInput = main.querySelector('[data-name="todo-input"]');
      //
      if (todoInput.value.trim() !== "") {
        //
        const value = todoInput.value;
        //
        const template = `
        <li class="list-group-item" draggable="true" data-id="${Date.now()}">
          <p>${value}</p>
          <button class="btn btn-outline-danger btn-sm" data-name="remove-btn">X</button>
        </li>
        `;
        //
        const todosList = main.querySelector('[data-name="todos-list"]');
        //
        todosList.insertAdjacentHTML("beforeend", template);
        //
        todoInput.value = "";
      }
    //
    } else if (name === "remove-btn") {
      //
      e.target.parentElement.remove();
    }
  }
});
Let's go directly to dragging.
To begin with, let's implement getting into the "throwing" zone and leaving it by adding / removing the appropriate class:
main.addEventListener("dragenter", (e) => {
  //
  if (e.target.classList.contains("list-group")) {
    e.target.classList.add("drop");
  }
});

main.addEventListener("dragleave", (e) => {
  if (e.target.classList.contains("drop")) {
    e.target.classList.remove("drop");
  }
});
Next, we process the start of the drag:
main.addEventListener("dragstart", (e) => {
  //
  if (e.target.classList.contains("list-group-item")) {
    //      "dataTransfer"    ;
    // dataTransfer    HTML - text/html,
    //
    e.dataTransfer.setData("text/plain", e.target.dataset.id);
  }
});
Now we need to somehow keep track of the element under the dragged one. This is necessary in order to arbitrarily arrange tasks in the list, i.e. swap tasks in a column in places. When handling the "mousemove" event, the "elementFromPoint (x, y)" method is used for this. The beauty of this interface is that to determine the "underlying" element, we just need to handle the "dragover" event:
//     ""
let elemBelow = "";

main.addEventListener("dragover", (e) => {
  //    ;
  //
  e.preventDefault();

  //     ;
  //
  elemBelow = e.target;
});
Finally, we handle the "drop" event:
main.addEventListener("drop", (e) => {
  //     ,   dataTransfer
  const todo = main.querySelector(
    `[data-id="${e.dataTransfer.getData("text/plain")}"]`
  );

  //   ,     -
  if (elemBelow === todo) {
    return;
  }

  //      , ,
  if (elemBelow.tagName === "P" || elemBelow.tagName === "BUTTON") {
    elemBelow = elemBelow.parentElement;
  }

  //      ,
  if (elemBelow.classList.contains("list-group-item")) {
    //   ,    :
    //    ;
    //
    //       (  )
    //
    const center =
      elemBelow.getBoundingClientRect().y +
      elemBelow.getBoundingClientRect().height / 2;
    //
    // ,
    // ,
    if (e.clientY > center) {
      if (elemBelow.nextElementSibling !== null) {
        elemBelow = elemBelow.nextElementSibling;
      } else {
        return;
      }
    }

    elemBelow.parentElement.insertBefore(todo, elemBelow);
    //
    //  ,
    todo.className = elemBelow.className;
  }

  //
  if (e.target.classList.contains("list-group")) {
    //
    //        ""
    e.target.append(todo);

    //     ""
    if (e.target.classList.contains("drop")) {
      e.target.classList.remove("drop");
    }

    //       ,
    const { name } = e.target.dataset;

    if (name === "completed-list") {
      if (todo.classList.contains("in-progress")) {
        todo.classList.remove("in-progress");
      }
      todo.classList.add("completed");
    } else if (name === "in-progress-list") {
      if (todo.classList.contains("completed")) {
        todo.classList.remove("completed");
      }
      todo.classList.add("in-progress");
    } else {
      todo.className = "list-group-item";
    }
  }
});
That's all. As you can see, nothing complicated. But what are the possibilities for adding interactivity to the page. It remains to wait until mobile browsers implement this technology, and everyone will be happy.
Hope you found something interesting for yourself. Thank you for your attention and have a nice day.