GitHub users get 2000 minutes a month to run GitHub Actions on the service infrastructure. Let's make good use of this free time.
I give instructions for developers of Flutter applications: how to run tests and a code analyzer for each pull request using GitHub Actions, build an artifact and deploy it for testing in Firebase.

A person very quickly gets used to good things. And he gets used to it so much that he does not even think about the fact that it was not always so. As the old anecdote about a man and a goat says, the realization of all the delights of life occurs precisely at the moment when you are deprived of these very delights.
If your working project is doing well with CI / CD, you are a lucky person.
Maybe you work in a startup and have carefully configured all the pipelines and hooks with your own hands.
It may be that a whole DevOps team takes care of your well-being: every month it pleases you with new integrations, build-time melting before our very eyes and advanced techniques for deploying assemblies to all imaginable and unthinkable places.
It does not matter. The main thing is that you are always sure that your builds are viable, and at the same time you yourself are relieved of a lot of very boring routine tasks, the thought of which always plunges developers into melancholy and despondency. By the way, I will be glad if you write in the comments when was the last time you manually changed the status of an issue in Jira?
Leaving your comfort zone
Where do they leave the comfort zone, and most importantly, why? A lot of reasons. A friend asked me to help write a small application for your own bar, you finally found time to implement a pet project of your dreams, or decided to release a library that was accidentally born as part of a project. Finally, you and your colleague just decided to write a small sample project for the workshop.
I bet that in any of the scenarios, your inspiration from new interesting tasks will quickly collide with the harsh reality of software development in an "airless environment" (yes, at some point, you will need a smart collector like air).
"CI / CD is difficult ..."
What do you usually say to yourself at such moments? “I don't understand this! I'm just writing a frontend / mobile phone and I don't know anything about your Jenkins! " What if I told you that you don't need to know anything like that?
Yes, you just need to be able to build your project using console commands - and that's it. You can greatly simplify your life, even if it is a personal small project, and not a giant multi-module monster that is already hard to digest an IDE.
Github Actions is so simple that even your grandmother would set it up without much difficulty.
Then what is the post about?
If everything is so simple, why waste time reading this opus? I'll answer with a bulleted list:
- Flutter. CI . , Flutter- . ,
- . Github Actions — . 2 000 ( ). - , .
- . Flutter Android iOS , - . , , , .
c CI/CD , . . ($).
Github Actions, !
Github Actions is a service that allows you to automate your repository workflow. Anything you do manually with your project - other than writing code directly - you can delegate to Github Actions. If you prefer to immediately get acquainted with the primary sources, go to the official documentation .
Often we don't even know what we need to automate at all. The team doesn't have time to understand the complex API of the service and then write and debug the solution from scratch. Marketplace solves this problem : almost 5 thousand ready-made Actions are published there that solve a lot of typical tasks (for example, sending notifications about events in Telegram , analyzing project sources for technical debt ,setting labels on PR depending on the files changed in it ). Bad news: many of them are shareware - with fairly strict usage limits.
The working process
Everything in Github Actions revolves around workflows . Each workflow answers two questions: what to do and when to do it.
What to do . There are countless options here: you can build, test and deploy your builds using ready-made or do-it-yourself scripts. Learn more about workflow configuration
When to do it . You can trigger workflows on events that occur in the repository. Creating a pull request, pushing a commit tag or even adding a new star to your project. Complete list of hooks
If the workflow should be executed not on an event, but at a certain time or at a certain frequency, you have at your disposal the POSIX cron syntax .More about regular events
In the repository, as many different workflows can coexist at the same time. Each workflow is described in a separate YAML file, each of which should be stored in the .github / workflows directory at the root of your repository. Learn more about workflows syntax
Runtime environment
Github Actions offers two options for executing your workflows:
- Github-hosted runners — , . Windows, Linux macOS. , Codemagic, ( ). , , ;
- Self-hosted runners — , . Github , .
In my article, I will focus on the first option. We're on the simplest path possible, right?
Setting up basic workflow for Flutter
Before we start configuring the workflow, we need to agree on two things.
First, the main role of workflow will be to complicate the breakdown of the code base. Code that doesn't build, contains potential problems, or breaks tests shouldn't get into mainstream.
Second: there may be some subtleties in my configuration that will not be relevant for your project. I will try to explain them. However, if you are using this article as a guide, borrow thoughtfully.
Finally, let's decide what our workflow should actually do. We need a plan to help us move in the right direction.
Step by step to the finished assembly
The above plan can be used as a checklist when setting up your own workflow. We have to:
- give the workflow a meaningful name;
- indicate on which event our workflow will start;
- decide on the machine with which configuration it will start;
- decide on the steps that our workflow will consist of:
- checkout the project,
- installing Java;
- installing Flutter (as you remember, every time we have a clean instance at our disposal),
- downloading project packages,
- starting a static analyzer,
- running tests,
- the build assembly itself,
- deploy the build to some place where testers can get it.
Now our work has taken on a tangible shape. Let's move on to the implementation.
What our workflow will look like at the very end
— . , , .
name: Flutter PR

on:
 pull_request:
   branches:
     - "dev/sprint-**"
   paths-ignore:
     - "docs/**"
     - "openapi/**"
     - ".vscode/**"

jobs:
 build:
   runs-on: ubuntu-latest
   steps:
     - uses: actions/checkout@v1
     - uses: actions/setup-java@v1
       with:
         java-version: "12.x"

     - uses: subosito/flutter-action@v1
       with:
         channel: "stable"

     - run: sh ./scripts/flutter_pub_get.sh

     - run: sh ./scripts/flutter_analyze.sh

     - run: flutter test

     - run: flutter build apk --release

     - uses: actions/upload-artifact@v1
       with:
         name: APK for QA
         path: build/app/outputs/apk/dev/debug/apk_name.apk

     - name: Upload artifact to Firebase App Distribution
        uses: wzieba/Firebase-Distribution-Github-Action@v1
        with:
          appId: ${{ secrets.FIREBASE_ANDROID_PROD_APP_ID }}
          token: ${{ secrets.FIREBASE_TOKEN }}
          groups: testers
          file: build/app/outputs/apk/dev/debug/apk_name.apk
          debug: true
Name
Obviously, we need to name our workflow so that the name reflects its essence as accurately as possible. The name ( docs ) is the first thing we see in the Actions Console when the workflow is executed. Why I named my workflow that way, you will find out in a moment.

name: Flutter PRTriggering event
The "on" block ( docs ) allows us to specify one or more events, upon registration of which we want to start our workflow. Moreover, some of the events can be fine-tuned.
Which event to choose? In order not to miss a breakdown, you can specify at least all existing events. Then the assembly will go almost continuously, but do we want this? No, as in this case the limit on our free tariff plan will end fantastically quickly. We will look for the optimal solution.
Let's assume that our project adheres to the agreements according to which the code cannot be pushed into the main branch of the project directly - only through the creation of a pull request. It is logical if our workflow will respond to the creation of a pull request and build a project from a modified codebase:
on: pull_request$ This is enough for work, but the solution is not yet very optimal. The build will be triggered on every pull request created. This is redundant, since we are only interested in pull requests directed to the main branch of the project. The syntax for Github Actions allows us to specify the names (or masks) of the branches we are interested in.
on:
 pull_request:
   branches:
     - "dev/sprint-**"
$ And again we are looking for ways to optimize the process. There are files that, even in theory, cannot harm your project: project documentation, Swagger, general code-style settings and IDE. Fortunately, we have the ability to ignore such files by the path mask. As a result, the “on” block will look like this:
on:
 pull_request:
   branches:
     - "dev/sprint-**"
   paths-ignore:
     - "docs/**"
     - "drz-swagger/**"
     - ".vscode/**"
Important : only make a pull request if you are ready to merge it. Each next push to an already created pull request will restart the workflow.
Job configuration

Finally, we are ready to configure the job ( docs ). Now is the time to clarify what role the job plays in the workflow.
Every workflow must include at least one job. It is job that contains a step-by-step description of the steps that we perform with our project. The number of jobs in one workflow is not limited, as well as the number of steps in one job. By default, all jobs are executed in parallel, unless the dependence of one job on the results of another is specified. Our project will have the only job that will be responsible for building the project.
Setting up the environment
Each time the workflow runs on a clean virtual machine instance. The only thing we can choose is the operating system that will be installed on this machine. What to choose?
It is tempting to choose macOS, because we are planning to build a Flutter application for target platforms: Android and iOS. Bad news. One minute of using an instance with macOS is billed as ten (10 !!!) minutes of using an instance with Ubuntu. In an instance with Windows, in our case, there is no point at all, since it will still not be possible to assemble an iOS assembly there, and its usage time is twice as expensive as an instance with Ubuntu. More about billing
$How can we make sure that our 2,000 free minutes don't turn into 200? There is no good solution. I decided to skip building the build on iOS when creating a pull request. This will potentially hit the stability of the iOS build. There is also a compromise option - to build an iOS build on macOS only when changing pubspec.yaml or any file from the / ios directory , in other cases, build only an Android build on an instance with Ubuntu. This can be done by analogy with how we set up the ignore files for the "on" block .
jobs:
 build:
   runs-on: ubuntu-latest
You can see the technical specifications , as well as a list of installed "out of the box" software . Flutter and Java, unfortunately, are not included in this list. They will have to be installed manually each time the workflow is executed.
Don't be in a hurry to get upset. Ready actions will come to our rescue, which we can use in the steps of our job. We'll use two:
- actions / setup-java - the official action for setting up the Java environment;
- subosito / flutter-action is an unofficial action for downloading and installing the Flutter SDK. It has proven itself well: it allows you to do whatever you might need - for example, specify the desired framework channel or switch to a specific SDK version.
steps:
      - uses: actions/setup-java@v1
        with:
          java-version: "12.x"

      - uses: subosito/flutter-action@v1
        with:
          channel: "stable"
Cloning a repository
We have a clean instance of a machine rented from Github for a few minutes. In the previous step, we installed all the necessary software on it. Now we need to clone the source repository for our project. To do this, we will use a ready-made tool:
- actions / checkout is the official action for cloning a repository with a ton of settings that we won't need in most cases. Since the workflow runs directly on the repository we are cloning, we don't need to specify it explicitly.
- uses: actions/checkout@v1Loading dependencies
Up to this point, we have not implemented steps with our own hands, but only used what I offer ready-made actions. Now we are moving on to the implementation of the active phase of the build of our project, so it's time to write the implementation of the step yourself.
Before building, we need to download all the packages that are specified in the dependencies block of our pubspec.yaml file, as well as all their transitive dependencies. To do this, the Flutter SDK offers a simple command out of the box
flutter pub get. The implementation of step can consist in calling one terminal command. In this case, the next step will only be called upon completion of this command.
- run: flutter pub getIf your project has a complex structure and contains a number of dart packages that are connected locally, you will face a problem. It is
flutter pub getimpossible to build a project without an explicit call for each of these packages. In my project, such packages are collected in the / core folder located in the root directory. Below is a script that solves this problem. It is described in the flutter_pub_get.sh file in the / scripts folder in the same root directory.
flutter pub get
cd core
for dir in */ ; do

    echo ${dir}
    cd ${dir}
    pwd
    flutter pub get
    cd ..
    pwd
    if [ "$#" -gt 0 ]; then shift; fi
    # shift
done
Since the implementation of step can be any terminal command, nothing prevents us from executing our shell script.
- run: sh ./scripts/flutter_pub_get.shStatic code analysis
Flutter invites us to use a built-in command
flutter analyzeto run a static analyzer. This will help to identify potential problems with our codebase at an early stage: before a bug hits the production, or our code turns into an unreadable and unsupported mess.
We could have taken advantage of the out-of-the-box feature, but alas, the default team behavior
flutter analyzehas a flaw that ruins our workflow at the wrong time.
Problems found by the analyzer are classified into three levels of severity: info, warning, error. In this issueIt is described that even if during the analysis only info class problems are found (and it is not always worth spending time on fixing them here and now), the command returns the code "1", as a result of which your assembly will crash.
I suggest using the following script as a temporary solution. From now on, the assembly will crash only if there are problems with the error level :
OUTPUT="$(flutter analyze)"
echo "$OUTPUT"
echo
if grep -q "error •" echo "$OUTPUT"; then
    echo "flutter analyze found errors"
    exit 1
else
    echo "flutter analyze didn't find any errors"
    exit 0
fi
We execute the shell script in the next step of our workflow:
- run: sh ./scripts/flutter_analyze.shRunning tests
If you have tests in your project, you are on the right track! For tests to work, it is not enough to write them - they need to be run regularly in order to correct implementation flaws in time or update them if necessary. Therefore, in the next step, we will implement
- run: flutter testBe careful: empty test classes that do not contain any implemented tests will crash the entire workflow. There is only one way out: do not declare test classes until you are ready to implement at least one test within it.
Build and Sign
All preparatory work is over. We have verified that the code most likely does not contain obvious problems. Now we move on to the most important stage - the production of the artifact. In other words, we will be building the APK.
The assembly itself is extremely simple to implement. We have at our disposal the terminal command flutter build, which is extremely deeply configurable and allows you to build an artifact for a specific flavor, main file, ABI. We do not cover these nuances in the article, so use additional command flags if necessary.
- run: flutter build apk --releaseOur goal is to get an assembly signed with a release key. And at this stage we will have to solve the security problem, because we need to store the release keystore somewhere, as well as all of its aliases and passwords.
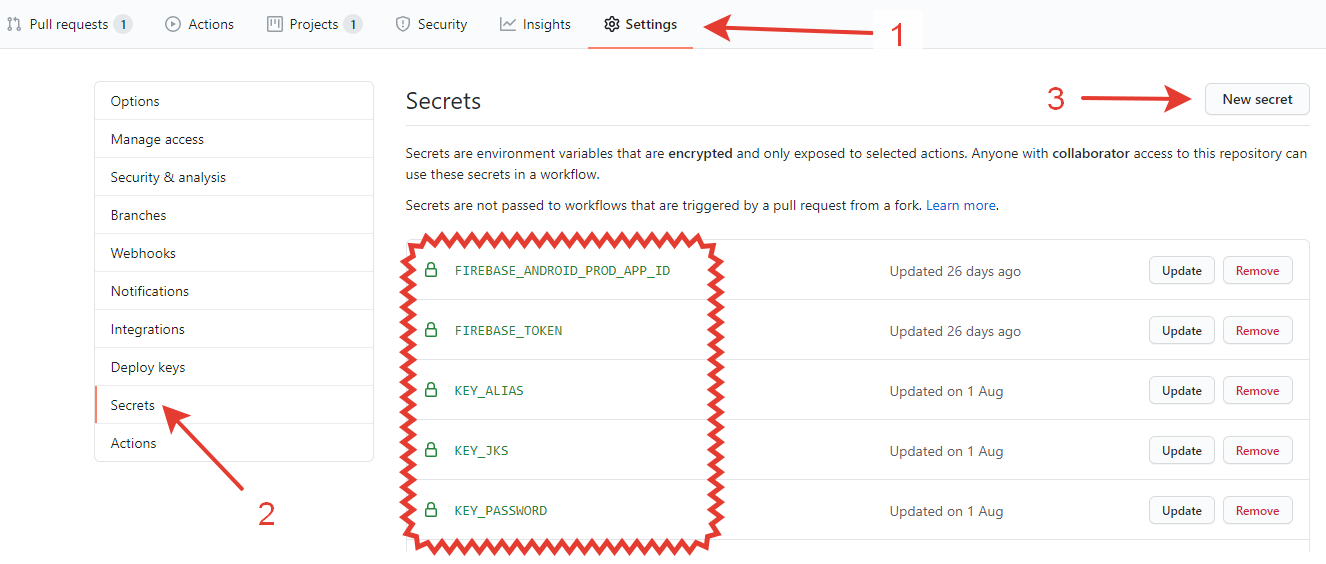
Github allows you to safely store string values in a dedicated Secrets repository . The data available here is stored in the corresponding repository and can be read programmatically from any step in your workflow. At the same time, the values cannot be seen through the Github web interface. Only delete or overwrite is allowed.
This looks like a good solution for aliases and passwords, especially if you are your own security service, but what about the * .jks file itself? Pushing it to the repository doesn't seem like a good idea, even if your repository is private. Unfortunately, Github does not provide any secure way of storing files, so you have to dodge.
It would be nice to represent our keystore file as a string. And it's real - you just need to encode it in base64. To do this, open a terminal in the directory containing our * .jks file and execute the following command. Next, a text file will be created from which you can copy the base64 representation of our keystore, then ... save it in Github Secrets.
openssl base64 < key_store_filename.jks | tr -d '\n' | tee keystore.jks.base64.txtNow that we have all the necessary components of a successful assembly signing in place, we will proceed with the configuration of the step. In the env block, we declare all the environment variables for that particular step. We will take the values of these variables from Secrets.
- run: flutter build apk --release
        env:
          STORE_PASSWORD: ${{ secrets.STORE_PASSWORD }}
          KEY_PASSWORD: ${{ secrets.KEY_PASSWORD }}
          KEY_ALIAS: ${{ secrets.KEY_ALIAS }}
          STORE_FILE: ${{ secrets.STORE_FILE }}
In our Android host, we have to describe the assembly configuration in such a way that we can sign the * .apk file in CI as well, without losing the ability to build the signed assembly locally. The keystoreConfig.gradle file is responsible for this moment .
If the keystore_release.properties file is found, it is known that the build occurs locally, which means that you can initialize all the properties of the keystoreConfig by simply reading them from the file. Otherwise, the assembly takes place in CI, which means that the only source of sensitive data is Github Secrets.
ext {
   def releaseKeystorePropsFile = rootProject.file("keystore/keystore_release.properties")
   if (releaseKeystorePropsFile.exists()) {
       println "Start extract release keystore config from keystore_release.properties"
       def keystoreProps = new Properties()
       keystoreProps.load(new FileInputStream(releaseKeystorePropsFile))
       keystoreConfig = [
               storePassword: keystoreProps['storePassword'],
               keyPassword  : keystoreProps['keyPassword'],
               keyAlias     : keystoreProps['keyAlias'],
               storeFile    : keystoreProps['storeFile']
       ]
   } else {
       println "Start extract release keystore config from global vars"
       keystoreConfig = [
               storePassword: "$System.env.STORE_PASSWORD",
               keyPassword  : "$System.env.KEY_PASSWORD",
               keyAlias     : "$System.env.KEY_ALIAS",
               storeFile    : "$System.env.STORE_FILE"
       ]
   }
   println "Extracted keystore config: $keystoreConfig"
}
And this is how the keystore_release.properties file looks like :
storePassword={___}
keyPassword={___}
keyAlias={___}
storeFile=../keystore/keystore.jks
The final step in the build.gradle file of our Android host is to apply the keystoreConfig file to our release build signing configuration:
android {
   signingConfigs {
       release {
           apply from: '../keystore/keystoreConfig.gradle'

           keyAlias keystoreConfig.keyAlias
           keyPassword keystoreConfig.keyPassword
           storeFile file(keystoreConfig.storeFile)
           storePassword keystoreConfig.storePassword
       }
   }
}
The signed assembly is already in our hands! But how do you extend it to your colleagues for testing?
Unloading
Github Actions allows you to configure the upload of artifacts to almost any known tool for distribution of assemblies, but we will consider only two options:
- Github Storage - the easiest way to upload assemblies to your own Github storage, which works out of the box, but has some limitations;
- Firebase App Distribution is a service from the Firebase ecosystem that replaced Beta by Crashlytics. Integration is a little more difficult to configure, but the service itself is much more convenient to use.
Github Storage
Github Storage integrates easily through the official action. You only need to specify the name of the assembly as your colleagues will see it in the web interface, as well as the path to the compiled * .apk file in CI.
- uses: actions/upload-artifact@v1
        with:
          name: APK for QA
          path: build/app/outputs/apk/dev/debug/apk_name.apk
The main problem is limited storage space. On a free plan you are provided with only 500 MB. The strangest thing is that I did not find any way to manually clear the entire storage at once through the web interface, so I got out of the situation through ... writing a separate workflow, responsible only for clearing the Storage from mossy artifacts.
Workflow runs daily at 1 am and removes all artifacts older than one week:
name: Github Storage clear

on:
  schedule:
    - cron: '0 1 * * *'

jobs:
  remove-old-artifacts:
    runs-on: ubuntu-latest
    timeout-minutes: 10

    steps:
      - name: Remove old artifacts
        uses: c-hive/gha-remove-artifacts@v1
        with:
          age: '1 week'
Firebase App Distribution
As for Firebase App Distribution, I used the ready-made action wzieba / Firebase-Distribution-Github-Action to integrate with it .
- name: Upload artifact to Firebase App Distribution
        uses: wzieba/Firebase-Distribution-Github-Action@v1
        with:
          appId: ${{ secrets.FIREBASE_ANDROID_PROD_APP_ID }}
          token: ${{ secrets.FIREBASE_TOKEN }}
          groups: testers
          file: build/app/outputs/apk/dev/debug/apk_name.apk
          debug: true
For the action to work correctly, it needs to pass parameters:
- appId - application identifier, which can be found in the settings of the Firebase project;

- token - a token for authentication to your FIrebase project, which is required to load the assembly into the service. You can get a token only through the Firebase CLI, for which you can read more in the official documentation ;
- file - path to the compiled * .apk-file on CI;
- groups - this parameter is optional, but allows you to specify the alias of the testers group to which the uploaded assembly will be automatically shared.
Launch and observation
Our simplest workflow is ready! All we have left to do is fire the triggering event and watch the progress of the workflow.
Advice and parting words
Now you can enjoy all the benefits of a simple CI / CD mechanism on your Flutter project, regardless of its size, development intensity, or your wallet.
Finally, here are some tips and observations that I came up with while working on this workflow:
- workflow . workflow , , . - . , - workflow , .
- step’ shell-. workflow . . .
- Run Duration workflow. workflow , . workflow , step’. . Flutter SDK . — 5-6 .
There are still tons of potential improvements and improvements ahead. Write in the comments your ideas for improving the workflow. What do you personally lack in it? Perhaps the implementation of the readers' most interesting ideas will form the basis of the next article on the topic.
All scripts and workflow can be found in the repository with the test application .
Thank you for attention.
PS Our Surf team releases many useful libraries for Flutter. We upload them to the SurfGear repository .