I felt that everything would work out for me, and went on a journey through the Linux world. In that #IBelieveinDoing issue, there were tutorials not only on Linux, but also on Git. Some parallels can be drawn between these systems. Linux is an open source OS used by programmers, and Git is a version control system that is used to track changes to source code when developing programs. It should be noted that learning Linux and Git turned out to be a very exciting experience. But Git is quite a complex system, so the basics were harder to master than the basics of Linux. In this article, I want to share with you what I learned while mastering Linux and Git.

Basic Linux commands
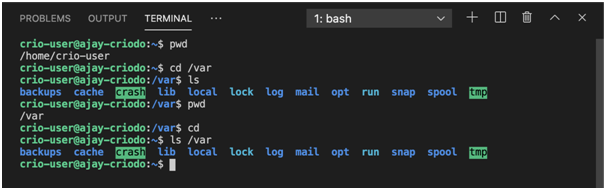
pwd: This command is used to display information about the working directory.
ls: With this command you can display information about the contents of a directory. If it is executed in this form, without command line arguments, it gives information in the default format.
cd: this command is for changing directory.
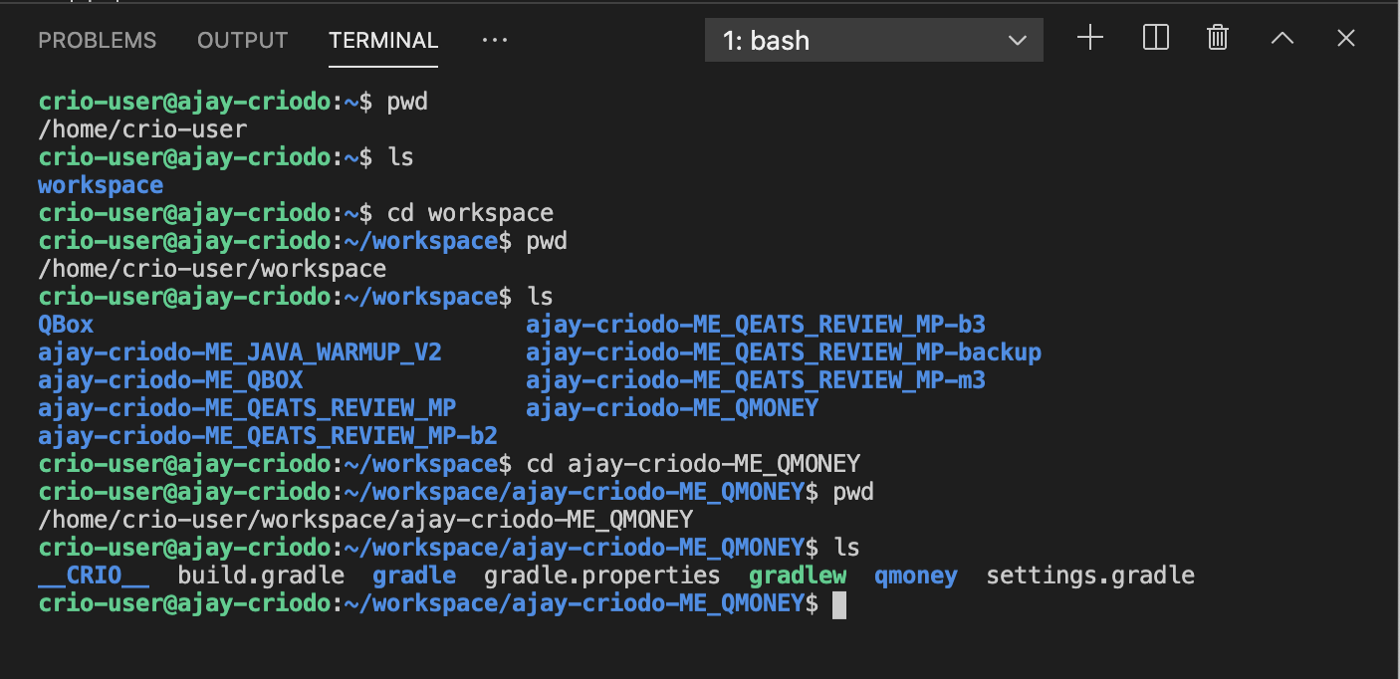
Experimenting with Linux Commands
cp : This command is for copying files and folders.
mv: With this command, you can rename or move files and folders.
touch: This command is used to create empty files and to change the timestamp of files.
cat: this command allows you to view the contents of files, with its help you can create copies of files, attach the contents of some files to others.
tree: This command allows you to display directory information in a tree-like format. The command, by default, displays information about folders and files and information about the number of files and folders in its output structure. Here is an example of its use
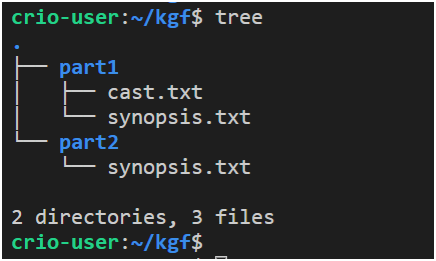
An example of using the tree command
Here folder names are highlighted in blue, file names are white. Other colors are used in the structures displayed by this command.
echo: This command is used to display the data passed to it on the screen.
grep: This command is for working with text data. In particular, it allows you to search for strings.
tail: This command prints the last 10 lines of a file.
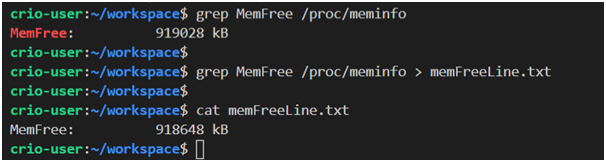
Examples of using grep and cat commands
awk : this command is intended to work with the corresponding utility, which gives us powerful tools for processing strings, the capabilities of which are comparable to those available in full-fledged programming languages.
In Linux, you can use pipelines, which are one-way pipes that you can use to communicate between processes. When describing pipelines, the symbol (
|) is used. Using this symbol, you can, for example, route the output of one command to the input of another.

An example of using the pipeline
ssh : this command allows you to work with an ssh client, which is used to connect to remote systems and to execute commands on them. The SSH protocol is aimed at organizing the secure interaction of computers.
rm: This command is used to delete files and folders. For example, calling it in the formrm fileleads to the deletion of the file, and in the formrm -r directory - to the deletion of the directory and all its contents.
Linux directory structure
Linux uses a tree-like directory structure. The beginning of this hierarchical structure is in the root directory. All other directories are nested in this directory. The forward slash (
/) is used to separate directory names when specifying paths to files and folders .
This is what the file system structure might look like on a Linux system.
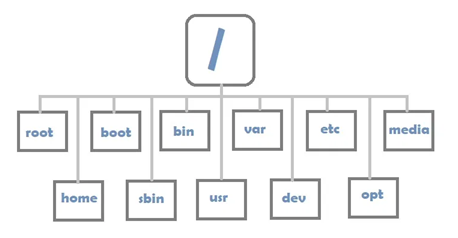
Directory Structure in Linux
Here are the characteristics of some important folders.
| Directory path | Notes |
|
Root directory. |
|
The directory where the user's materials are stored. |
|
This is where the files needed to run Linux are stored. |
|
The executables are located here. |
|
Contains various files used by the system and installed programs. These can be log files, databases, cached web page content. |
Absolute and relative addressing
Absolute file paths always contain the full path from the root directory to the directories that contain the required files.
Relative paths are relative to the current directory.
Experimenting with paths
There are special relative paths, which are described in the following table.
| Relative path | Description | Example | Example Notes |
|
Current working directory. | |
Displays information about the contents of the current directory. |
|
Parent directory. | |
Go up one level to the parent directory. |
|
Previous working directory. | |
Return to the previous working directory. |
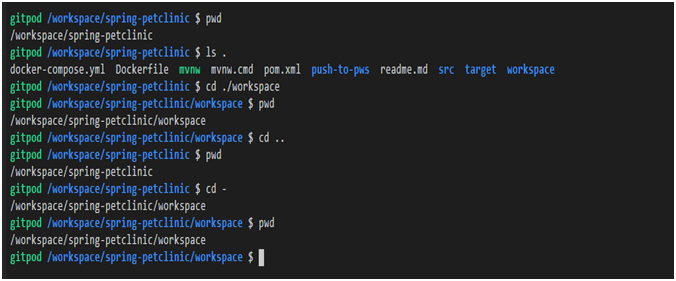
Examples of using special relative paths
Soft and hard links to files
A soft (symbolic) file link contains a pointer to the file name. These links resemble shortcuts that are used to quickly access a file from different directories. If a file that has a soft link is deleted, the link remains, but stops working.
A hard link is a link to the location on the hard drive where the file is located. The system considers the file to exist as long as there is at least one hard link to it. In fact, if a file has multiple hard links, it can be compared to a file having multiple names.
The command is used to create hard and soft links to files
ln. Here's an example of creating a symbolic link with it:
ln -s /path/to/file linkname
Command Behavior Control
The behavior of Linux commands can be controlled by passing command line arguments (switches, options, flags) to them when they are invoked. They usually look like a hyphen (
-) followed by the one-letter key name (such a construction might look like, for example -a). They can also look like two hyphens ( --) followed by a longer key name (sort of --all).
To find out more about Linux commands, you can use the built-in help system, which is accessed through the command
man. For example, lsyou can use the command to get help on a command man ls. Below is the result of a similar command.
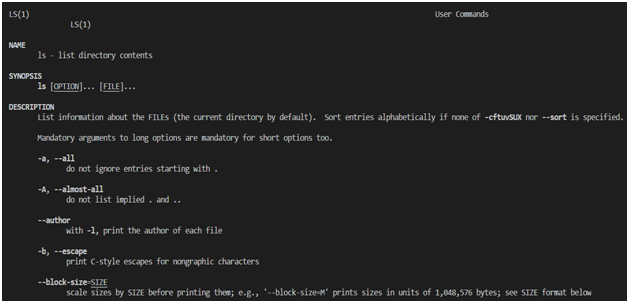
Ls Command
Reference Command reference pages are divided into several sections. Among them are the following:
NAME(name). This contains the name of the command and a brief description of what it does.SYNOPSIS(command syntax summary). Here is a diagram for using the commandDESCRIPTION(description). This section provides a detailed description of the command and the command line switches it supports.
For example, the command is
lsoften used with an option -lthat allows you to display details about the contents of a directory.
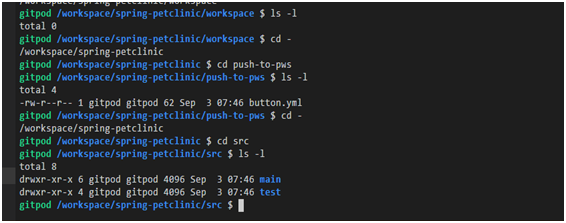
Using the ls -l command
In the previous image, you might have noticed the view constructs
drwxr-xr-x. This is a description of file permissions.
File permissions
Suppose we have the following construction describing file permissions:
- rwx r-- r--
Please note that four groups of symbols can be distinguished in it:
- The first symbol indicates what exactly we are dealing with. Namely, if there is a (
-) sign here , then we have a file in front of us. The letter (d) indicates a directory. The letter (l) is for a link. - The following three symbols let you know what permissions the owner has to work with a given file:
r- read,w- write,x- execute. The full set of permissions is represented by a sequencerwx, if a certain permission is absent, a symbol (-) is placed in the corresponding position instead . - , ( , ). , .
- , , , , .
The command is used to manage file permissions
chmod. For example, to add to the current rules of access to the file permission for it to run, you can use the following scheme it calls: chmod +x <filename>. The design +xindicates that this permission is added for all users.
Let's talk about some of the specifics of configuring file permissions using
chmod. So, to assign a certain permission to all users, constructions similar to the one described above are used +x. The ( +) operator is used to add permissions, the ( -) operator allows you to remove permissions, the ( =) operator is used to set certain rights for the user who owns the file ( u, user), for the group (g, group), for other users ( o, others) and for all users ( a, all). This is done in view constructs chmod u=rwx,g=rx,o=rx filename.
When assigning permissions, they are often written in numerical form. Octal codes correspond to certain rights. Thus, the
xcorresponding code 1, wthe appropriate code 2and rthe corresponding code 4. The code0corresponds to the complete absence of permissions to work with the file. File permissions are described by a three-digit number, the order of numbers in which corresponds to the above-described order of the permission groups. That is, the first number describes the permissions of the owner of the file, the second describes the group's permissions, and the third describes the permissions of other users. Each of these numbers is the sum of the authorization codes r, wand x.
For example, a command of the form
chmod 444 filenamemeans that everyone will only have the right to read the file ( r--r--r--), and a command of the form chmod 700 filenameindicates that the owner will have the right to read, write and run the file ( rwx, 4+2+1), and no one else has the right to perform any actions with the file. ( rwx------).
Working with Git
When working with Git, the following sequence of actions is usually used:
- Modifying a file in the local working directory.
- File indexing (command
git add). - Saving a snapshot of the indexed data in the internal database (
git commit). - Submitting changes from the local repository to the remote (
git push). - Loading changes from a remote repository to a local one (
git pull).
Here is a diagram illustrating this sequence of steps.
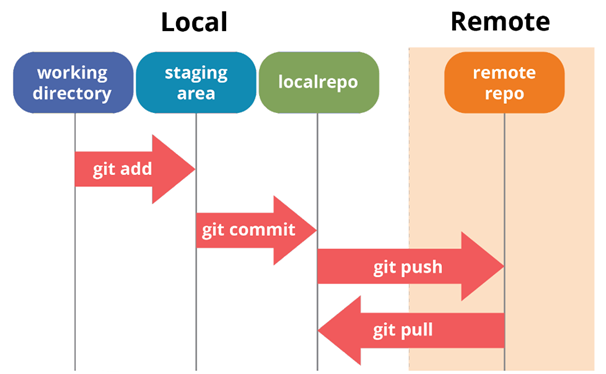
Typical Git Workflow
Files can be in various states when working with Git.
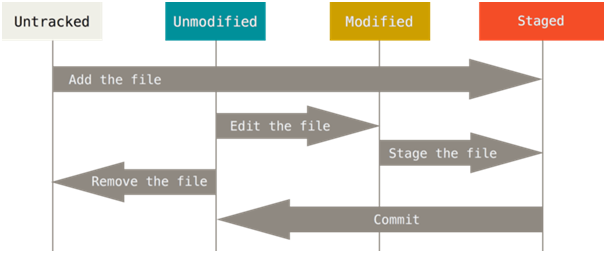
File states
- Untracked is a file that Git does not watch for changes. This file can be added to the index and be in a Staged state.
- Unmodified - A file that has been monitored but whose content has not changed. If you delete this file, it will no longer be monitored. If you change it, it will go into the Modified state.
- Modified - the file that is being watched, the contents of which have changed. It can be indexed and put into Staged state.
- Staged is a file being monitored and included in the index. The corresponding changes can be incorporated into the Git database.
Let's look at some of the Git commands.
git init: This command creates an empty Git repository in the directory. This is the first step in creating a new repository. After executing this command, you can use the commands git addand git commit.

Git init
git add command: This command adds files to the index. It supports, in the formgit add ., adding all non-indexed files to the index, in the formgit add filename- adding a specific file to the index, in the formgit add dirname- adding a directory to the index.
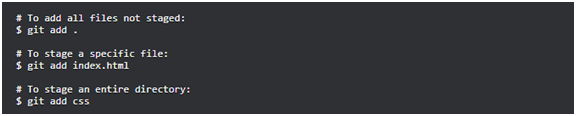
Git add
git commit command: This command writes changes to the local repository. These changes are called, by analogy with the command name, "commits". Each commit has a unique identifier, making it easier to work with commits.

Git commit
git status command: This command allows you to get information about the current state of the repository.
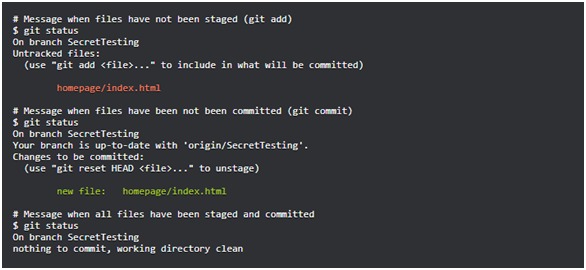
Git status
git config command: This command allows you to customize Git. Among the settings Git can be noteduser.nameanduser.email. They contain the username and email address used in the commits and indicate who made them. If agit configflag--globalis usedwhen calling the command, thesettings are applied to all local repositories. Without this flag, the settings apply only to the current repository.

Git config
git checkout command: This command is used to switch between branches of a repository (asgit checkout <branch_name>). With its help, you can create a new branch and switch to it (git checkout -b <new_branch>).
git merge: This command allows you to merge the branches of the repository. It takes the changes in one branch and merges them into the other branch. For example, there is a branch that is working on a new project feature. After this feature is complete, the changes are pushed to the branch that stores the stable features.
git clone: This command is used to create a local working copy of a remote repository. When it is executed, the materials of the remote repository are downloaded to the computer. Cloning an existing repository is comparable to creating a new repository with the commandgit init... But when cloning, we have a repository at our disposal, in which there is already something, and when the command git initis executed , an empty repository.
git pull: This command is for downloading fresh data from a remote repository.
git push: This command can be used to push local commits to the remote repository. When calling this command, you need to pass it information about the remote repository and about the branch of the local repository, which needs to be sent to the remote repository.
Outcome
I told you everything I learned during my journey into the world of Linux and Git. It was very exciting. Hopefully you will want to do something similar and learn something new, something that broadens your professional horizons.
If you have recently mastered something interesting - please tell us about it.