
My name is Ilya Gulyaev, I am a test automation engineer in the Post Deployment Verification team at DINS.
In DINS, we use Jenkins in many processes: from building builds to running deployments and autotests. In my team, we use Jenkins as a platform for uniformly launching smoke checks after deploying each of our services from development environments to production.
A year ago, other teams decided to use our pipelines not only to check one service after updating it, but also to check the state of the entire environment before running large test batches. The load on our platform has increased tenfold, and Jenkins has ceased to cope with the task at hand and just began to fall. We quickly realized that adding resources and tweaking the garbage collector could only delay the problem, but not completely solve it. Therefore, we decided to find Jenkins bottlenecks and optimize them.
In this article, I will explain how the Jenkins Pipeline works and share my findings that may help you make your pipelines faster. The material will be useful to engineers who have already worked with Jenkins and want to get to know the tool better.
What a Beast Jenkins Pipeline
Jenkins Pipeline is a powerful tool that allows you to automate various processes. Jenkins Pipeline is a set of plugins that allow you to describe actions in the form of a Groovy DSL, and is the successor to the Build Flow plugin.
The script for the Build Flow plugin was executed directly on the master in a separate Java thread that executed Groovy code without barriers preventing access to the internal Jenkins API. This approach posed a security risk, which later became one of the reasons for abandoning Build Flow, and served as a prerequisite for creating a safe and scalable tool for running scripts - Jenkins Pipeline.
You can learn more about the history of Jenkins Pipeline creation from the author's article Build Flow orOleg Nenashev's talk on Groovy DSL in Jenkins .
How Jenkins Pipeline Works
Now let's figure out how pipelines work from the inside. They usually say that Jenkins Pipeline is a completely different kind of jobs in Jenkins, unlike the good old freestyle jobs that can be clicked in the web interface. From the user's point of view, it may look like this, but from the Jenkins side, pipelines are a set of plugins that allow you to transfer the description of actions into the code.
Pipeline and Freestyle Jobs Similarities
- Job description (not steps) is stored in config.xml file
- Parameters are stored in config.xml
- Triggers are also stored in config.xml
- And even some options are stored in config.xml
So. Stop. The official documentation says that parameters, triggers and options can be set directly in the Pipeline. Where is the truth?
The truth is that the parameters described in the Pipeline will be automatically added to the configuration section in the web interface when the job starts. You can trust me because I wrote this functionality in the latest edition , but more on this in the second part of the article.
Differences between Pipeline and Freestyle Jobs
- At the time of the start of the job, Jenkins does not know anything about the agent for executing the job.
- The actions are described in one groovy script.
Launching Jenkins Declarative Pipeline
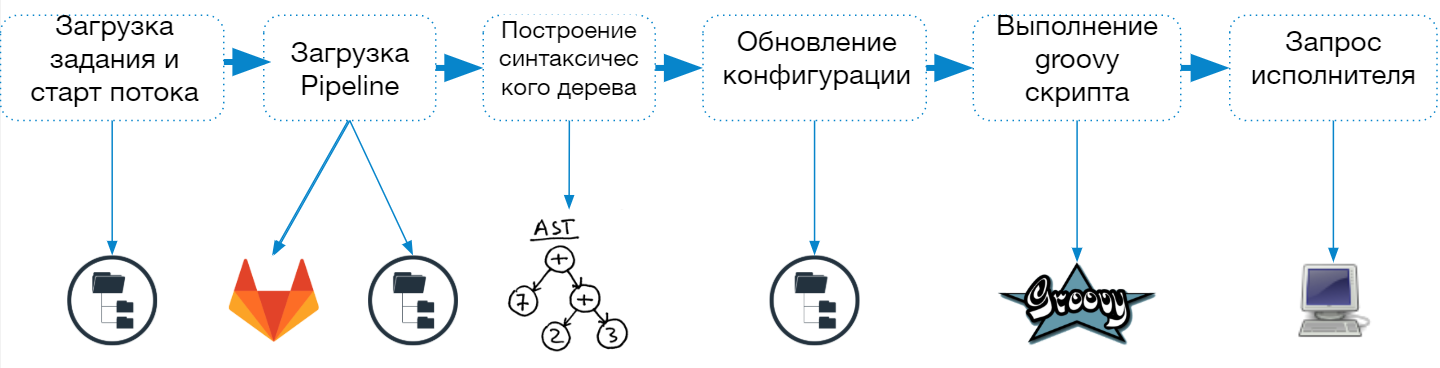
The Jenkins Pipeline startup process consists of the following steps:
- Load job description from config.xml file
- Start a separate thread (lightweight performer) to complete the task
- Loading the pipeline script
- Building and checking a syntax tree
- Job configuration updates
- Combining parameters and properties specified in the job description and in the script
- Saving Job Descriptions to the File System
- Executing a script in a groovy sandbox
- Agent request for an entire job or a single step
When a pipeline job starts, Jenkins creates a separate thread and sends the job to the queue for execution, and after loading the script, it determines which agent is needed to complete the task.
To support this approach, a special Jenkins thread pool (lightweight executors) is used. You can see that they are executed on the master, but do not affect the usual pool of executors: The
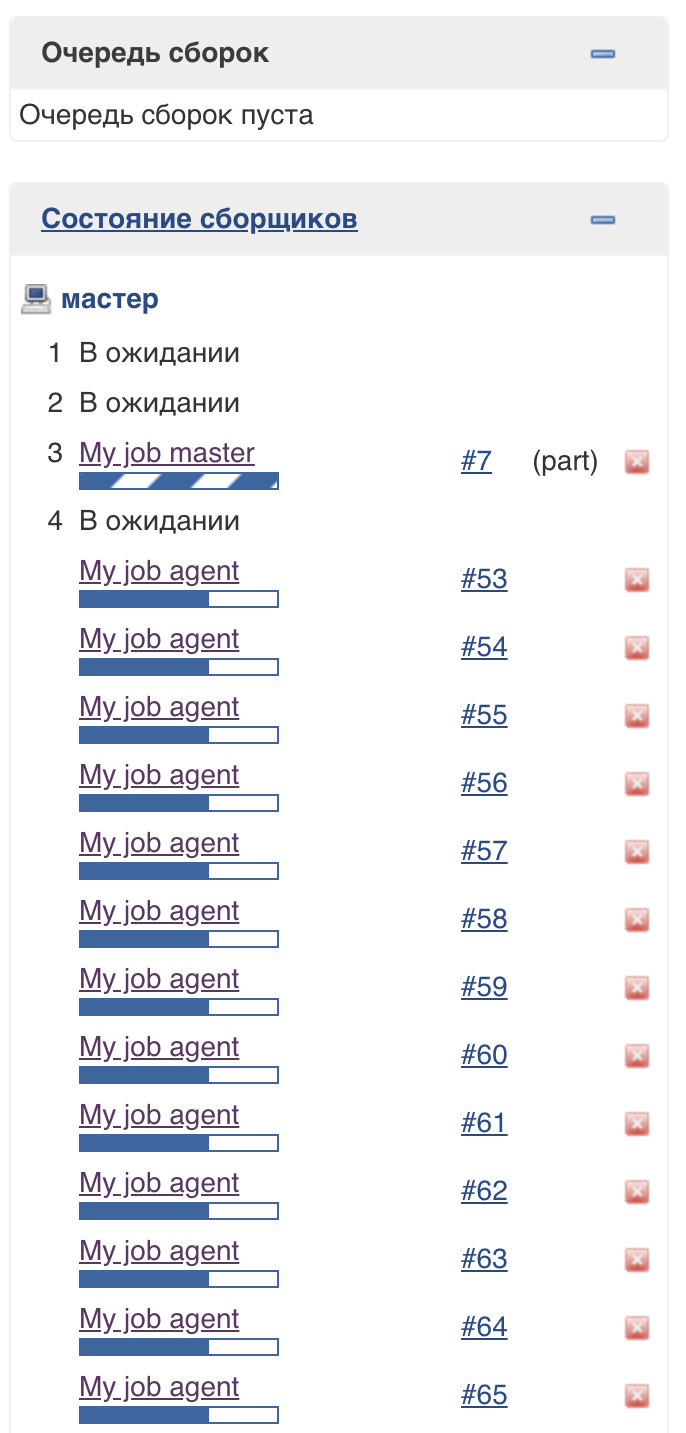
number of threads in this pool is not limited (at the time of this writing).
Working parameters in the Pipeline. As well as triggers and some options
Parameters processing can be described by the formula:

From the job parameters that we see at startup, the Pipeline parameters from the previous startup are first removed, and only then the parameters specified in the Pipeline of the current startup are added. This allows parameters to be removed from the job if they have been removed from the Pipeline.
How does it work from the inside out?
Let's consider an example config.xml (the file that stores the job's configuration):
<?xml version='1.1' encoding='UTF-8'?>
<flow-definition plugin="workflow-job@2.35">
  <actions>
    <org.jenkinsci.plugins.pipeline.modeldefinition.actions.DeclarativeJobAction plugin="pipeline-model-definition@1.5.0"/>
    <org.jenkinsci.plugins.pipeline.modeldefinition.actions.DeclarativeJobPropertyTrackerAction plugin="pipeline-model-definition@1.5.0">
      <jobProperties>
        <string>jenkins.model.BuildDiscarderProperty</string>
      </jobProperties>
      <triggers/>
      <parameters>
        <string>parameter_3</string>
      </parameters>
    </org.jenkinsci.plugins.pipeline.modeldefinition.actions.DeclarativeJobPropertyTrackerAction>
  </actions>
  <description></description>
  <keepDependencies>false</keepDependencies>
  <properties>
    <hudson.model.ParametersDefinitionProperty>
      <parameterDefinitions>
        <hudson.model.StringParameterDefinition>
          <name>parameter_1</name>
          <description></description>
          <defaultValue></defaultValue>
          <trim>false</trim>
        </hudson.model.StringParameterDefinition>
        <hudson.model.StringParameterDefinition>
          <name>parameter_2</name>
          <description></description>
          <defaultValue></defaultValue>
          <trim>false</trim>
        </hudson.model.StringParameterDefinition>
        <hudson.model.StringParameterDefinition>
          <name>parameter_3</name>
          <description></description>
          <defaultValue></defaultValue>
          <trim>false</trim>
        </hudson.model.StringParameterDefinition>
      </parameterDefinitions>
    </hudson.model.ParametersDefinitionProperty>
    <jenkins.model.BuildDiscarderProperty>
      <strategy class="org.jenkinsci.plugins.BuildRotator.BuildRotator" plugin="buildrotator@1.2">
        <daysToKeep>30</daysToKeep>
        <numToKeep>10000</numToKeep>
        <artifactsDaysToKeep>-1</artifactsDaysToKeep>
        <artifactsNumToKeep>-1</artifactsNumToKeep>
      </strategy>
    </jenkins.model.BuildDiscarderProperty>
    <com.sonyericsson.rebuild.RebuildSettings plugin="rebuild@1.28">
      <autoRebuild>false</autoRebuild>
      <rebuildDisabled>false</rebuildDisabled>
    </com.sonyericsson.rebuild.RebuildSettings>
  </properties>
  <definition class="org.jenkinsci.plugins.workflow.cps.CpsScmFlowDefinition" plugin="workflow-cps@2.80">
    <scm class="hudson.plugins.filesystem_scm.FSSCM" plugin="filesystem_scm@2.1">
      <path>/path/to/jenkinsfile/</path>
      <clearWorkspace>true</clearWorkspace>
    </scm>
    <scriptPath>Jenkinsfile</scriptPath>
    <lightweight>true</lightweight>
  </definition>
  <triggers/>
  <disabled>false</disabled>
</flow-definition>
The properties section contains parameters, triggers and options with which the job will be launched. An additional section, DeclarativeJobPropertyTrackerAction, is used to store parameters set only in the pipeline.
When a parameter is removed from the pipeline, it will be removed both from DeclarativeJobPropertyTrackerAction and from properties , since Jenkins will know that the parameter was defined only in the pipeline.
When adding a parameter, the situation is reversed, the parameter will be added DeclarativeJobPropertyTrackerAction and properties , but only at the time of the pipeline execution.
That is why if you set the parameters only in the pipeline, then theywill be unavailable on first launch .
Jenkins Pipeline Execution
Once the Pipeline script has been downloaded and compiled, the execution process begins. But this process doesn't just involve doing groovy. I have highlighted the main heavyweight operations that are performed at the time of the job execution:
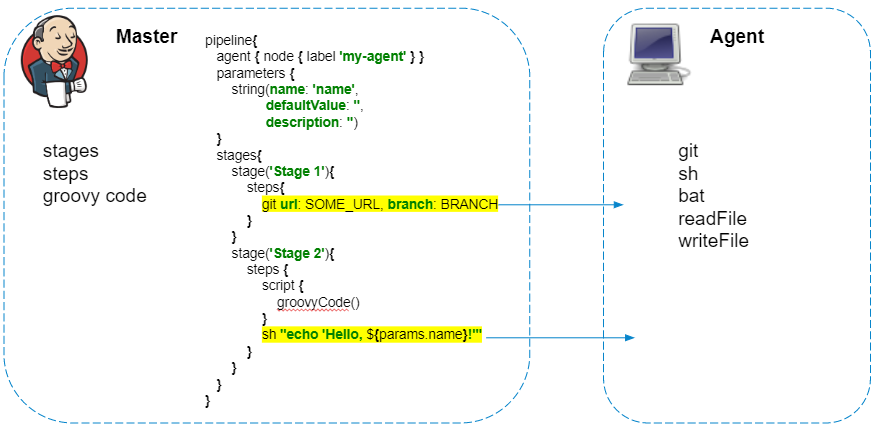
Execution of Groovy code
The pipeline script is always executed on the master - we must not forget about this, so as not to create unnecessary load on Jenkins. Only steps that interact with the agent's file system or system calls are executed on the agent.
The pipelines have a great plugin that allows you to make HTTP requests . In addition, the answer can be saved to a file.
httpRequest url: 'http://localhost:8080/jenkins/api/json?pretty=true', outputFile: 'result.json'
Initially, it may seem that this code should be completely executed on the agent, send a request from the agent, and save the response to the result.json file. But everything happens the other way around, and the request is executed from Jenkins himself, and to save the contents of the file is copied to the agent. If additional processing of the response in the pipeline is not required, then I advise you to replace such requests with curl:
sh 'curl "http://localhost:8080/jenkins/api/json?pretty=true" -o "result.json"'
Working with logs and artifacts
Regardless of the agent on which commands are executed, logs and artifacts are processed and saved to the master file system in real time.
If the pipeline uses credentials, then before saving the logs are additionally filtered on the master .

Saving Steps (Pipeline Durability)
Jenkins Pipeline positions itself as a task that consists of separate pieces that are independent and can be reproduced when the master crashes. But you have to pay for this with additional writes to disk, because depending on the settings of the task, steps with varying degrees of detail are serialized and saved to disk.

Depending on the pipeline durability, the steps in the pipeline graph will be stored in one or more files for each job run. Excerpt from the documentation :
The workflow-support plugin for storing steps (FlowNode) uses the FlowNodeStorage class and its SimpleXStreamFlowNodeStorage and BulkFlowNodeStorage implementations.
- FlowNodeStorage uses in-memory caching to aggregate disk writes. The buffer is automatically written at runtime. You generally don't need to worry about this, but keep in mind that saving a FlowNode does not guarantee that it will be written to disk immediately.
- SimpleXStreamFlowNodeStorage uses one small XML file for each FlowNode - although we use a soft-reference in-memory cache for nodes, this results in much worse performance when first passing through the steps (FlowNodes).
- BulkFlowNodeStorage uses one larger XML file with all FlowNodes in it. This class is used in PERFORMANCE_OPTIMIZED liveness mode, which writes much less frequently. This is generally much more efficient because one large streaming record is faster than a bunch of small records and minimizes the load on the OS to manage all the tiny files.
Original
Storage: in the workflow-support plugin, see the 'FlowNodeStorage' class and the SimpleXStreamFlowNodeStorage and BulkFlowNodeStorage implementations.
- FlowNodeStorage uses in-memory caching to consolidate disk writes. Automatic flushing is implemented at execution time. Generally, you won't need to worry about this, but be aware that saving a FlowNode does not guarantee it is immediately persisted to disk.
- The SimpleXStreamFlowNodeStorage uses a single small XML file for every FlowNode — although we use a soft-reference in-memory cache for the nodes, this generates much worse performance the first time we iterate through the FlowNodes (or when)
- The BulkFlowNodeStorage uses a single larger XML file with all the FlowNodes in it. This is used in the PERFORMANCE_OPTIMIZED durability mode, which writes much less often. It is generally much more efficient because a single large streaming write is faster than a bunch of small writes, and it minimizes the system load of managing all the tiny files.
The saved steps can be found in the directory:
$JENKINS_HOME/jobs/$JOB_NAME/builds/$BUILD_ID/workflow/
Example file:
<?xml version='1.1' encoding='UTF-8'?>
<Tag plugin="workflow-support@3.5">
  <node class="cps.n.StepStartNode" plugin="workflow-cps@2.82">
    <parentIds>
      <string>4</string>
    </parentIds>
    <id>5</id>
    <descriptorId>org.jenkinsci.plugins.workflow.support.steps.StageStep</descriptorId>
  </node>
  <actions>
    <s.a.LogStorageAction/>
    <cps.a.ArgumentsActionImpl plugin="workflow-cps@2.82">
      <arguments>
        <entry>
          <string>name</string>
          <string>Declarative: Checkout SCM</string>
        </entry>
      </arguments>
      <isUnmodifiedBySanitization>true</isUnmodifiedBySanitization>
    </cps.a.ArgumentsActionImpl>
    <wf.a.TimingAction plugin="workflow-api@2.40">
      <startTime>1600855071994</startTime>
    </wf.a.TimingAction>
  </actions>
</Tag>
Outcome
I hope this material was interesting and helped to better understand what pipelines are and how they work from the inside. If you still have questions - share them below, I will be glad to answer!
In the second part of the article, I will consider individual cases that will help you find problems with the Jenkins Pipeline and speed up your tasks. We'll learn how to solve concurrent launch issues, look at survivability options, and discuss why Jenkins should be profiled.